Product SiteDocumentation Site

Qlustar Cluster OS 9.2

Administration Manual

Manual for the configuration, customization and operation of Qlustar clusters.

Qlustar Documentation Team

Q-Leap Networks GmbH

Legal Notice

Copyright ©2017 Q-Leap Networks GmbH
This material may only be copied or distributed with explicit permission from Q-Leap Networks GmbH. The Qlustar license can be found at /usr/share/qlustar/LICENSE.html on an installed Qlustar head-node.

Abstract

Qlustar is a complete Linux distribution based on Debian/Ubuntu. Its main purpose is to provide an Operating System (OS) that simplifies the setup, administration, monitoring and general use of HPC, Storage and Virtualization/Cloud Linux clusters. Hence we call Qlustar a Cluster OS.
Preface
1. Qlustar Document Conventions
1.1. Typographic Conventions
1.2. Pull-quote Conventions
1.3. Notes and Warnings
2. Feedback requested
1. Introduction
2. Qlustar Base Configuration
2.1. Network Configuration and Services
2.1.1. Basic Network Configuration
2.1.2. DNS
2.1.3. DHCP
2.1.4. IP Masquerading (NAT)
2.1.5. Time Server
2.2. Basic Services
2.2.1. Disk Partitions and File-systems
2.2.2. NIS
2.2.3. NFS
2.2.4. Automounter
2.2.5. SSH - Secure Shell
2.2.6. Mail server - Postfix
3. Qlustar Hardware Configuration
3.1. Infiniband Networks
3.1.1. IB Fabric Verification/Diagnosis
3.1.2. OpenSM Configuration
4. Cluster Node Management
4.1. Boot Process
4.1.1. Compute-node booting
4.1.2. TFTP Boot Server
4.1.3. RAM-disk image
4.1.4. QluMan Remote Execution Server
4.2. Node Customization
4.2.1. Dynamic Configuration Settings
4.2.2. DHCP-Client
4.2.3. Cluster-wide Configuration Directory
4.2.4. NFS boot scripts
4.2.5. Adding directories, files, links
4.2.6. Mail Transport Agent
4.2.7. Infiniband
4.3. Node Remote Control
4.3.1. Serial Console Parameter
4.3.2. IPMI Configuration
5. Monitoring Infrastructure
5.1. Ganglia
5.1.1. Monitoring the nodes
5.2. Nagios
5.2.1. Nagios Plugins
5.2.2. Monitoring the head-node(s)
5.2.3. Webinterface
5.2.4. Restart
6. General Administration Tasks
6.1. User Management
6.1.1. Adding User Accounts
6.1.2. Removing User Accounts
6.1.3. Managing user restrictions
6.1.4. Shell Setup
6.2. Storage Management
6.2.1. Raid
6.2.2. Logical Volume Management
6.2.3. Zpools and ZFS
6.3. OS Package Management
6.3.1. Package sources
6.3.2. dpkg
6.3.3. apt
6.3.4. Debian Package Alternatives
7. Updating Qlustar
7.1. Qlustar updates
7.1.1. Updating the head-node(s)
7.1.2. Updating the chroot(s)
7.1.3. Updating the nodes
A. Revision History
Index

Preface

1. Qlustar Document Conventions

Qlustar manuals use the following conventions to highlight certain words and phrases and draw attention to specific pieces of information.

1.1. Typographic Conventions

Four typographic conventions are used to call attention to specific words and phrases. These conventions, and the circumstances they apply to, are as follows.
Mono-spaced Bold
Used to highlight system input, including shell commands, file names and paths. Also used to highlight keys and key combinations. For example:
To see the contents of the file my_next_bestselling_novel in your current working directory, enter the cat my_next_bestselling_novel command at the shell prompt and press Enter to execute the command.
The above includes a file name, a shell command and a key, all presented in mono-spaced bold and all distinguishable thanks to context.
Key combinations can be distinguished from an individual key by the plus sign that connects each part of a key combination. For example:
Press Enter to execute the command.
Press Ctrl+Alt+F2 to switch to a virtual terminal.
The first example highlights a particular key to press. The second example highlights a key combination: a set of three keys pressed simultaneously.
If source code is discussed, class names, methods, functions, variable names and returned values mentioned within a paragraph will be presented as above, in mono-spaced bold. For example:
File-related classes include filesystem for file systems, file for files, and dir for directories. Each class has its own associated set of permissions.
Proportional Bold
This denotes words or phrases encountered on a system, including application names; dialog-box text; labeled buttons; check-box and radio-button labels; menu titles and submenu titles. For example:
Choose SystemPreferencesMouse from the main menu bar to launch Mouse Preferences. In the Buttons tab, select the Left-handed mouse check box and click Close to switch the primary mouse button from the left to the right (making the mouse suitable for use in the left hand).
To insert a special character into a gedit file, choose ApplicationsAccessoriesCharacter Map from the main menu bar. Next, choose SearchFind… from the Character Map menu bar, type the name of the character in the Search field and click Next. The character you sought will be highlighted in the Character Table. Double-click this highlighted character to place it in the Text to copy field and then click the Copy button. Now switch back to your document and choose EditPaste from the gedit menu bar.
The above text includes application names; system-wide menu names and items; application-specific menu names; and buttons and text found within a GUI interface, all presented in proportional bold and all distinguishable by context.
Mono-spaced Bold Italic or Proportional Bold Italic
Whether mono-spaced bold or proportional bold, the addition of italics indicates replaceable or variable text. Italics denotes text you do not input literally or displayed text that changes depending on circumstance. For example:
To connect to a remote machine using ssh, type ssh username@domain.name at a shell prompt. If the remote machine is example.com and your username on that machine is john, type ssh john@example.com.
The mount -o remount file-system command remounts the named file system. For example, to remount the /home file system, the command is mount -o remount /home.
To see the version of a currently installed package, use the rpm -q package command. It will return a result as follows: package-version-release.
Note the words in bold italics above: username, domain.name, file-system, package, version and release. Each word is a placeholder, either for text you enter when issuing a command or for text displayed by the system.
Aside from standard usage for presenting the title of a work, italics denotes the first use of a new and important term. For example:
Publican is a DocBook publishing system.

1.2. Pull-quote Conventions

Terminal output and source code listings are set off visually from the surrounding text.
Output sent to a terminal is set in mono-spaced roman and presented thus:
books        Desktop   documentation  drafts  mss    photos   stuff  svn
books_tests  Desktop1  downloads      images  notes  scripts  svgs
Commands to be executed on certain nodes of a cluster or the admins workstation are indicated by using descriptive shell prompts including user and hostname. Note that by default, the shell prompt on Qlustar nodes always ends in the newline character, thus commands are typed on the line following the prompt. As mentioned above, the command itself is shown in mono-spaced bold and the output of a command in mono-spaced roman. Examples:
0 root@cl-head ~ #
echo "I'm executed by root on a head-node"
I'm executed by root on a head-node
0 root@beo-01 ~ #
echo "I'm executed by root on a compute node"
I'm executed by root on a compute node
0 root@sn-1 ~ #
echo "I'm executed by root on a storage node"
I'm executed by root on a storage node
0 user@workstation ~ $ 
echo "I'm executed by user admin on the admins workstation"
I'm executed by user admin on the admins workstation
Source-code listings are also set in mono-spaced roman but add syntax highlighting as follows:
package org.jboss.book.jca.ex1;

import javax.naming.InitialContext;

public class ExClient
{
   public static void main(String args[]) 
       throws Exception
   {
      InitialContext iniCtx = new InitialContext();
      Object         ref    = iniCtx.lookup("EchoBean");
      EchoHome       home   = (EchoHome) ref;
      Echo           echo   = home.create();

      System.out.println("Created Echo");

      System.out.println("Echo.echo('Hello') = " + echo.echo("Hello"));
   }
}

1.3. Notes and Warnings

Finally, we use three visual styles to draw attention to information that might otherwise be overlooked.

Note

Notes are tips, shortcuts or alternative approaches to the task at hand. Ignoring a note should have no negative consequences, but you might miss out on a trick that makes your life easier.

Important

Important boxes detail things that are easily missed: configuration changes that only apply to the current session, or services that need restarting before an update will apply. Ignoring a box labeled “Important” will not cause data loss but may cause irritation and frustration.

Warning

Warnings should not be ignored. Ignoring warnings will most likely cause data loss.

2. Feedback requested

Contact to report errors or missing pieces in this documentation.

Chapter 1. Introduction

Qlustar is a full-fledged Linux distribution based on Debian/Ubuntu. Its main focus is to provide an Operating System (OS) that simplifies the setup, administration, monitoring and general use of Linux clusters. Hence we call it a Cluster OS.
A Qlustar cluster typically consists of one or more head-nodes, and a larger number of compute-, storage- or cloud-nodes (in this manual we usually refer to these latter nodes simply as compute-nodes). In an HPC cluster, it is highly advisable to separate user login sessions onto dedicated Front-End (FE) nodes. This leads to higher stability and security of the whole system, since then the head-node(s) (its most critical component), are not subject to problems arising from uncontrolled user activity. The FE node(s) can run on real physical hardware or (especially on small clusters with less activity) in a virtual machine (VM).

Note

Qlustar has an installation option that allows the automatic setup/configuration of a KVM FE node.
For clusters with advanced file I/O performance requirements, the basic Qlustar configuration providing an NFS based setup to serve user home directories will be insufficient. In this case, a parallel file system like Lustre or BeeGFS will be needed. With QluMan, it's easy to add storage nodes to a cluster, that will be able to serve Lustre MDTs and OSTs or BeeGFS server components (if required also in a fail-safe high-availability configuration).
Usually, all nodes in a cluster are connected through one or more dedicated internal Ethernet networks. If fast inter-node communication is required, an additional high-speed interconnect network like Infiniband may be used.
Most of the time, compute and cloud nodes are stripped-down servers with SATA hard disk drives (sometimes also disk-less), often without keyboard and mouse connection. These days, servers typically have a remote management interface (IPMI), that allows to perform most hardware related tasks of a node (like reset, power cycling etc.) over the network. In addition, IPMI provides remote access to a nodes console.
The above figure shows a schematic description of the components building a basic HPC Cluster. The head-node typically requires a more powerful hardware configuration than the compute nodes to guarantee higher availability and to accommodate central disk storage. A Gigabit Ethernet and/or Infiniband network are the most common network interconnects of HPC clusters today.
While the above entry-level hardware configurations will be sufficient for departmental clusters, a compute center will often have to provide a system with guaranteed up-time, scalable file I/O, as well as a high throughput / low latency network to satisfy the needs of demanding users. A schematic description of a hardware setup for such a scenario is shown in the following figure. Qlustar is equally capable to deploy such advanced configurations with little effort.

Chapter 2. Qlustar Base Configuration

2.1. Network Configuration and Services

This section describes the basic network configuration and services of a Qlustar cluster.

2.1.1. Basic Network Configuration

The IP configuration of the head-node is defined in the file /etc/network/interfaces (type man interfaces for details), while /etc/resolv.conf is the key-control file regarding the DNS configuration (see Section 2.1.2, “DNS”). Network interfaces can be brought up or down using the commands ifup and ifdown (see also the corresponding man pages). Typically, the head-node has at least two network interfaces, one for the external LAN and one for the internal cluster network. For all cluster-internal networks (boot/NFS, optional Infiniband and/or IPMI), unofficial (not routed) IP addresses are used, usually in the range 192.168.x.0/255.255.255.0, while for larger clusters the range 172.16.y.0/255.255.0.0 is often used. In the latter case, y might indicate the rack number.

Note

The cluster-internal network ranges can be conveniently chosen during installation.

2.1.2. DNS

This section describes how to configure the Domain Name System (DNS).
The file /etc/resolv.conf contains the addresses of the DNS servers to use and a list of domain names to search when looking up a short (not fully qualified) hostname. Example:
search your.domain
nameserver 10.0.0.252
nameserver 10.0.0.253
where 10.0.0.252 and 10.0.0.253 are the addresses of the DNS servers and your.domain is the DNS domain name.

Note

Recent versions of Qlustar allow the DNS configuration to be configured directly in /etc/network/interfaces. To make use of this, dns- option lines need to be added to the relevant iface stanza. The following option names are supported: dns-nameservers, dns-search, and dns-sortlist. Get more details on these options by executing man resolvconf.The dns-nameservers entry is added and configured automatically during installation.
If the compute-nodes also need DNS access, they should use the head-node(s) as a forward-only DNS server. In that case the package bind9 should be installed and the addresses of the DNS servers be entered in the file /etc/bind/named.conf.options. Example:
options {
  ...
  forwarders {
    10.0.0.252;
    10.0.0.253;
  };
  ...
The compute-nodes must then use the cluster-internal address of the head-node (192.168.52.254 in the example below) as their DNS server. This and the DNS domain name have to be entered in the DHCP template file of QluMan as follows, so that the compute-nodes may receive the required information via DHCP:
...
option domain-name "your.domain";
option domain-name-servers 192.168.52.254;
...

2.1.3. DHCP

The IP configuration of the compute-nodes is done using the Dynamic Host Control Protocol (DHCP). The DHCP server is not only responsible to automatically supply the IP address and netmask to these nodes, but also additional configuration options like the gateway and DNS server addresses, DNS domain name and many other parameters. The DHCP server configuration file is /etc/dhcp/dhcpd.conf (type man dhcpd.conf) and is auto-generated by QluMan. There is a general or global section and a per node section in this file. The global section determines values that are to be applied to all the nodes registered within the dhcpd.conf file. On the contrary, the contents of a node section applies only to that specific machine and is created from the corresponding host info of the QluMan database. The following listing shows the default global section that is automatically generated by QluMan during the installation of a Qlustar cluster:
option qlustar-cfgmnt code 132 = text;
option qlustar-cfgmnt "-t nfs -o rw,hard,intr 192.168.52.1:/srv/ql-common";
next-server 192.168.52.1;
filename "pxelinux.0";
option nis-domain "beo-cluster";
option nis-servers 192.168.52.1;
option routers 192.168.52.1;
option subnet-mask 255.255.255.0;
option ntp-servers 192.168.52.1;
option lpr-servers 192.168.52.1;
subnet 192.168.52.0 netmask 255.255.255.0 {
}

Note

If a cluster has additional internal networks (e.g. Infiniband), the IP address of a node in that network is derived from its basic DHCP address and set automatically during boot. The addresses of additional networks can be specified during installation and in QluMan. Check the QluMan Guide for more details.

2.1.3.1. Special DHCP options

You can set the name of the auto-mount master map with the DHCP option 128 (the default name is auto.master). To modify it, include a line in the dhcpd.conf header as follows:
option option-128 code 128 = text;
option option-128 "auto.master";

2.1.4. IP Masquerading (NAT)

IP masquerading (NAT) is configured by default on the head-node(s) during installation, to allow the compute-nodes direct TCP/IP connections to machines outside of the internal cluster network. This could be necessary e.g., when applications running on the compute-nodes need to contact a license server in the public LAN. All IP packets with unofficial sender IP addresses and a destination in the public LAN are then translated by the head-node to packets with its own official IP address. When a reply packet arrives, it is translated back to the unofficial IP address of the originating node inside of the cluster. The head-node works as a router in this case. The following section in /etc/network/interfaces shows, how masquerading is activated on boot and disabled on shutdown:
iface eth1 inet static
  address 4.4.4.123
  netmask 255.255.0.0
  broadcast 4.4.255.255
  gateway 4.4.255.254
  up iptables -t nat -A POSTROUTING -s 192.168.52.0/24 \
    -o eth1 -j MASQUERADE
  down iptables -t nat -D POSTROUTING -s 192.168.52.0/24 \
    -o eth1 -j MASQUERADE

2.1.5. Time Server

Synchronized system time throughout the cluster is very crucial for its flawless operation. It is achieved using the Network Time Protocol (NTP) daemon. If the head-node has direct Internet access, publicly available time-servers on the Internet can be contacted and used as an accurate time reference. In order to set a list of time-servers, edit the file /etc/ntp.conf and add a line for every ntp-server to be contacted:
server ntpserver

2.2. Basic Services

This section describes the basic services running on a typical Qlustar cluster.

2.2.1. Disk Partitions and File-systems

Typically, a head-node has two mirrored boot disks. Sometimes it also holds additional data disks, that are setup either as a mirror, a RAID 5/6 or are part of an external storage system. The boot disk (or the RAID device in case of a RAID boot setup) is used as a physical volume for the basic system LVM volume group (default name vgroot). See Section 6.2.2, “Logical Volume Management” for more details on LVM. The system volume group is the container of the following logical volumes: root, var, tmp, swap, apps and data (the latter can also be chosen to be located on a separate volume group made from additionally available disks during installation). Each of these logical volumes is used as the underlying block device for the correspondingly named file-system. Hence, the whole head-node setup, including the / (root) file-system is typically under control of LVM, adding large flexibility for storage management.
All additional disks or RAID sets are partitioned with a single partition of type LVM, and used as LVM physical devices. Static mount configuration for file-systems is entered in /etc/fstab. All file-systems are of type ext4 unless requested otherwise.

Note

Newer Qlustar installations also have the option to use ZFS pools (see Section 6.2.3.1, “Zpool Administration”) to setup additional data disks.

2.2.2. NIS

NIS (Network Information System) is used as the cluster wide name service database. User account (passwd and shadow map) and group information (group map), hostname resolution (hosts map), auto-mounter (auto.master, auto.apps, auto.data), netgroup and services are the most important maps. The head-node is configured as a NIS master server when running qlustar-initial-config during installation. In case of a HA head-node setup, the second head-node becomes a NIS slave server.
The generated NIS databases are located on the NIS master server under /var/yp and the corresponding source files in the directory /etc/qlustar/yp. The passwd and shadow tables are updated automatically by the script adduser.sh when users are added (see Section 6.1.1, “Adding User Accounts”) and the host map is automatically generated from QluMan. Apart from that, usually nothing needs to be changed in the provided NIS configuration. For security reasons, the file /etc/qlustar/yp/shadow should be readable and writable only by root. In case NIS source files have been changed manually, the command make -C /var/yp must be executed to regenerate the maps and activate the changes. For more detailed information about NIS, you may also consult the NIS package HowTo at /usr/share/doc/nis/nis.debian.howto.gz.
Another important security aspect is the access restriction to the NIS server. Only the compute-nodes should be allowed to contact the NIS server. In case the head-node is also used as a work-group NIS server, additional access can be allowed for the corresponding subnet to which the work-group workstations are connected. The access settings are configured in /etc/ypserv.securenets (see man ypserv).
The master NIS server is also its own client. The corresponding configuration for the NIS client (ypbind) process is set in /etc/yp.conf. The NIS domain name is set in /etc/defaultdomain and usually defined as qlustar. On cluster nodes booting over the network, these settings are all configured automatically by DHCP (see also Section 2.1.3, “DHCP”).

Note

Like with any standard NIS setup, if a user wants to change his/her login password, the command yppasswd should be used.

2.2.3. NFS

To ensure a cluster wide homogeneous directory structure, the head-node provides NFS (Network File System) services to the compute-nodes. The kernel NFS server with protocol version 3 is used for accomplishing this goal. The typical Qlustar directory structure consists of three file-systems that are exported by the head-node via NFS to all other nodes: /srv/apps, /srv/data and /srv/ql-common. Note that in NFS version 4, one directory serves as the root path for all exported file-systems and all exported directories must be a sub-directory of this path. To achieve compatibility with NFS 4 in Qlustar, the directory /srv is used for this purpose. While /srv/apps and /srv/data are typically separate file-systems on the head-node, the entry /srv/ql-common is a bind mount of the global Qlustar configuration directory /etc/qlustar/common. This mount is generated from the following entry in /etc/fstab:
/etc/qlustar/common    /srv/ql-common    none    bind    0    0
File-systems to be shared via NFS need an entry in the file /etc/exports. Execute man exports for a detailed explanation of the corresponding syntax. For security reasons, access to shared file-systems should be limited to trusted networks. The directory /srv is exported with a special parameter fsid. An export entry with the parameter no_root_squash for a host will enable full write access for the root user on that host (without that parameter, root is mapped to the user nobody on NFS mounts). In the following example, root on the host login-c (default name of the FrontEnd node) will have full write access to all exported file-systems:
/srv login-c(async,rw,no_subtree_check,fsid=0,insecure,no_root_squash)\
  192.168.52.0/24(async,rw,no_subtree_check,fsid=0,insecure)
/srv/data login-c(async,rw,no_subtree_check,insecure,nohide,no_root_squash)\
  192.168.52.0/24(async,rw,no_subtree_check,insecure,nohide)
/srv/apps login-c(async,rw,no-subtree_check,insecure,nohide,no_root_squash)\
  192.168.52.0/24(async,rw,no_subtree_check,insecure,nohide)
/srv/ql-common login-c(async,rw,subtree_check,insecure,nohide,no_root_squash)\
  192.168.52.0/24(async,ro,subtree_check,insecure,nohide)
After changing the exports information, the NFS server needs to reload its configuration to activate it. This is achieved by executing the command
0 root@cl-head ~ #
/etc/init.d/nfs-kernel-server reload

2.2.4. Automounter

NFS mounts on Qlustar nodes booting via the network are mostly managed by the kernel automounter. The information needed to configure these mounts comes from the NIS automounter maps auto.apps and auto.data. You can view the contents of these maps using the commands ypcat -k auto.apps and ypcat -k auto.data. The automounter software is able to determine which mounts are being consulted at a given time using so-called master maps. In Qlustar, this is the NIS map auto.master. Its content is defined in the source file /etc/qlustar/yp/auto.master with the following default settings:
/apps auto.apps
/data auto.data
This means that /apps is the base mount path for all entries in auto.apps and /data for all entries in auto.data. The referenced maps themselves have entries of the form (example for auto.data):
home -fstype=nfs,rw,hard,intr $NFSSRV:/srv/data/&
The remote directory /srv/data should thus be mounted by the automounter at the path /data/home on the NFS client. The variable $NFSSRV contains the hostname of the NFS server. Its value defaults to beosrv-c and could be modified by setting the DHCP option option-130 with the following lines in the QluMan DHCP template:
option option-130 code 130 = text;
option option-130 "nfsserver";

Warning

In this example, the variable would be changed to nfsserver. Changing the default is only recommended for very special cases though.

2.2.5. SSH - Secure Shell

Remote shell access from the LAN to the head-node and from the head-node to the compute-nodes is only allowed using the OpenSSH secure shell (ssh). A correct configuration of the ssh daemon is of crucial importance for the security of the whole cluster. Most important is to allow only ssh protocol version 2 connections. The default configuration in the cluster allows for AgentForwarding and X11Forwarding. This way, X11 programs can be executed without any further hassle from any compute-node with the X display appearing on a users workstation in the LAN. The relevant ssh configuration files are /etc/ssh/sshd_config and /etc/ssh/ssh_config.
To allow password-less root access from the head to the other cluster nodes, the root ssh public key that is generated on the head-node is automatically put into the file /etc/qlustar/common/image-files/ssh/authorized_keys during installation. This file is then copied into the directory /root/.ssh on any netboot node during its boot process.
One last step is required in order to prevent interactive questions when using ssh logins between nodes: A file named ssh_known_hosts containing all hosts keys in the cluster must exist. It is automatically generated by QluMan, placed into the directory /etc/qlustar/common/image-files/ssh and linked to /etc/ssh/ssh_known_hosts on netboot nodes.
Host-based authentication
To enable host-based authentication, the parameter HostbasedAuthentication must be set to yes in /etc/ssh/sshd_config on the clients. This is the default in Qlustar. Furthermore, the file /etc/ssh/shosts.equiv must contain the hostnames of all hosts from where login should be allowed. This file is also automatically generated by QluMan. Note that this mechanism works for ordinary users but not for the root user.

2.2.6. Mail server - Postfix

Mostly for the purpose of sending alert and other informational messages, the mail server postfix is setup on the head-node. Typically it is configured to simply transfer all mail to a central mail relay, whose name can be entered during installation. The main postfix configuration file is /etc/postfix/main.cf. Mail aliases can be added in /etc/aliases (initial aliases were configured during installation). A change in this file requires execution of the command postalias /etc/aliases to activate the changes. Have a look at Mail Transport Agent to find out, how to configure mail on the compute-nodes.

Chapter 3. Qlustar Hardware Configuration

3.1. Infiniband Networks

Many clusters with the need for high-throughput and/or low-latency communication between nodes use Infiniband (IB) network hardware. Qlustar fully supports Infiniband via the OFED software stack. The basic configuration for Infiniband networks is explained later in Section 4.2.7, “Infiniband”.

3.1.1. IB Fabric Verification/Diagnosis

Especially for large clusters, an IB network is a complex fabric. The desired performance can only be achieved, if all components work flawlessly. Hence, it is important to have tools that can verify the validity of the hardware setup. In this section, we describe a number of checks that can help to setup a flawless IB fabric.
0 root@cl-head ~ #
ibstat

CA 'mlx4_0'
CA type: MT26428
Number of ports: 1
Firmware version: 2.7.0
Hardware version: b0
Node GUID: 0x003048fffff4cb8c
System image GUID: 0x003048fffff4cb8f
Port 1:
State: Active
Physical state: LinkUp
Rate: 40
Base lid: 310
LMC: 0
SM lid: 1
Capability mask: 0x02510868
Port GUID: 0x003048fffff4cb8d
Link layer: InfiniBand
0 root@cl-head ~ #
cat /sys/class/infiniband/mlx4_0/ports/1/rate

40 Gb/sec (4X QDR)

0 root@cl-head ~ #
cat /sys/class/infiniband/mlx4_0/ports/1/state

4: ACTIVE

0 root@cl-head ~ #
cat /sys/class/infiniband/mlx4_0/ports/1/phys_state

5: LinkUp

0 root@cl-head ~ #
cat /sys/class/infiniband/mlx4_0/board_id

SM_2122000001000

0 root@cl-head ~ #
cat /sys/class/infiniband/mlx4_0/fw_ver

2.7.0
0 root@cl-head ~ #
ibv_devinfo

hca_id: mlx4_0
fw_ver: 2.7.000
node_guid: 0030:48ff:fff4:cb8c
sys_image_guid: 0030:48ff:fff4:cb8f
vendor_id: 0x02c9
vendor_part_id: 26428
hw_ver: 0xB0
board_id: SM_2122000001000
phys_port_cnt: 1
port: 1
state: PORT_ACTIVE (4)
max_mtu: 2048 (4)
active_mtu: 2048 (4)
sm_lid: 1
port_lid: 310
port_lmc: 0x00
0 root@cl-head ~ #
ibv_devices

device node GUID
------ ----------------
mlx4_0 003048fffff4cb8c
0 root@cl-head ~ #
ifconfig ib0

ib0 Link encap:UNSPEC HWaddr 80-00-00-48-FE-80-00-00-00-00-00-00-00-00-00-00 
inet addr:172.17.7.105 Bcast:172.17.127.255 Mask:255.255.128.0
UP BROADCAST RUNNING MULTICAST MTU:2044 Metric:1
RX packets:388445 errors:0 dropped:0 overruns:0 frame:0
TX packets:34 errors:0 dropped:0 overruns:0 carrier:0
collisions:0 txqueuelen:256 
RX bytes:39462502 (39.4 MB) TX bytes:2040 (2.0 KB)
0 root@cl-head ~ #
ibswitches

Switch : 0x0002c902004885b0 ports 36 "MF0;cluster-ibs:IS5300/L18/U1" base port 0 lid 17 lmc 0
Switch : 0x0002c90200488f60 ports 36 "MF0;cluster-ibs:IS5300/L17/U1" base port 0 lid 22 lmc 0
Switch : 0x0002c902004885a8 ports 36 "MF0;cluster-ibs:IS5300/L16/U1" base port 0 lid 16 lmc 0
Switch : 0x0002c90200488fc8 ports 36 "MF0;cluster-ibs:IS5300/L15/U1" base port 0 lid 26 lmc 0
Switch : 0x0002c902004885a0 ports 36 "MF0;cluster-ibs:IS5300/L14/U1" base port 0 lid 15 lmc 0
Switch : 0x0002c90200488fc0 ports 36 "MF0;cluster-ibs:IS5300/L13/U1" base port 0 lid 25 lmc 0
Switch : 0x0002c902004884e0 ports 36 "MF0;cluster-ibs:IS5300/L12/U1" base port 0 lid 10 lmc 0
Switch : 0x0002c90200488f68 ports 36 "MF0;cluster-ibs:IS5300/L11/U1" base port 0 lid 23 lmc 0
Switch : 0x0002c90200488510 ports 36 "MF0;cluster-ibs:IS5300/L10/U1" base port 0 lid 12 lmc 0
Switch : 0x0002c902004885e8 ports 36 "MF0;cluster-ibs:IS5300/L09/U1" base port 0 lid 19 lmc 0
Switch : 0x0002c90200488f78 ports 36 "MF0;cluster-ibs:IS5300/L08/U1" base port 0 lid 24 lmc 0
Switch : 0x0002c90200488598 ports 36 "MF0;cluster-ibs:IS5300/L07/U1" base port 0 lid 14 lmc 0
Switch : 0x0002c90200488fd8 ports 36 "MF0;cluster-ibs:IS5300/L06/U1" base port 0 lid 27 lmc 0
Switch : 0x0002c902004885f8 ports 36 "MF0;cluster-ibs:IS5300/L05/U1" base port 0 lid 21 lmc 0
Switch : 0x0002c902004885f0 ports 36 "MF0;cluster-ibs:IS5300/L03/U1" base port 0 lid 20 lmc 0
Switch : 0x0002c90200488528 ports 36 "MF0;cluster-ibs:IS5300/L02/U1" base port 0 lid 13 lmc 0
Switch : 0x0002c902004885e0 ports 36 "MF0;cluster-ibs:IS5300/L01/U1" base port 0 lid 18 lmc 0
Switch : 0x0002c90200472eb0 ports 36 "MF0;cluster-ibs:IS5300/S09/U1" base port 0 lid 4 lmc 0
Switch : 0x0002c90200472f08 ports 36 "MF0;cluster-ibs:IS5300/S08/U1" base port 0 lid 9 lmc 0
Switch : 0x0002c90200472ec8 ports 36 "MF0;cluster-ibs:IS5300/S07/U1" base port 0 lid 7 lmc 0
Switch : 0x0002c90200472ed0 ports 36 "MF0;cluster-ibs:IS5300/S06/U1" base port 0 lid 8 lmc 0
Switch : 0x0002c90200472ec0 ports 36 "MF0;cluster-ibs:IS5300/S05/U1" base port 0 lid 6 lmc 0
Switch : 0x0002c90200472eb8 ports 36 "MF0;cluster-ibs:IS5300/S04/U1" base port 0 lid 5 lmc 0
Switch : 0x0002c9020046cc60 ports 36 "MF0;cluster-ibs:IS5300/S03/U1" base port 0 lid 2 lmc 0
Switch : 0x0002c9020046cd58 ports 36 "MF0;cluster-ibs:IS5300/S02/U1" base port 0 lid 3 lmc 0
Switch : 0x0002c90200479668 ports 36 "MF0;cluster-ibs:IS5300/S01/U1" enhanced port 0 lid 1 lmc
Switch : 0x0002c90200488500 ports 36 "MF0;cluster-ibs:IS5300/L04/U1" base port 0 lid 11 lmc 0
0 root@cl-head ~ #
ibnodes | head -10

Ca : 0x0002c902002141f0 ports 1 "MT25204 InfiniHostLx Mellanox Technologies"
Ca : 0x0002c90200214150 ports 1 "MT25204 InfiniHostLx Mellanox Technologies"
Ca : 0x0002c9020021412c ports 1 "MT25204 InfiniHostLx Mellanox Technologies"
Ca : 0x0002c90200214164 ports 1 "MT25204 InfiniHostLx Mellanox Technologies"
Ca : 0x0002c902002141c8 ports 1 "MT25204 InfiniHostLx Mellanox Technologies"
Ca : 0x0002c9020020d82c ports 1 "MT25204 InfiniHostLx Mellanox Technologies"
Ca : 0x0002c9020020d6c0 ports 1 "MT25204 InfiniHostLx Mellanox Technologies"
Ca : 0x0002c90200216eb8 ports 1 "MT25204 InfiniHostLx Mellanox Technologies"
Ca : 0x0002c9020021413c ports 1 "MT25204 InfiniHostLx Mellanox Technologies"
Ca : 0x002590ffff2fc5f4 ports 1 "MT25408 ConnectX Mellanox Technologies"
Because the output of the following command is extremely long, we only show the first 40 lines here:
0 root@cl-head ~ #
ibnetdiscover | head -40

# Topology file: generated on Thu Oct 10 14:06:20 2013
#
# Initiated from node 0002c903000c817c port 0002c903000c817d
vendid=0x2c9
devid=0xbd36
sysimgguid=0x2c90200479470
switchguid=0x2c902004885b0(2c902004885b0)
Switch 36 "S-0002c902004885b0" # "MF0;cluster-ibs:IS5300/L18/U1" base port 0 lid 17 lmc 0
[19] "S-0002c90200479668"[35] # "MF0;cluster-ibs:IS5300/S01/U1" lid 1 4xQDR
[20] "S-0002c90200479668"[36] # "MF0;cluster-ibs:IS5300/S01/U1" lid 1 4xQDR
[21] "S-0002c9020046cd58"[35] # "MF0;cluster-ibs:IS5300/S02/U1" lid 3 4xQDR
[22] "S-0002c9020046cd58"[36] # "MF0;cluster-ibs:IS5300/S02/U1" lid 3 4xQDR
[23] "S-0002c9020046cc60"[35] # "MF0;cluster-ibs:IS5300/S03/U1" lid 2 4xQDR
[24] "S-0002c9020046cc60"[36] # "MF0;cluster-ibs:IS5300/S03/U1" lid 2 4xQDR
[25] "S-0002c90200472eb8"[35] # "MF0;cluster-ibs:IS5300/S04/U1" lid 5 4xQDR
[26] "S-0002c90200472eb8"[36] # "MF0;cluster-ibs:IS5300/S04/U1" lid 5 4xQDR
[27] "S-0002c90200472ec0"[35] # "MF0;cluster-ibs:IS5300/S05/U1" lid 6 4xQDR
[28] "S-0002c90200472ec0"[36] # "MF0;cluster-ibs:IS5300/S05/U1" lid 6 4xQDR
[29] "S-0002c90200472ed0"[35] # "MF0;cluster-ibs:IS5300/S06/U1" lid 8 4xQDR
[30] "S-0002c90200472ed0"[36] # "MF0;cluster-ibs:IS5300/S06/U1" lid 8 4xQDR
[31] "S-0002c90200472ec8"[35] # "MF0;cluster-ibs:IS5300/S07/U1" lid 7 4xQDR
[32] "S-0002c90200472ec8"[36] # "MF0;cluster-ibs:IS5300/S07/U1" lid 7 4xQDR
[33] "S-0002c90200472f08"[35] # "MF0;cluster-ibs:IS5300/S08/U1" lid 9 4xQDR
[34] "S-0002c90200472f08"[36] # "MF0;cluster-ibs:IS5300/S08/U1" lid 9 4xQDR
[35] "S-0002c90200472eb0"[35] # "MF0;cluster-ibs:IS5300/S09/U1" lid 4 4xQDR
[36] "S-0002c90200472eb0"[36] # "MF0;cluster-ibs:IS5300/S09/U1" lid 4 4xQDR
vendid=0x2c9
devid=0xbd36
sysimgguid=0x2c90200479470
switchguid=0x2c90200488f60(2c90200488f60)
Switch 36 "S-0002c90200488f60" # "MF0;cluster-ibs:IS5300/L17/U1" base port 0 lid 22 lmc 0
[1] "H-0002c9020021413c"[1](2c9020021413d) # "MT25204 InfiniHostLx Mellanox Technologies" lid 284 4xDDR
[2] "H-0002c90200216eb8"[1](2c90200216eb9) # "MT25204 InfiniHostLx Mellanox Technologies" lid 241 4xDDR
[3] "H-0002c9020020d6c0"[1](2c9020020d6c1) # "MT25204 InfiniHostLx Mellanox Technologies" lid 244 4xDDR
[4] "H-0002c9020020d82c"[1](2c9020020d82d) # "MT25204 InfiniHostLx Mellanox Technologies" lid 242 4xDDR
[6] "H-0002c902002141c8"[1](2c902002141c9) # "MT25204 InfiniHostLx Mellanox Technologies" lid 243 4xDDR
[9] "H-0002c90200214164"[1](2c90200214165) # "MT25204 InfiniHostLx Mellanox Technologies" lid 293 4xDDR
0 root@cl-head ~ #
ibcheckstate 

## Summary: 215 nodes checked, 0 bad nodes found
## 1024 ports checked, 0 ports with bad state found
0 root@cl-head ~ #
ibcheckwidth

## Summary: 215 nodes checked, 0 bad nodes found
## 1024 ports checked, 0 ports with 1x width in error found

3.1.2. OpenSM Configuration

A functional IB fabric needs at least one node with a running subnet manager. This can be a switch or any other node connected to the fabric. In the latter case, OpenSM will be used. Please check the QluMan Guide for details about how to setup OpenSM on a compute-node. If OpenSM should run on a head-node, you will have to install the package opensm and configure it manually, if necessary (for simple networks, the default configuration will be sufficient).

Chapter 4. Cluster Node Management

4.1. Boot Process

This section describes the boot process of Qlustar cluster-nodes.

4.1.1. Compute-node booting

The boot process of the compute-nodes follows precise rules. It takes place in four steps:
  1. The PXE boot ROM of the network card sends a DHCP request. If the node is already registered in QluMan, the request is answered by the DHCP server running on the head-node(s), allowing the adapter to configure its basic IP settings.
  2. The boot ROM requests a PXE loader program from the TFTP server on the head-node (the TFTP server specified by DHCP could also be on another node, but this is not the default). The PXE loader is then sent to the compute-node via TFTP.
  3. PXELinux downloads the Qlustar Linux kernel and the assigned RAM-disk (OS) image, boots the kernel and mounts the RAM-disk.
  4. The usual Linux boot process proceeds.

4.1.2. TFTP Boot Server

The Advanced TFTP server transfers the boot image to the compute-nodes. All files that should be served by tftp must reside in the directory /var/lib/tftpboot. On a Qlustar installation, it contains three symbolic links:
pxelinux.0 -> /usr/lib/syslinux/pxelinux.0
pxelinux.cfg -> /etc/qlustar/pxelinux.cfg
qlustar -> /var/lib/qlustar
The directory /etc/qlustar/pxelinux.cfg contains the PXE boot configuration files for the compute-nodes. There is a default configuration that applies to any node without an assigned custom boot configuration in QluMan. For every host with a custom boot configuration, QluMan adds a symbolic link pointing to the actual configuration file. The links are named after the node's Hostid, which you can find out with the gethostip command. For more details about how to define boot configurations see the corresponding section of the QluMan Guide.

4.1.3. RAM-disk image

The RAM-disk image is the file-system holding the node OS that is mounted as the root filesystem of the compute-nodes. It is assembled on the head-node(s) from the image modules, you are able to select in QluMan. Every RAM-disk image contains at least the core module. See the corresponding section of the QluMan Guide for more details. All available image modules are displayed and selectable in QluMan and the configuration and assembly of images is done automatically from within QluMan.

Note

By default, the root password of a Qlustar OS image and hence the node booting it, is taken from the head-node(s) /etc/shadow file and is therefore the same as on the head-node(s). If you want to change this, you can call qlustar-image-reconfigure <image-name>. (Replacing <image-name> with the actual name of the image). You can then specify a different root password for the node OS image.
Changelogs
Any Qlustar node OS image contains changelogs of the various image modules it is composed of. They are located in the directory /usr/share/doc/qlustar-image. The main changelog file is core.changelog.gz. The other files are automatically generated. The files *.packages.version.gz lists the packages each module is made of. The files *.contents.changelog*.gz lists the files that were changed between each version, and *.packages.changelog*.gz list differences in the package list and versions. Hence, you always have detailed information about what has been changed in new images as well as the package sources of their content.

4.1.4. QluMan Remote Execution Server

The QluMan execution server (qluman-execd) runs on any head- and compute-node of a Qlustar cluster. It is one of Qlustar's main components, responsible for executing remote commands as well as writing configurations to disk.

4.1.4.1. Dynamic Boot Script Excecution

When a compute-node boots and qluman-execd starts, it automatically performs some initialization/configuration tasks depending on the nodes QluMan configuration options. The following is a list of tasks managed by qluman-execd:
Infiniband IP configuration
Configuration of the Infiniband IPoIB address, if a node is configured to use Infiniband within QluMan.
Infiniband OpenSM startup
Startup of OpenSM in case the node is configured to do so.
IPMI IP configuration and channel selection
Reconfiguration of the node's IPMI address, if a node is configured correspondingly within QluMan.
For details about the configuration of the above components, see the corresponding section of the QluMan Guide.

Note

If required for debugging, etc., the boot scripts managed by QluMan Execd can still be executed manually, like normal System V boot scripts.

4.2. Node Customization

This section describes the customization options/tools for the configuration of Qlustar cluster-nodes.

4.2.1. Dynamic Configuration Settings

A number of configuration options are configured dynamically when a node boots. These settings will be stored either in the file /etc/qlustar/options or in a separate file in the directory /etc/qlustar/options.d of the nodes root filesystem. Usual BASH shell syntax is used for the options. An example for the latter are the configuration settings for a nodes Infiniband stack. They will be placed in the file ib, which is created on the fly by the QluMan execd process while booting (see also the previous section and Section 4.2.7, “Infiniband”).

Note

The settings in /etc/qlustar/options as well as the config files generated in /etc/qlustar/options.d should usually not be edited manually. However, when a node has trouble starting certain services or configuring some system components, it can make sense to inspect and possibly change the settings in these files to see whether that solves the problem. Please report such a situation as a bug, so that it can be fixed in a future release.

4.2.2. DHCP-Client

The dhclient process started during the boot process of compute-nodes will configure the IP addresses and other parameters given. By default, only the network interface from which the node boots is managed by DHCP. In a QluMan boot config, you can set the kernel parameter dhcp_ifaces to a comma separated list of interface names to manage other interfaces as well. Example: dhcp_ifaces=eth0,eth1. The first interface in this list is the primary interface. Extended information like NIS-domain and NIS-servers is queried through this interface.
Setting dhcp_ifaces=bond0:eth0:eth1 you can easily define a bonding interface. This line would cause the interfaces eth0 and eth1 to act as slave interfaces associated to bond0. You can add additional options for the bonding interface separated with plus signs. These options include mode (defaults to 0) and miimon (defaults to 100). See the output of the command modinfo bonding for a short explanation of these options.
Examples
  • To set the mode to active-backup
    dhcp_ifaces=bond0:eth0:eth1+mode=1
    
  • To increase the link check interval to 200ms:
    dhcp_ifaces=bond0:eth0:eth1+miimon=200
    
  • To add another interface eth2 that dhcp-client should configure:
    dhcp_ifaces=bond0:eth0:eth1,eth2
    
Bridging
  • Additionally you can define a bridge interface like this:
    dhcp_ifaces=br0:eth0
    
    This makes the interface eth0 be the the bridge port for br0.

4.2.3. Cluster-wide Configuration Directory

The directory /etc/qlustar/common contains cluster-wide configuration files for the nodes. At an early stage of the boot processs this directory is mounted as an NFS directory from the head-node. By default the following arguments to mount are used:
-t nfs -o rw,hard,intr 192.168.52.254:/srv/ql-common
If you want to use different arguments, you can set the following DHCP parameter in the QluMan DHCP template (see also Section 2.1.3, “DHCP”):
option qlustar-cfgmnt code 132 = text;
option qlustar-cfgmnt "-t nfs -o rw,hard,intr 192.168.52.254:/srv/ql-common";

4.2.4. NFS boot scripts

To allow for flexible configuration of compute-nodes, a specific NFS directory (/etc/qlustar/common/rc.boot) is searched for executable scripts in a late phase of the boot process. The scripts found are then executed one by one. You can use this mechanism to perform arbitrary modifications/customization of the compute node OS.

4.2.5. Adding directories, files, links

The script /lib/qlustar/copy-files, which is also executed at boot, consults a configuration file /etc/qlustar/common/image-files/destinations, where each line describes a directory to be created, a file to be copied from an NFS path to a local path, or a link that needs to be created in the RAM-disk. Example:
# remotefile is a path relative to /etc/qlustar/common/image-files
# and destdir is the absolute path of the directory where remotefile
# should be copied to. mode is used as input to chmod.
# Example:
# authorized_keys   /root/.ssh    root:root   600

# Directories
/etc/ldap

# remotefile            destdir         owner           permissions
ssh/authorized_keys     /root/.ssh      root:root       644
etc/nsswitch.conf       /etc            root:root       644
etc/ldap.conf           /etc            root:root       644
etc/timezone            /etc            root:root       644

# Symbolic links
# Source                target
/l/home                 /home
With this mechanism, it is also possible to specify additional files to process by adding an #include line like this:
#include ldapfiles
In this example, the file ldapfile will be processed just like the destinations file.
Furthermore, if the file /etc/qlustar/common/softgroups exists, it may specify a group name directly (without whitespace) followed by a colon followed by a hostlist. An example softgroups file may look like this:
version2: beo-[01-04]
version3: beo-[05-08]
This will make hosts beo-01 - beo-04 additionally consult the file /etc/qlustar/common/image-files/destinations.version2 and hosts beo-05 - beo-08 consult /etc/qlustar/common/image-files/destinations.version3. The group name defined in the softgroups is the extension to the destinations file. The files could look like this:
# destinations.version2 - use version2 of the program:
       /apps/local/bin/program.version2 /usr/bin/program # destinations.version3 - use version3
       of the program: /apps/local/bin/program.version3 /usr/bin/program
Hence, with this mechanism, you can have parts of your cluster use different versions of the same program.

4.2.6. Mail Transport Agent

By default the compute-nodes do not send mail. You can however activate the simple MTA ssmtp by assigning the QluMan generic property Activate Mail to cluster nodes.
The configuration of ssmtp needs to be done in the directory /etc/qlustar/common/ssmtp and consists of two files, ssmtp.conf and revaliases. In ssmtp.conf you should set the following parameters:
Root
The address to send mail to for users with id less than 1000.
Mailhub
The host to send all mail to.
RewriteDomain
Make all mail look like originating from this domain.
FromLineOverride
Allow users to override the domain, must be “yes” or “no”.
Hostname
The fully qualified name of this host
An example configuration file would be:
Root=user@domain.com
Mailhub=relayhost
RewriteDomain=domain.com
FromLineOverride=Yes
Hostname=thishost.domain.com
In the file revaliases, you can specify how mails to local accounts should be forwarded to outgoing addresses and which mail server to use. Example:
user:user@mailprovider.com:mailserver.mailprovider.com

4.2.7. Infiniband

If the dynamically created file /etc/qlustar/options.d/ib exists (see Section 4.2.1, “Dynamic Configuration Settings” for details on the mechanism), the Infiniband stack will be initialized according to the settings in there as follows:
  • The required kernel modules will be loaded
  • The IPoIB (IP over IB) adapter ib0 will receive an IP address.
The available parameters in this file are:
IB_IP
the IPoIB IP address of the adapter
IB_MASK
The network mask of the IB network
An example /etc/qlustar/options.d/ib options file:
IB_IP=192.168.83.3
IB_MASK=255.255.255.0

4.3. Node Remote Control

This section describes the tools and configuration options for the remote control of Qlustar cluster nodes.

4.3.1. Serial Console Parameter

The kernel commandline that is passed to a node is configured in a QluMan BootConfig. If you need to set/modify the serial console parameter you can change it there. There are already pre-defined variants of kernel commandlines for the most common cases.
Access to the Serial Console
To access the serial console use the command console-login. It allows to select the node for which the console should be opened. Depending on the type of console you need different keystrokes to exit. If you are using
ipmi-console
then you need to type &+.
ipmitool
then type ~+.
minicom
then use Ctrl-a+x

4.3.2. IPMI Configuration

Most servers nowadays are equipped with an Intelligent Platform Management Interface (IPMI). Qlustar allows to automatically configure the IP address of these interfaces via QluMan.

Chapter 5. Monitoring Infrastructure

5.1. Ganglia

This section describes the Qlustar Ganglia setup. Nagios in combination with Ganglia is used to monitor the hardware of the compute nodes as well as the head-node.

5.1.1. Monitoring the nodes

Each node sends sensor data and other information such as swap usage, fill level of file systems and S.M.A.R.T. data of the hard disks to a multicast address where the head-node can collect them. The way each node collects the sensor data depends on the hardware type. The Qlustar Cluster Suite detects the type that is suitable for a specific compute node. You can list the current metrics by running 
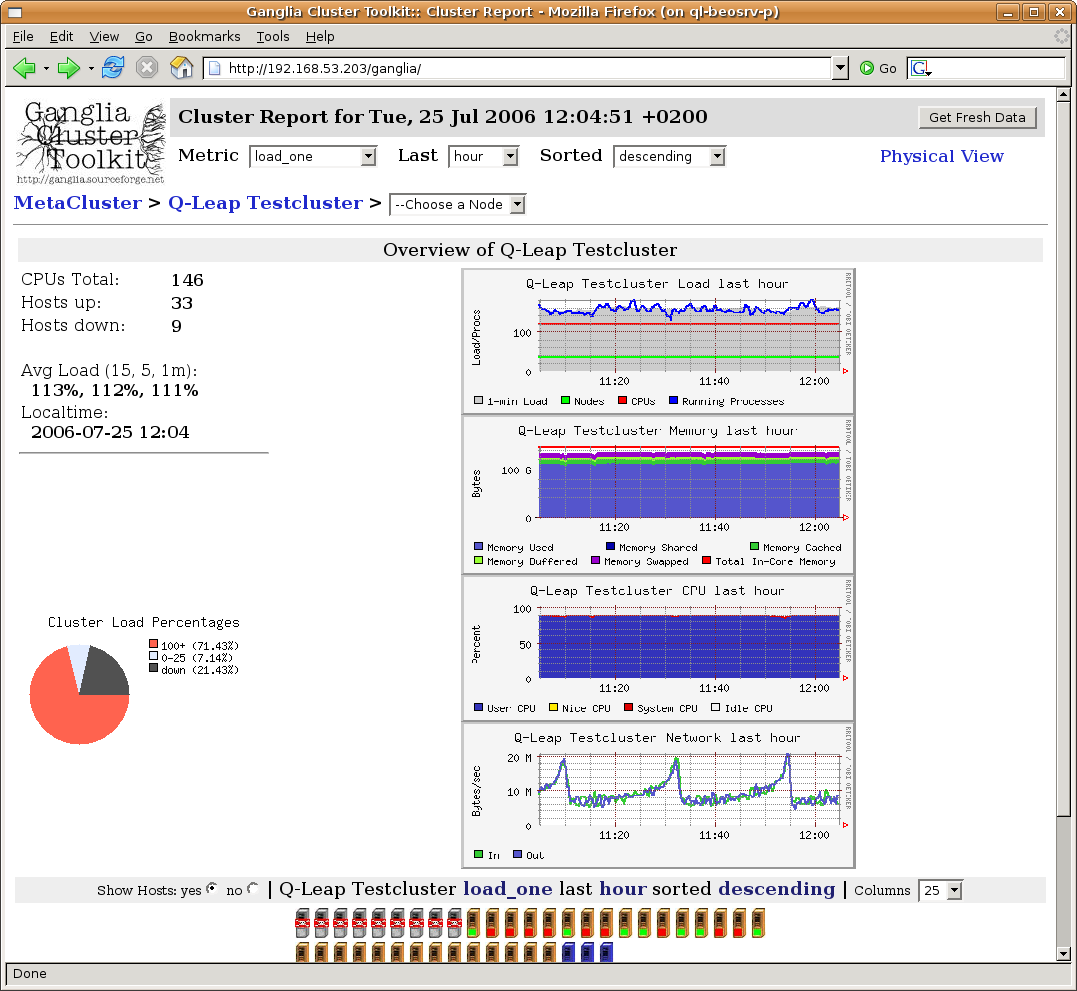
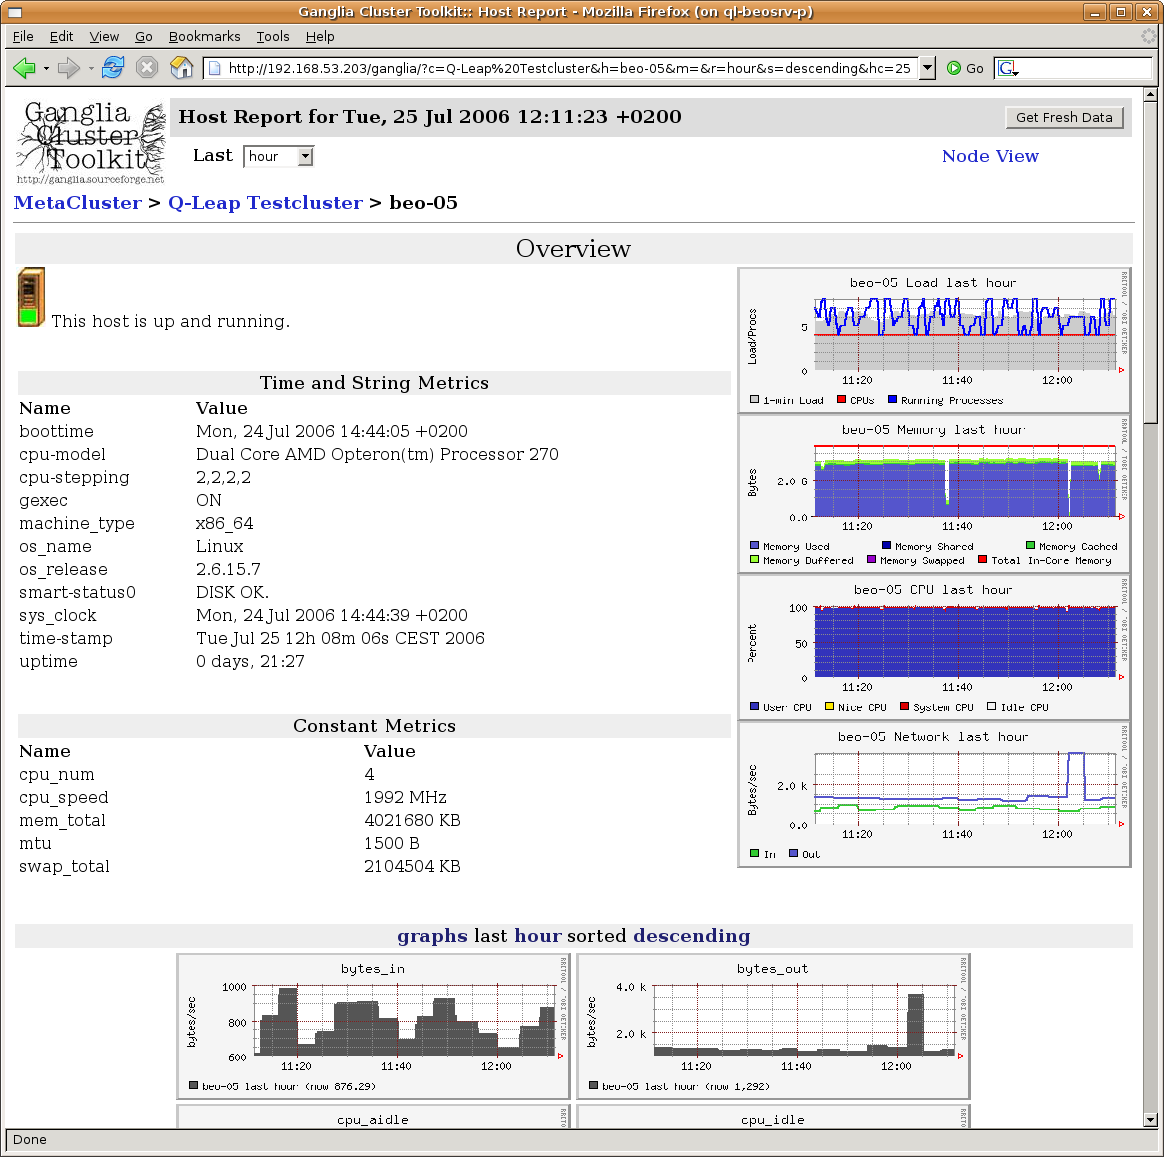
ganglia --help. The package ganglia-webfrontend allows to view the state of your cluster and each node from within a web-browser. It suffices to visit the Link http://<head-node>/ganglia.

5.2. Nagios

This section describes the Qlustar Nagios setup.

5.2.1. Nagios Plugins

The package qlustar-nagios-plugins contains the tools required to process the data received from Ganglia. The thresholds, services and nodes to monitor and group definitions are set in files located in the directory /etc/nagios3/conf.d/qlustar. The file nodes.cfg lists the nodes. This file is auto-generated from QluMan. A few lines are required for each node as shown in this example:
define host {
  host_name      beo-01 
  use            generic-node
  register       1
}
define host {
  host_name      beo-10
  use            generic-node
  register       1
}
The file hostgroup-definitions.cfg defines which nodes belong to which hostgroup:
define hostgroup {
  hostgroup_name        ganglia-nodes
  members               beo-0.
  register              1
}
The regular expression beo-0. specifies, that all nodes with a hostname matching the expression are member of this group. If you need to create additional groups because you have different types of nodes with a different set of available metrics, or with metrics that require different thresholds, then you can define them here. Example:
define hostgroup {
  hostgroup_name          opterons
  members                 beo-1[3-6]
  register                1 
}
The file services.cfg lists all metrics that should be monitored. It includes the thresholds, and for which groups each service is defined. For cluster nodes, the metric data is delivered via Ganglia. The following example defines the monitoring of the fan speed for the members of the group opterons:
define service {
  use                      generic-service
  hostgroup_name           opterons
  service_description      Ganglia fan1
  check_command            check_ganglia_fan!3000!0!"fan1"!$HOSTNAME$
  register                 1
}
With this definition, the service will enter the warning state once the fan-speed goes below 3000, and if it completely fails (speed 0), it will enter the error state.
The following is an example for a service that is monitored for the members of two hostgroups:
define service {
  use                     generic-service
  hostgroup_name          ganglia-nodes,opterons
  service_description     Ganglia temp1
  check_command           check_ganglia_temp!50!60!"temperature1"!$HOSTNAME$
  register                1
}

5.2.2. Monitoring the head-node(s)

The file localhost.cfg lists the services that should be monitored for the head-node(s). The definitions are different because the data is not collected through Ganglia.

Note

The software RAID (md) devices are monitored by mdadm and mail is sent to root if a device fails. The RAID devices are not monitored with the nagios setup by default.

5.2.3. Webinterface

You can open the Nagios web interface at the address http://<head-node>/nagios3/. Login as nagiosadmin. The password can be changed by executing the following command as root:
0 root@cl-head ~ #
htpasswd /etc/nagios3/htpasswd.users nagiosadmin

5.2.4. Restart

Nagios uses the information collected by Ganglia. In case this information source is not available, nagios will send warning mails. To avoid being flooded by these mails when you need to restart Ganglia, you should first stop Nagios:
0 root@cl-head ~ #
/etc/init.d/nagios3 stop
Then you can restart Ganglia:
0 root@cl-head ~ #
/etc/init.d/ganglia-monitor restart

0 root@cl-head ~ #
/etc/init.d/gmetad restart
After restarting Ganglia on the head-node you need to restart Ganglia on the compute nodes as well:
0 root@cl-head ~ #
dsh -a /etc/init.d/ganglia-monitor restart

0 root@cl-head ~ #
dsh -a /etc/init.d/gmetric stop

0 root@cl-head ~ #
dsh -a /etc/init.d/gmetric start
Finally you can start Nagios again
0 root@cl-head ~ #
/etc/init.d/nagios3 start

Chapter 6. General Administration Tasks

Qlustar supports the most common GPU hardware types for GPU computing. There are hardware dependent packages and general development tools.

6.1. User Management

Currently user management is done on the command line.

6.1.1. Adding User Accounts

Adding users is conveniently performed by invoking the script
/usr/sbin/adduser.sh. Example:
0 root@cl-head ~ #
/usr/sbin/adduser.sh -u username -n 'real name'
This script performs all the tasks necessary for creating a new user account. There are a number of options to this script that you can see when invoking it using the -h flag. This script reads the configuration file /etc/qlustar/common/adduser.cf for default values. Please note that the user ids of new accounts should be greater than 1000 to avoid a conflict with existing system accounts.

6.1.2. Removing User Accounts

Use the script /usr/sbin/removeuser.sh to remove a user account from the system. Example:
0 root@cl-head ~ #
removeuser.sh username
To recursively remove the user’s home-directory as well add the -r option:
0 root@cl-head ~ #
removeuser.sh -r username
There are other options to this script that you can view when invoking it with the -h flag. This script also uses the configuration file /etc/qlustar/common/adduser.cf for default values.

6.1.3. Managing user restrictions

In the default configuration of a Qlustar cluster, all registered users are allowed to login by ssh on the cluster nodes. However, it is easily possible for cluster admins to change this default behavior. Users will then be allowed to ssh only into nodes where one of their jobs is running. To activate this setting for a node, use QluMan to assign the generic property Limit User Logins with a value yes to it.

6.1.4. Shell Setup

The Qlustar shell setup supports tcsh and bash. There are global initialization files that are used in both shells so you only have to modify one file for environment variables, aliases and path variables. The global files are:
/etc/qlustar/common/skel/env
Use this file to add or modify environment variables that are not path variables. The syntax of this file is as follows: lines beginning with a hash sign (#) and empty lines are ignored. Every other line consists of a variable name and the value for this variable separated with a space. Example: the following line sets the variable VISUAL to vi:
VISUAL vi

Note

A file ~/.ql-env in a user’s home directory can define personal environment variables in the same manner.
/etc/qlustar/common/skel/alias
Use this file to define shell aliases. It has the same syntax as the file env described above. Again, a personal ~/.ql-alias file can define personal aliases.
/etc/qlustar/common/skel/paths
This directory contains files with a name of the form varname.Linux. The varname is converted to upper case and specifies a ‘PATH like’ environment variable (e.g. PATH, MANPATH, LD_LIBRARY_PATH, CLASSPATH , … ). Each line in this file is a directory to add to this environment variable. If the line begins with a ’p’ followed by a space followed by a directory, then this directory is prepended to the path variable otherwise it is appended. A user can create his/her own ~/.paths directory and so can use the same setup.

6.1.4.1. Bash Setup

We provide an extensible bash setup and bash is the recommended login shell. The bash startup consists of global settings and user settings. Global settings are stored in files under /etc/qlustar/common/skel. User settings are stored in files in the corresponding home directory.
/etc/qlustar/common/skel/bash/bashrc
This file sources the other bash files. Do not modify.
/etc/qlustar/common/skel/bash/bash-vars
This file is used for setting bash variables.
/etc/qlustar/common/skel/bash/alias
This file defines bash aliases.
/etc/qlustar/common/skel/bash/functions
You can use this file if you plan making bash functions available to users.
The file ~/.bashrc also sources the following user specific files which have the same meaning as the global bash files.
  • ~/.bash/env
  • ~/.bash/bash-vars
  • ~/.bash/alias
  • ~/.bash/functions

6.1.4.2. Tcsh Setup

We provide a similar setup for the tcsh. The following files are used:
/etc/qlustar/common/skel/tcsh/tcshrc
This global tcshrc is sourced first and sources other startup files.
/etc/qlustar/common/skel/tcsh/tcsh-vars
Use this file to set tcsh variables.
/etc/qlustar/common/skel/tcsh/alias
You can use this file to define tcsh aliases.
The file ~/.tcshrc also sources the following use specific files which have the same meaning as the global tcsh files.
  • ~/.tcsh/alias
  • ~/.tcsh/env
  • ~/.tcsh/tcsh-vars

6.2. Storage Management

6.2.1. Raid

6.2.1.1. Kernel Software RAID

Software RAID is part of the Linux kernel. RAID configuration is done with the mdadm command. It is used to manage the RAID devices (see man page). Status information is obtained form /proc/mdstat.
How to replace a failed Disk in a Software RAID Setup
In case of a disk failure use mdadm to remove the failed disk from the raid-array, and after replacing the disk first partition it as the old one and again use mdadm to include the new disk into the raid-array. A failed disk is marked with a (F) in /proc/mdstat.
Example:
0 root@cl-head ~ #
cat /proc/mdstat

Personalities : [raid0] [raid1] [raid5] [multipath]
read_ahead 1024 sectors
md0 : active raid1 sdb1[1] sda1[0]
104320 blocks [2/2] [UU]
md1 : active raid1 sdb2[0](F) sda2[1]
17414336 blocks [2/1] [_U]
md2 : active raid1 sdb3[1] sda3[0]
18322048 blocks [2/2] [UU]
unused devices: <none>
So disk /dev/sdb has failed. In the example, the disk error affected only /dev/md1, but partitions of the faulty disk are also part of /dev/md0 and /dev/md2. So they need to be removed as well before the disk can be replaced. Hence, the following commands need to be executed:
To remove the faulty partition:
0 root@cl-head ~ #
mdadm --manage /dev/md1 -r /dev/sdb2
To mark the other affected partitions on the disk as faulty and remove them:
0 root@cl-head ~ #
mdadm --manage /dev/md0 -f /dev/sdb1

0 root@cl-head ~ #
mdadm --manage /dev/md0 -r /dev/sdb1

0 root@cl-head ~ #
mdadm --manage /dev/md2 -f /dev/sdb3

0 root@cl-head ~ #
mdadm --manage /dev/md2 -r /dev/sdb3
Now the disk is not accessed any more and can be removed. After the new disk has been inserted, repartition it:
0 root@cl-head ~ #
sfdisk -d /dev/sda | sfdisk /dev/sdb
Now start the resync
0 root@cl-head ~ #
mdadm --manage /dev/md0 -a /dev/sdb1

0 root@cl-head ~ #
mdadm --manage /dev/md1 -a /dev/sdb2

0 root@cl-head ~ #
mdadm --manage /dev/md2 -a /dev/sdb3
To watch the resync process, you can enter:
0 root@cl-head ~ #
watch --differences=cumulative cat /proc/mdstat 
Press Ctrl+C to exit the display

6.2.2. Logical Volume Management

The Linux Logical Volume Manager (LVM) provides a convenient and flexible way of managing storage. Storage devices like hard discs or RAID sets are registered as physical volumes, and are then assigned to volume groups. Volume groups contain one or more logical volumes, which can be resized according to the storage space available in the volume group. New physical volumes can be added to or removed from a volume group at any time, thereby transparently enlarging or reducing the storage space available in a volume group. Filesystems are created on top of logical volumes.
Examples:
0 root@cl-head ~ #
pvcreate /dev/sdb1

0 root@cl-head ~ #
vgcreate vg0 /dev/sdb1

0 root@cl-head ~ #
lvcreate -n scratch -L 1GB vg0
These commands declare /dev/sdb1 as a physical volume, create the volume group vg0 with the physical volume /dev/sdb1, and create a logical volume /dev/vg0/scratch of size 1GB. You can now create a filesystem on this logical volume and mount it:
0 root@cl-head ~ #
mkfs.ext4 /dev/vg0/scratch

0 root@cl-head ~ #
mount /dev/vg0/scratch /scratch
To increase the size of the filesystem you do not have to unmount it but you have to increase the logical volume before resizing the filesystem:
0 root@cl-head ~ #
lvextend -L +1G /dev/vg0/scratch

0 root@cl-head ~ #
resize2fs /dev/vg0/scratch
This increased the filesystem by 1 Gb. If you want to decrease the size of the filesystem you first need to unmount it. After that decrease the filesystem and finally reduce the logical volume:
0 root@cl-head ~ #
unmount /scratch

0 root@cl-head ~ #
e2fsck -f /dev/vg0/scratch

0 root@cl-head ~ #
resize2fs /dev/vg0/scratch 500M

0 root@cl-head ~ #
lvreduce -L 500M /dev/vg0/scratch

0 root@cl-head ~ #
mount /dev/vg0/scratch /scratch
This decreased the filesystem to 500Mb. To check how much space is left in a volume group use the command vgdisplay. Look for a line showing Free Size.
Frequent commands:
  • Physical volumes: pvcreate
  • Volume groups: vgscan, vgchange, vgdisplay, vgcreate, vgremove
  • Logical volumes: lvdisplay,lvcreate, lvextend, lvreduce, lvremove

6.2.3. Zpools and ZFS

Note

This section borrows heavily from the excellent ZFS tutorial series by Aaron Toponce.

6.2.3.1. Zpool Administration

6.2.3.1.1. VDEVs
Virtual Device Introduction
To start, we need to understand the concept of virtual devices, or VDEVs, as ZFS uses them internally extensively. If you are already familiar with RAID, then this concept is not new to you, although you may not have referred to it as “VDEVs”. Basically, we have a meta-device that represents one or more physical devices. In Linux software RAID, you might have a /dev/md0 device that represents a RAID-5 array of 4 disks. In this case, /dev/md0 would be your “VDEV”.
There are seven types of VDEVs in ZFS:
  1. disk (default)- The physical hard drives in your system.
  2. file- The absolute path of pre-allocated files/images.
  3. mirror- Standard software RAID-1 mirror.
  4. raidz1/2/3- Non-standard distributed parity-based software RAID levels.
  5. spare- Hard drives marked as a “hot spare” for ZFS software RAID.
  6. cache- Device used for a level 2 adaptive read cache (L2ARC).
  7. log- A separate log (SLOG) called the “ZFS Intent Log” or ZIL.
It’s important to note that VDEVs are always dynamically striped. This will make more sense as we cover the commands below. However, suppose there are 4 disks in a ZFS stripe. The stripe size is calculated by the number of disks and the size of the disks in the array. If more disks are added, the stripe size can be adjusted as needed for the additional disk. Thus, the dynamic nature of the stripe.
Some zpool caveats
I would be amiss if I didn’t meantion some of the caveats that come with ZFS:
  • Once a device is added to a VDEV, it cannot be removed.
  • You cannot shrink a zpool, only grow it.
  • RAID-0 is faster than RAID-1, which is faster than RAIDZ-1, which is faster than RAIDZ-2, which is faster than RAIDZ-3.
  • Hot spares are not dynamically added unless you enable the setting, which is off by default.
  • A zpool will not dynamically rezise when larger disks fill the pool unless you enable the setting before your first disk replacement, which is off by default.
  • A zpool will know about “advanced format” 4K sector drives if and only if the drive reports such.
  • Deduplication is extremely expensive, will cause performance degredation if not enough RAM is installed, and is pool-wide, not local to filesystems.
  • On the other hand, compression is extremely cheap on the CPU, yet it is disabled by default.
  • ZFS suffers a great deal from fragmentation, and full zpools will “feel” the performance degredation.
  • ZFS suports encryption natively, but it is not Free Software. It is proprietary copyrighted by Oracle.
For the next examples, we will assume 4 drives: /dev/sde, /dev/sdf, /dev/sdg and /dev/sdh, all 8 GB USB thumb drives. Between each of the commands, if you are following along, then make sure you follow the cleanup step at the end of each section.
A simple pool
Let’s start by creating a simple zpool wyth my 4 drives. I could create a zpool named “tank” with the following command:
0 root@cl-head ~ #
zpool create tank sde sdf sdg sdh
In this case, I’m using four disk VDEVs. Notice that I’m not using full device paths, although I could. Because VDEVs are always dynamically striped, this is effectively a RAID-0 between four drives (no redundancy). We should also check the status of the zpool:
0 root@cl-head ~ #
zpool status tank

pool: tank
state: ONLINE
scan: none requested
config:

       NAME        STATE     READ WRITE CKSUM
       tank        ONLINE       0     0     0
         sde       ONLINE       0     0     0
         sdf       ONLINE       0     0     0 
         sdg       ONLINE       0     0     0
         sdh       ONLINE       0     0     0

errors: No known data errors	 
Let’s tear down the zpool, and create a new one. Run the following before continuing, if you’re following along in your own terminal:
0 root@cl-head ~ #
zpool destroy tank
A simple mirrored zpool
In this next example, I wish to mirror all four drives (/dev/sde, /dev/sdf, /dev/sdg and /dev/sdh). So, rather than using the disk VDEV, I’ll be using “mirror”. The command is as follows:
0 root@cl-head ~ #
zpool create tank mirror sde sdf sdg sdh

0 root@cl-head ~ #
zpool status tank

  pool: tank
 state: ONLINE
  scan: none requested
config:

       NAME        STATE     READ WRITE CKSUM
       tank        ONLINE       0     0     0
         mirror-0  ONLINE       0     0     0
           sde     ONLINE       0     0     0
           sdf     ONLINE       0     0     0
           sdg     ONLINE       0     0     0
           sdh     ONLINE       0     0     0

errors: No known data errors
Notice that “mirror-0″ is now the VDEV, with each physical device managed by it. As mentioned earlier, this would be analogous to a Linux software RAID “/dev/md0″ device representing the four physical devices. Let’s now clean up our pool, and create another.
0 root@cl-head ~ #
zpool destroy tank
Nested VDEVs
VDEVs can be nested. A perfect example is a standard RAID-1+0 (commonly referred to as “RAID-10″). This is a stripe of mirrors. In order to specify the nested VDEVs, I just put them on the command line in order (emphasis mine):
0 root@cl-head ~ #
zpool create tank mirror sde sdf mirror sdg sdh

0 root@cl-head ~ #
zpool status

  pool: tank
 state: ONLINE
  scan: none requested
config:

       NAME        STATE     READ WRITE CKSUM
       tank        ONLINE       0     0     0
         mirror-0  ONLINE       0     0     0
           sde     ONLINE       0     0     0
           sdf     ONLINE       0     0     0
         mirror-1  ONLINE       0     0     0
           sdg     ONLINE       0     0     0
           sdh     ONLINE       0     0     0

errors: No known data errors
The first VDEV is “mirror-0″ which is managing /dev/sde and /dev/sdf. This was done by calling “mirror sde sdf”. The second VDEV is “mirror-1″ which is managing /dev/sdg and /dev/sdh. This was done by calling “mirror sdg sdh”. Because VDEVs are always dynamically striped, “mirror-0″ and “mirror-1″ are striped, thus creating the RAID-1+0 setup. Don’t forget to cleanup before continuing:
0 root@cl-head ~ #
zpool destroy tank
File VDEVs
As mentioned, pre-allocated files can be used per setting up zpools on your existing ext4 filesystem (or whatever). It should be noted that this is meant entirely for testing purposes, and not for storing production data. Using files is a great way to have a sandbox, where you can test compression ratio, the size of the deduplication table, or other things without actually committing production data to it. When creating file VDEVs, you cannot use relative paths, but must use absolute paths. Further, the image files must be preallocated, and not sparse files or thin provisioned. Let’s see how this works:
0 root@cl-head ~ #
for i in {1..4}; do dd if=/dev/zero of=/tmp/file$i bs=1G count=4
&> /dev/null; done

0 root@cl-head ~ #
zpool create tank /tmp/file1 /tmp/file2 /tmp/file3 /tmp/file4

0 root@cl-head ~ #
zpool status tank

  pool: tank
 state: ONLINE
  scan: none requested
config:

             NAME          STATE     READ WRITE CKSUM
             tank          ONLINE       0     0     0
               /tmp/file1  ONLINE       0     0     0
               /tmp/file2  ONLINE       0     0     0
               /tmp/file3  ONLINE       0     0     0
               /tmp/file4  ONLINE       0     0     0

errors: No known data errors
In this case, we created a RAID-0. We used preallocated files using /dev/zero that are each 4GB in size. Thus, the size of our zpool is 16 GB in usable space. Each file, as with our first example using disks, is a VDEV. Of course, you can treat the files as disks, and put them into a mirror configuration, RAID-1+0, RAIDZ-1 (coming in the next post), etc.
0 root@cl-head ~ #
zpool destroy tank
Hybrid pools
This last example should show you the complex pools you can setup by using different VDEVs. Using our four file VDEVs from the previous example, and our four disk VDEVs /dev/sde through /dev/sdh, let’s create a hybrid pool with cache and log drives. Again, I emphasized the nested VDEVs for clarity:
0 root@cl-head ~ #
zpool create tank mirror /tmp/file1 /tmp/file2 mirror /tmp/file3
/tmp/file4 log mirror sde sdf cache sdg sdh

0 root@cl-head ~ #
zpool status tank

  pool: tank
 state: ONLINE
  scan: none requested
config:

               NAME            STATE     READ WRITE CKSUM
               tank            ONLINE       0     0     0
                 mirror-0      ONLINE       0     0     0
                   /tmp/file1  ONLINE       0     0     0
                   /tmp/file2  ONLINE       0     0     0
                 mirror-1      ONLINE       0     0     0
                   /tmp/file3  ONLINE       0     0     0
                   /tmp/file4  ONLINE       0     0     0
               logs
                 mirror-2      ONLINE       0     0     0
                   sde         ONLINE       0     0     0
                   sdf         ONLINE       0     0     0
               cache
                 sdg           ONLINE       0     0     0
                 sdh           ONLINE       0     0     0

errors: No known data errors
There’s a lot going on here, so let’s dissect it. First, we created a RAID-1+0 using our four preallocated image files. Notice the VDEVs “mirror-0″ and “mirror-1″, and what they are managing. Second, we created a third VDEV called “mirror-2″ that actually is not used for storing data in the pool, but is used as a ZFS intent log, or ZIL. We’ll cover the ZIL in more detail in another post. Then we created two VDEVs for caching data called “sdg” and “sdh”. The are standard disk VDEVs that we’ve already learned about. However, they are also managed by the “cache” VDEV. So, in this case, we’ve used 6 of the 7 VDEVs listed above, the only one missing is “spare”.
Noticing the indentation will help you see what VDEV is managing what. The “tank” pool is comprised of the “mirror-0″ and “mirror-1″ VDEVs for long-term persistent storage. The ZIL is magaged by “mirror-2″, which is comprised of /dev/sde and /dev/sdf. The read-only cache VDEV is managed by two disks, /dev/sdg and /dev/sdh. Neither the “logs” nor the “cache” are long-term storage for the pool, thus creating a “hybrid pool” setup.
0 root@cl-head ~ #
zpool destroy tank
Real life example
In production, the files would be physical disk, and the ZIL and cache would be fast SSDs. Here is my current zpool setup which is storing this blog, among other things:
0 root@cl-head ~ #
zpool status pool

  pool: pool
 state: ONLINE
  scan: scrub repaired 0 in 2h23m with 0 errors on Sun Dec  2 02:23:44 2012
config:

                NAME                                              STATE     READ WRITE CKSUM
                pool                                              ONLINE       0     0     0
                  raidz1-0                                        ONLINE       0     0     0
                    sdd                                           ONLINE       0     0     0
                    sde                                           ONLINE       0     0     0
                    sdf                                           ONLINE       0     0     0
                    sdg                                           ONLINE       0     0     0
                logs
                  mirror-1                                        ONLINE       0     0     0
                    ata-OCZ-REVODRIVE_OCZ-33W9WE11E9X73Y41-part1  ONLINE       0     0     0
                    ata-OCZ-REVODRIVE_OCZ-X5RG0EIY7MN7676K-part1  ONLINE       0     0     0
                cache
                  ata-OCZ-REVODRIVE_OCZ-33W9WE11E9X73Y41-part2    ONLINE       0     0     0
                  ata-OCZ-REVODRIVE_OCZ-X5RG0EIY7MN7676K-part2    ONLINE       0     0     0

errors: No known data errors
Notice that my “logs” and “cache” VDEVs are OCZ Revodrive SSDs, while the four platter disks are in a RAIDZ-1 VDEV (RAIDZ will be discussed in the next post). However, notice that the name of the SSDs is “ata-OCZ-REVODRIVE_OCZ-33W9WE11E9X73Y41-part1″, etc. These are found in /dev/disk/by-id/. The reason I chose these instead of “sdb” and “sdc” is because the cache and log devices don’t necessarily store the same ZFS metadata. Thus, when the pool is being created on boot, they may not come into the pool, and could be missing. Or, the motherboard may assign the drive letters in a different order. This isn’t a problem with the main pool, but is a big problem on GNU/Linux with logs and cached devices. Using the device name under /dev/disk/by-id/ ensures greater persistence and uniqueness.
Also do notice the simplicity in the implementation. Consider doing something similar with LVM, RAID and ext4. You would need to do the following:
0 root@cl-head ~ #
mdadm -C /dev/md0 -l 0 -n 4 /dev/sde /dev/sdf /dev/sdg /dev/sdh

0 root@cl-head ~ #
pvcreate /dev/md0

0 root@cl-head ~ #
vgcreate /dev/md0 tank

0 root@cl-head ~ #
lvcreate -l 100%FREE -n videos tank

0 root@cl-head ~ #
mkfs.ext4 /dev/tank/videos

0 root@cl-head ~ #
mkdir -p /tank/videos

0 root@cl-head ~ #
mount -t ext4 /dev/tank/videos /tank/videos
The above was done in ZFS (minus creating the logical volume, which will get to later) with one command, rather than seven.
Conclusion
This should act as a good starting point for getting the basic understanding of zpools and VDEVs. The rest of it is all downhill from here. You’ve made it over the “big hurdle” of understanding how ZFS handles pooled storage. We still need to cover RAIDZ levels, and we still need to go into more depth about log and cache devices, as well as pool settings, such as deduplication and compression, but all of these will be handled in separate posts. Then we can get into ZFS filesystem datasets, their settings, and advantages and disagvantages. But, you now have a head start on the core part of ZFS pools.
6.2.3.1.2. RAIDZ
Self-healing RAID
ZFS can detect silent errors, and fix them on the fly. Suppose for a moment that there is bad data on a disk in the array, for whatever reason. When the application requests the data, ZFS constructs the stripe as we just learned, and compares each block against a SHA-256 checksum in the metadata. If the read stripe does not match the checksum, ZFS finds the corrupted block, it then reads the parity, and fixes it through combinatorial reconstruction. It then returns good data to the application. This is all accomplished in ZFS itself, without the help of special hardware. Another aspect of the RAIDZ levels is the fact that if the stripe is longer than the disks in the array, if there is a disk failure, not enough data with the parity can reconstruct the data. Thus, ZFS will mirror some of the data in the stripe to prevent this from happening.
Again, if your RAID and filesystem are separate products, they are not aware of each other, so detecting and fixing silent data errors is not possible. So, with that out of the way, let’s build some RAIDZ pools. As with my previous post, I’ll be using 5 USB thumb drives /dev/sde, /dev/sdf, /dev/sdg, /dev/sdh and /dev/sdi which are all 8 GB in size.
RAIDZ-1
RAIDZ-1 is similar to RAID-5 in that there is a single parity bit distributed across all the disks in the array. The stripe width is variable, and could cover the exact width of disks in the array, fewer disks, or more disks, as evident in the image above. This still allows for one disk failure to maintain data. Two disk failures would result in data loss. A minimum of 3 disks should be used in a RAIDZ-1. The capacity of your storage will be the number of disks in your array times the storage of the smallest disk, minus one disk for parity storage (there is a caveat to zpool storage sizes I’ll get to in another post). So in my example, I should have roughly 16 GB of usable disk.
To setup a zpool with RAIDZ-1, we use the “raidz1″ VDEV, in this case using only 3 USB drives:
0 root@cl-head ~ #
zpool create tank raidz1 sde sdf sdg

0 root@cl-head ~ #
zpool status tank

  pool: pool
 state: ONLINE
  scan: none requested
config:

             NAME          STATE     READ WRITE CKSUM
             pool          ONLINE       0     0     0
               raidz1-0    ONLINE       0     0     0
                 sde       ONLINE       0     0     0
                 sdf       ONLINE       0     0     0
                 sdg       ONLINE       0     0     0

errors: No known data errors
Cleanup before moving on, if following in your terminal:
0 root@cl-head ~ #
zpool destroy tank
RAIDZ-2
RAIDZ-2 is similar to RAID-6 in that there is a dual parity bit distributed across all the disks in the array. The stripe width is variable, and could cover the exact width of disks in the array, fewer disks, or more disks, as evident in the image above. This still allows for two disk failures to maintain data. Three disk failures would result in data loss. A minimum of 4 disks should be used in a RAIDZ-2. The capacity of your storage will be the number of disks in your array times the storage of the smallest disk, minus two disks for parity storage. So in my example, I should have roughly 16 GB of usable disk.
To setup a zpool with RAIDZ-2, we use the “raidz2″ VDEV:
0 root@cl-head ~ #
zpool create tank raidz2 sde sdf sdg sdh

0 root@cl-head ~ #
zpool status tank

  pool: pool
 state: ONLINE
  scan: none requested
config:

            NAME          STATE     READ WRITE CKSUM
            pool          ONLINE       0     0     0
              raidz2-0    ONLINE       0     0     0
                sde       ONLINE       0     0     0
                sdf       ONLINE       0     0     0
                sdg       ONLINE       0     0     0
                sdh       ONLINE       0     0     0

errors: No known data errors
Cleanup before moving on, if following in your terminal:
0 root@cl-head ~ #
zpool destroy tank
RAIDZ-3
RAIDZ-3 does not have a standardized RAID level to compare it to. However, it is the logical continuation of RAIDZ-1 and RAIDZ-2 in that there is a triple parity bit distributed across all the disks in the array. The stripe width is variable, and could cover the exact width of disks in the array, fewer disks, or more disks, as evident in the image above. This still allows for three disk failures to maintain data. Four disk failures would result in data loss. A minimum of 5 disks should be used in a RAIDZ-3. The capacity of your storage will be the number of disks in your array times the storage of the smallest disk, minus three disks for parity storage. So in out example, we should have roughly 16 GB of usable disk.
To setup a zpool with RAIDZ-3, we use the “raidz3″ VDEV:
0 root@cl-head ~ #
zpool create tank raidz3 sde sdf sdg sdh sdi

0 root@cl-head ~ #
zpool status tank

  pool: pool
 state: ONLINE
  scan: none requested
config:

                NAME          STATE     READ WRITE CKSUM
                pool          ONLINE       0     0     0
                  raidz3-0    ONLINE       0     0     0
                    sde       ONLINE       0     0     0
                    sdf       ONLINE       0     0     0
                    sdg       ONLINE       0     0     0
                    sdh       ONLINE       0     0     0
                    sdi       ONLINE       0     0     0

 errors: No known data errors
Cleanup before moving on, if following in your terminal:
0 root@cl-head ~ #
zpool destroy tank
Performance Considerations
Lastly, in terms of performance, mirrors will always outperform RAIDZ levels. On both reads and writes. Further, RAIDZ-1 will outperform RAIDZ-2, which it turn will outperform RAIDZ-3. The more parity bits you have to calculate, the longer it’s going to take to both read and write the data. Of course, you can always add striping to your VDEVs to maximize on some of this performance. Nested RAID levels, such as RAID-1+0 are considered “the Cadillac of RAID levels” due to the flexibility in which you can lose disks without parity, and the throughput you get from the stripe. So, in a nutshell, from fastest to slowest, your non-nested RAID levels will perform as:
  • RAID-0 (fastest)
  • RAID-1
  • RAIDZ-1
  • RAIDZ-2
  • RAIDZ-3 (slowest)
6.2.3.1.3. Exporting and Importing Storage Pools
Motivation
As a GNU/Linux storage administrator, you may come across the need to move your storage from one server to another. This could be accomplished by physically moving the disks from one storage box to another, or by copying the data from the old live running system to the new. we will cover both cases in this series. The latter deals with sending and receiving ZFS snapshots, a topic that will take us some time getting to. This post will deal with the former; that is, physically moving the drives.
One slick feature of ZFS is the ability to export your storage pool, so you can disassemble the drives, unplug their cables, and move the drives to another system. Once on the new system, ZFS gives you the ability to import the storage pool, regardless of the order of the drives. A good demonstration of this is to grab some USB sticks, plug them in, and create a ZFS storage pool. Then export the pool, unplug the sticks, drop them into a hat, and mix them up. Then, plug them back in at any random order, and re-import the pool on a new box. In fact, ZFS is smart enough to detect endianness. In other words, you can export the storage pool from a big endian system, and import the pool on a little endian system, without hiccup.
Exporting Storage Pools
When the migration is ready to take place, before unplugging the power, you need to export the storage pool. This will cause the kernel to flush all pending data to disk, writes data to the disk acknowledging that the export was done, and removes all knowledge that the storage pool existed in the system. At this point, it’s safe to shut down the computer, and remove the drives.
If you do not export the storage pool before removing the drives, you will not be able to import the drives on the new system, and you might not have gotten all unwritten data flushed to disk. Even though the data will remain consistent due to the nature of the filesystem, when importing, it will appear to the old system as a faulted pool. Further, the destination system will refuse to import a pool that has not been explicitly exported. This is to prevent race conditions with network attached storage that may be already using the pool.
To export a storage pool, use the following command:
0 root@cl-head ~ #
zpool export tank
This command will attempt to unmount all ZFS datasets as well as the pool. By default, when creating ZFS storage pools and filesystems, they are automatically mounted to the system. There is no need to explicitly unmount the filesystems as you with with ext3 or ext4. The export will handle that. Further, some pools may refuse to be exported, for whatever reason. You can pass the -f switch if needed to force the export.
Importing Storage Pools
Once the drives have been physically installed into the new server, you can import the pool. Further, the new system may have multiple pools installed, to which you will want to determine which pool to import, or to import them all. If the storage pool “tank” does not already exist on the new server, and this is the pool you wish to import, then you can run the following command:
0 root@cl-head ~ #
zpool import tank

0 root@cl-head ~ #
zpool status tank

 state: ONLINE
  scan: none requested
config:

                 NAME        STATE     READ WRITE CKSUM
                 tank        ONLINE       0     0     0
                   mirror-0  ONLINE       0     0     0
                     sde     ONLINE       0     0     0
                     sdf     ONLINE       0     0     0
                   mirror-1  ONLINE       0     0     0
                     sdg     ONLINE       0     0     0
                     sdh     ONLINE       0     0     0
                   mirror-2  ONLINE       0     0     0
                     sdi     ONLINE       0     0     0
                     sdj     ONLINE       0     0     0

errors: No known data errors
Your storage pool state may not be ONLINE, meaning that everything is healthy. If the system does not recognize a disk in your pool, you may get a DEGRADED state. If one or more of the drives appear as faulty to the system, then you may get a FAULTED state in your pool. You will need to troubleshoot what drives are causing the problem, and fix accordingly.
You can import multiple pools simultaneously by either specifying each pool as an argument, or by passing the -a switch for importing all discovered pools. For importing the two pools “tank1″ and “tank2″, type:
0 root@cl-head ~ #
zpool import tank1 tank2
For importing all known pools, type:
0 root@cl-head ~ #
zpool import -a
Recovering A Destroyed Pool
If a ZFS storage pool was previously destroyed, the pool can still be imported to the system. Destroying a pool doesn’t wipe the data on the disks, so the metadata is still in tact, and the pool can still be discovered. Let’s take a clean pool called “tank”, destroy it, move the disks to a new system, then try to import the pool. You will need to pass the -D switch to tell ZFS to import a destroyed pool. Do not provide the pool name as an argument, as you would normally do:
(server A)
0 root@cl-head ~ #
zpool destroy tank

(server B)
0 root@cl-head ~ #
zpool import -D

  pool: tank
    id: 17105118590326096187
 state: ONLINE (DESTROYED)
action: The pool can be imported using its name or numeric identifier.
config:

                 tank        ONLINE
                   mirror-0  ONLINE
                     sde     ONLINE
                     sdf     ONLINE
                   mirror-1  ONLINE
                     sdg     ONLINE
                     sdh     ONLINE
                   mirror-2  ONLINE
                     sdi     ONLINE
                     sdj     ONLINE
                
                
  pool: tank
    id: 2911384395464928396
 state: UNAVAIL (DESTROYED)
status: One or more devices are missing from the system.
action: The pool cannot be imported. Attach the missing
        devices and try again.
   see: http://zfsonlinux.org/msg/ZFS-8000-6X
config:

                 tank          UNAVAIL  missing device
                   sdk         ONLINE
                   sdr         ONLINE

 Additional devices are known to be part of this pool, though their
 exact configuration cannot be determined.
Notice that the state of the pool is ONLINE (DESTROYED). Even though the pool is ONLINE, it is only partially online. Basically, it’s only been discovered, but it’s not available for use. If you run the df command, you will find that the storage pool is not mounted. This means the ZFS filesystem datasets are not available, and you currently cannot store data into the pool. However, ZFS has found the pool, and you can bring it fully ONLINE for standard usage by running the import command one more time, this time specifying the pool name as an argument to import:
(server B)
0 root@cl-head ~ #
zpool import -D tank

cannot import 'tank': more than one matching pool
import by numeric ID instead

(server B)
0 root@cl-head ~ #
zpool import -D 17105118590326096187

(server B)
0 root@cl-head ~ #
zpool status tank

  pool: tank
 state: ONLINE
  scan: none requested
config:

                   NAME        STATE     READ WRITE CKSUM
                   tank        ONLINE       0     0     0
                     mirror-0  ONLINE       0     0     0
                       sde     ONLINE       0     0     0
                       sdf     ONLINE       0     0     0
                     mirror-1  ONLINE       0     0     0
                       sdg     ONLINE       0     0     0
                       sdh     ONLINE       0     0     0
                     mirror-2  ONLINE       0     0     0
                       sdi     ONLINE       0     0     0
                       sdj     ONLINE       0     0     0

errors: No known data errors
Notice that ZFS was warning me that it found more than on storage pool matching the name “tank”, and to import the pool, I must use its unique identifier. So, I pass that as an argument from my previous import. This is because in my previous output, we can see there are two known pools with the pool name “tank”. However, after specifying its ID, I was able to successfully bring the storage pool to full ONLINE status. You can identify this by checking its status:
0 root@cl-head ~ #
zpool status tank

  pool: tank
 state: ONLINE
status: The pool is formatted using an older on-disk format.  The pool can
        still be used, but some features are unavailable.
action: Upgrade the pool using 'zpool upgrade'.  Once this is done, the
        pool will no longer be accessible on older software versions.
 scrub: none requested
config:

                 NAME        STATE     READ WRITE CKSUM
                 tank        ONLINE       0     0     0
                   mirror-0  ONLINE       0     0     0
                     sde     ONLINE       0     0     0
                     sdf     ONLINE       0     0     0
                   mirror-1  ONLINE       0     0     0
                     sdg     ONLINE       0     0     0
                     sdh     ONLINE       0     0     0
                   mirror-2  ONLINE       0     0     0
                     sdi     ONLINE       0     0     0
                     sdj     ONLINE       0     0     0
Upgrading Storage Pools
One thing that may crop up when migrating disk, is that there may be different pool and filesystem versions of the software. For example, you may have exported the pool on a system running pool version 20, while importing into a system with pool version 28 support. As such, you can upgrade your pool version to use the latest software for that release. As is evident with the previous example, it seems that the new server has an update version of the software. We are going to upgrade.

Warning

Once you upgrade your pool to a newer version of ZFS, older versions will not be able to use the storage pool. So, make sure that when you upgrade the pool, you know that there will be no need for going back to the old system. Further, there is no way to revert the upgrade and revert to the old version.
First, we can see a brief description of features that will be available to the pool:
0 root@cl-head ~ #
zpool upgrade -v

This system is currently running ZFS pool version 28.
The following versions are supported:
          
          VER   DESCRIPTION
          ---   ---------------------------------------------------
           1    Initial ZFS version
           2    Ditto blocks (replicated metadata)
           3    Hot spares and double parity RAID-Z
           4    zpool history
           5    Compression using the gzip algorithm
           6    bootfs pool property
           7    Separate intent log devices
           8    Delegated administration
           9    refquota and refreservation properties
           10   Cache devices
           11   Improved scrub performance
           12   Snapshot properties
           13   snapused property
           14   passthrough-x aclinherit
           15   user/group space accounting
           16   stmf property support
           17   Triple-parity RAID-Z
           18   Snapshot user holds
           19   Log device removal
           20   Compression using zle (zero-length encoding)
           21   Deduplication
           22   Received properties
           23   Slim ZIL
           24   System attributes
           25   Improved scrub stats
           26   Improved snapshot deletion performance
           27   Improved snapshot creation performance
           28   Multiple vdev replacements

For more information on a particular version, including supported releases,
see the ZFS Administration Guide.
So, let’s perform the upgrade to get to version 28 of the pool:
0 root@cl-head ~ #
zpool upgrade -a
As a sidenote, when using ZFS on Linux, the RPM and Debian packages will contain an /etc/init.d/zfs init script for setting up the pools and datasets on boot. This is done by importing them on boot. However, at shutdown, the init script does not export the pools. Rather, it just unmounts them. So, if you migrate the disk to another box after only shutting down, you will be not be able to import the storage pool on the new box.
Conclusion
There are plenty of situations where you may need to move disk from one storage server to another. Thankfully, ZFS makes this easy with exporting and importing pools. Further, the zpool command has enough subcommands and switches to handle the most common scenarios when a pool will not export or import. Towards the very end of the series, we’ll discuss the zdb command, and how it may be useful here. But at this point, steer clear of zdb, and just focus on keeping your pools in order, and properly exporting and importing them as needed.
6.2.3.1.4. Scrub and Resilver
Standard Validation
In GNU/Linux, we have a number of filesystem checking utilities for verifying data integrity on the disk. This is done through the “fsck” utility. However, it has a couple major drawbacks. First, you must fsck the disk offline if you are intending on fixing data errors. This means downtime. So, you must use the umount command to unmount your disks, before the fsck. For root partitions, this further means booting from another medium, like a CDROM or USB stick. Depending on the size of the disks, this downtime could take hours. Second, the filesystem, such as ext3 or ext4, knows nothing of the underlying data structures, such as LVM or RAID. You may only have a bad block on one disk, but a good block on another disk. Unfortunately, Linux software RAID has no idea which is good or bad, and from the perspective of ext3 or ext4, it will get good data if read from the disk containing the good block, and corrupted data from the disk containing the bad block, without any control over which disk to pull the data from, and fixing the corruption. These errors are known as silent data errors, and there is really nothing you can do about it with the standard GNU/Linux filesystem stack.
ZFS Scrubbing
With ZFS on Linux, detecting and correcting silent data errors is done through scrubbing the disks. This is similar in technique to ECC RAM, where if an error resides in the ECC DIMM, you can find another register that contains the good data, and use it to fix the bad register. This is an old technique that has been around for a while, so it’s surprising that it’s not available in the standard suite of journaled filesystems. Further, just like you can scrub ECC RAM on a live running system, without downtime, you should be able to scrub your disks without downtime as well. With ZFS, you can.
While ZFS is performing a scrub on your pool, it is checking every block in the storage pool against its known SHA-256 checksum. Every block from top-to-bottom is checksummed using SHA-256 by default. This can be changed to using the Fletcher algorithm, although it’s not recommended. Because of SHA-256, you have a 1 in 2^256 or 1 in 10^77 chance that a corrupted block hashes to the same SHA-256 checksum. This is a 0.00000000000000000000000000000000000000000000000000000000000000000000000000001% chance. For reference, uncorrected ECC memory errors will happen on about 50 orders of magnitude more frequently, with the most reliable hardware on the market. So, when scrubbing your data, the probability is that either the checksum will match, and you have a good data block, or it won’t match, and you have a corrupted data block.
Scrubbing ZFS storage pools is not something that happens automatically. You need to do it manually, and it’s highly recommended that you do it on a regularly scheduled interval. The recommended frequency at which you should scrub the data depends on the quality of the underlying disks. If you have SAS or FC disks, then once per month should be sufficient. If you have consumer grade SATA or SCSI, you should do once per week. You can schedule a scrub easily with the following command:
0 root@cl-head ~ #
zpool scrub tank

0 root@cl-head ~ #
zpool status tank

  pool: tank
 state: ONLINE
  scan: scrub in progress since Sat Dec  8 08:06:36 2012
        32.0M scanned out of 48.5M at 16.0M/s, 0h0m to go
        0 repaired, 65.99% done
config:

                  NAME        STATE     READ WRITE CKSUM
                  tank        ONLINE       0     0     0
                    mirror-0  ONLINE       0     0     0
                      sde     ONLINE       0     0     0
                      sdf     ONLINE       0     0     0
                    mirror-1  ONLINE       0     0     0
                      sdg     ONLINE       0     0     0
                      sdh     ONLINE       0     0     0
                    mirror-2  ONLINE       0     0     0
                      sdi     ONLINE       0     0     0
                      sdj     ONLINE       0     0     0

errors: No known data errors
As you can see, you can get a status of the scrub while it is in progress. Doing a scrub can severely impact performance of the disks and the applications needing them. So, if for any reason you need to stop the scrub, you can pass the -s switch to the scrub subcommand. However, you should let the scrub continue to completion.
0 root@cl-head ~ #
zpool scrub -s tank
You should put something similar to the following in your root’s crontab, which will execute a scrub every Sunday at 02:00 in the morning:
0 2 * * 0 /sbin/zpool scrub tank
Self Healing Data
If your storage pool is using some sort of redundancy, then ZFS will not only detect the silent data errors on a scrub, but it will also correct them if good data exists on a different disk. This is known as “self healing”, and can be demonstrated in the following image. In our RAIDZ post, we discussed how the data is self-healed with RAIDZ, using the parity and a reconstruction algorithm. We are going to simplify it a bit, and use just a two way mirror. Suppose that an application needs some data blocks, and in those blocks, on of them is corrupted. How does ZFS know the data is corrupted? By checking the SHA-256 checksum of the block, as already mentioned. If a checksum does not match on a block, it will look at our other disk in the mirror to see if a good block can be found. If so, the good block is passed to the application, then ZFS will fix the bad block in the mirror, so that it also passes the SHA-256 checksum. As a result, the application will always get good data, and your pool will always be in a good, clean, consistent state.
Resilvering Data
Resilvering data is the same concept as rebuilding or resyncing data onto the new disk into the array. However, with Linux software RAID, hardware RAID controllers, and other RAID implementations, there is no distinction between which blocks are actually live, and which aren’t. So, the rebuild starts at the beginning of the disk, and does not stop until it reaches the end of the disk. Because ZFS knows about the the RAID structure and the filesystem metadata, we can be smart about rebuilding the data. Rather than wasting our time on free disk, where live blocks are not stored, we can concern ourselves with ONLY those live blocks. This can provide significant time savings, if your storage pool is only partially filled. If the pool is only 10% filled, then that means only working on 10% of the drives. Win. Thus, with ZFS we need a new term than “rebuilding”, “resyncing” or “reconstructing”. In this case, we refer to the process of rebuilding data as “resilvering”.
Unfortunately, disks will die, and need to be replaced. Provided you have redundancy in your storage pool, and can afford some failures, you can still send data to and receive data from applications, even though the pool will be in “DEGRADED” mode. If you have the luxury of hot swapping disks while the system is live, you can replace the disk without downtime (lucky you). If not, you will still need to identify the dead disk, and replace it. This can be a chore if you have many disks in your pool, say 24. However, most GNU/Linux operating system vendors, such as Debian or Ubuntu, provide a utility called “hdparm” that allows you to discover the serial number of all the disks in your pool. This is, of course, that the disk controllers are presenting that information to the Linux kernel, which they typically do. So, you could run something like:
0 root@cl-head ~ #
for i in a b c d e f g; do echo -n "/dev/sd$i: "; hdparm -I
/dev/sd$i | awk '/Serial Number/ {print $3}'; done

/dev/sda: OCZ-9724MG8BII8G3255
/dev/sdb: OCZ-69ZO5475MT43KNTU
/dev/sdc: WD-WCAPD3307153
/dev/sdd: JP2940HD0K9RJC
/dev/sde: /dev/sde: No such file or directory
/dev/sdf: JP2940HD0SB8RC
/dev/sdg: S1D1C3WR
It appears that /dev/sde is my dead disk. I have the serial numbers for all the other disks in the system, but not this one. So, by process of elimination, I can go to the storage array, and find which serial number was not printed. This is my dead disk. In this case, I find serial number “JP2940HD01VLMC”. I pull the disk, replace it with a new one, and see if /dev/sde is repopulated, and the others are still online. If so, I’ve found my disk, and can add it to the pool. This has actually happened to me twice already, on both of my personal hypervisors. It was a snap to replace, and I was online in under 10 minutes.
To replace an dead disk in the pool with a new one, you use the replace subcommand. Suppose the new disk also identifed itself as /dev/sde, then I would issue the following command:
0 root@cl-head ~ #
zpool replace tank sde sde

0 root@cl-head ~ #
zpool status tank

  pool: tank
 state: ONLINE
status: One or more devices is currently being resilvered.  The pool will
        continue to function, possibly in a degraded state.
action: Wait for the resilver to complete.
        scrub: resilver in progress for 0h2m, 16.43% done, 0h13m to go
config:

                  NAME          STATE       READ WRITE CKSUM
                  tank          DEGRADED       0     0     0
                    mirror-0    DEGRADED       0     0     0
                      replacing DEGRADED       0     0     0
                      sde       ONLINE         0     0     0
                      sdf       ONLINE         0     0     0
                    mirror-1    ONLINE         0     0     0
                      sdg       ONLINE         0     0     0
                      sdh       ONLINE         0     0     0
                    mirror-2    ONLINE         0     0     0
                      sdi       ONLINE         0     0     0
                      sdj       ONLINE         0     0     0
The resilver is analagous to a rebuild with Linux software RAID. It is rebuilding the data blocks on the new disk until the mirror, in this case, is in a completely healthy state. Viewing the status of the resilver will help you get an idea of when it will complete.
Identifying Pool Problems
Determining quickly if everything is functioning as it should be, without the full output of the zpool status command can be done by passing the -x switch. This is useful for scripts to parse without fancy logic, which could alert you in the event of a failure:
0 root@cl-head ~ #
zpool status -x

all pools are healthy
The rows in the zpool status command give you vital information about the pool, most of which are self-explanatory. They are defined as follows:
  • pool
    The name of the pool
  • state
    The current health of the pool. This information refers only to the ability of the pool to provide the necessary replication level.
  • status
    A description of what is wrong with the pool. This field is omitted if no problems are found.
  • action
    A recommended action for repairing the errors. This field is an abbreviated form directing the user to one of the following sections. This field is omitted if no problems are found.
  • see
    A reference to a knowledge article containing detailed repair information. Online articles are updated more often than this guide can be updated, and should always be referenced for the most up-to-date repair procedures. This field is omitted if no problems are found.
  • scrub
    Identifies the current status of a scrub operation, which might include the date and time that the last scrub was completed, a scrub in progress, or if no scrubbing was requested.
  • errors
    Identifies known data errors or the absence of known data errors.
  • config
    Describes the configuration layout of the devices comprising the pool, as well as their state and any errors generated from the devices. The state can be one of the following: ONLINE, FAULTED, DEGRADED, UNAVAILABLE, or OFFLINE. If the state is anything but ONLINE, the fault tolerance of the pool has been compromised.
The columns in the status output, “READ”, “WRITE” and “CHKSUM” are defined as follows:
  • NAME
    The name of each VDEV in the pool, presented in a nested order.
  • STATE
    The state of each VDEV in the pool. The state can be any of the states found in “config” above.
  • READ
    I/O errors occurred while issuing a read request.
  • WRITE
    I/O errors occurred while issuing a write request.
  • CHKSUM
    Checksum errors. The device returned corrupted data as the result of a read request.
Conclusion
Scrubbing your data on regular intervals will ensure that the blocks in the storage pool remain consistent. Even though the scrub can put strain on applications wishing to read or write data, it can save hours of headache in the future. Further, because you could have a “damaged device” at any time (see about damaged devices with ZFS), properly knowing how to fix the device, and what to expect when replacing one, is critical to storage administration. Of course, there is plenty more I could discuss about this topic, but this should at least introduce you to the concepts of scrubbing and resilvering data.
6.2.3.1.5. Getting and Setting Properties
Motivation
With ext4, and many filesystems in GNU/Linux, we have a way for tuning various flags in the filesystem. Things like setting labels, default mount options, and other tunables. With ZFS, it’s no different, and in fact, is far more verbose. These properties allow us to modify all sorts of variables, both for the pool, and for the datasets it contains. Thus, we can “tune” the filesystem to our liking or needs. However, not every property is tunable. Some are read-only. But, we’ll define what each of the properties are and how they affect the pool. Note, we are only looking at zpool properties, and we will get to ZFS dataset properties when we reach the dataset subtopic.
Zpool Properties
allocated
The amount of data that has been committed into the pool by all of the ZFS datasets. This setting is read-only.
altroot
Identifies an alternate root directory. If set, this directory is prepended to any mount points within the pool. This property can be used when examining an unknown pool, if the mount points cannot be trusted, or in an alternate boot environment, where the typical paths are not valid.Setting altroot defaults to using cachefile=none, though this may be overridden using an explicit setting.
ashift
Can only be set at pool creation time. Pool sector size exponent, to the power of 2. I/O operations will be aligned to the specified size boundaries. Default value is “9″, as 2^9 = 512, the standard sector size operating system utilities use for reading and writing data. For advanced format drives with 4 KiB boundaries, the value should be set to ashift=12, as 2^12 = 4096.
autoexpand
Must be set before replacing the first drive in your pool. Controls automatic pool expansion when the underlying LUN is grown. Default is “off”. After all drives in the pool have been replaced with larger drives, the pool will automatically grow to the new size. This setting is a boolean, with values either “on” or “off”.
autoreplace
Controls automatic device replacement of a spare VDEV in your pool. Default is set to “off”. As such, device replacement must be initiated manually by using the zpool replace command. This setting is a boolean, with values either “on” or “off”.
bootfs
Read-only setting that defines the bootable ZFS dataset in the pool. This is typically set by an installation program.
cachefile
Controls the location of where the pool configuration is cached. When importing a zpool on a system, ZFS can detect the drive geometry using the metadata on the disks. However, in some clustering environments, the cache file may need to be stored in a different location for pools that would not automatically be imported. Can be set to any string, but for most ZFS installations, the default location of /etc/zfs/zpool.cache should be sufficient.
capacity
Read-only value that identifies the percentage of pool space used.
comment
A text string consisting of no more than 32 printable ASCII characters that will be stored such that it is available even if the pool becomes faulted. An administrator can provide additional information about a pool using this setting.
dedupditto
Sets a block deduplication threshold, and if the reference count for a deduplicated block goes above the threshold, a duplicate copy of the block is stored automatically. The default value is 0. Can be any positive number.
dedupratio
Read-only deduplication ratio specified for a pool, expressed as a multiplier
delegation
Controls whether a non-privileged user can be granted access permissions that are defined for the dataset. The setting is a boolean, defaults to “on” and can be “on” or “off”.
expandsize
Amount of uninitialized space within the pool or device that can be used to increase the total capacity of the pool. Uninitialized space consists of any space on an EFI labeled vdev which has not been brought online (i.e. zpool online -e). This space occurs when a LUN is dynamically expanded.
failmode
Controls the system behavior in the event of catastrophic pool failure. This condition is typically a result of a loss of connectivity to the underlying storage device(s) or a failure of all devices within the pool. The behavior of such an event is determined as follows:
  • wait
    Blocks all I/O access until the device connectivity is recovered and the errors are cleared. This is the default behavior.
  • continue
    Returns EIO to any new write I/O requests but allows reads to any of the remaining healthy devices. Any write requests that have yet to be committed to disk would be blocked.
  • panic
    Prints out a message to the console and generates a system crash dump.
free
Read-only value that identifies the number of blocks within the pool that are not allocated.
guid
Read-only property that identifies the unique identifier for the pool. Similar to the UUID string for ext4 filesystems.
health
Read-only property that identifies the current health of the pool, as either ONLINE, DEGRADED, FAULTED, OFFLINE, REMOVED, or UNAVAIL.
listsnapshots
Controls whether snapshot information that is associated with this pool is displayed with the zfs list command. If this property is disabled, snapshot information can be displayed with the zfs list -t snapshot command. The default value is “off”. Boolean value that can be either “off” or “on”.
readonly
Boolean value that can be either “off” or “on”. Default value is “off”. Controls setting the pool into read-only mode to prevent writes and/or data corruption.
size
Read-only property that identifies the total size of the storage pool.
version
Writable setting that identifies the current on-disk version of the pool. Can be any value from 1 to the output of the zpool upgrade -v command. This property can be used when a specific version is needed for backwards compatibility.
Getting and Setting Properties
There are a few ways you can get to the properties of your pool- you can get all properties at once, only one property, or more than one, comma-separated. For example, suppose I wanted to get just the health of the pool. I could issue the following command:
0 root@cl-head ~ #
zpool get health tank

NAME  PROPERTY  VALUE   SOURCE
tank  health    ONLINE  -
If I wanted to get multiple settings, say the health of the system, how much is free, and how much is allocated, I could issue this command instead:
0 root@cl-head ~ #
zpool get health,free,allocated tank

NAME  PROPERTY   VALUE   SOURCE
tank  health     ONLINE  -
tank  free       176G    -
tank  allocated  32.2G   -
And of course, if I wanted to get all the settings available, I could run:
0 root@cl-head ~ #
zpool get all tank

NAME  PROPERTY       VALUE       SOURCE
tank  size           208G        -
tank  capacity       15%         -
tank  altroot        -           default
tank  health         ONLINE      -
tank  guid           1695112377970346970  default
tank  version        28          default
tank  bootfs         -           default
tank  delegation     on          default
tank  autoreplace    off         default
tank  cachefile      -           default
tank  failmode       wait        default
tank  listsnapshots  off         default
tank  autoexpand     off         default
tank  dedupditto     0           default
tank  dedupratio     1.00x       -
tank  free           176G        -
tank  allocated      32.2G       -
tank  readonly       off         -
tank  ashift         0           default
tank  comment        -           default
tank  expandsize     0           -
Setting a property is just as easy. However, there is a catch. For properties that require a string argument, there is no way to get it back to default. At least not that I am aware of. With the rest of the properties, if you try to set a property to an invalid argument, an error will print to the screen letting you know what is available, but it will not notify you as to what is default. However, you can look at the ‘SOURCE’ column. If the value in that column is “default”, then it’s default. If it’s “local”, then it was user-defined.
Suppose we wanted to change the comment property, this is how I would do it:
0 root@cl-head ~ #
zpool set comment="Contact admins@example.com" tank

0 root@cl-head ~ #
zpool get comment tank

NAME  PROPERTY  VALUE                       SOURCE
tank  comment   Contact admins@example.com  local
As you can see, the SOURCE is “local” for the comment property. Thus, it was user-defined. As mentioned, I don’t know of a way to get string properties back to default after being set. Further, any modifiable property can be set at pool creation time by using the -o switch, as follows:
0 root@cl-head ~ #
zpool create -o ashift=12 tank raid1 sda sdb
Final Thoughts
The zpool properties apply to the entire pool, which means ZFS datasets will inherit that property from the pool. Some properties that you set on your ZFS dataset, which will be discussed towards the end of this series, apply to the whole pool. For example, if you enable block deduplication for a ZFS dataset, it dedupes blocks found in the entire pool, not just in your dataset. However, only blocks in that dataset will be actively deduped, while other ZFS datasets may not. Also, setting a property is not retroactive. In the case of your autoexpand zpool property to automatically expand the zpool size when all the drives have been replaced, if you replaced a drive before enabling the property, that drive will be considered a smaller drive, even if it physically isn’t. Setting properties only applies to operations on the data moving forward, and never backward.
Despite a few of these caveats, having the ability to change some parameters of your pool to fit your needs as a GNU/Linux storage administrator gives you great control that other filesystems don’t. And, as we’ve discovered thus far, everything can be handled with a single command zpool, and easy-to-recall subcommands. We’ll have one more post discussing a thorough examination of caveats that you will want to consider before creating your pools, then we will leave the zpool category, and work our way towards ZFS datasets, the bread and butter of ZFS as a whole. If there is anything additional about zpools you would like me to post on, let me know now, and I can squeeze it in.
6.2.3.1.6. Best Practices and Caveats
Best Practices
As with all recommendations, some of these guidelines carry a great amount of weight, while others might not. You may not even be able to follow them as rigidly as you would like. Regardless, you should be aware of them. I’ll try to provide a reason why for each. They’re listed in no specific order. The idea of “best practices” is to optimize space efficiency, performance and ensure maximum data integrity.
  • Only run ZFS on 64-bit kernels. It has 64-bit specific code that 32-bit kernels cannot do anything with.
  • Install ZFS only on a system with lots of RAM. 1 GB is a bare minimum, 2 GB is better, 4 GB would be preferred to start. Remember, ZFS will use 7/8 of the available RAM for the ARC.
  • Use ECC RAM when possible for scrubbing data in registers and maintaining data consistency. The ARC is an actual read-only data cache of valuable data in RAM.
  • Use whole disks rather than partitions. ZFS can make better use of the on-disk cache as a result. If you must use partitions, backup the partition table, and take care when reinstalling data into the other partitions, so you don’t corrupt the data in your pool.
  • Keep each VDEV in a storage pool the same size. If VDEVs vary in size, ZFS will favor the larger VDEV, which could lead to performance bottlenecks.
  • Use redundancy when possible, as ZFS can and will want to correct data errors that exist in the pool. You cannot fix these errors if you do not have a redundant good copy elsewhere in the pool. Mirrors and RAID-Z levels accomplish this.
  • For the number of disks in the storage pool, use the “power of two plus parity” recommendation. This is for storage space efficiency and hitting the “sweet spot” in performance. So, for a RAIDZ-1 VDEV, use three (2+1), five (4+1), or nine (8+1) disks. For a RAIDZ-2 VDEV, use four (2+2), six (4+2), ten (8+2), or eighteen (16+2) disks. For a RAIDZ-3 VDEV, use five (2+3), seven (4+3), eleven (8+3), or nineteen (16+3) disks. For pools larger than this, consider striping across mirrored VDEVs.
  • Consider using RAIDZ-2 or RAIDZ-3 over RAIDZ-1. You’ve heard the phrase “when it rains, it pours”. This is true for disk failures. If a disk fails in a RAIDZ-1, and the hot spare is getting resilvered, until the data is fully copied, you cannot afford another disk failure during the resilver, or you will suffer data loss. With RAIDZ-2, you can suffer two disk failures, instead of one, increasing the probability you have fully resilvered the necessary data before the second, and even third disk fails.
  • Perform regular (at least weekly) backups of the full storage pool. It’s not a backup, unless you have multiple copies. Just because you have redundant disk, does not ensure live running data in the event of a power failure, hardware failure or disconnected cables.
  • Use hot spares to quickly recover from a damaged device. Set the “autoreplace” property to on for the pool.
  • Consider using a hybrid storage pool with fast SSDs or NVRAM drives. Using a fast SLOG and L2ARC can greatly improve performance.
  • If using a hybrid storage pool with multiple devices, mirror the SLOG and stripe the L2ARC.
  • If using a hybrid storage pool, and partitioning the fast SSD or NVRAM drive, unless you know you will need it, 1 GB is likely sufficient for your SLOG. Use the rest of the SSD or NVRAM drive for the L2ARC. The more storage for the L2ARC, the better.
  • Keep pool capacity under 80% for best performance. Due to the copy-on-write nature of ZFS, the filesystem gets heavily fragmented. Email reports of capacity at least monthly.
  • Scrub consumer-grade SATA and SCSI disks weekly and enterprise-grade SAS and FC disks monthly.
  • Email reports of the storage pool health weekly for redundant arrays, and bi-weekly for non-redundant arrays.
  • When using advanced format disks that read and write data in 4 KB sectors, set the “ashift” value to 12 on pool creation for maximum performance. Default is 9 for 512-byte sectors.
  • Set “autoexpand” to on, so you can expand the storage pool automatically after all disks in the pool have been replaced with larger ones. Default is off.
  • Always export your storage pool when moving the disks from one physical system to another.
  • When considering performance, know that for sequential writes, mirrors will always outperform RAID-Z levels. For sequential reads, RAID-Z levels will perform more slowly than mirrors on smaller data blocks and faster on larger data blocks. For random reads and writes, mirrors and RAID-Z seem to perform in similar manners. Striped mirrors will outperform mirrors and RAID-Z in both sequential, and random reads and writes.
  • Compression is disabled by default. This doesn’t make much sense with today’s hardware. ZFS compression is extremely cheap, extremely fast, and barely adds any latency to the reads and writes. In fact, in some scenarios, your disks will respond faster with compression enabled than disabled. A further benefit is the massive space benefits.
Caveats
The point of the caveat list is by no means to discourage you from using ZFS. Instead, as a storage administrator planning out your ZFS storage server, these are things that you should be aware of, so as not to catch you with your pants down, and without your data. If you don’t head these warnings, you could end up with corrupted data. The line may be blurred with the “best practices” list above. I’ve tried making this list all about data corruption if not headed. Read and head the caveats, and you should be good.
  • Your VDEVs determine the IOPS of the storage, and the slowest disk in that VDEV will determine the IOPS for the entire VDEV.
  • ZFS uses 1/64 of the available raw storage for metadata. So, if you purchased a 1 TB drive, the actual raw size is 976 GiB. After ZFS uses it, you will have 961 GiB of available space. The “zfs list” command will show an accurate representation of your available storage. Plan your storage keeping this in mind.
  • ZFS wants to control the whole block stack. It checksums, resilvers live data instead of full disks, self-heals corrupted blocks, and a number of other unique features. If using a RAID card, make sure to configure it as a true JBOD (or “passthrough mode”), so ZFS can control the disks. If you can’t do this with your RAID card, don’t use it. Best to use a real HBA.
  • Do not use other volume management software beneath ZFS. ZFS will perform better, and ensure greater data integrity, if it has control of the whole block device stack. As such, avoid using dm-crypt, mdadm or LVM beneath ZFS.
  • Do not share a SLOG or L2ARC DEVICE across pools. Each pool should have its own physical DEVICE, not logical drive, as is the case with some PCI-Express SSD cards. Use the full card for one pool, and a different physical card for another pool. If you share a physical device, you will create race conditions, and could end up with corrupted data.
  • Do not share a single storage pool across different servers. ZFS is not a clustered filesystem. Use GlusterFS, Ceph, Lustre or some other clustered filesystem on top of the pool if you wish to have a shared storage backend.
  • Other than a spare, SLOG and L2ARC in your hybrid pool, do not mix VDEVs in a single pool. If one VDEV is a mirror, all VDEVs should be mirrors. If one VDEV is a RAIDZ-1, all VDEVs should be RAIDZ-1. Unless of course, you know what you are doing, and are willing to accept the consequences. ZFS attempts to balance the data across VDEVs. Having a VDEV of a different redundancy can lead to performance issues and space efficiency concerns, and make it very difficult to recover in the event of a failure.
  • Do not mix disk sizes or speeds in a single VDEV. Do mix fabrication dates, however, to prevent mass drive failure.
  • In fact, do not mix disk sizes or speeds in your storage pool at all.
  • Do not mix disk counts across VDEVs. If one VDEV uses 4 drives, all VDEVs should use 4 drives.
  • Do not put all the drives from a single controller in one VDEV. Plan your storage, such that if a controller fails, it affects only the number of disks necessary to keep the data online.
  • When using advanced format disks, you must set the ashift value to 12 at pool creation. It cannot be changed after the fact. Use “zpool create -o ashift=12 tank mirror sda sdb” as an example.
  • Hot spare disks will not be added to the VDEV to replace a failed drive by default. You MUST enable this feature. Set the autoreplace feature to on. Use “zpool set autoreplace=on tank” as an example.
  • The storage pool will not auto resize itself when all smaller drives in the pool have been replaced by larger ones. You MUST enable this feature, and you MUST enable it before replacing the first disk. Use “zpool set autoexpand=on tank” as an example.
  • ZFS does not restripe data in a VDEV nor across multiple VDEVs. Typically, when adding a new device to a RAID array, the RAID controller will rebuild the data, by creating a new stripe width. This will free up some space on the drives in the pool, as it copies data to the new disk. ZFS has no such mechanism. Eventually, over time, the disks will balance out due to the writes, but even a scrub will not rebuild the stripe width.
  • You cannot shrink a zpool, only grow it. This means you cannot remove VDEVs from a storage pool.
  • You can only remove drives from mirrored VDEV using the “zpool detach” command. You can replace drives with another drive in RAIDZ and mirror VDEVs however.
  • Do not create a storage pool of files or ZVOLs from an existing zpool. Race conditions will be present, and you will end up with corrupted data. Always keep multiple pools separate.
  • The Linux kernel may not assign a drive the same drive letter at every boot. Thus, you should use the /dev/disk/by-id/ convention for your SLOG and L2ARC. If you don’t, your zpool devices could end up as a SLOG device, which would in turn clobber your ZFS data.
  • Don’t create massive storage pools “just because you can”. Even though ZFS can create 78-bit storage pool sizes, that doesn’t mean you need to create one.
  • Don’t put production directly into the zpool. Use ZFS datasets instead.
  • Don’t commit production data to file VDEVs. Only use file VDEVs for testing scripts or learning the ins and outs of ZFS.

6.2.3.2. ZFS Filesystem Administration

6.2.3.2.1. Creating Filesystems
Background
First, we need to understand how traditional filesystems and volume management work in GNU/Linux before we can get a thorough understanding of ZFS datasets. To treat this fairly, we need to assemble Linux software RAID, LVM, and ext4 or another Linux kernel supported filesystem together.
This is done by creating a redundant array of disks, and exporting a block device to represent that array. Then, we format that exported block device using LVM. If we have multiple RAID arrays, we format each of those as well. We then add all these exported block devices to a “volume group” which represents my pooled storage. If I had five exported RAID arrays, of 1 TB each, then I would have 5 TB of pooled storage in this volume group. Now, I need to decide how to divide up the volume, to create logical volumes of a specific size. If this was for an Ubuntu or Debian installation, maybe I would give 100 GB to one logical volume for the root filesystem. That 100 GB is now marked as occupied by the volume group. I then give 500 GB to my home directory, and so forth. Each operation exports a block device, representing my logical volume. It’s these block devices that I format with ex4 or a filesystem of my choosing.
In this scenario, each logical volume is a fixed size in the volume group. It cannot address the full pool. So, when formatting the logical volume block device, the filesystem is a fixed size. When that device fills, you must resize the logical volume and the filesystem together. This typically requires a myriad of commands, and it’s tricky to get just right without losing data.
ZFS handles filesystems a bit differently. First, there is no need to create this stacked approach to storage. We’ve already covered how to pool the storage, now we well cover how to use it. This is done by creating a dataset in the filesystem. By default, this dataset will have full access to the entire storage pool. If our storage pool is 5 TB in size, as previously mentioned, then our first dataset will have access to all 5 TB in the pool. If I create a second dataset, it too will have full access to all 5 TB in the pool. And so on and so forth.
Now, as files are placed in the dataset, the pool marks that storage as unavailable to all datasets. This means that each dataset is aware of what is available in the pool and what is not by all other datasets in the pool. There is no need to create logical volumes of limited size. Each dataset will continue to place files in the pool, until the pool is filled. As the cards fall, they fall. You can, of course, put quotas on datasets, limiting their size, or export ZVOLs, topics we’ll cover later.
So, let’s create some datasets.
Basic Creation
In these examples, we will assume our ZFS shared storage is named “tank”. Further, we will assume that the pool is created with 4 preallocated files of 1 GB in size each, in a RAIDZ-1 array. Let’s create some datasets.
0 root@cl-head ~ #
zfs create tank/test

0 root@cl-head ~ #
zfs list

          NAME         USED  AVAIL  REFER  MOUNTPOINT
          tank         175K  2.92G  43.4K  /tank
          tank/test   41.9K  2.92G  41.9K  /tank/test
Notice that the dataset “tank/test” is mounted to “/tank/test” by default, and that it has full access to the entire pool. Also notice that it is occupying only 41.9 KB of the pool. Let’s create 4 more datasets, then look at the output:
0 root@cl-head ~ #
zfs create tank/test2

0 root@cl-head ~ #
zfs create tank/test3

0 root@cl-head ~ #
zfs create tank/test4

0 root@cl-head ~ #
zfs create tank/test5

0 root@cl-head ~ #
zfs list

          NAME         USED  AVAIL  REFER  MOUNTPOINT
          tank         392K  2.92G  47.9K  /tank
          tank/test   41.9K  2.92G  41.9K  /tank/test
          tank/test2  41.9K  2.92G  41.9K  /tank/test2
          tank/test3  41.9K  2.92G  41.9K  /tank/test3
          tank/test4  41.9K  2.92G  41.9K  /tank/test4
          tank/test5  41.9K  2.92G  41.9K  /tank/test5
Each dataset is automatically mounted to its respective mount point, and each dataset has full unfettered access to the storage pool. Let’s fill up some data in one of the datasets, and see how that affects the underlying storage:
0 root@cl-head ~ #
cd /tank/test3

0 root@cl-head ~ #
for i in {1..10}; do dd if=/dev/urandom of=file$i.img bs=1024 count=$RANDOM
&> /dev/null; done

0 root@cl-head ~ #
zfs list

          NAME         USED  AVAIL  REFER  MOUNTPOINT
          tank         159M  2.77G  49.4K  /tank
          tank/test   41.9K  2.77G  41.9K  /tank/test
          tank/test2  41.9K  2.77G  41.9K  /tank/test2
          tank/test3   158M  2.77G   158M  /tank/test3
          tank/test4  41.9K  2.77G  41.9K  /tank/test4
          tank/test5  41.9K  2.77G  41.9K  /tank/test5
Notice that in my case, “tank/test3″ is occupying 158 MB of disk, so according to the rest of the datasets, there is only 2.77 GB available in the pool, where previously there was 2.92 GB. So as you can see, the big advantage here is that I do not need to worry about preallocated block devices, as I would with LVM. Instead, ZFS manages the entire stack, so it understands how much data has been occupied, and how much is available.
Mounting Datasets
It’s important to understand that when creating datasets, you aren’t creating exportable block devices by default. This means you don’t have something directly to mount. In conclusion, there is nothing to add to your /etc/fstab file for persistence across reboots.
So, if there is nothing to add do the /etc/fstab file, how do the filesystems get mounted? This is done by importing the pool, if necessary, then running the “zfs mount” command. Similarly, we have a “zfs unmount” command to unmount datasets, or we can use the standard “umount” utility:
0 root@cl-head ~ #
umount /tank/test5

0 root@cl-head ~ #
mount | grep tank

tank/test on /tank/test type zfs (rw,relatime,xattr)
tank/test2 on /tank/test2 type zfs (rw,relatime,xattr)
tank/test3 on /tank/test3 type zfs (rw,relatime,xattr)
tank/test4 on /tank/test4 type zfs (rw,relatime,xattr)
0 root@cl-head ~ #
zfs mount tank/test5

0 root@cl-head ~ #
mount | grep tank

tank/test on /tank/test type zfs (rw,relatime,xattr)
tank/test2 on /tank/test2 type zfs (rw,relatime,xattr)
tank/test3 on /tank/test3 type zfs (rw,relatime,xattr)
tank/test4 on /tank/test4 type zfs (rw,relatime,xattr)
tank/test5 on /tank/test5 type zfs (rw,relatime,xattr)
By default, the mount point for the dataset is “/<pool-name>/<dataset-name>”. This can be changed, by changing the dataset property. Just as storage pools have properties that can be tuned, so do datasets. We’ll dedicate a full post to dataset properties later. We only need to change the “mountpoint” property, as follows:
0 root@cl-head ~ #
zfs set mountpoint=/mnt/test tank/test

0 root@cl-head ~ #
mount | grep tank

tank on /tank type zfs (rw,relatime,xattr)
tank/test2 on /tank/test2 type zfs (rw,relatime,xattr)
tank/test3 on /tank/test3 type zfs (rw,relatime,xattr)
tank/test4 on /tank/test4 type zfs (rw,relatime,xattr)
tank/test5 on /tank/test5 type zfs (rw,relatime,xattr)
tank/test on /mnt/test type zfs (rw,relatime,xattr)
Nested Datasets
Datasets don’t need to be isolated. You can create nested datasets within each other. This allows you to create namespaces, while tuning a nested directory structure, without affecting the other. For example, maybe you want compression on /var/log, but not on the parent /var. there are other benefits as well, with some caveats that we will look at later.
To create a nested dataset, create it like you would any other, by providing the parent storage pool and dataset. In this case we will create a nested log dataset in the test dataset:
0 root@cl-head ~ #
zfs create tank/test/log

0 root@cl-head ~ #
zfs list

          NAME            USED  AVAIL  REFER  MOUNTPOINT
          tank            159M  2.77G  47.9K  /tank
          tank/test      85.3K  2.77G  43.4K  /mnt/test
          tank/test/log  41.9K  2.77G  41.9K  /mnt/test/log
          tank/test2     41.9K  2.77G  41.9K  /tank/test2
          tank/test3      158M  2.77G   158M  /tank/test3
          tank/test4     41.9K  2.77G  41.9K  /tank/test4
          tank/test5     41.9K  2.77G  41.9K  /tank/test5
Additional Dataset Administration
Along with creating datasets, when you no longer need them, you can destroy them. This frees up the blocks for use by other datasets, and cannot be reverted without a previous snapshot, which we’ll cover later. To destroy a dataset:
0 root@cl-head ~ #
zfs destroy tank/test5

0 root@cl-head ~ #
zfs list

          NAME            USED  AVAIL  REFER  MOUNTPOINT
          tank            159M  2.77G  49.4K  /tank
          tank/test      41.9K  2.77G  41.9K  /mnt/test
          tank/test/log  41.9K  2.77G  41.9K  /mnt/test/log
          tank/test2     41.9K  2.77G  41.9K  /tank/test2
          tank/test3      158M  2.77G   158M  /tank/test3
          tank/test4     41.9K  2.77G  41.9K  /tank/test4
We can also rename a dataset if needed. This is handy when the purpose of the dataset changes, and you want the name to reflect that purpose. The arguments take a dataset source as the first argument and the new name as the last argument. To rename the tank/test3 dataset to music:
0 root@cl-head ~ #
zfs rename tank/test3 tank/music

0 root@cl-head ~ #
zfs list

          NAME            USED  AVAIL  REFER  MOUNTPOINT
          tank            159M  2.77G  49.4K  /tank
          tank/music      158M  2.77G   158M  /tank/music
          tank/test      41.9K  2.77G  41.9K  /mnt/test
          tank/test/log  41.9K  2.77G  41.9K  /mnt/test/log
          tank/test2     41.9K  2.77G  41.9K  /tank/test2
          tank/test4     41.9K  2.77G  41.9K  /tank/test4
6.2.3.2.2. Subsection Compression
Compression is transparent with ZFS if you enable it. This means that every file you store in your pool can be compressed. From your point of view as an application, the file does not appear to be compressed, but appears to be stored uncompressed. In other words, if you run the “file” command on your plain text configuration file, it will report it as such. Instead, underneath the file layer, ZFS is compressing and decompressing the data on disk on the fly. And because compression is so cheap on the CPU, and exceptionally fast with some algorithms, it should not be noticeable.
Compression is enabled and disabled per dataset. Further, the supported compression algorithms are LZJB, ZLE, and Gzip. With Gzip, the standards levels of 1 through 9 are supported, where 1 is as fast as possible, with the least compression, and 9 is as compressed as possible, taking as much time as necessary. The default is 6, as is standard in GNU/Linux and other Unix operating systems. LZJB, on the other hand, was invented by Jeff Bonwick, who is also the author of ZFS. LZJB was designed to be fast with tight compression ratios, which is standard with most Lempel-Ziv algorithms. LZJB is the default. ZLE is a speed demon, with very light compression ratios. LZJB seems to provide the best all around results it terms of performance and compression.
Obviously, compression can vary on the disk space saved. If the dataset is storing mostly uncompressed data, such as plain text log files, or configuration files, the compression ratios can be massive. If the dataset is storing mostly compressed images and video, then you won’t see much if anything in the way of disk savings. With that said, compression is disabled by default, and enabling LZJB doesn’t seem to yield any performance impact. So even if you’re storing largely compressed data, for the data files that are not compressed, you can get those compression savings, without impacting the performance of the storage server. So, IMO, I would recommend enabling compression for all of your datasets.

Warning

Enabling compression on a dataset is not retroactive! It will only apply to newly committed or modified data. Any previous data in the dataset will remain uncompressed. So, if you want to use compression, you should enable it before you begin committing data.
To enable compression on a dataset, we just need to modify the “compression” property. The valid values for that property are: “on”, “off”, “lzjb”, “gzip”, “gzip[1-9]“, and “zle”.
0 root@cl-head ~ #
zfs create tank/log

0 root@cl-head ~ #
zfs set compression=lzjb tank/log
Now that we’ve enabled compression on this dataset, let’s copy over some uncompressed data, and see what sort of savings we would see. A great source of uncompressed data would be the /etc/ and /var/log/ directories. Let’s create a tarball of these directories, see it’s raw size and see what sort of space savings we achieved:
0 root@cl-head ~ #
tar -cf /tank/test/text.tar /var/log/ /etc/

0 root@cl-head ~ #
ls -lh /tank/test/text.tar

-rw-rw-r-- 1 root root 24M Dec 17 21:24 /tank/test/text.tar

0 root@cl-head ~ #
zfs list tank/test

          NAME        USED  AVAIL  REFER  MOUNTPOINT
          tank/test  11.1M  2.91G  11.1M  /tank/test

0 root@cl-head ~ #
zfs get compressratio tank/test

          NAME       PROPERTY       VALUE  SOURCE
          tank/test  compressratio  2.14x  -
So, in my case, I created a 24 MB uncompressed tarball. After copying it to the dataset that had compression enabled, it only occupied 11.1 MB. This is less than half the size (text compresses very well)! We can read the “compressratio” property on the dataset to see what sort of space savings we are achieving. In my case, the output is telling me that the compressed data would occupy 2.14 times the amount of disk space, if uncompressed. Very nice.
6.2.3.2.3. Snapshots and Clones
Snapshots with ZFS are similar to snapshots with Linux LVM. A snapshot is a first class read-only filesystem. It is a mirrored copy of the state of the filesystem at the time you took the snapshot. Think of it like a digital photograph of the outside world. Even though the world is changing, you have an image of what the world was like at the exact moment you took that photograph. Snapshots behave in a similar manner, except when data changes that was part of the dataset, you keep the original copy in the snapshot itself. This way, you can maintain persistence of that filesystem.
You can keep up to 2^64 snapshots in your pool, ZFS snapshots are persistent across reboots, and they don’t require any additional backing store; they use the same storage pool as the rest of your data. If you remember our post about the nature of copy-on-write filesystems, you will remember our discussion about Merkle trees. A ZFS snapshot is a copy of the Merkle tree in that state, except we make sure that the snapshot of that Merkle tree is never modified.
Creating snapshots is near instantaneous, and they are cheap. However, once the data begins to change, the snapshot will begin storing data. If you have multiple snapshots, then multiple deltas will be tracked across all the snapshots. However, depending on your needs, snapshots can still be exceptionally cheap.
Creating Snapshots
You can create two types of snapshots: pool snapshots and dataset snapshots. Which type of snapshot you want to take is up to you. You must give the snapshot a name, however. The syntax for the snapshot name is:
- pool/dataset@snapshot-name
- pool@snapshot-name
To create a snapshot, we use the “zfs snapshot” command. For example, to take a snapshot of the “tank/test” dataset, we would issue:
0 root@cl-head ~ #
zfs snapshot tank/test@tuesday
Even though a snapshot is a first class filesystem, it does not contain modifiable properties like standard ZFS datasets or pools. In fact, everything about a snapshot is read-only. For example, if you wished to enable compression on a snapshot, here is what would happen:
0 root@cl-head ~ #
zfs set compression=lzjb tank/test@friday

cannot set property for 'tank/test@friday': this property can not be modified for
snapshots
Listing Snapshots
Snapshots can be displayed two ways: by accessing a hidden “.zfs” directory in the root of the dataset, or by using the “zfs list” command. First, let’s discuss the hidden directory. Check out this madness:
0 root@cl-head ~ #
ls -a /tank/test

./  ../  boot.tar  text.tar  text.tar.2

0 root@cl-head ~ #
cd /tank/test/.zfs/

0 root@cl-head ~ #
ls -a

./  ../  shares/  snapshot/
Even though the “.zfs” directory was not visible, even with “ls -a”, we could still change directory to it. If you wish to have the “.zfs” directory visible, you can change the “snapdir” property on the dataset. The valid values are “hidden” and “visible”. By default, it’s hidden. Let’s change it:
0 root@cl-head ~ #
zfs set snapdir=visible tank/test

0 root@cl-head ~ #
ls -a /tank/test

./  ../  boot.tar  text.tar  text.tar.2  .zfs/
The other way to display snapshots is by using the “zfs list” command, and passing the “-t snapshot” argument, as follows:
0 root@cl-head ~ #
zfs list -t snapshot

          NAME                              USED  AVAIL  REFER  MOUNTPOINT
          pool/cache@2012:12:18:51:2:19:00     0      -   525M  -
          pool/cache@2012:12:18:51:2:19:15     0      -   525M  -
          pool/home@2012:12:18:51:2:19:00  18.8M      -  28.6G  -
          pool/home@2012:12:18:51:2:19:15  18.3M      -  28.6G  -
          pool/log@2012:12:18:51:2:19:00    184K      -  10.4M  -
          pool/log@2012:12:18:51:2:19:15    184K      -  10.4M  -
          pool/swap@2012:12:18:51:2:19:00      0      -    76K  -
          pool/swap@2012:12:18:51:2:19:15      0      -    76K  -
          pool/vmsa@2012:12:18:51:2:19:00      0      -  1.12M  -
          pool/vmsa@2012:12:18:51:2:19:15      0      -  1.12M  -
          pool/vmsb@2012:12:18:51:2:19:00      0      -  1.31M  -
          pool/vmsb@2012:12:18:51:2:19:15      0      -  1.31M  -
          tank@2012:12:18:51:2:19:00           0      -  43.4K  -
          tank@2012:12:18:51:2:19:15           0      -  43.4K  -
          tank/test@2012:12:18:51:2:19:00      0      -  37.1M  -
          tank/test@2012:12:18:51:2:19:15      0      -  37.1M  -
Notice that by default, it will show all snapshots for all pools.
If you want to be more specific with the output, you can see all snapshots of a given parent, whether it be a dataset, or a storage pool. You only need to pass the “-r” switch for recursion, then provide the parent. In this case, I’ll see only the snapshots of the storage pool “tank”, and ignore those in “pool”:
0 root@cl-head ~ #
zfs list -r -t snapshot tank

          NAME                              USED  AVAIL  REFER  MOUNTPOINT
          tank@2012:12:18:51:2:19:00           0      -  43.4K  -
          tank@2012:12:18:51:2:19:15           0      -  43.4K  -
          tank/test@2012:12:18:51:2:19:00      0      -  37.1M  -
          tank/test@2012:12:18:51:2:19:15      0      -  37.1M  -
Destroying Snapshots
Just as you would destroy a storage pool, or a ZFS dataset, you use a similar method for destroying snapshots. To destroy a snapshot, use the “zfs destroy” command, and supply the snapshot as an argument that you want to destroy:
0 root@cl-head ~ #
zfs destroy tank/test@2012:12:18:51:2:19:15
An important thing to know, is if a snapshot exists, it’s considered a child filesystem to the dataset. As such, you cannot remove a dataset until all snapshots, and nested datasets have been destroyed.
0 root@cl-head ~ #
zfs destroy tank/test

cannot destroy 'tank/test': filesystem has children
use '-r' to destroy the following datasets:
tank/test@2012:12:18:51:2:19:15
tank/test@2012:12:18:51:2:19:00
Destroying snapshots can free up additional space that other snapshots may be holding onto, because they are unique to those snapshots.
Renaming Snapshots
You can rename snapshots, however, they must be renamed in the storage pool and ZFS dataset from which they were created. Other than that, renaming snapshots is pretty straight forward:
0 root@cl-head ~ #
zfs rename tank/test@2012:12:18:51:2:19:15 tank/test@tuesday-19:15
Rolling Back to a Snapshot
A discussion about snapshots would not be complete without a discussion about rolling back your filesystem to a previous snapshot.
Rolling back to a previous snapshot will discard any data changes between that snapshot and the current time. Further, by default, you can only rollback to the most recent snapshot. In order to rollback to an earlier snapshot, you must destroy all snapshots between the current time and that snapshot you wish to rollback to. If that’s not enough, the filesystem must be unmounted before the rollback can begin. This means downtime.
To rollback the “tank/test” dataset to the “tuesday” snapshot, we would issue:
0 root@cl-head ~ #
zfs rollback tank/test@tuesday

cannot rollback to 'tank/test@tuesday': more recent snapshots exist
use '-r' to force deletion of the following snapshots:
tank/test@wednesday
tank/test@thursday
As expected, we must remove the “@wednesday” and “@thursday” snapshots before we can rollback to the “@tuesday” snapshot.
ZFS Clones
A ZFS clone is a writeable filesystem that was “upgraded” from a snapshot. Clones can only be created from snapshots, and a dependency on the snapshot will remain as long as the clone exists. This means that you cannot destroy a snapshot, if you cloned it. The clone relies on the data that the snapshot gives it, to exist. You must destroy the clone before you can destroy the snapshot.
Creating clones is nearly instantaneous, just like snapshots, and initially does not take up any additional space. Instead, it occupies all the initial space of the snapshot. As data is modified in the clone, it begins to take up space separate from the snapshot.
Creating ZFS Clones
Creating a clone is done with the “zfs clone” command, the snapshot to clone, and the name of the new filesystem. The clone does not need to reside in the same dataset as the clone, but it does need to reside in the same storage pool. For example, if I wanted to clone the “tank/test@tuesday” snapshot, and give it the name of “tank/tuesday”, I would run the following command:
0 root@cl-head ~ #
zfs clone tank/test@tuesday tank/tuesday

0 root@cl-head ~ #
dd if=/dev/zero of=/tank/tuesday/random.img bs=1M count=100

0 root@cl-head ~ #
zfs list -r tank

          NAME           USED  AVAIL  REFER  MOUNTPOINT
          tank           161M  2.78G  44.9K  /tank
          tank/test     37.1M  2.78G  37.1M  /tank/test
          tank/tuesday   124M  2.78G   161M  /tank/tuesday
Destroying Clones
As with destroying datasets or snapshots, we use the “zfs destroy” command. Again, you cannot destroy a snapshot until you destroy the clones. So, if we wanted to destroy the “tank/tuesday” clone:
0 root@cl-head ~ #
zfs destroy tank/tuesday
Just like you would with any other ZFS dataset.
Some Final Thoughts
Because keeping snapshots is very cheap, it’s recommended to snapshot your datasets frequently. Sun Microsystems provided a Time Slider that was part of the GNOME Nautilus file manager. Time Slider keeps snapshots in the following manner:
  • frequent- snapshots every 15 mins, keeping 4 snapshots
  • hourly- snapshots every hour, keeping 24 snapshots
  • daily- snapshots every day, keeping 31 snapshots
  • weekly- snapshots every week, keeping 7 snapshots
  • monthly- snapshots every month, keeping 12 snapshots
Unfortunately, Time Slider is not part of the standard GNOME desktop, so it’s not available for GNU/Linux. However, the ZFS on Linux developers have created a “zfs-auto-snapshot” package that you can install from the project’s PPA if running Ubuntu. If running another GNU/Linux operating system, you could easily write a Bash or Python script that mimics that functionality, and place it on your root’s crontab.
Because both snapshots and clones are cheap, it’s recommended that you take advantage of them. Clones can be useful to test deploying virtual machines, or development environments that are cloned from production environments. When finished, they can easily be destroyed, without affecting the parent dataset from which the snapshot was created.
6.2.3.2.4. Sending and Receiving Filesystems
ZFS Send
Sending a ZFS filesystem means taking a snapshot of a dataset, and sending the snapshot. This ensures that while sending the data, it will always remain consistent, which is crux for all things ZFS. By default, we send the data to a file. We then can move that single file to an offsite backup, another storage server, or whatever. The advantage a ZFS send has over “dd”, is the fact that you do not need to take the filesystem offilne to get at the data. This is a Big Win IMO.
To send a filesystem to a file, you first must make a snapshot of the dataset. After the snapshot has been made, you send the snapshot. This produces an output stream, that must be redirected. As such, you would issue something like the following:
0 root@cl-head ~ #
zfs snapshot tank/test@tuesday

0 root@cl-head ~ #
zfs send tank/test@tuesday > /backup/test-tuesday.img
Now, your brain should be thinking. You have at your disposal a whole suite of Unix utilities to manipulate data. So, rather than storing the raw data, how about we compress it with the “xz” utility?
0 root@cl-head ~ #
zfs send tank/test@tuesday | xz > /backup/test-tuesday.img.xz
Want to encrypt the backup? You could use OpenSSL or GnuPG:
0 root@cl-head ~ #
zfs send tank/test@tuesday | xz | openssl enc -aes-256-cbc -a
-salt > /backup/test-tuesday.img.xz.asc
ZFS Receive
Receiving ZFS filesystems is the other side of the coin. Where you have a data stream, you can import that data into a full writable filesystem. It wouldn’t make much sense to send the filesystem to an image file, if you can’t really do anything with the data in the file.
Just as “zfs send” operates on streams, “zfs receive” does the same. So, suppose we want to receive the “/backup/test-tuesday.img” filesystem. We can receive it into any storage pool, and it will create the necessary dataset.
0 root@cl-head ~ #
zfs receive tank/test2 < /backup/test-tuesday.img
Of course, in our sending example, I compressed and encrypted a sent filesystem. So, to reverse that process, I do the commands in the reverse order:
0 root@cl-head ~ #
openssl enc -d -aes-256-cbc -a -in /storage/temp/testzone.gz.ssl
| unxz | zfs receive tank/test2
The “zfs recv” command can be used as a shortcut.
Combining Send and Receive
Both “zfs send” and “zfs receive” operate on streams of input and output. So, it would make sense that we can send a filesystem into another. Of course we can do this locally:
0 root@cl-head ~ #
zfs send tank/test@tuesday | zfs receive pool/test
This is perfectly acceptable, but it doesn’t make a lot of sense to keep multiple copies of the filesystem on the same storage server. Instead, it would make better sense to send the filesystem to a remote box. You can do this trivially with OpenSSH:
0 root@cl-head ~ #
zfs send tank/test@tuesday | ssh user@server.example.com "zfs receive pool/test"
Check out the simplicity of that command. You’re taking live, running and consistent data from a snapshot, and sending that data to another box. This is epic for offsite storage backups. On your ZFS storage servers, you would run frequent snapshots of the datasets. Then, as a nightly cron job, you would “zfs send” the latest snapshot to an offsite storage server using “zfs receive”. And because you are running a secure, tight ship, you encrypt the data with OpenSSL and XZ. Win.
6.2.3.2.5. ZVOLS
What is a ZVOL?
A ZVOL is a “ZFS volume” that has been exported to the system as a block device. So far, when dealing with the ZFS filesystem, other than creating our pool, we haven’t dealt with block devices at all, even when mounting the datasets. It’s almost like ZFS is behaving like a userspace application more than a filesystem. I mean, on GNU/Linux, when working with filesystems, you’re constantly working with block devices, whether they be full disks, partitions, RAID arrays or logical volumes. Yet somehow, we’ve managed to escape all that with ZFS. Well, not any longer. Now we get our hands dirty with ZVOLs.
A ZVOL is a ZFS block device that resides in your storage pool. This means that the single block device gets to take advantage of your underlying RAID array, such as mirrors or RAID-Z. It gets to take advantage of the copy-on-write benefits, such as snapshots. It gets to take advantage of online scrubbing, compression and data deduplication. It gets to take advantage of the ZIL and ARC. Because it’s a legitimate block device, you can do some very interesting things with your ZVOL. We’ll look at three of them here- swap, ext4, and VM storage. First, we need to learn how to create a ZVOL.
Creating a ZVOL
To create a ZVOL, we use the “-V” switch with our “zfs create” command, and give it a size. For example, if we wanted to create a 1 GB ZVOL, we could issue the following command. Notice further that there are a couple new symlinks that exist in /dev/zvol/tank/ and /dev/tank/ which points to a new block device in /dev/:
0 root@cl-head ~ #
zfs create -V 1G tank/disk1

0 root@cl-head ~ #
ls -l /dev/zvol/tank/disk1

lrwxrwxrwx 1 root root 11 Dec 20 22:10 /dev/zvol/tank/disk1 -> ../../zd144

0 root@cl-head ~ #
ls -l /dev/tank/disk1

lrwxrwxrwx 1 root root 8 Dec 20 22:10 /dev/tank/disk1 -> ../zd144
Because this is a full fledged, 100% bona fide block device that is 1 GB in size, we can do anything with it that we would do with any other block device, and we get all the benefits of ZFS underneath. Plus, creating a ZVOL is near instantaneous, regardless of size. Now, I could create a block device with GNU/Linux from a file on the filesystem. For example, if running ext4, I can create a 1 GB file, then make a block device out of it as follows:
0 root@cl-head ~ #
fallocate -l 1G /tmp/file.img

0 root@cl-head ~ #
losetup /dev/loop0 /tmp/file.img
I now have the block device /dev/loop0 that represents my 1 GB file. Just as with any other block device, I can format it, add it to swap, etc. But it’s not as elegant, and it has severe limitations. First off, by default you only have 8 loopback devices for your exported block devices. You can change this number, however. With ZFS, you can create 2^64 ZVOLs by default. Also, it requires a preallocated image, on top of your filesystem. So, you are managing three layers of data: the block device, the file, and the blocks on the filesystem. With ZVOLs, the block device is exported right off the storage pool, just like any other dataset.
Let’s look at some things we can do with this ZVOL.
Swap on a ZVOL
It can act as part of a healthy system, keeping RAM dedicated to what the kernel actively needs. But, when active RAM starts spilling over to swap, then you have “the swap of death”, as your disks thrash, trying to keep up with the demands of the kernel. So, depending on your system and needs, you may or may not need swap.
First, let’s create 1 GB block device for our swap. We’ll call the dataset “tank/swap” to make it easy to identify its intention. Before we begin, let’s check out how much swap we currently have on our system with the “free” command:
0 root@cl-head ~ #
free
	
	                  total       used       free     shared    buffers     cached
             Mem:      12327288    8637124    3690164          0     175264    1276812
             -/+ buffers/cache:    7185048    5142240
             Swap:            0          0          0
In this case, we do not have any swap enabled. So, let’s create 1 GB of swap on a ZVOL, and add it to the kernel:
0 root@cl-head ~ #
zfs create -V 1G tank/swap

0 root@cl-head ~ #
mkswap /dev/zvol/tank/swap

0 root@cl-head ~ #
swapon /dev/zvol/tank/swap

0 root@cl-head ~ #
free
	
                 total       used       free     shared    buffers     cached
    Mem:      12327288    8667492    3659796          0     175268    1276804
    -/+ buffers/cache:    7215420    5111868
    Swap:      1048572          0    1048572
It worked! We have a legitimate Linux kernel swap device on top of ZFS. Sweet. As is typical with swap devices, they don’t have a mountpoint. They are either enabled, or disabled, and this swap device is no different.
Ext4 on a ZVOL
This may sound wacky, but you could put another filesystem, and mount it, on top of a ZVOL. In other words, you could have an ext4 formatted ZVOL and mounted to /mnt. You could even partition your ZVOL, and put multiple filesystems on it. Let’s do that!
0 root@cl-head ~ #
zfs create -V 100G tank/ext4

0 root@cl-head ~ #
fdisk /dev/tank/ext4

( follow the prompts to create 2 partitions- the first 1 GB in size, the second to
fill the rest )

0 root@cl-head ~ #
fdisk -l /dev/tank/ext4
	
    Disk /dev/tank/ext4: 107.4 GB, 107374182400 bytes
    16 heads, 63 sectors/track, 208050 cylinders, total 209715200 sectors
    Units = sectors of 1 * 512 = 512 bytes
    Sector size (logical/physical): 512 bytes / 8192 bytes
    I/O size (minimum/optimal): 8192 bytes / 8192 bytes
    Disk identifier: 0x000a0d54

	
                         Device Boot       Start         End      Blocks   Id  System
    /dev/tank/ext4p1            2048     2099199     1048576   83  Linux
    /dev/tank/ext4p2         2099200   209715199   103808000   83  Linux
Let’s create some filesystems, and mount them:
0 root@cl-head ~ #
zfs set compression=lzjb pool/ext4

0 root@cl-head ~ #
tar -cf /mnt/zd0p1/files.tar /etc/

0 root@cl-head ~ #
tar -cf /mnt/zd0p2/files.tar /etc /var/log/

0 root@cl-head ~ #
zfs snapshot tank/ext4@001
You probably didn’t notice, but you just enabled transparent compression and took a snapshot of your ext4 filesystem. These are two things you can’t do with ext4 natively. You also have all the benefits of ZFS that ext4 normally couldn’t give you. So, now you regularly snapshot your data, you perform online scrubs, and send it offsite for backup. Most importantly, your data is consistent.
ZVOL storage for VMs
Lastly, you can use these block devices as the backend storage for VMs. It’s not uncommon to create logical volume block devices as the backend for VM storage. After having the block device available for Qemu, you attach the block device to the virtual machine, and from its perspective, you have a “/dev/vda” or “/dev/sda” depending on the setup.
If using libvirt, you would have a /etc/libvirt/qemu/vm.xml file. In that file, you could have the following, where “/dev/zd0″ is the ZVOL block device:
<disk type='block' device='disk'>
<driver name='qemu' type='raw' cache='none'/'>
<source dev='/dev/zd0'/'>
<target dev='vda' bus='virtio'/'>
<alias name='virtio-disk0'/'>
<address type='pci' domain='0x0000' bus='0x00' slot='0x05' function='0x0'/'>
</disk'>
At this point, your VM gets all the ZFS benefits underneath, such as snapshots, compression, deduplication, data integrity, drive redundancy, etc.
Conclusion
ZVOLs are a great way to get to block devices quickly while taking advantage of all of the underlying ZFS features. Using the ZVOLs as the VM backing storage is especially attractive. However, I should note that when using ZVOLs, you cannot replicate them across a cluster. ZFS is not a clustered filesystem. If you want data replication across a cluster, then you should not use ZVOLs, and use file images for your VM backing storage instead. Other than that, you get all of the amazing benefits of ZFS that we have been blogging about up to this point, and beyond, for whatever data resides on your ZVOL.

6.3. OS Package Management

Ubuntu/Debian package management is based on the concept of package sources or repositories. A configuration file /etc/apt/sources.list (or separate files in the directory /etc/apt/sources.list.d) specifies the location of package sources.
When a package is to be installed, all package source locations are checked whether they contain the desired package. If the desired package is found in only one package repository that one is taken, if it is found in more than one, then the package with the newest version is installed.

6.3.1. Package sources

Package sources are usually specified in /etc/apt/sources.list and can be of many different types, like http, ftp, file, cdrom, … (see man sources.list). In a default Qlustar installation this file is empty, since all the Qlustar package sources are defined in the file /etc/apt/sources.list.d/qlustar.list. If your system has access to the Internet either directly or through a http proxy the file will look like this:
deb http://repo.qlustar.com/repo/ubuntu 9.1-trusty main universe non-free
deb http://repo.qlustar.com/repo/ubuntu 9.1-trusty-proposed-updates main universe non-free
This enables access to the Qlustar 8.1 software repository.

Note

The file /etc/apt/sources.list.d/qlustar.list is managed by Qlustar and should usually not be edited manually. If you prefer not to receive the proposed updates, you can comment out the second line in the file. Be aware, that this will prevent you from receiving timely security updates as well.

6.3.2. dpkg

dpkg (see man dpkg) is the basic package management tool for Ubuntu/Debian, comparable to rpm (Red Hat Package Manager). It is not capable of automatically resolving package dependencies.

6.3.3. apt

apt is the high-level package management tool for Ubuntu/Debian. apt-get (man apt-get) with its sub-commands provides all the functionality needed to maintain an Ubuntu/Debian system. A seem-less and fast upgrade of an Ubuntu/Debian system is typically performed running the two commands
0 root@cl-head ~ #
apt-get update

0 root@cl-head ~ #
apt-get dist-upgrade.
Detailed upgrade instructions for a Qlustar system can be found in the Qlustar Update Section
New packages can be installed by running apt-get install <package name>. If package name depends on, or conflicts with other packages those will be automatically installed or removed upon confirmation.

6.3.4. Debian Package Alternatives

The possibility to concurrently run different versions of the same application on a single cluster is often crucial. In principle, this is achievable in a couple of ways, each one requiring more or less handwork depending on the type of application in question. Fortunately, Ubuntu/Debian provides the built-in "alternatives mechanism" to manage software versions in automated form. It has the additional advantage that it works appropriately for any kind of application.
Let us consider the case of the GNU C compiler gcc as an example of the situation described above. Simply installing the gcc package via apt-get is all you need to do in this case. The alternatives are automatically configured for you.
0 root@cl-head ~ #
gcc --version

gcc (Ubuntu/Linaro 4.6.3-1ubuntu5) 4.6.3
Copyright (C) 2011 Free Software Foundation, Inc.
This is free software; see the source for copying conditions.  There is NO
warranty; not even for MERCHANTABILITY or FITNESS FOR A PARTICULAR PURPOSE.
This tells us that currently we are running the version 4.6.3 of the GNU C compiler. Let us inspect the gcc binary.
0 root@cl-head ~ #
which gcc

/usr/bin/gcc

0 root@cl-head ~ #
ls -l /usr/bin/gcc

lrwxrwxrwx ... /usr/bin/gcc -> /etc/alternatives/gcc
As we tried to locate the gcc command, we found that it was being executed from the /usr/bin path. However we also discovered, that it’s a symbolic link pointing to /etc/alternatives/gcc. The directory /etc/alternatives is the place, where all the software alternatives are configured in Ubuntu/Debian. Let us inspect a little further.
0 root@cl-head ~ #
ls -l /etc/alternatives/gcc

lrwxrwxrwx 1 root root 16 Mai 13 19:23 /etc/alternatives/gcc -> /usr/bin/gcc-4.6

0 root@cl-head ~ #
ls -l /usr/bin/gcc-4.6

-rwxr-xr-x 1 root root 353216 Apr 16  2012 /usr/bin/gcc-4.6
We have another symbolic link, this time referring to /usr/bin/gcc-4.6 and a little digging afterward reveals that this is the real gcc executable. If alternative versions for a program are available, the alternatives system will create a link with the name of the program in the default path pointing to the appropriate file in /etc/alternatives. This will finally link to the executable, we actually want to use. Instead of manually manipulating these links, choosing a different default version for a program should be done using the command update-alternatives.
Using update-alternatives we can quickly figure out which alternatives are currently configured for a certain executable. Let us look at the current setup of gcc.
0 root@cl-head ~ #
update-alternatives --display gcc

gcc - auto mode
link currently points to /usr/bin/gcc-4.6
/usr/bin/gcc-4.8 - priority 20
/usr/bin/gcc-4.6 - priority 50
Current ‘best’ version is /usr/bin/gcc-4.6
As you can see the current link points to /usr/bin/gcc-4.6 as we already discovered. There is another alternative, namely /usr/bin/gcc-4.8 with a priority of 20. The priority of /usr/bin/gcc-4.6 is 50. The line 'gcc - auto mode’ means that the alternatives system will look for the package with the highest priority in order to use that executable.
The last line in the above output says that the current best priority link is /usr/bin/gcc-4.6. Now if we want to use version 4.8 instead, we can tell update-alternatives to use exactly this version:
0 root@cl-head ~ #
update-alternatives --config gcc

There are 2 alternatives which provide ‘gcc’.
Selection Alternative
-----------------------------------------------
+ 1 /usr/bin/gcc-4.8
2 /usr/bin/gcc-4.6
*Press enter to keep the default[*], or type selection number:
We already knew by looking at the output that there where only two options. Now we can select which option we want. Let’s look at the output of the command again.
0 root@cl-head ~ #
update-alternatives --display gcc

gcc - status is manual.
link currently points to /usr/bin/4.8
/usr/bin/gcc-4.6 - priority 50
/usr/bin/gcc-4.8 - priority 20
Current ‘best’ version is /usr/bin/gcc-4.6.
We got a link currently pointing to /usr/bin/gcc-4.8 so we quickly do the same checking as we did before.
0 root@cl-head ~ #
which gcc

/usr/bin/gcc

0 root@cl-head ~ #
ls -l /usr/bin/gcc

lrwxrwxrwx 1 root root 21 Sep  2 18:32 /usr/bin/gcc -> /etc/alternatives/gcc

0 root@cl-head ~ #
ls -l /etc/alternatives/gcc

lrwxrwxrwx 1 root root 16 Sep  2 18:32 /etc/alternatives/gcc -> /usr/bin/gcc-4.8

0 root@cl-head ~ #
gcc --version

gcc (Ubuntu 4.8.1-2ubuntu1~10.04.1) 4.8.1
Copyright (C) 2013 Free Software Foundation, Inc.
This is free software; see the source for copying conditions.  There is NO
warranty; not even for MERCHANTABILITY or FITNESS FOR A PARTICULAR PURPOSE.
Only the link within /etc/alternatives has changed. When looking at the gcc version we see that it’s using the gcc-4.8 version.
A further useful feature of update-alternatives is the possibility of creating groups of files having a relation with each other. These so called slaves will not only allow you to update the link to the desired executable but also any other information related to it like man pages, documentation, etc. Please consult man update-alternatives for more information on the capabilities of this powerful software versioning method.

Chapter 7. Updating Qlustar

7.1. Qlustar updates

Updating a Qlustar cluster is a multi-step process. The detailed steps depend on whether the update involves a kernel update or not (the release notes will mention it, if a new kernel is part of the update) and what module versions you have selected for your images. We'll explain the differences below. Follow the steps in the following order.

7.1.1. Updating the head-node(s)

Apply the standard Debian procedure to update the head-node(s) installation. Execute as root:
0 root@cl-head ~ #
apt-get update
0 root@cl-head ~ #
apt-get dist-upgrade
This will update all packages. In most cases, if new versions of the Qlustar image module packages are available, this will also automatically rebuild the images defined in QluMan. We elaborate on this below.
If the kernel was updated by this process reboot the head-node(s) after executing the above commands, otherwise you're done with this step.

7.1.2. Updating the chroot(s)

This is also a standard Debian upgrade as explained in the First Step Guide. If you have setup multiple chroots, you'll have to update all of them.

7.1.3. Updating the nodes

If the update contains a new kernel, reboot all nodes. In case you have some storage nodes that export a global file-system (e.g. NFS or Lustre), reboot them first, then all the other nodes.
If the update doesn't contain a new kernel, you have the choice of either rebooting the nodes like above or using the Qlustar online update mechanism (currently the online update has to be executed manually, future versions of QluMan will allow to do this from the GUI) as follows: Execute the following command on the head-node:
0 root@cl-head ~ #
qlustar-image-update -H <hostlist>
where <hostlist> is a list of nodes in hostlist format, e.g. beo-[01-80]. You also have the option to first check what exactly the update will change. To find out, execute the following:
0 root@cl-head ~ #
qlustar-image-update -c -H <hostlist>
This will show what will be changed by this update.
0 root@cl-head ~ #
qlustar-image-update -s -H <hostlist>
This will show all services (daemons) that need to be restarted as a result of this update. If you want more detailed information about the update process, add the option -v to any of the previous command lines.

7.1.3.1. When will images be updated/rebuilt?

There are a couple of cases to distinguish, depending on what version is selected for an image in QluMan (see also the corresponding section in the QluMan Guide
  1. Selected image version is of type x.y.z, e.g. 9.1.1. In this case, the image will be rebuilt if and only if there is an update for the selected version (9.1.1) of the modules. Such updates will always be bug-/security-fixes.
  2. Selected image version is of type x.y, e.g. 9.1 with 9.1.1 being the most recent 9.1.z version before applying the update. In this case the image is rebuilt, if the update entails a new maintenance release (e.g. 9.1.2 which will then become the new real image version) or an update for the currently installed (9.1.1) modules.
  3. Selected image version is of type x, e.g. 9 with 9.1 being the most recent 9.y and 9.1.1 being the most recent 9.1.z version before applying the update. In this case the image is rebuilt, if either the update entails a new feature release (e.g. 9.2, the latest 9.2.z will then become the new real image version) or a new maintenance release (e.g. 9.1.2 which will then become the new real image version) or an update for the currently installed (9.1.1) modules. With this option, manual intervention to obtain a new image version is only necessary when upgrading to a new major release (e.g. 10.y.z).

Appendix A. Revision History

Revision History
Revision 9.2-0Thu Apr 27 2017Qlustar Documentation Team
Updates for 9.2 release
Revision 9.1-1Fri Jul 3 2015Qlustar Documentation Team
Updates for 9.1 release
Revision 9.0-1Thu Jan 29 2015Qlustar Documentation Team
Updates for 9.0 release
Revision 8.1-1Wed Jan 15 2014Qlustar Documentation Team
Updates for 8.1 release
Revision 8.0-1Fri Mar 1 2013Qlustar Documentation Team
Initial 8.0 version

Index

B

Base Configuration, Qlustar Base Configuration
Boot Process, Boot Process
Compute-node booting, Compute-node booting
Dynamic Execution, Dynamic Boot Script Excecution
RAM-disk image, RAM-disk image
TFTP Boot Server, TFTP Boot Server

F

feedback
contact information for Qlustar, Feedback requested
Front-End nodes, Introduction

G

Ganglia, Ganglia
Monitoring the nodes, Monitoring the nodes
General Administration Tasks, General Administration Tasks

H

Hardware Configuration, Qlustar Hardware Configuration
head-node, Introduction

N

Nagios, Nagios
head-node, Monitoring the head-node(s)
Nagios Plugins, Nagios Plugins
Restart, Restart
Webinterface, Webinterface
Network Configuration, Network Configuration and Services
Basic Network Configuration, Basic Network Configuration
cluster-internal networks, Basic Network Configuration
DHCP, DHCP
Special DHCP options, Special DHCP options
DNS, DNS
IP Masquerading, IP Masquerading (NAT)
Time Server, Time Server
Network Services, Network Configuration and Services
Node Customization, Node Customization
Adding directories, files, links, Adding directories, files, links
Cluster-wide Configuration Directory, Cluster-wide Configuration Directory
DHCP-Client, DHCP-Client
Dynamic Configuration Settings, Dynamic Configuration Settings
Infiniband, Infiniband
Mail Transport Agent, Mail Transport Agent
NFS boot scripts, NFS boot scripts
Node Management, Cluster Node Management

O

Operating System
Cluster OS, Introduction

P

Package Management, OS Package Management
alternatives, Debian Package Alternatives
apt, apt
dpkg, dpkg
Package sources, Package sources

Q

QluMan
Remote Execution Server, QluMan Remote Execution Server

R

Remote Control, Node Remote Control
Serial Console Parameter, Serial Console Parameter, IPMI Configuration

S

Services, Basic Services
Automounter, Automounter
Disk Partitions and File-systems, Disk Partitions and File-systems
Mail server - Postfix, Mail server - Postfix
NFS, NFS
NIS, NIS
SSH - Secure Shell, SSH - Secure Shell
Shell setup, Shell Setup
Bash Setup, Bash Setup
Tcsh Setup, Tcsh Setup
Storage Management, Storage Management
Logical Volume Management, Logical Volume Management
Raid, Raid
Kernel Software Raid, Kernel Software RAID

U

User Management, User Management
Adding users, Adding User Accounts
Managing restrictions, Managing user restrictions
Removing users, Removing User Accounts

Z

ZFS File System, ZFS Filesystem Administration
Creating Filesystems, Creating Filesystems
Sending and Receiving Filesystems, Sending and Receiving Filesystems
Snapshots and Clones, Snapshots and Clones
Subsection Compression, Subsection Compression
ZVOLS, ZVOLS
Zpools, Zpool Administration
Best Practices and Caveats, Best Practices and Caveats
Exporting and Importing Storage Pools, Exporting and Importing Storage Pools
Getting and Setting Properties, Getting and Setting Properties
RAIDZ, RAIDZ
Scrub and Resilver, Scrub and Resilver
VDEVs, VDEVs