

Abstract
Mono-spaced Bold
To see the contents of the filemy_next_bestselling_novelin your current working directory, enter thecat my_next_bestselling_novelcommand at the shell prompt and press Enter to execute the command.
Press Enter to execute the command.Press Ctrl+Alt+F2 to switch to a virtual terminal.
mono-spaced bold. For example:
File-related classes includefilesystemfor file systems,filefor files, anddirfor directories. Each class has its own associated set of permissions.
Choose → → from the main menu bar to launch Mouse Preferences. In the Buttons tab, select the Left-handed mouse check box and click to switch the primary mouse button from the left to the right (making the mouse suitable for use in the left hand).To insert a special character into a gedit file, choose → → from the main menu bar. Next, choose → from the Character Map menu bar, type the name of the character in the Search field and click . The character you sought will be highlighted in the Character Table. Double-click this highlighted character to place it in the Text to copy field and then click the button. Now switch back to your document and choose → from the gedit menu bar.
Mono-spaced Bold Italic or Proportional Bold Italic
To connect to a remote machine using ssh, typessh username@domain.nameat a shell prompt. If the remote machine isexample.comand your username on that machine is john, typessh john@example.com.Themount -o remount file-systemcommand remounts the named file system. For example, to remount the/homefile system, the command ismount -o remount /home.To see the version of a currently installed package, use therpm -q packagecommand. It will return a result as follows:package-version-release.
Publican is a DocBook publishing system.
mono-spaced roman and presented thus:
books        Desktop   documentation  drafts  mss    photos   stuff  svn
books_tests  Desktop1  downloads      images  notes  scripts  svgs
mono-spaced bold and the output of a command in mono-spaced roman. Examples:
0 root@cl-head ~ #echo "I'm executed by root on a head-node"I'm executed by root on a head-node
0 root@beo-01 ~ #echo "I'm executed by root on a compute node"I'm executed by root on a compute node
0 root@sn-1 ~ #echo "I'm executed by root on a storage node"I'm executed by root on a storage node
0 user@workstation ~ $echo "I'm executed by user admin on the admins workstation"I'm executed by user admin on the admins workstation
mono-spaced roman but add syntax highlighting as follows:
package org.jboss.book.jca.ex1;
import javax.naming.InitialContext;
public class ExClient
{
public static void main(String args[])
throws Exception
{
InitialContext iniCtx = new InitialContext();
Object ref = iniCtx.lookup("EchoBean");
EchoHome home = (EchoHome) ref;
Echo echo = home.create();
System.out.println("Created Echo");
System.out.println("Echo.echo('Hello') = " + echo.echo("Hello"));
}
}
Note
Important
Warning
qlustar-docs@qlustar.com to report errors or missing pieces in this documentation.
Qlustar Management interface. The QluMan GUI is multi-user as well as multi-cluster capable: Different users are allowed to work simultaneously with the GUI. Changes made by one user are updated and visible in real-time in the windows opened by all the other users. On the other hand, it is possible to manage a virtually unlimited number of clusters within a single instance of the QluMan GUI at the same time. Each cluster is shown in a tab or in a separate main window.
modular OS images. Different nodes may have different hardware or need to provide specific and varying functionality/services. Therefore, to optimize the use of hardware resources and increase stability/security, Qlustar does not come with just one boot image that covers every use-case. Instead, a number of image modules with different software components are provided from which individual custom OS images can be created as needed. A Qlustar OS image just contains what is actually required to accomplish the tasks of a node, nothing more. See below for more details about configuring OS images.
Host Template. Assigning a Host Template to a group of hosts makes it possible to specify their complete properties and configuration settings with a single click. Nonetheless, for maximum flexibility, it is also allowed to override or extend the settings from the template of a host by assigning either one of the sets and/or individual properties/config classes to it. In case of conflicts, values from individual properties/config classes have highest priority followed by set values and finally the Host Template values. For more details on this see Section 5.2, “Configuring Hosts”.


Remember password check-box. Without enabling this, you will have to input the password again, whenever changes to the safe need to be written. If you are starting qluman-qt for the first time and therefore have no certificate safe yet, this dialog is skipped and an empty Connect Cluster dialog opens directly. See Section 2.2.1, “ Adding a new Cluster ” below about how to add a new cluster.
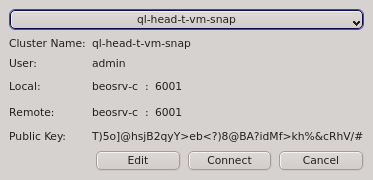

Connect Cluster dialog opens. The last cluster used will be pre-selected but a different cluster can be selected from the drop-down menu. Click the button to connect to the selected cluster. If this is the first time you connect to this cluster, the client generates a random public/private key pair. These keys will eventually be used for permanent authentification of the chosen user with this cluster. Following this, a connection to the server is made with an attempt to authenticate the client using the one-time token. On success, the server stores the public key of the client for future logins and the client stores both the private and public keys in the certificate safe. This finalizes the initial handshake.
Note

QluNet internal network client ID is also listed there.

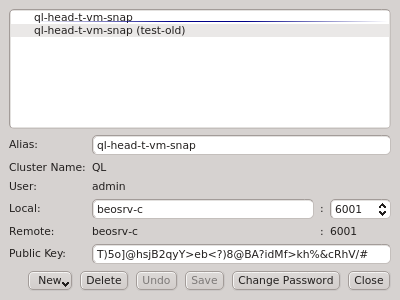
Manage Clusters dialog manages all your accounts on different clusters or as different users on the same cluster. It allows adding new cluster connections, editing existing and removing obsolete ones as well as changing the password for the certificate safe. It can be opened by clicking in the Connect Cluster dialog.


Local Hostname to use the external hostname of the head-node. Similarly, if you changed the port for qlumand or if you're


Alias is the name this cluster will be shown as, when using the drop-down menu in the Connect Cluster dialog. Click to add the cluster connection.


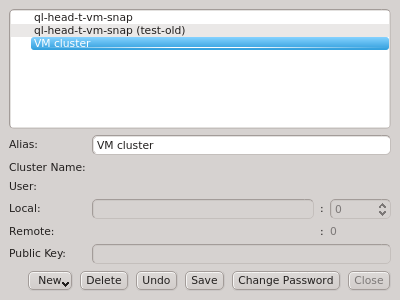
Manage Clusters dialog will be reflected in the drop-down menu
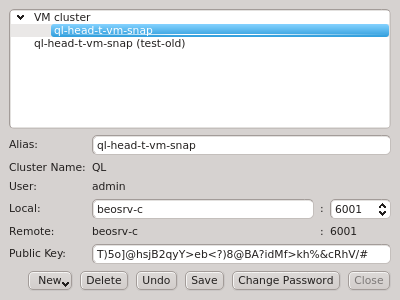

Connect Cluster dialog. This allows a nicely structured layout when dealing with a larger number of clusters as e.g. in the case of service providers. Standard cluster admins will most likely not need this feature.


Manage Clusters dialog allows changing the password for the certificate safe. This requires entering the old password for the safe as well as the new password and a confirmation of the new password. The button will only be selectable if the new password and confirmation matches.
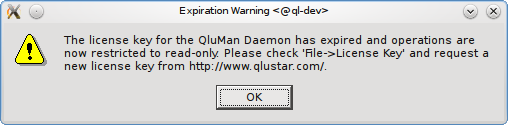
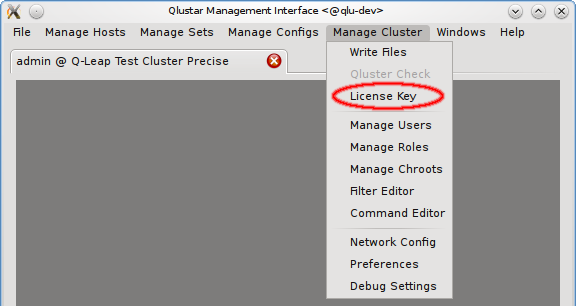
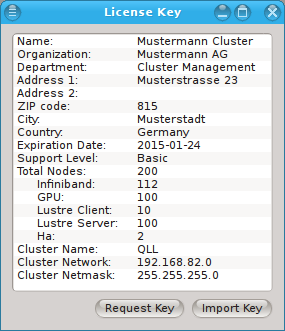
License Key window can be opened by selecting -> in the main Menu. If you never installed a license key before, the window will come up mostly empty.
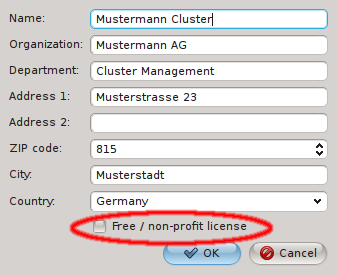
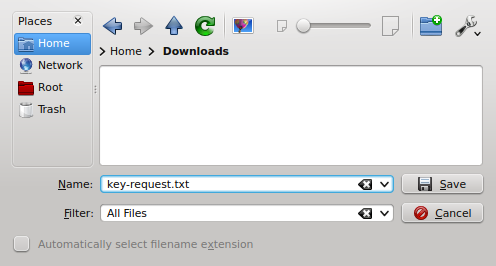
Key Info Dialog will open asking you for your name and address info. If you intend to use Qlustar Basic Edition, checkmark at the bottom of the dialog. Select to continue saving the key request in a file. Enter a file-name and save. You will now have to send an e-mail specifying the required number of nodes and features (see our order page) with this key file attached to order@q-leap.com
Enclosure View window.

Note
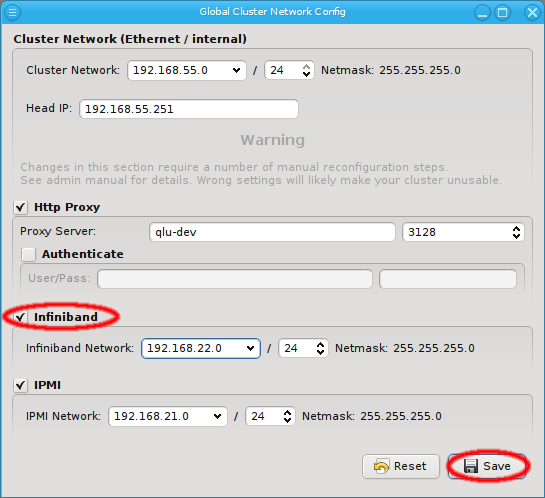
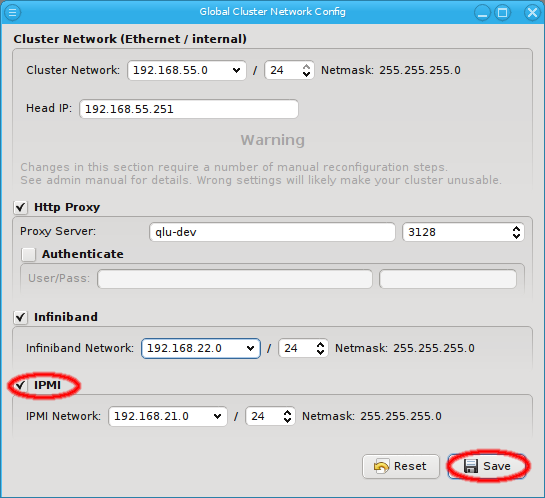
Global Cluster Network Config do not take effect immediately after being changed in the dialog. They require a further confirmation by clicking the button, that will then actually commit the changes.
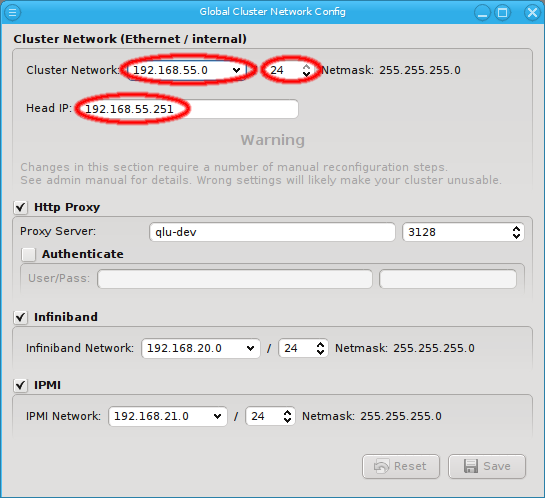
Global Cluster Network Config there are 3 settings relevant for Ethernet: The Cluster Network IP address, the netmask and the cluster internal Head IP address. When changing the Cluster Network IP address or netmask, the IP addresses of all hosts configured in QluMan will be remapped to reflect their new values. This requires that the new netmask is large enough, so that the resulting network range can include all existing hosts in the cluster. Therefore, the GUI won't let you pick anything too small. If there are unused address ranges in your existing network and you need a smaller netmask than currently selectable, you will first have to change some host addresses so that all of them combined occupy a small enough subset of the current network.
Global DHCP Template, NIS Host header and SSH Hosts / Known Hosts. These templates are simple, freely editable text blobs. A change of the Head IP in the Global Cluster Network Config will not change them, so you need to check and adjust each of them manually.
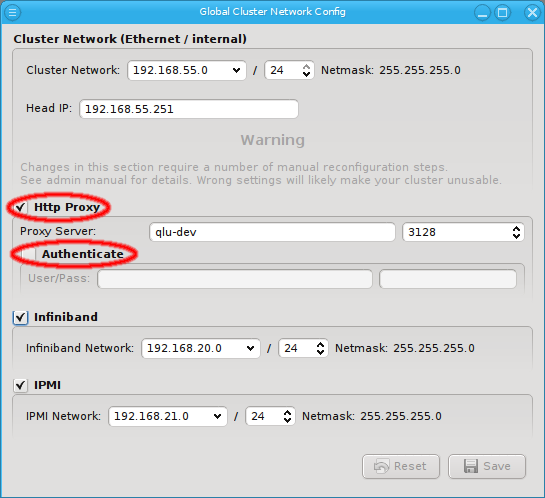
http proxy must be configured. Qluman uses this proxy to download packages from the Qlustar repository, when creating a new chroot. Click the checkmark before Http Proxy to enable proxy support and enter the hostname together with the port of the proxy. If the proxy requires authentication, click the checkmark before Authenticate and enter a username and password. Like usual, the new settings will only take affect, when you click the button.
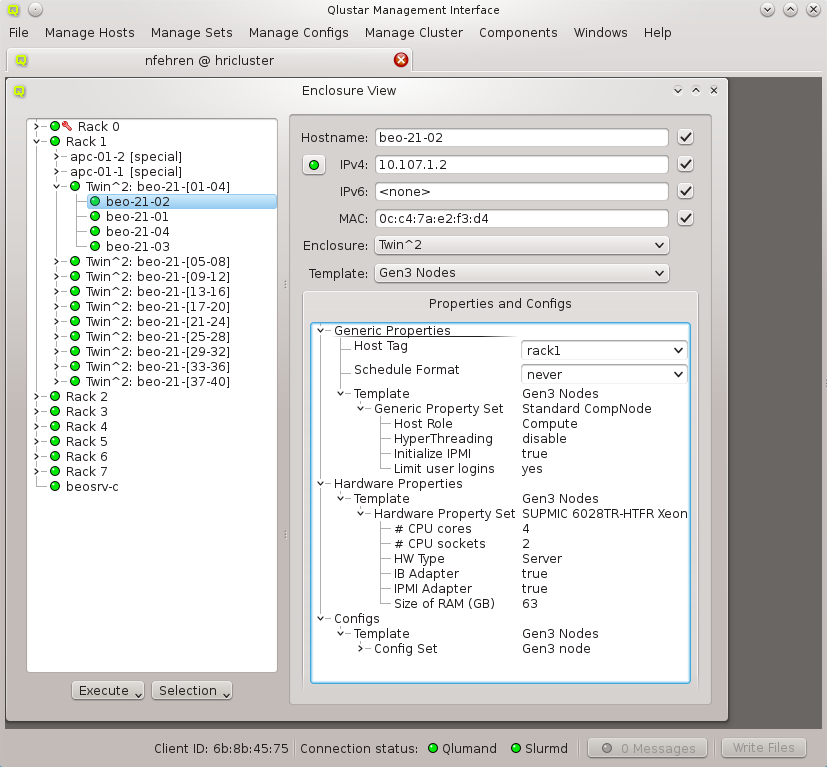
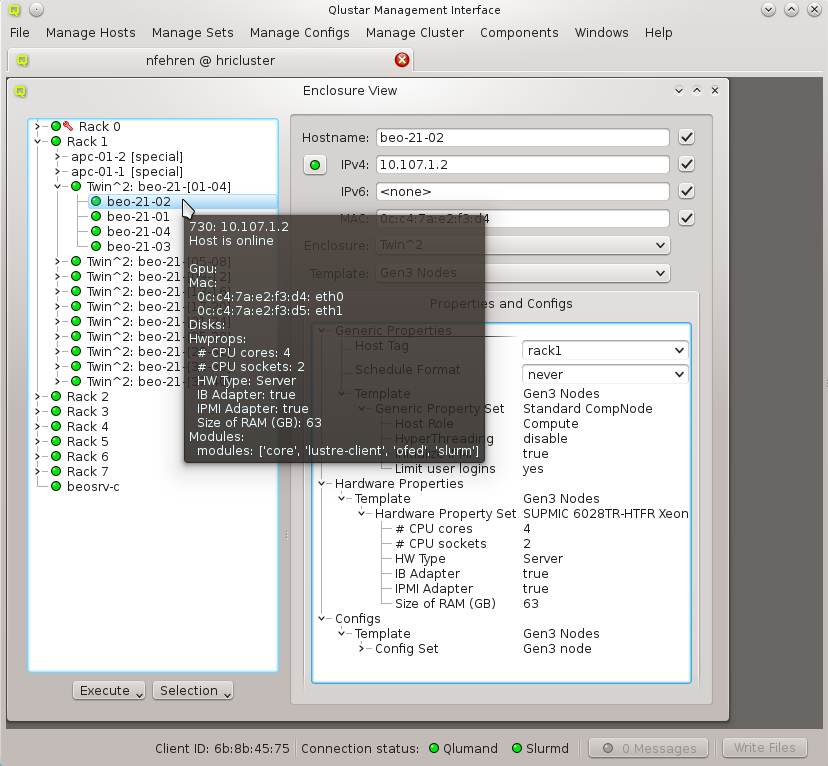
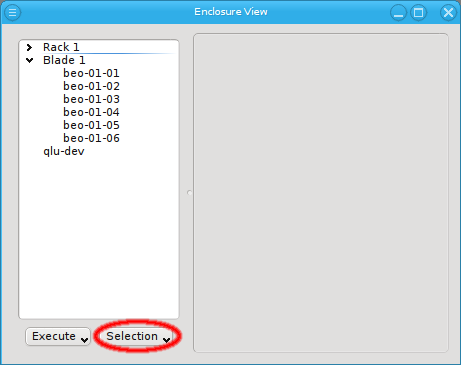
Enclosure View shows an overview of the cluster in a tree structure. The tree is designed to reflect the physical structure of the cluster. At the lowest level are the hosts. A host can be a head, storage or compute node but also a switch e.g. In general, anything in the cluster that has a name, IP and MAC address is a host.
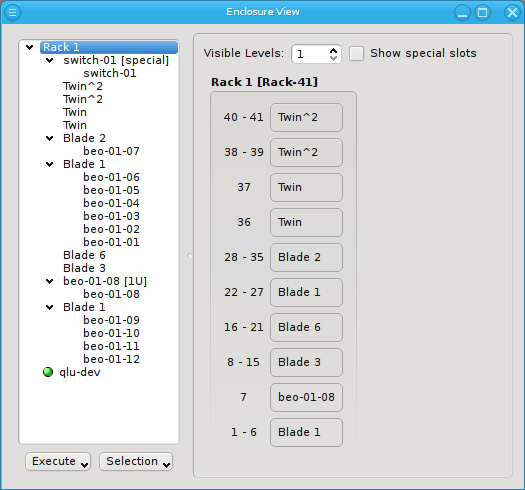
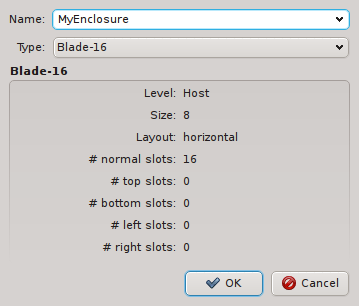
bare board and should be placed into a host enclosure. 1U, 2U, 3U or 4U enclosures contain exactly one board, while others like a Twin or Blade chassis can have multiple boards. Once defined, host enclosures can be placed into racks, racks grouped into rows, rows into rooms and so on. The tree has a simple drag&drop interface. E.g. you can select a number of nodes (by holding the CTRL key and clicking or holding the shift key and dragging the mouse) and drag&drop them into a Blade enclosure.
multi-host enclosure (like a Blade or Twin chassis) the enclosure type can be changed to one of the single-slot host enclosures (1U, 2U, etc.). A new enclosure of the chosen type will then be created if the node is not already part of one. If a node is included in a multi-host enclosure, this field will be ghosted.
Note
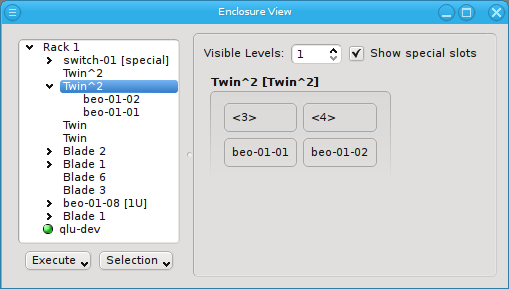

beo-01 and beo-02 and two slots remain empty, showing only the number of each slot in brackets.
beo-11 and beo-12. The special top, left, right and bottom (not visible) slots are empty. In future versions a network switch or power controller, that is mounted at some special position of the rack, can be placed into these special slots.


Note
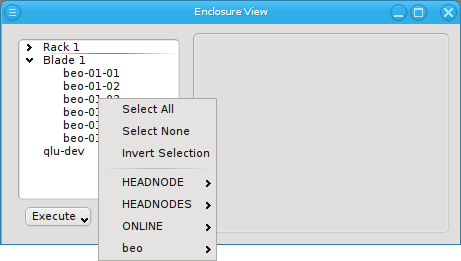
Enclosure View. When pressed, at the top of the appearing selection menu you'll find 3 items: To select all hosts, clear the selection or to invert the selection.

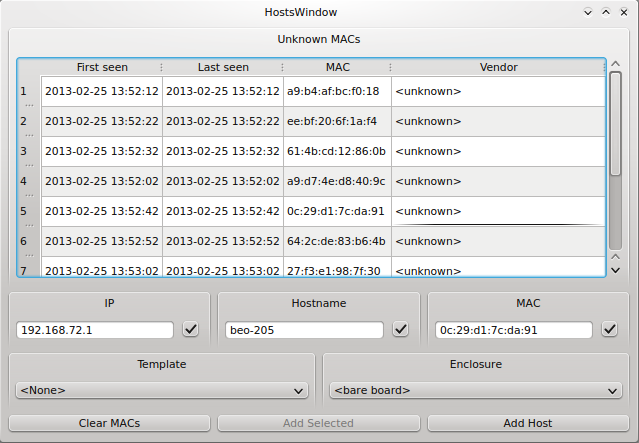

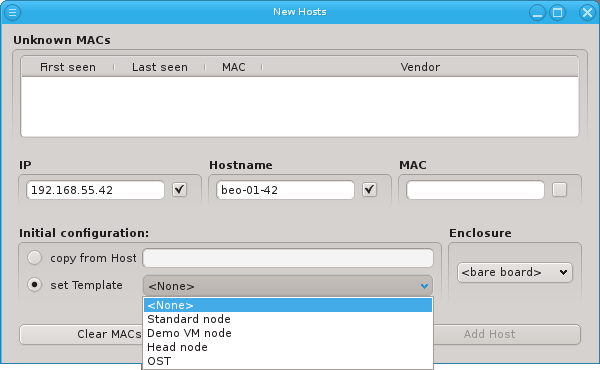
DHCP log file for unknown hosts that have requested an IP address. For each unknown host found in the logs, the table at the top of the window shows the time of the first and last appearance in the log, its MAC address as well as the hardware vendor this MAC is assigned too (if known). Selecting a MAC in the table copies it into the MAC text field at the bottom and a double-click adds the host with the selected MAC. One can also select multiple lines (by holding the CTRL key and clicking or holding the shift key and dragging the mouse) and then click the button at the bottom to add them all using the auto-increment feature for the IP address and hostname. If unsure, try adding a single host first and check the auto-increment does the right thing before adding a group of hosts.
Hardware properties are used to describe the hardware of a host. Amongst others, hardware properties like the amount of RAM or number of CPU cores are used to configure resource management systems like slurm or torque, so jobs can be assigned to the desired hosts. Others, like e.g. the server model or BIOS version, are purely informational and might be used for inventory management.
Generic properties can be configuration options, like OpenSM Host, or purely informational, like Paid by. While hardware properties are meant to be more rigid, typically with a configurable set of fixed values, generic properties are more flexible and can be defined at will. This will become more apparent in future versions of QluMan. Generic properties are also not necessarily unique, making it possible to assign multiple values for a single generic property. This is useful e.g. to add multiple torque host tags or to put hosts in multiple groups for dsh/pdsh (via the 'Host tag').
specific properties are specific to a single host. The best example for such a property is the serial number of the host.
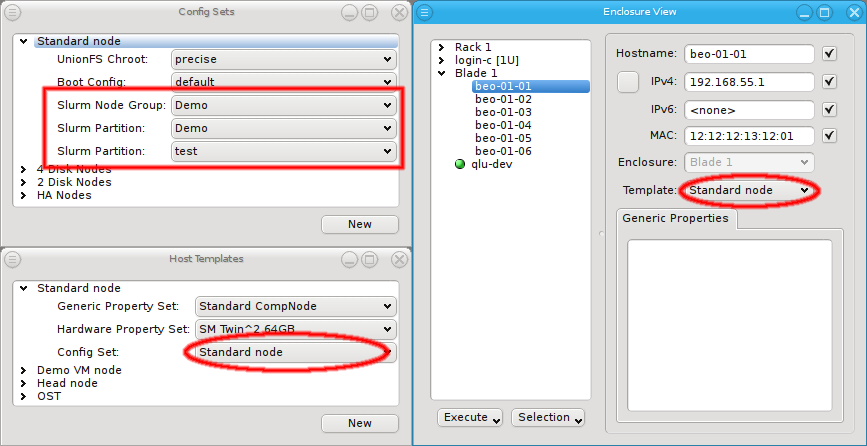
Host Template can then be created by choosing one generic property set, one hardware property set and one config set.
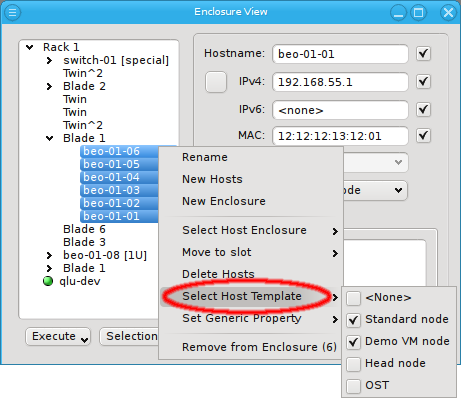
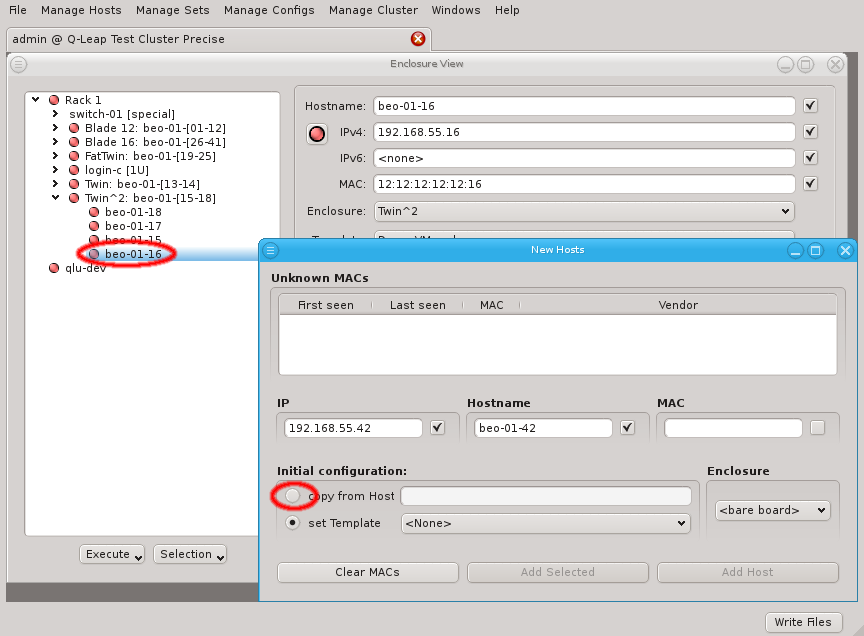
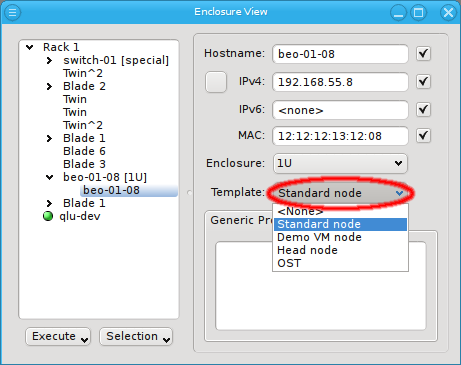
Host Template exists, a host can be configured by selecting the desired template in the Enclosure View window. For a single host, this can be done by selecting it in the tree view. This brings up the host information on the right and a template can be selected from the drop-down menu. To configure multiple hosts, you would select them in the tree view and choose a Host Template from the context menu. The check-marks in the sub-menu indicate which Host Templates are currently assigned (if any) for the selected nodes. This action will override the previous assignment.

Generic properties can also be assigned to a host individually. Such assigned properties take precedence over ones of the same type selected through the Host Template. This is useful when a property should be changed temporarily for some hosts or when a property should not be changeable globally through the Host Template. Note that by default, every new host has the generic property Schedule Format: always, which is required to format the disk on the first boot. This should be removed after the first successful boot of the host, so that log files will be preserved across boots in the future.
Hardware Wizard guides you through the necessary configuration steps with a special emphasis on the hardware configuration. It uses the auto-detected hardware properties of hosts to suggest their optimal configuration options. Furthermore, it tries to keep a balance between the available configuration strategies: Using templates, property/config sets or individual properties/config classes.
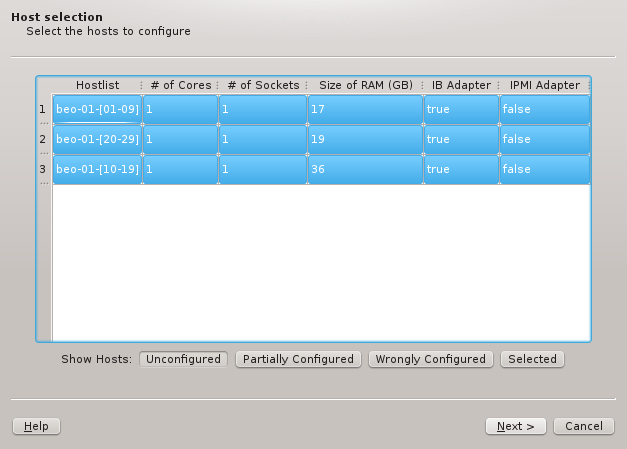
Host Template will fall into this category. The button adds hosts that already have some hardware configured correctly but not all of it. The button adds hosts, where the configured hardware properties do not match the hardware detected at boot, e.g. when nodes have been updated with more ram. Finally, the button adds hosts, that have been selected in the enclosure view, including hosts that are configured correctly already.
Host Template and therefore single Hardware Property, Generic Property and Config Set. The possible differences in hardware configurations within the list of selected hosts will be handled by the wizard with the per host settings. In case all the groups shouldn't use the same Host Template, groups may be selected or deselected individually and the remaining ones can be configured by running the wizard again later. Groups of hosts with identical hardware can't be split up though. If this is required, select the hosts individually in the Enclosure View and use only the button. Once the desired groups of hosts have been selected click to continue configuring them.
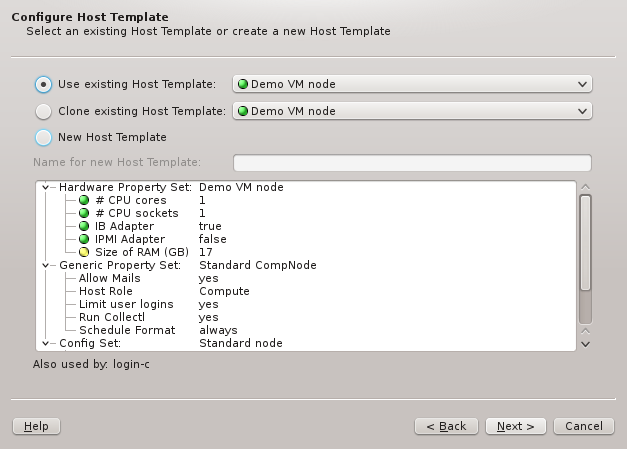
Host Template. One of the wizard's goals is, to find an existing Host Template with a Hardware Property set that optimally matches the detected hardware for at least some of the selected hosts. If such a Host Template is found, it will be pre-selected and the choice will be active.
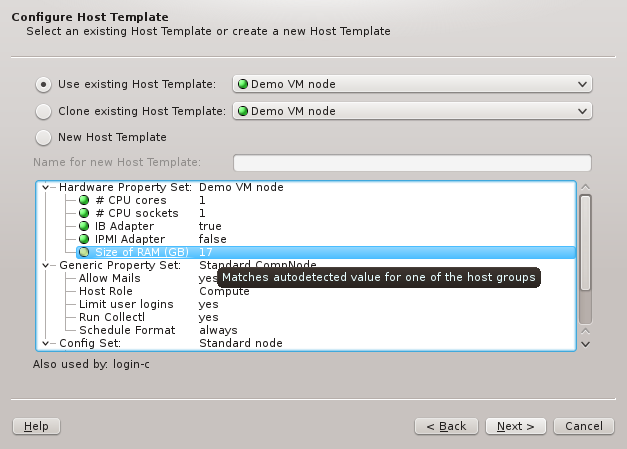
Hardware Property Set of the selected Host Template are color-coded, to show how well they fit the detected values of the host groups being configured. Hovering over a hardware property brings up a helpful tool-tip explaining the coloring. A green bulb indicates, that the property matches the detected value for all hosts. A yellow one, that it matches some but not all hosts. This happens, when some of the selected hosts have different hardware and means that the selected template is still a good fit. A red bulb indicates that the value matches none of the hosts and is a bad fit. Such a property value may be changed later in the follow-up pages or a different Host Template can be selected right-away.
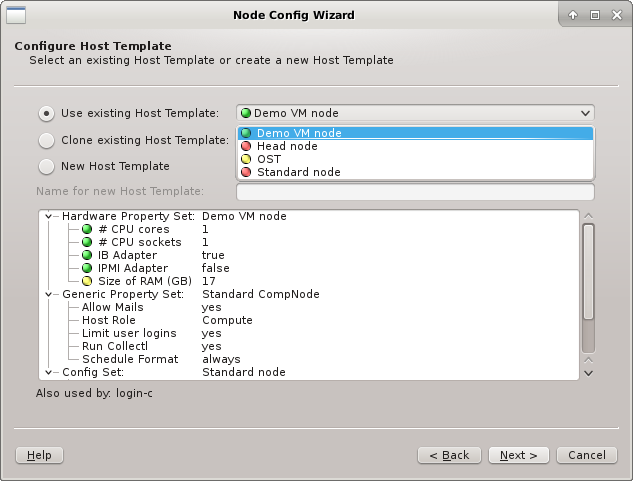
Host Template is not the desired choice, a different one can be selected from the drop-down menu. The choices are again color-coded to indicate how well they match the detected properties of the selected hosts. Here a green bulb means that the Host Template matches the detected hardware of at least one host perfectly. A yellow one means that not all hardware properties for the hosts are part of the template, but at least nothing is configured wrongly.
Host Template includes a hardware property, that matches none of the hosts and would be a bad fit. Nonetheless such a template might still be the right choice, since it can be modified for an optimal fit in the follow-up page. Alternatively, the correct hardware properties can be set on a per host basis by the wizard at a later stage .
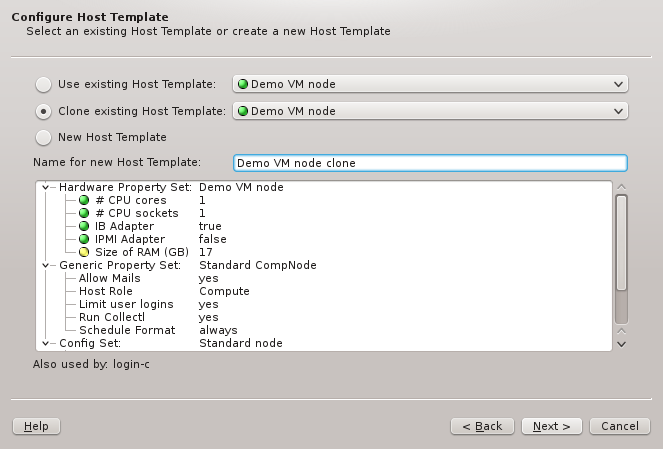
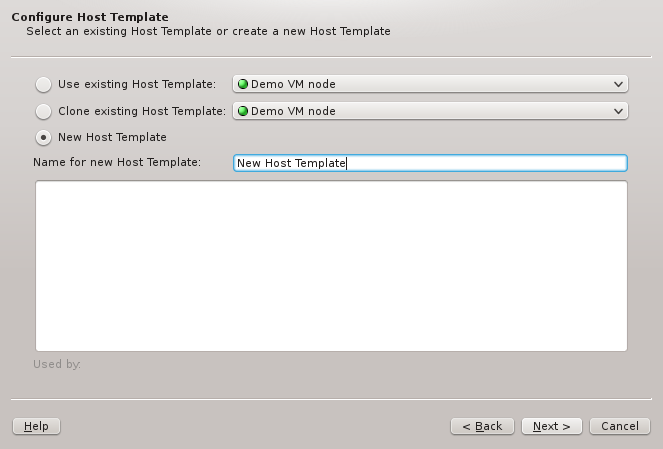
Host Templates are suitable, a new one can be created in one of two ways: Either an existing template can be cloned or a completely new one can be created. In both cases, a name for the new template must be given.


HW Property Set to be used in the selected Host Template. It is the main source for the node's hardware configuration. Like in the previous page an existing HW Property Set can be used/cloned or a new one may be created. Most likely an existing set will be suggested by the wizard. Alternatives are selectable from the drop-down menu. The available choices are again color-coded indicating how well they match the detected host properties.

HW Property Set at this stage, will affect the selected Host Template. If an existing Host Template was chosen in the previous page, changing it might affect hosts other than the ones being configured in the wizard. In such a case, the wizard will ask for confirmation that such a change is desired.


HW Property Set may be modified for a better fit by using the auto-detected HW Properties displayed at the bottom right. If multiple groups of hosts are being configured at the same time, the properties, where hosts differ, will have a drop-down menu to select the most suitable value. Once the desired selection is made, the properties can be copied over the existing HW Property Set by clicking the button. The wizard will ask for confirmation, in case this would impact hosts not currently being configured. Finally, it will set the HW Property Set displayed at the bottom left into edit-mode.


HW Properties that will be pre-selected: While cloning will start with the properties of the cloned set, creating a new one initially will have none.


HW Property Set can be further edited by selecting different values for properties, adding new ones or by removing some of them (both from the context-menu). Once the desired HW Properties are selected, click to continue.

HW Property Set doesn't match all properties of the hosts to be configured, then the Resolve Hardware Conflict page will appear next. At the bottom of it, the conflicting or missing HW Properties are listed showing the detected value for each group of hosts. If only a single property is missing, the wizard will suggest to add this property individually per host.

HW Property Set per host might be preferable and will be the pre-selected choice. There is not really a wrong choice here. To some extent, the chosen option is a matter of taste.
Note

HW Property Sets was chosen in the previous page, the set to be used for each group must be picked here. The Wizard will try to find an existing HW Property Set that already contains the correct Hardware Properties for each group. If such a set is found, it will be pre-selected. Otherwise, the only option is to generate a new set, for which a name must be entered, before it's possible to continue.

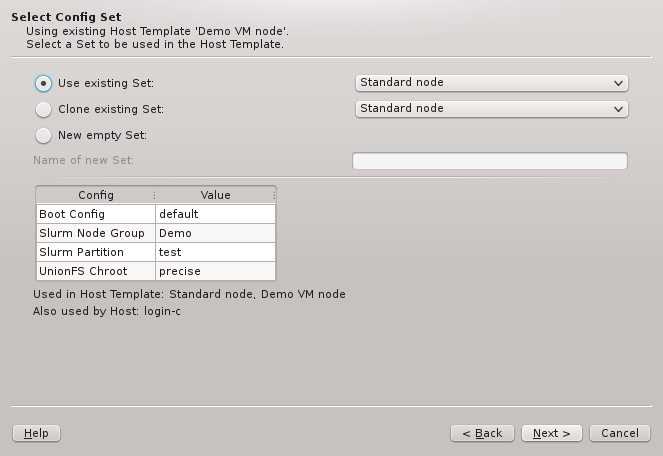
Host Template, a Generic Property Set and a Config Set must be selected. The two wizard pages handling this are very much alike, and similar to the one for selecting the HW Property Set. Again, there are three main options: Using/cloning an existing set, or creating a new empty one. Since there is no auto-detection for the values in these two types of sets, there is no color-coding of the choices in this case.


QluMan version, but if or is chosen, the properties and configs can be added to or removed from the new set. If the hosts have IPMI, the IPMI properties might need to be set in the Select Generic Property Set page. On the other hand, in the Select Config Set page, the Boot, Disk, and Slurm configs, are the most likely candidates for settings that need to be selected and fine-tuned.

Host Template (hence common to all hosts) are shown in tree-form. At the bottom, the additional Hardware Properties and/or Hardware Property Sets, that will be set for each group of hosts on a per-host basis, are listed. In case of conflicts, they potentially override the values of the Host Template. Host groups with no per-host overrides are not shown here.
Note
Host Template or Hardware Property Set was modified during the wizard procedure, then this is the last chance to drop out. By clicking , all the modifications are made permanent, and the configuration settings will be assigned to the selected hosts. The latter should then be fully configured, and after writing the changes (see Section 7.2, “Writing Config Files”), will be ready to (re)boot.
Config Classes manage configurations that are too complex to fit into the key + value scheme used by properties. Therefore, there is no common interface to configure all classes. Instead, each class has its own configuration dialog, presenting the specific options it provides. Furthermore, some classes depend on sub-classes (e.g. Boot Configs depend on Qlustar Images). Only the top-level Config Classes are directly assignable to a Config Set or a host. Sub-classes are assigned indirectly via their parent class. Most of the functional subsystems of Qlustar have a dedicated Config Class. Currently, there are four of them: Boot, DHCP, Disk, and Slurm Configs (Slurm is optional) complemented by a single sub-class, Qlustar Images.
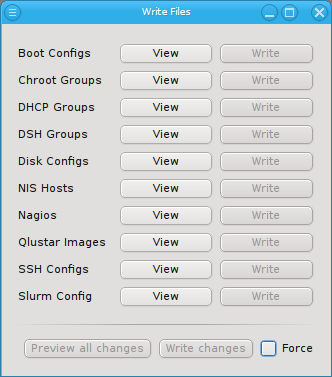
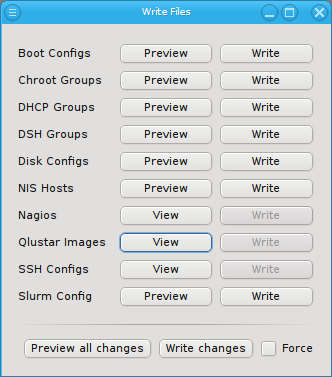
Config Classes and sub-classes, are translated into automatically generated configuration files on the head-node(s). While QluMan configuration options are usually saved in the QluMan database immediately after they have been entered in the GUI, the write process of the real configuration files on disk is a separate step, that needs to be specifically initiated and confirmed.

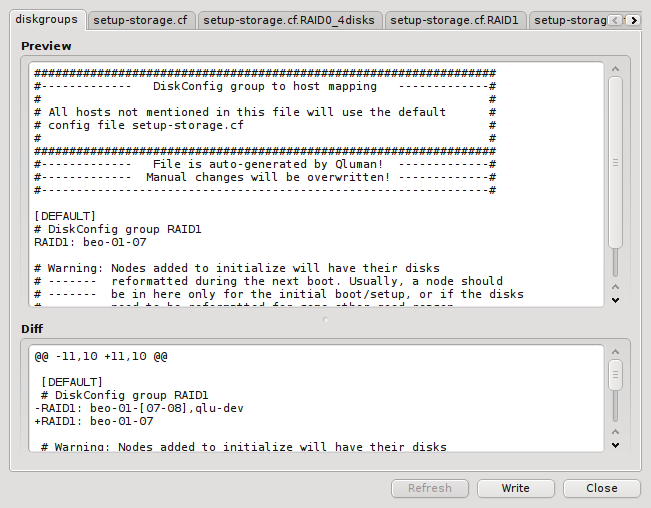
context diff of the changes compared to the current file on disk (if there are any differences). If a Config Class changes only one file, that file will be shown directly. If multiple files are involved, there will be one tab for each file.
Note
Note

Boot Config dialog allows to define settings for the PXE/tftp boot server. A boot configuration determines which Qlustar OS image is delivered to a node, and optionally permits the specification of PXELinux commands and/or Linux kernel parameters. When opened, the Boot Config window shows a collapsed tree-list of all boot configs currently defined, sorted by their names.
Note
default config is special: It applies to any node without a specifically assigned (either through a template or directly) Boot Config. This means, that in the simplest configuration, where all nodes should boot identically, having just the default config will be sufficient.
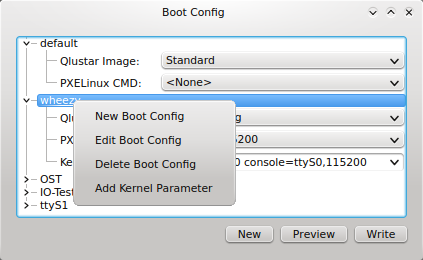
Boot Config item, the configured Qlustar image, PXELinux command, and kernel parameters become visible. You can change any of the values, by simply selecting a different option from the drop-down menus. In case of kernel parameters, you can also directly edit the entry and save the result by pressing return. Furthermore, it is possible to add more kernel parameters or remove them through the context menu.
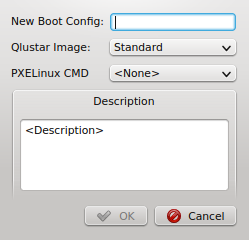
Boot Configs and edit or delete an existing one. Alternatively, a new Boot Config can be created by clicking the button at the bottom of the dialog. Both, the context menu and the button bring up the New Boot Config dialog. Simply enter the name and description for the new config, select a Qlustar image and (optionally) a PXELinux command. Finally press to create it. The new config will then appear in the Boot Config window and will be ready for use.
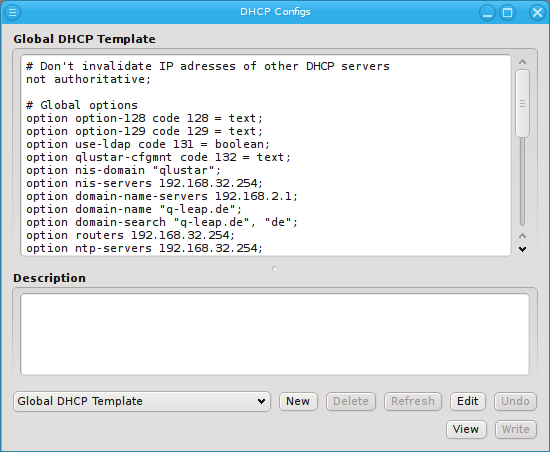
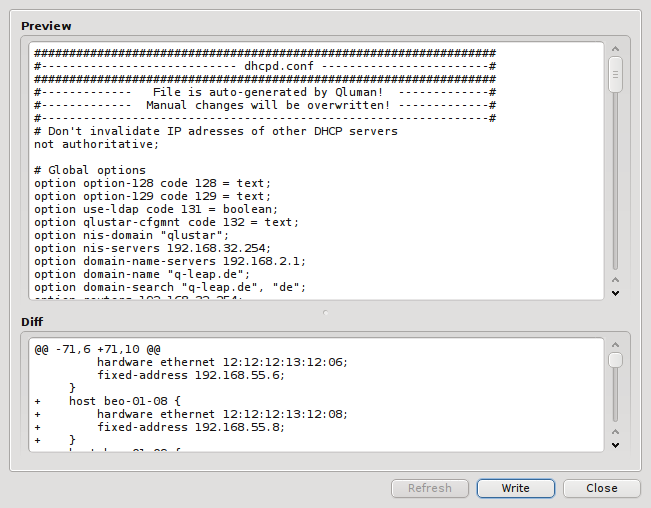
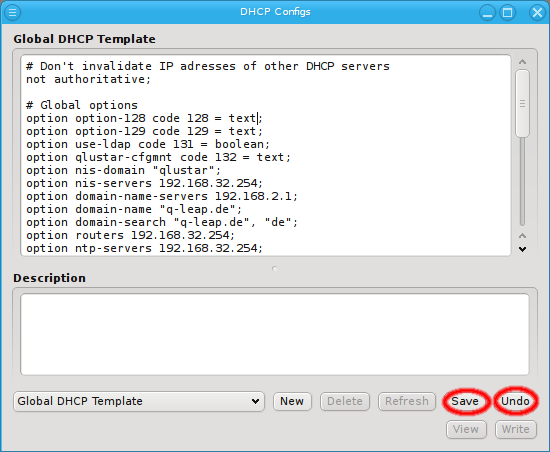
DHCP config dialog allows the configuration of the DHCP server and is provide by the main menu ->. The final DHCP server configuration file on disk is assembled from the header which defines global settings and the host part which contains the MAC/IP address and hostname of all the hosts registered with QluMan. The header can freely be edited in the Global DHCP Template part of the dialog. An initial version of it is created during installation and in most cases doesn't need to be changed. It contains many important parameters required for the cluster to function properly. Please consult the documentation of the DHCP server and the dhcpd.conf man page for the syntax of this file.
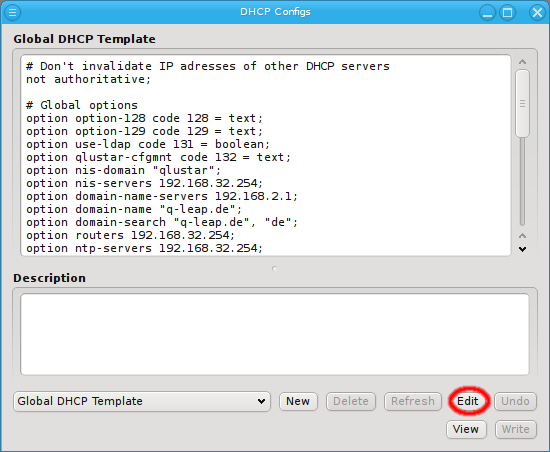
Note
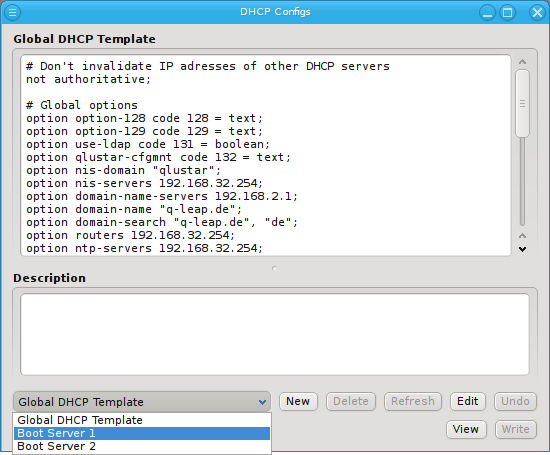
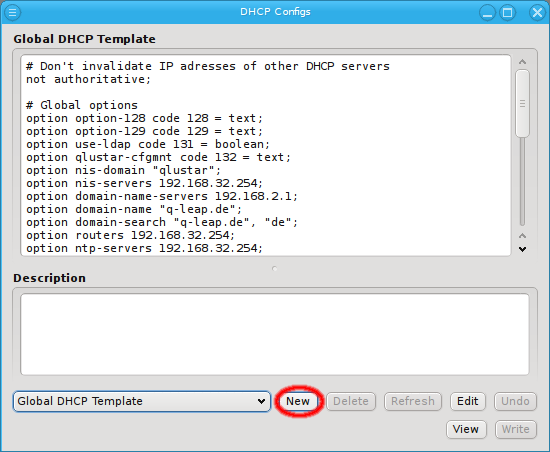
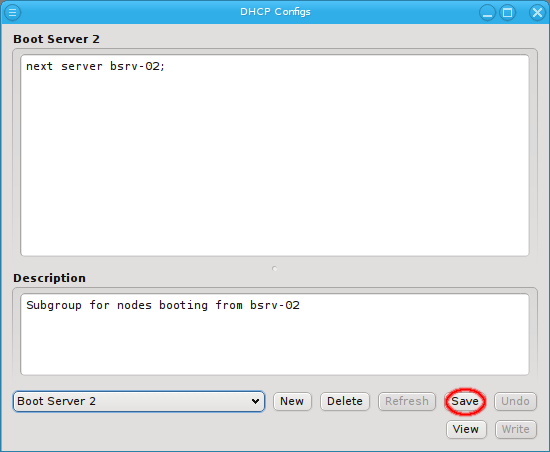
dhcpd.conf file together with a diff to the old version on disk by clicking the button. The changes will only take full effect when you click the button. This will also tell the DHCP server to reload its configuration. The same can also be done through the main menus -> entry or the button at the bottom of the cluster window and then selecting or button in the DHCP Configs row.
Schedule Format: always generic property during the initial boot (see the discussion Property/Config Sets.
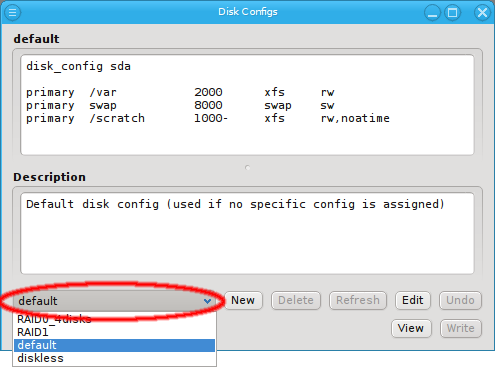
Disk Configs dialog accessible from the main menu ->. You can select the config to be viewed/edited from the drop-down menu at the bottom left. A couple of example configurations are created during the installation. Note that there are two special configs: (a) "disk-less" (not editable or deletable) and (b) "default" (editable but not deletable). The default config is used for any node that doesn't have a specific assignment to a disk config (via a Host Template, config set). The configuration itself can be edited in the text field at the top of the dialog and should conform to setup_storage syntax (see above). New configs can be created by choosing from the drop-down menu. As usual, enter the name of the new config in the text field and fill in the contents and description.
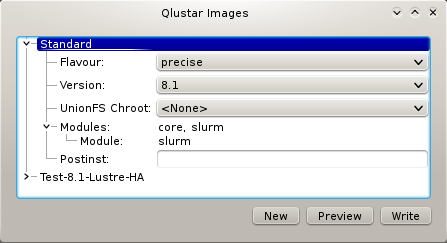
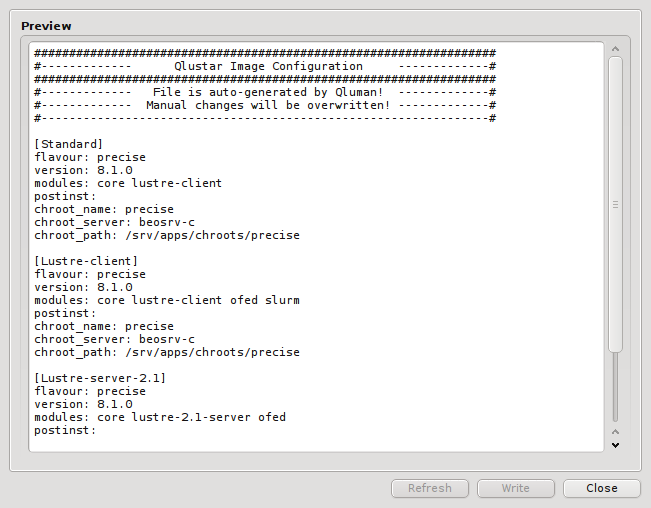
Qlustar Images dialog accessible via ->. Each image has a unique name, a flavor (e.g. trusty), a version, an optional chroot and one or more image modules.
apt-get dist-upgrade will update to 9.3 versions automatically. So with this choice, updates will usually include larger changes, since new feature releases (like 9.3) will automatically be installed.
apt-get dist-upgrade will update the modules/images to 9.2.1 automatically once available. So this choice will update to new maintenance releases automatically. The most conservative choice would be to explicitly select a x.y.z version (currently 9.2.0), since then images will only receive bug fix updates without explicitly changing the version in Qlustar. See also the discussion in the general Qlustar Update Guide
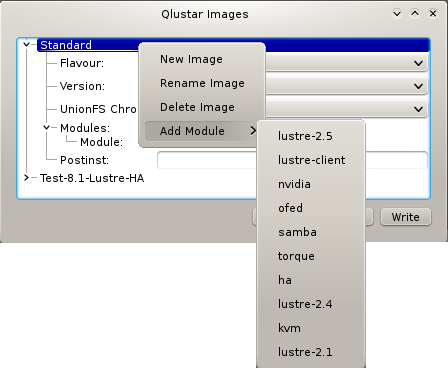
core module. Additional modules can be added or removed using the context menu when hovering over an entry. Only modules that are not already chosen are available for selection.

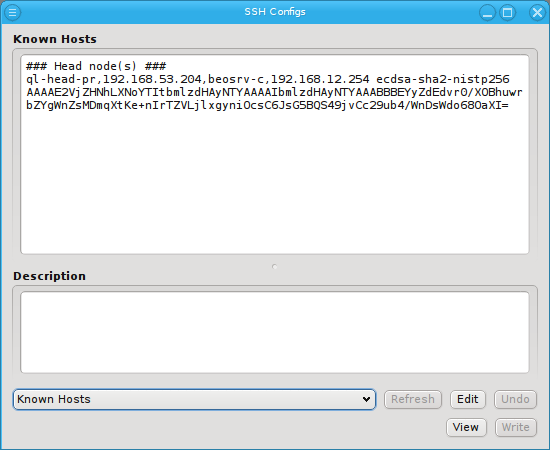
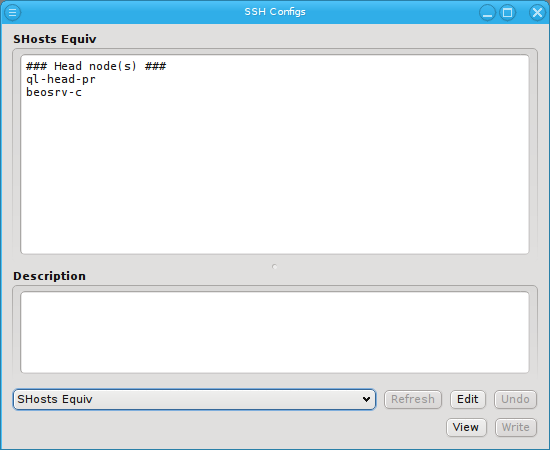

ssh_known_hosts (holds ssh host keys of cluster nodes), (b) shosts.equiv (enables login without password between machines within the cluster) and (c) authorized_keys (used to allow password-less root login to nodes with the specified ssh public keys).
authorized_keys one just has the configurable part. Ssh host info for the head-node and a possibly configured frontend-node are automatically inserted during the installation process.
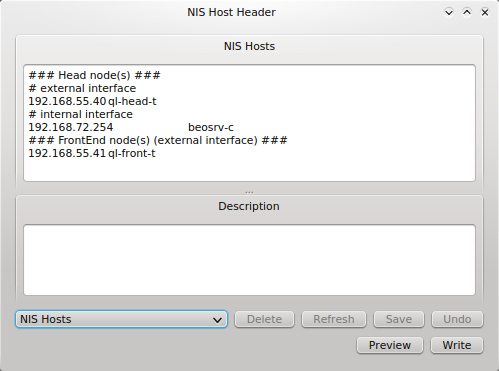
NIS hosts dialog: To edit the header part of either config, select -> from the main menu. Then choose the config to work on by using the drop-down menu at the bottom left and press . The top part of the window popping up can then freely be edited. When done press . Finally, the resulting ssh host files can be previewed and written to disk by pressing the corresponding buttons at the bottom of the dialog.
Note
authorized_keys file, as this is automatically written to /root/.ssh during the boot phase on hosts, that are not head-nodes.
UnionFS chroot. Exceptions are single purpose images e.g. for Lustre servers. By design, images are stripped down to the functionality (programs) that is most often needed on a compute/storage node. This keeps them small while still providing fast, network-independent access to programs/files typically used.
Qlustar OS image. In practice, this means that all files belonging to the chroot will be available on the nodes configured to use the chroot, but if a file/program is also in the node's image, that version will be used. Hence, this method combines the compactness and speed of the imaging approach with the completeness of a full OS installation to give you the best of all worlds.
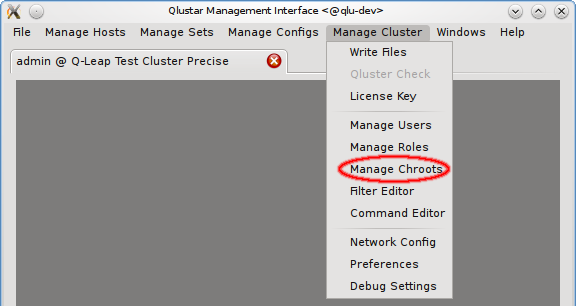
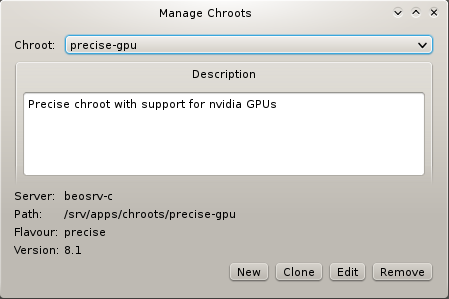
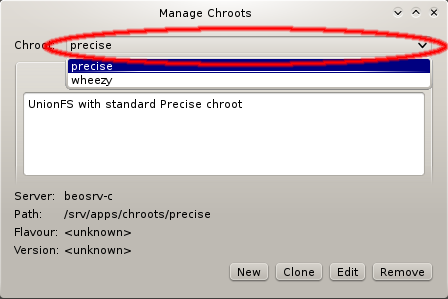
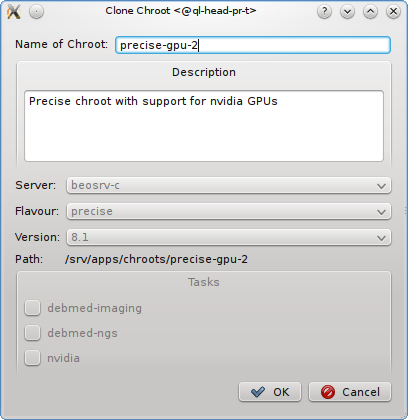
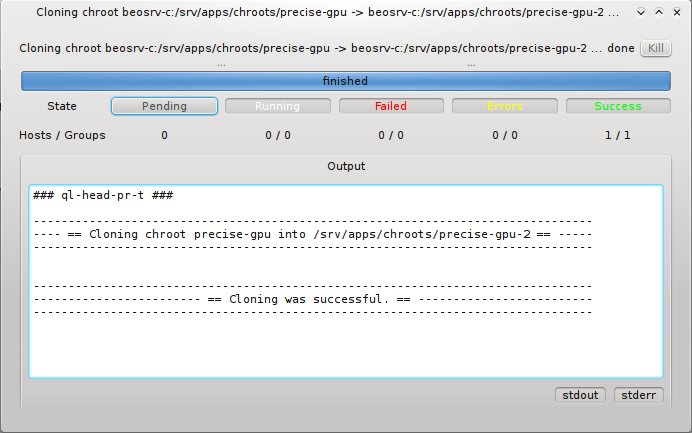
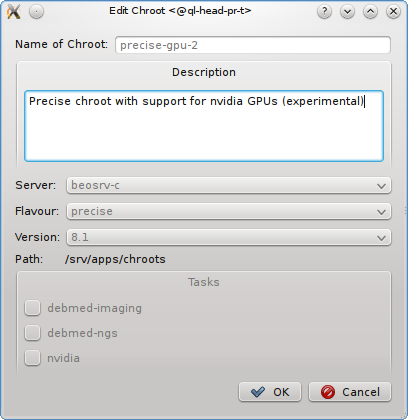
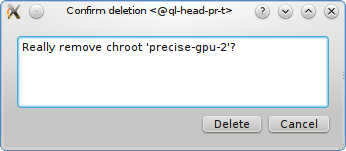
Manage Chroots dialog. It is accessible via the main menu (->) and provides a number of actions related to chroots. Manipulation of the contents of chroots is explained elsewhere.
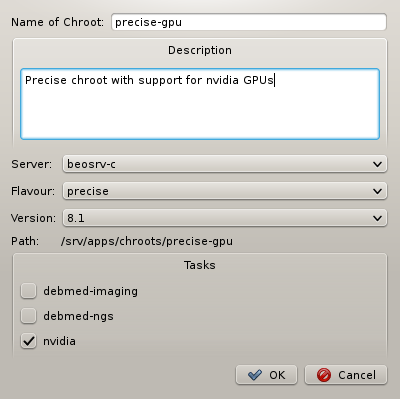
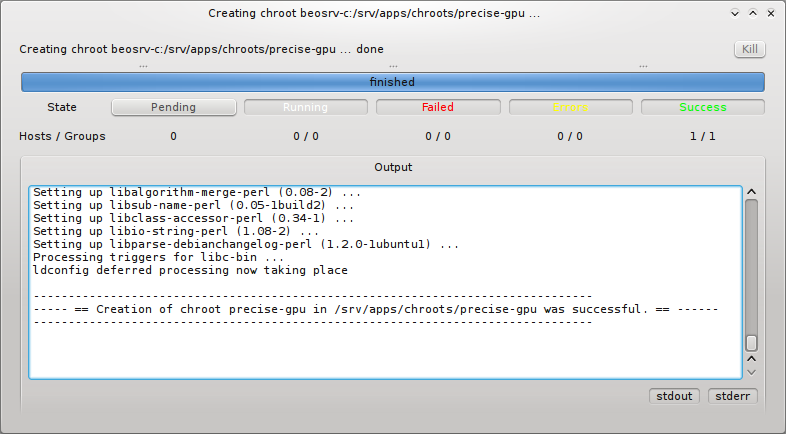
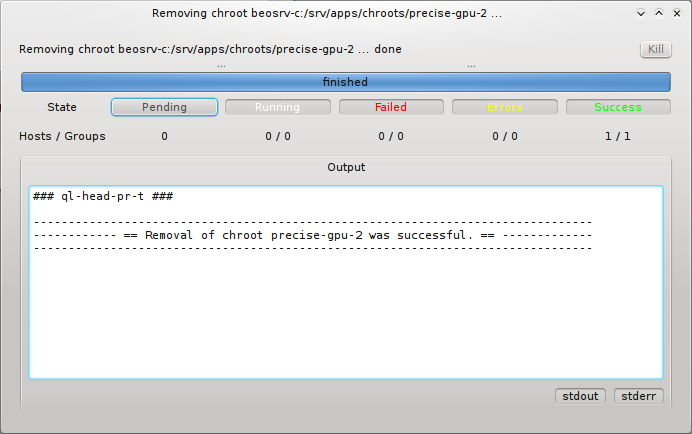
Qlustar tasks. These are topic package bundles, each consisting of a collection of packages relevant to a certain field of HPC applications. Pressing the button then starts the generation of the chroot. You can follow the rather lengthy process (count a couple of minutes) in its own window.
Note
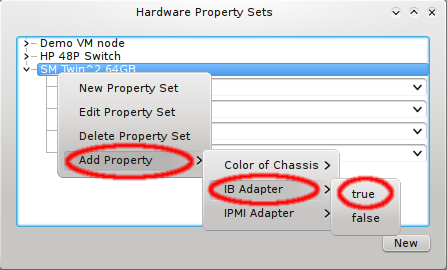
IB Adapter with a value of true must be assigned to a host, to explicitly enable IB for it. This is done most conveniently, by adding this property to the Hardware Property Set(s) used in the Host Template(s) for nodes with IB. If this assignment exists, Infiniband modules will be loaded and IP-over-IB will be configured during the boot process of the corresponding nodes with the IP mapping described above.
Note


OpenSM Ports. You can then edit the value in the Generic Properties box of a host. Editing the line and pressing return will create the new value. Beware that this will only affect one shown host. To assign the new value to other hosts, select them and then change the OpenSM Ports property through the context menu.


OpenSM Options to one host. Then edit the value to your requirements and press return to create it. Finally add/change the OpenSM Options generic property for all relevant hosts.
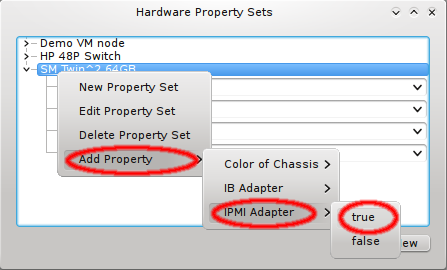
IPMI Adapter with a value of true. The easiest way to achieve this, is to add the IPMI Adapter property to the Hardware Property Set(s) used in the Host Template(s) for the nodes with IPMI. With this assignment, a node is ready for monitoring its temperature and fan speeds.

Initialize IPMI. Per default the settings of the IPMI cards are not touched by Qlustar. However, if the Initialize IPMI generic property is assigned and set to true, the IPMI card network settings of the corresponding host will be set every time it boots. Changing the value of this property to true and after booting back to false allows a one-time setup of the cards network properties.


IPMI Channel to use. Per default channel 1 is used and this is the only preset value for the property. If you need to use a different channel, first add the generic property IPMI Channel to the Generic Property Set (or to a host directly) and then edit the value.

Pre-defined and custom commands. The RXengine has the following capabilities:
Hostlist format or through a Host Filter, so that even large groups can be represented by a short string.
stdout and/or stderr.
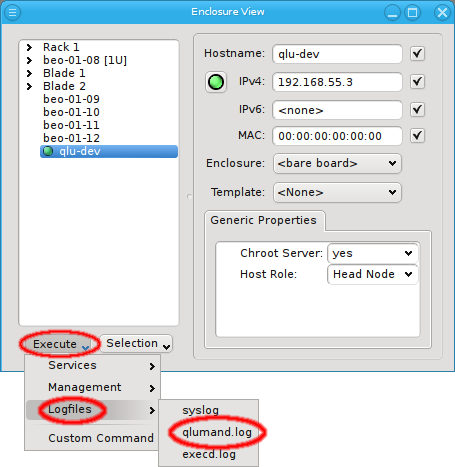
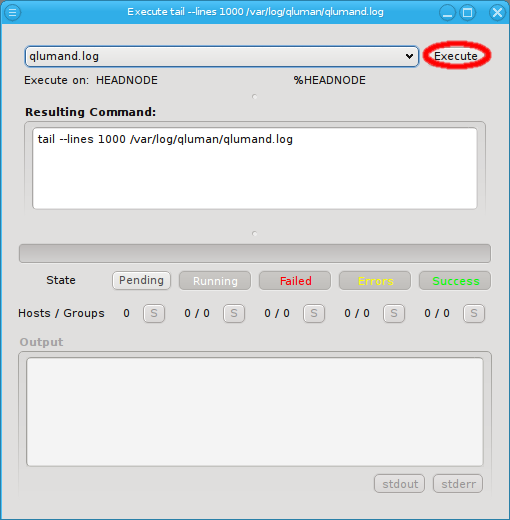
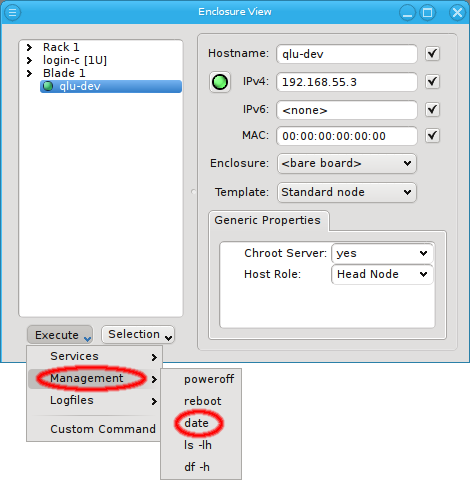
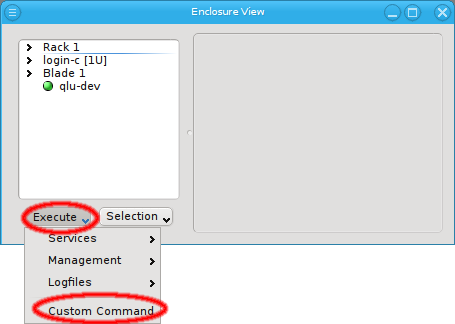
Command Editor (see Section 9.5, “Command Editor” for details). To execute a pre-defined command, open the pull-down menu of the at the bottom of the Enclosure View and select an entry. This opens a new Command Execution window for pre-defined commands. At the very top of it, the selected pre-defined command is shown. It can be changed if required. Below that is a list of the arguments, the selected command accepts. Execute on is always present showing where the command will be executed. If defined, additional arguments of the command are displayed underneath. Further below, the final command is shown, with its arguments inserted at the right places. The command will be executed upon clicking the button.

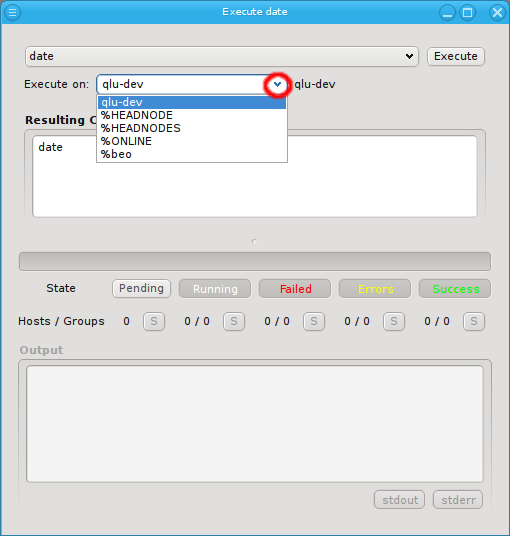
Enclosure View, the combo-box will contain the hostlist corresponding to the selection as default. The text can be edited directly or a filter can be chosen from the dropdown menu. Any argument starting with "%" is assumed to be a filter. If this is not intended, the "%" must be escaped by another "%", but only at the start of an argument. For more details about specifying arguments in pre-defined commands see Section 9.5, “Command Editor”.

Enclosure View and select custom command from the menu. This opens a new blank Command Execution window.
Note
Enclosure View.
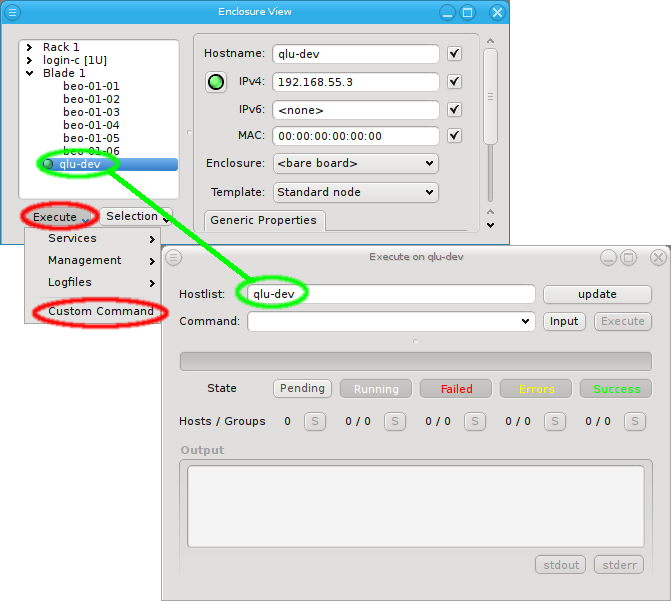
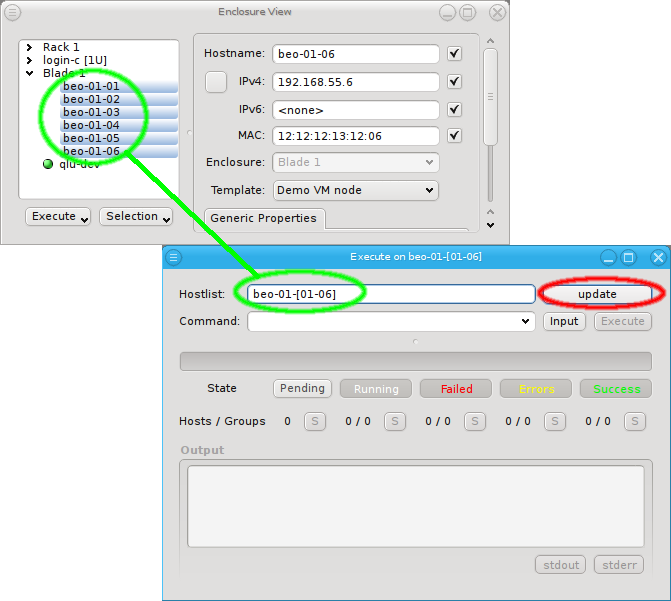
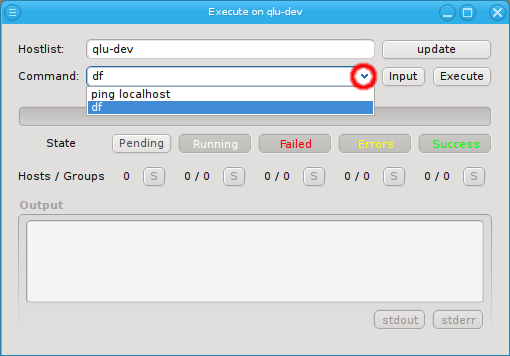
Enclosure View before clicking the button, a hostlist representing these hosts will be present in the Command Execution window. This allows easy selection of hosts to run a command on by selecting them in the Enclosure View. The hostlist can also be updated at a later time from the currently selected hosts in the Enclosure View by clicking the button. This makes it simple, to run the same command on different sets of hosts. When a command is executed, it is added to the history and can be accessed again later through the pull-down menu. This allows rerunning recently used commands without having to retype them every time.
Note
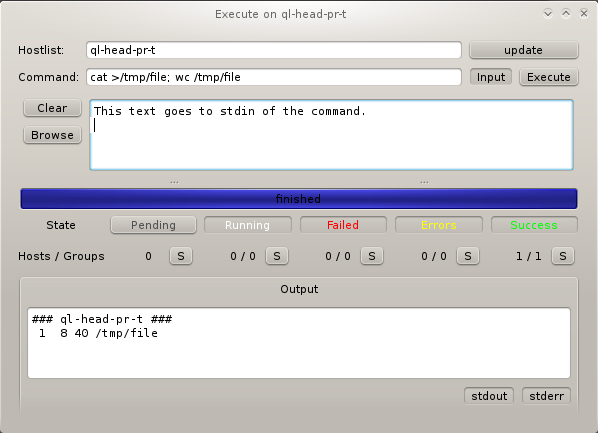
stdin of the command on each host.
BASH shell on every host matching the hostlist. The full bash syntax is supported. Redirection of output to files, as in the last example, and working with variables works as expected. Please refer to the bash documentation (e.g. man bash) for more details.


Custom Command Editor by clicking the tool button next to the command. This dialog allows you to rearrange the order of how the commands appear in the custom command selectbox, delete and even edit them.

Edit button gets enabled. After you click on it, a new dialog appears that lets you edit the command. Click Apply to save your changes.


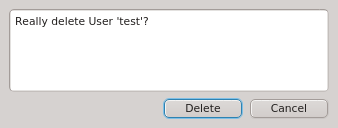
Delete.
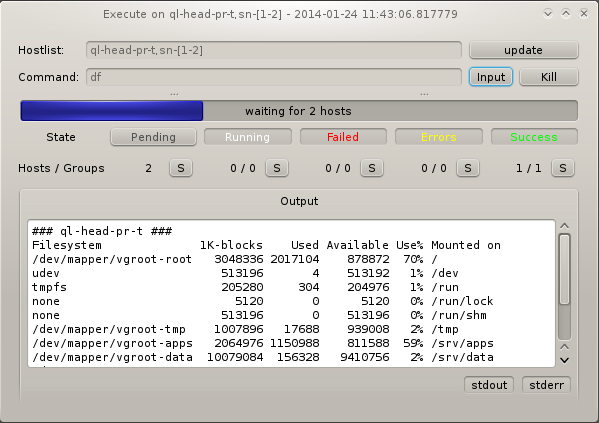
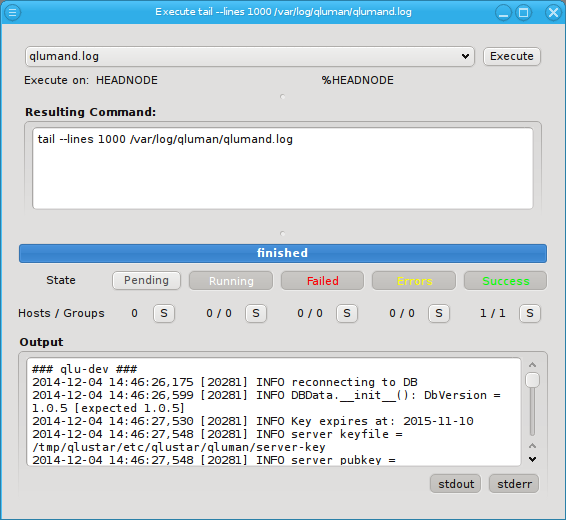
Pending state. Once a host confirms that it has started its command, it will change to the Running state. When the command concludes, the state becomes one of Failed, Errors or Success. If the command exited with a return code other than 0, the host will enter the Failed state. If the command exited with a return code of 0, but produced output on stderr, it will enter the Errors state. Otherwise, it enters the Success state.
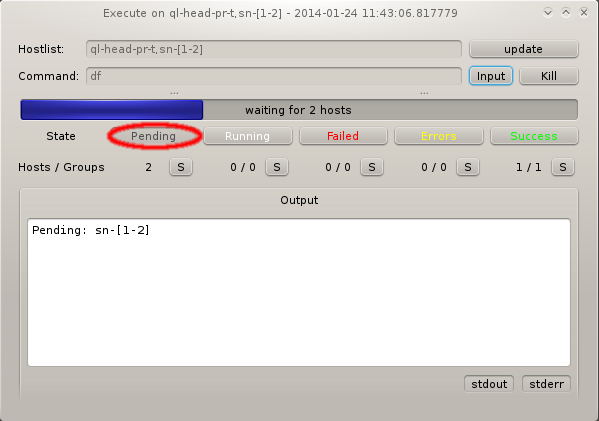
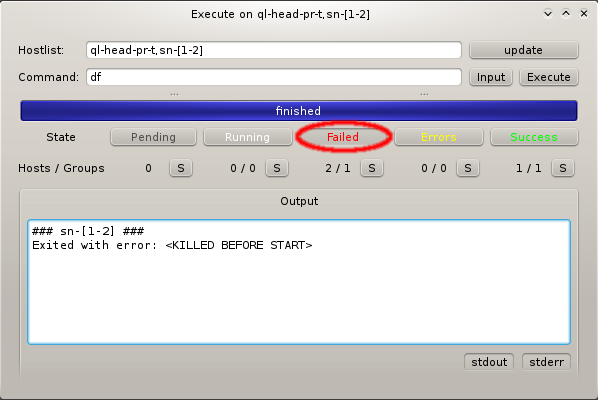
sn-1 and sn-2 were down, so they remained in the Pending state. By clicking the button, a hostlist of the pending hosts is displayed. The QluMan server will start the command on those hosts, when they become online again. If you do not want that to happen, or if the command does not terminate on its own, then the button allows you to stop the command. A killed command counts as failed, so sn-1 and sn-2 now enter that state. The command output also reflects, that the command was killed.

sn-1 and sn-2) have failed, because they where offline and the command was killed before starting. The output of both was identical, so they form one group. Similar, one host (ql-head-pr-t) completed the command successfully and builds its own group.
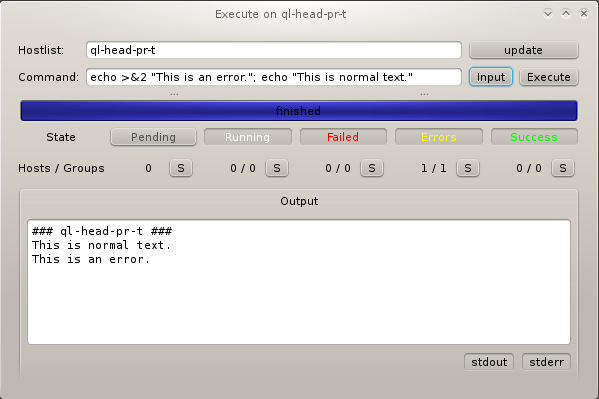
stdout and warnings as well as errors to stderr. In the latter case, the command ends up in the Errors state, because this is usually something that needs further inspection. The screenshot example prints two lines, one to stderr and one to stdout. Unfortunately Unix does not enforce any order between output to stdout and stderr. Therefore, as in this example, it can happen, that a small delay between the command output and reading from the file descriptors causes the order to slightly change.
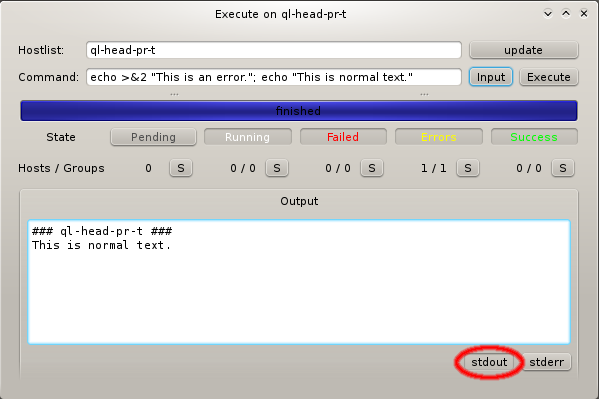
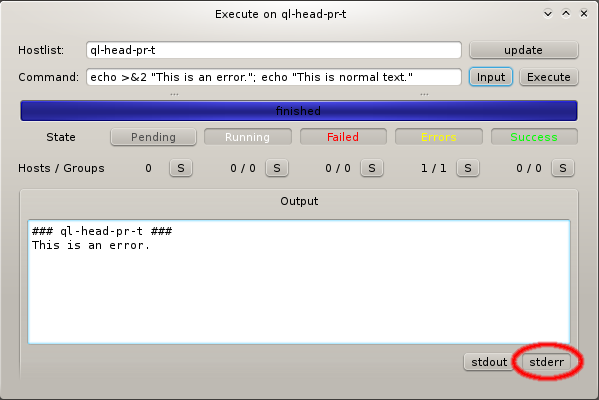
stdout. To simplify an analysis of the command output for such cases, the two buttons and at the bottom of the window allow toggling the visibility of stdout and stderr output selectively on and off.
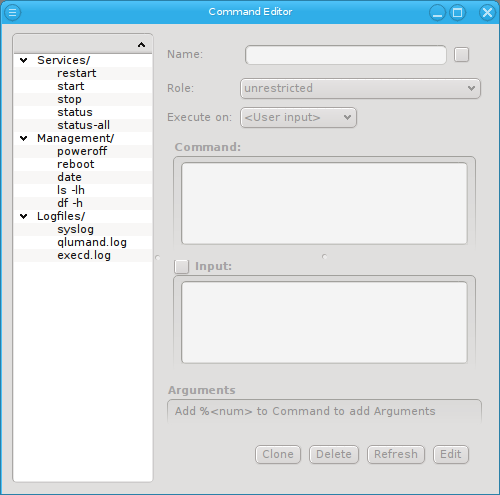
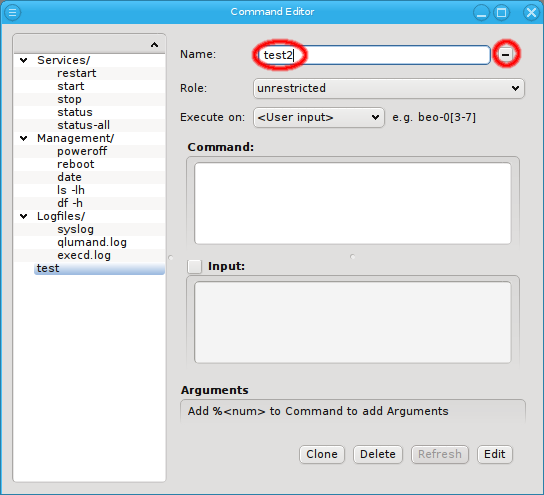
command editor shows all the pre-defined commands in a tree view on the left. A number of useful commands are already defined by default. Selecting a command shows its definition on the right-hand side, where it can also be edited. Every command has a unique name/alias under which it appears in the tree view on the left, the execute menu in the Enclosure View and in the drop down menu of the pre-defined commands execution window. In the future, it will also be possible to limit commands to specific user roles, but for now all commands are unrestricted. A user either has rights to execute any pre-defined commands or none. Below the role selector, the command itself is defined.


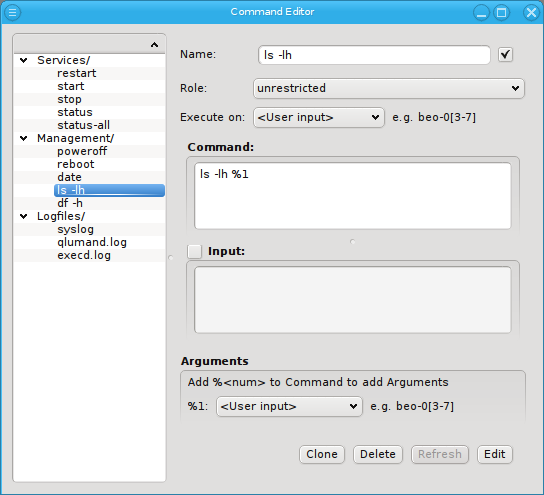
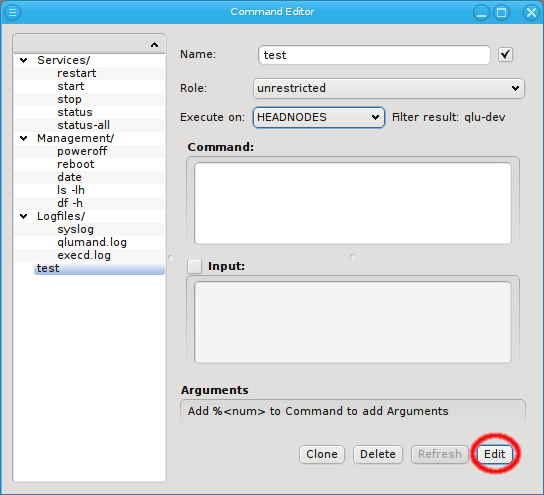
User input. This means, the user will have to choose the hostlist, where the command will run, at the time, when it will be executed. Alternatively, the hostlist of the command can be preset by selecting one of the filters from the dropdown menu. If a filter is selected, the hostlist, it currently evaluates to, is displayed below it.
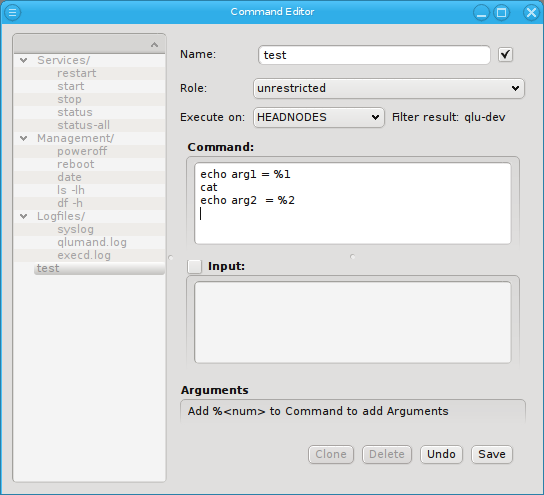
BASH shell on every host matching the hostlist. The full bash syntax is supported. Redirection of output to files and working with variables works as expected. Please refer to the bash documentation (e.g. man bash) for more details. There is one exception to this: A "%" character followed by a number specifies additional arguments for the command, as explained in more detail below.
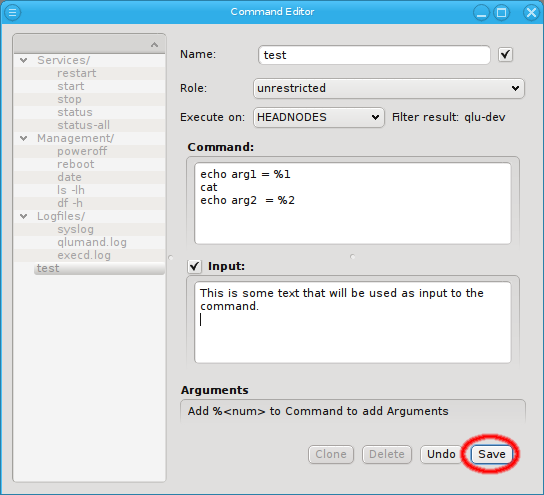
Arguments box.

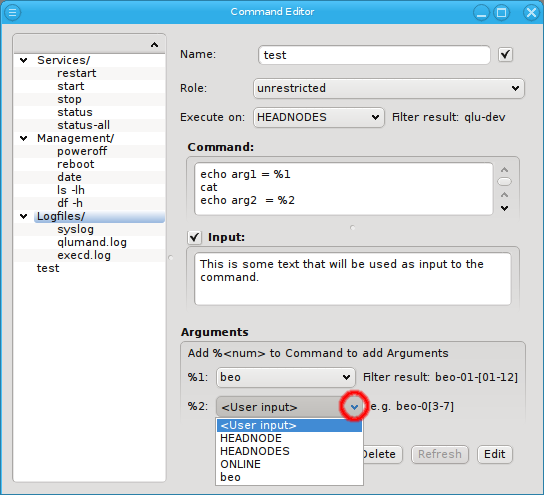
Execute on definition. They can either be left up to the user, to be filled in when the command is executed or be specified by a filter selectable from the drop-down menu. When executed, the num placeholders in the command text are replaced by the user specified arguments or the resulting hostlist of the filter. There are always as many arguments as there are placeholders in the command. To add an argument, edit the command text and add a placeholder there. To remove an argument, edit the command text and remove the placeholder.

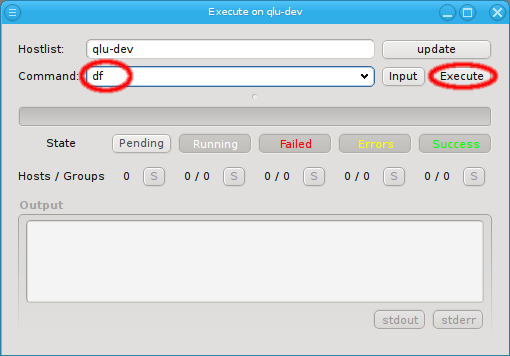
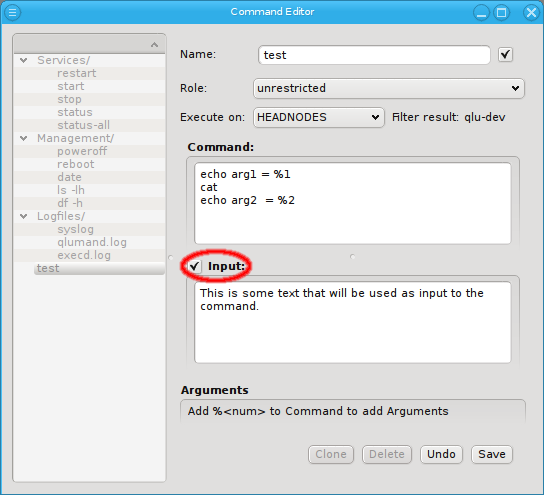
qlu-dev is the only head node in the cluster). It has some input and two extra arguments. The first one is fixed to a Hostname filter that evaluates to any host starting with beo. The second one is left for the user to be specified, hence, when executing the command, only the second argument is editable. In the screenshot, the ONLINE filter was chosen for this argument, but any other text would have been possible too. For easy verification, the command text, with all the arguments substituted, is shown together with the command input (if defined).
Note
cat command, so in the output shown, it appears between the two echo commands.

Host filters define a set of hosts by specifying any number of criteria. The set of hosts defined by a filter is dynamic: Changes made to the properties of hosts are automatically reflected in the hostlist a filter evaluates to. Every time a filter is used, the criteria defining it are evaluated from scratch. Hence, host filters provide a powerful tool to classify hosts into groups, in a way that will dynamically take into account changes made to the cluster. They can be used in various ways within QluMan:


beo and a Host Template filter that selects all Demo VM nodes. A host has to pass all top-level filters to show up. Currently, QluMan provides six top-level filters: Hostname, HostTemplate, Enclosure, HEADNODE, HEADNODES and ONLINE. Additional ones will be added in the future.


python syntax and is matched against the beginning of the hostname. If a match against the full hostname is desired then "$" should be added at the end. A ".*" can be added to the front, to match anywhere in the hostname instead of matching against the beginning.
Note


beo as well as end on "1", two Hostname filters have to be added.
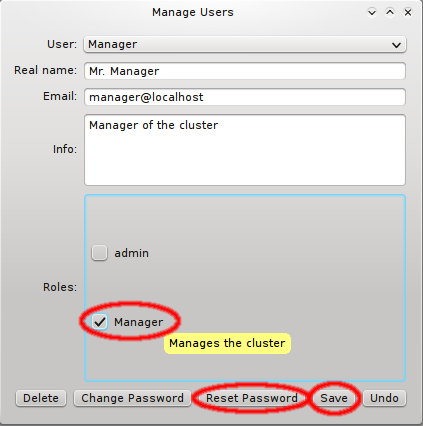
multi-user capable and provides an interface to configure and control users as well as their permissions when they work with QluMan. The QluMan users are not connected to system users in any way. To simplify permission management, the concept of user roles can be used. User roles allow to pre-define a collection of permissions for QluMan operations. Once defined, they can be assigned to a user.
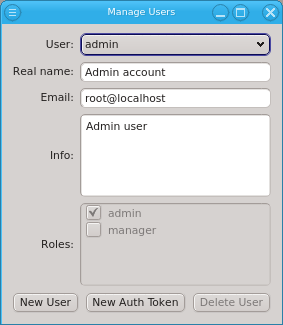
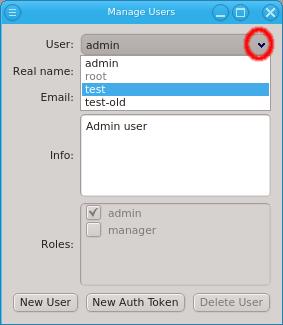
admin user is pre-defined and has the admin role, meaning all possible rights. Roles for the admin user can not be changed, just like the root user in a Linux system always has all rights. When running QluMan for the first time, you should set the correct email address for the admin user.
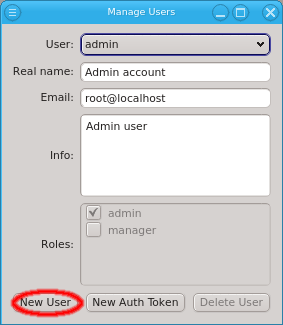
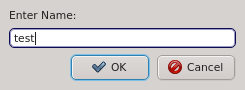
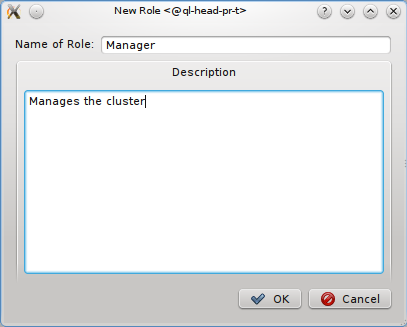
one-time token for the user, by clicking . Generating the one-time token may take a little time to finish and happens before the New Auth Token dialog opens. The dialog shows a certificate containing the

Note

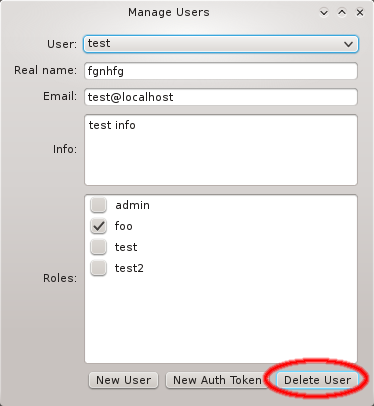
New Auth Token dialog also has 3 useful buttons at the right bottom corner. The button allows adding the certificate directly to the running client. The use case for this is when creating a user account for oneself when working as admin. It is recommended, that for clusters with multiple users having the admin role, that every user has his own user account and the admin user is only used to initially create the new users.


Note
qlumand server. The latter ensures that the client will only talk to the desired server and can't be eavesdropped. The certificate also contains a one-time token, allowing any client to log in exactly once within the next 48 hours.
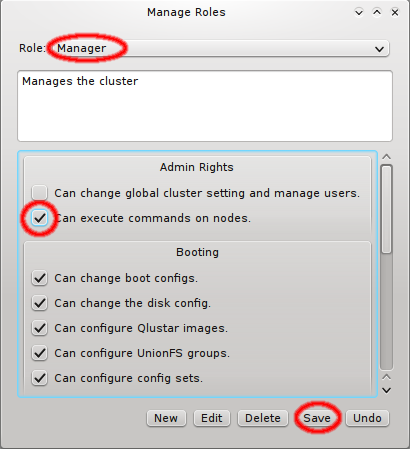
Qlustar Images window opened from . Others govern the right to specific actions or to alter specific properties. For example, the right to configure OpenSM on hosts, enables the user to add, alter or delete the OpenSM Ports and OpenSM Options property of hosts in the Enclosure View.
Admin rights covers rights with global impact and root access to nodes, Booting covers all settings that affect how nodes will boot, Services covers the configuration of daemons and Host Config covers the general configuration of hosts.
Log Viewer that allows to inspect important events in the cluster. Messages are categorized depending on the type of event, when it occurred, which component(s) it involved and how important it was.
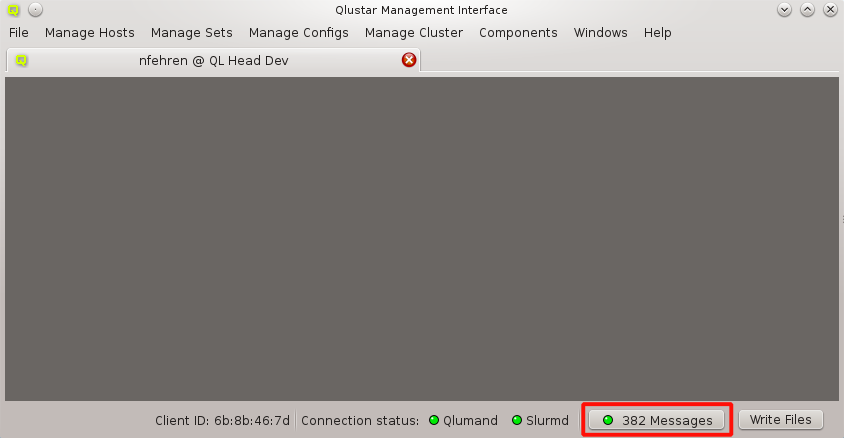
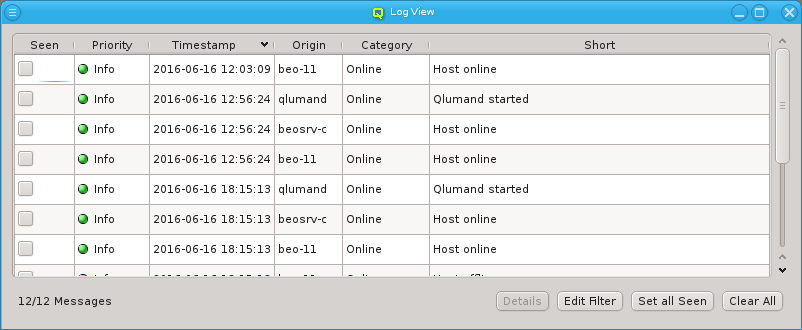


Messages window. The Seen filter can also be toggled between Seen and Unseen by clicking the checkmark. The column can only be disabled by selecting Ignore from the context menu.


Config Header tab.
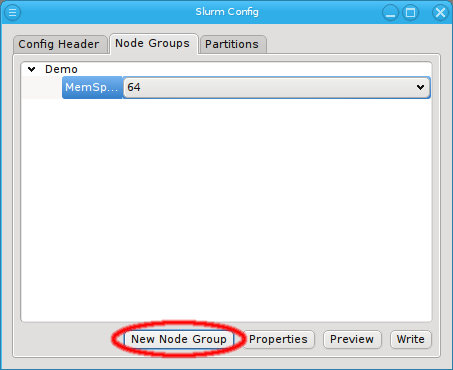
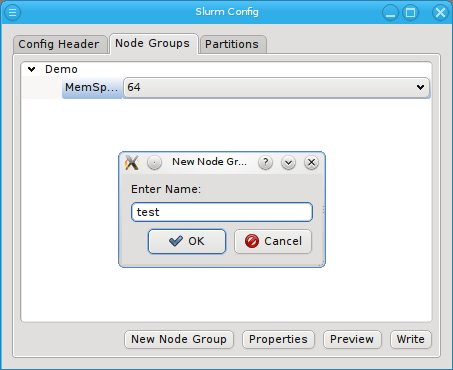
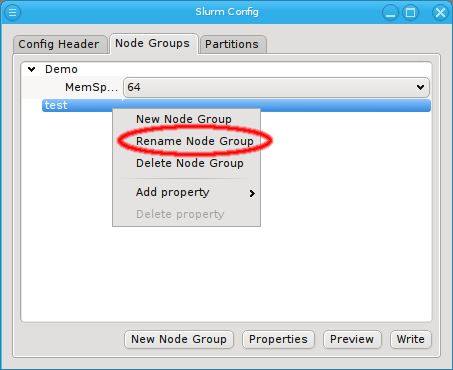
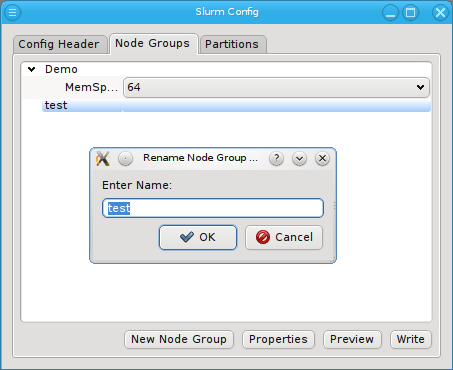
Node Groups tab.
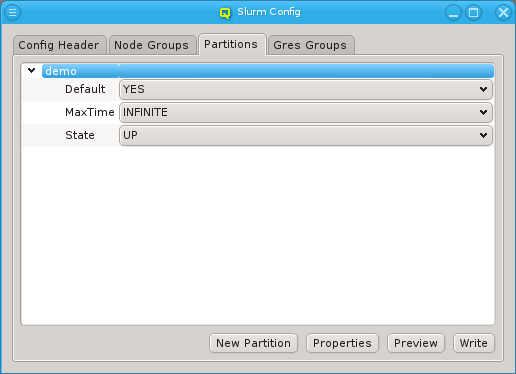
Partitions tab.
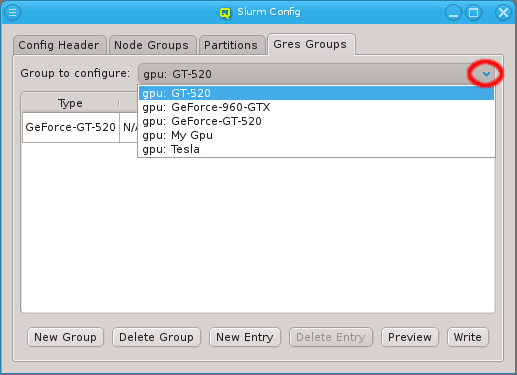
Gres Groups tab.
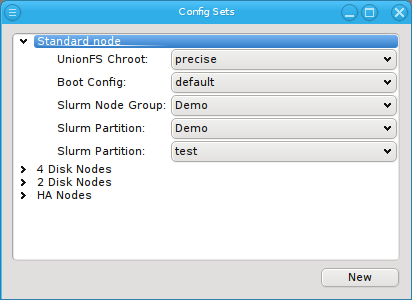
Config Sets and Host Templates or by direct assignment through the config (set) context menu in the enclosure view.
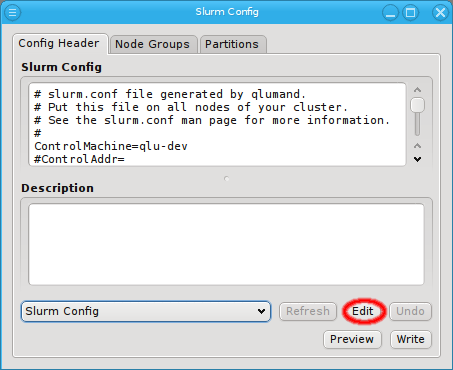
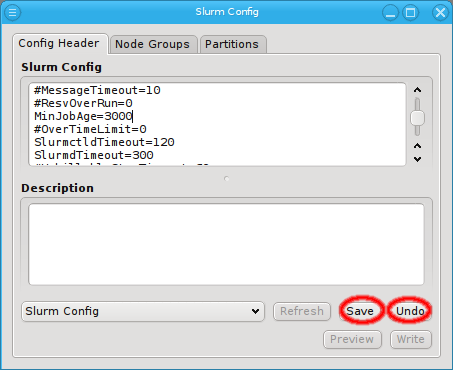
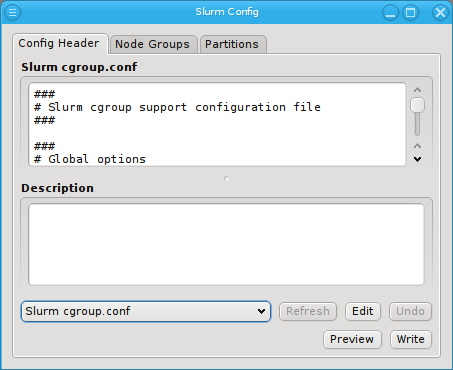
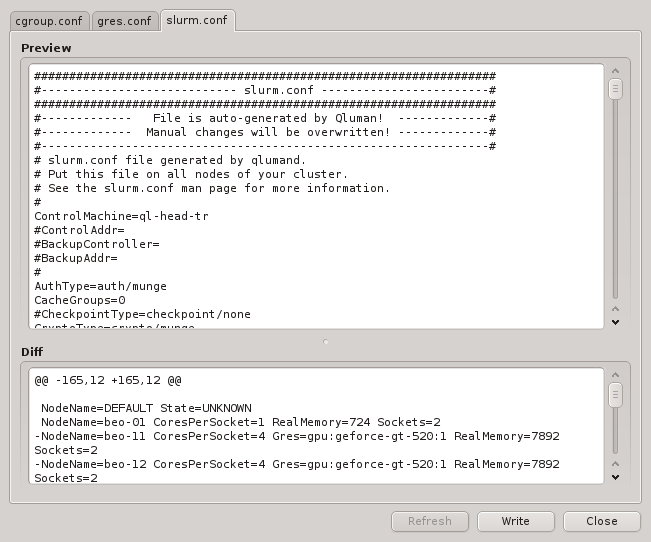
cgroups.conf. On write, QluMan adds the NodeName and PartitionName lines at the end of the slurm config template to generate the slurm.conf file, while the cgroup.conf file gets written as is. For the syntax of both templates, please refer to the slurm documentation (e.g. man slurm.conf). To edit one of the templates, select it, click the button and start making changes. Click to save the changes or to discard them. Use the button to check changes before writing them.
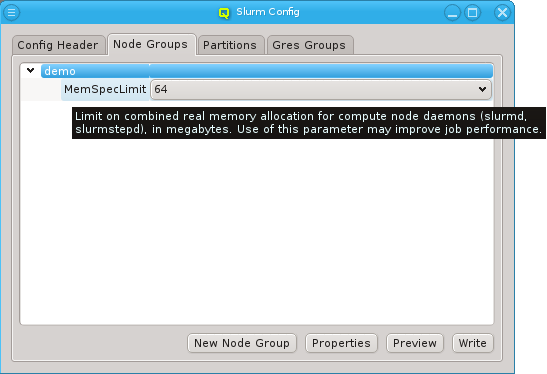
MemSpecLimit property is defined, but other properties like Feature or Weight can be added by using the Slurm Property Editor.


slurm.conf file. An example for this is the Feature property. Properties can also be changed directly using the pull-down menu. If a change will cause a duplicate value, the previous (duplicate) value is automatically removed.

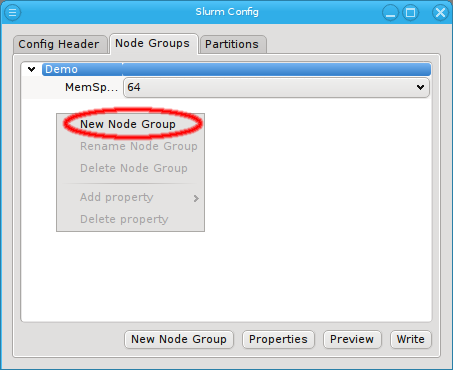
Node Groups tab is selected, the editor for node properties will be opened. If the Partitions tab is selected, the editor for partition properties will be opened.

Weight and allows adding such a property without further questions. In this case, QluMan will also set the unique flag and add all known property values automatically.


Gres in the screenshot) a dialog opens up, asking for confirmation. Note that adding an unknown property can lead to a failure when trying to restart slurm. Therefore make sure to only add properties you are certain slurm will know about. A property without values can be deleted by clicking the button.


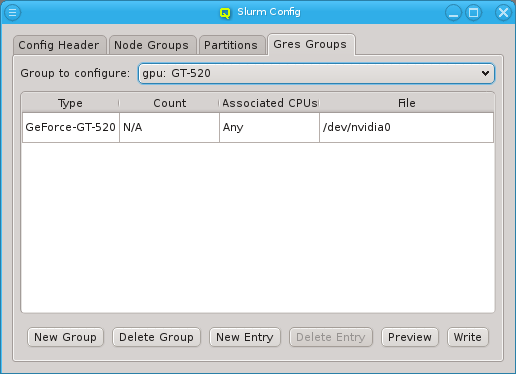


type column must be filled in. For resources that can be allocated in multiple pieces, a count can be set, indicating the number of resource


file column.
Note


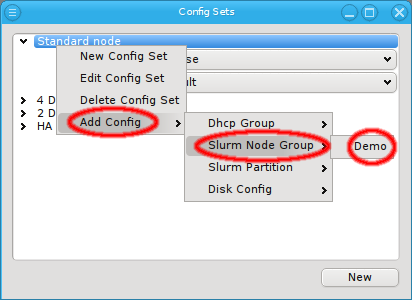
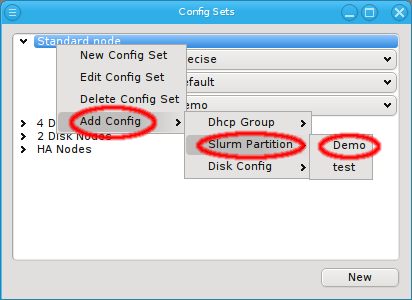
Node/Gres Groups and Partitions by use of a Host Template and its corresponding Config Set or by direct assignment. A Config Set may contain at most one Node Group but any number of Gres Groups or Partitions,
Config Set or via the Enclosure View context menu of hosts.
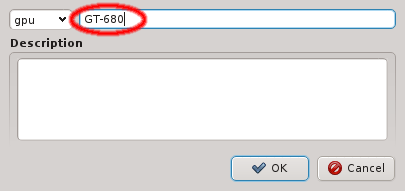
Gres Groups are used to specify the type and number of GPUs of a host. When submitting jobs that require GPUs, this information is then used to determine the nodes that satisfy the job requirements. All the necessary settings for the desired configuration of the nodes may also be done manually and can be changed later through the slurm config dialog from the main window.
GPU Wizard guides you through the necessary configuration steps. It uses the auto-detected GPUs of hosts to suggest their optimal configuration options. Furthermore, it attempts to establish a balance between the available configuration strategies: Using templates or individually assigned config sets and/or config classes.
Note

Note


Config Set Page you have the option to a) add (modify) the GPU config to the Config Set of the currently assigned Host Template, b) clone the Config Set currently active or c) assign Gres Groups directly to the group of selected hosts. Select the desired method and press to continue to the next step.

Host Template Page will appear and offer the choice to either modify the currently used Host Template or to create a clone of it for further modification.
Note


Gres Group exists that includes all or a subset of the unconfigured GPUs, the context menu allows to select it. This would conclude the assignment process.


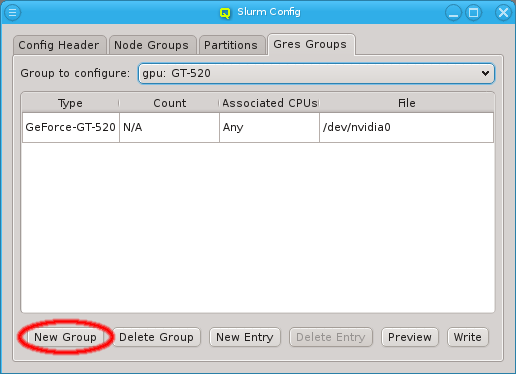
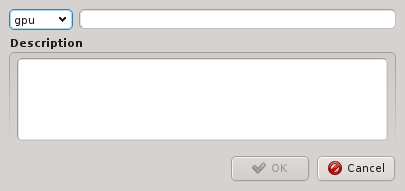
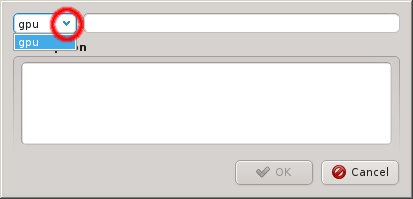
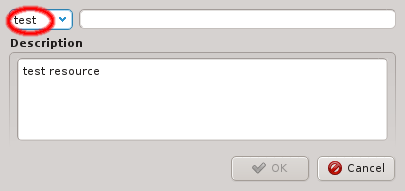
Gres Group can be created that the GPUs will be a member of. The new group will have to be given a name and optionally a description. Once all GPUs are assigned to a Gres Group, you can finish the process by pressing .


Config Set, b) create and assign a new one


Gres Groups to the selected hosts. When choosing option b), the blank field of the New Config Set column becomes editable by double-clicking.

Cluster Usage Overview tab and the Job Overview tab.


Cluster Usage Overview provides continuously updated information and charts about Node, CPU Core and Memory utilization by Slurm jobs. Every information field in the tables has a tool-tip that supplies more detailed information about it.
Note
Cluster Usage Overview can be changed in the Preferences Dialog.
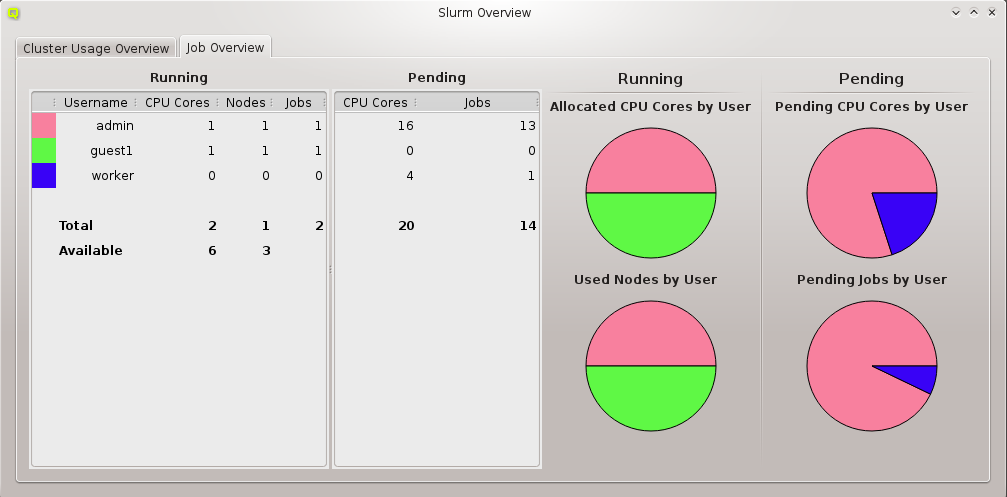
Job Overview display consists of two tables and four charts being continuously updated. The Running table provides summary information about running jobs of users. It shows the color representing the user (if his share is displayed in one of the charts), his username, the count of utilized CPU cores, the number of used nodes and the number of running jobs. The Pending table provides the total number of requested CPU cores and the number of pending jobs for the same user.

Allocated CPU Cores by User, Used Nodes by User, Pending CPU Cores by User and Pending Jobs by User. Every slice of the pie-chart has a tool-tip showing the name of the user it corresponds to together with his share in percentage of the corresponding resource. The used colors change randomly with every new invocation of the window.
Note

Job Management window shows a continuously updated table with all current jobs of the cluster. Since a single job has about 100 properties, every QluMan user is able to customize the job properties he wants to be displayed and which ones should be hidden in the table (see Customize Columns for more detailed information).

Save Button. You can restore a layout by selecting it in the Layout combo box and press Load. When the Job Management gets opened it always uses the last state as layout. This is the layout that was set when you closed the Job Management the last time.


Activate Filter at the bottom of the window, allows to activate one or more custom filters (created using the Job Filter Editor) by checking the corresponding entry. This can be useful to restrict the list of displayed jobs according to some criteria (e.g. a certain user). All currently active filters are shown in the bottom left corner of the Job Management window. They can be deactivated again by unchecking their entry in the Activate Filter sub-window.
Note


Customize Columns dialog displays all known columns (properties of a job) in two lists. The columns in the left list will be shown in the jobs table, the ones in the right list won't. To show or hide columns just select them and drag them either into the left or right list. Confirm your changes with OK.
Note
Job Management table.


Get more information in the context-menu of a job. It shows the properties and their corresponding values of the selected job in a table. There are two filters that may be applied: One is for hiding all properties with a value of 0, None, False or empty, the other one for hiding exotic properties which one is rarely interested in. Per default, both filters are enabled. To disable them, you have to check the corresponding entry at the bottom of the dialog.
Note

Job Management window.

Job Filter Editor dialog it is possible to create custom filters for the Job Management table. After it has been opened, a new filter may be created by clicking New Filter and then insert a name for the filter. After confirming with OK the filter is created and a new window comes up, where properties can be assigned to it. To add properties, right-click for the context-menu and select the property you want to filter with.


Save button. Now the new filter can be applied in the Job Management window.
Node State Management dialog lists all hosts that are registered with Slurm. There are three different kind of views showing the existing hosts. The color of the LED in front of the hostname indicates the Slurm state a node is in. When hovering over a particular node, a tool-tip describing the state appears.


Enclosure View dialog. It is useful when acting on a group of nodes located in specific enclosures (e.g. to drain all nodes in a certain rack, because of a planned maintenance for that rack).


Hostlist field (e.g. beo-[01-04]). The nodes will appear in the right list, if the hostlist is valid.

Execute button. In case the action was operating on the nodes slurmd, an RXEngine window comes up, in which one can track the success of the remote slurmd operation. To clear the complete list of selected nodes, one can click the Clear button. To remove only a subset of nodes, one can select them in the right list and remove them via the context-menu.
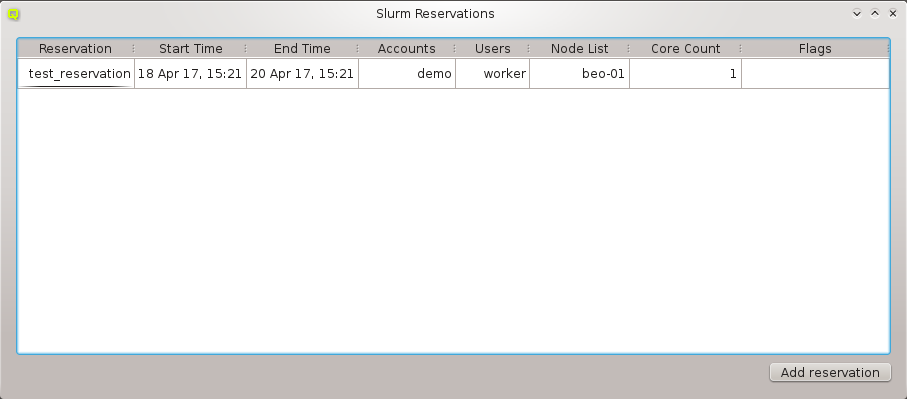
Slurm Reservations window shows a table of all active reservations and their most important properties. Furthermore, it allows to manipulate the reservations and create new ones.
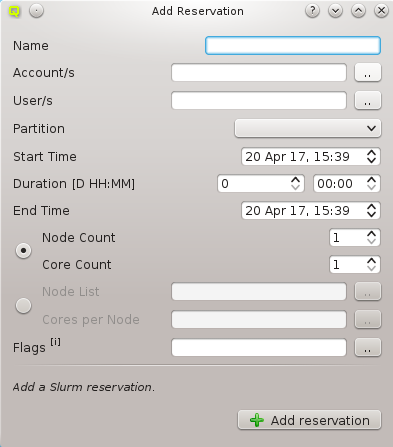
Add reservation button. A new dialog pops up. The following parameters can be specified:
Select User dialog shows only the users belonging to the selected accounts.
Add reservation button.
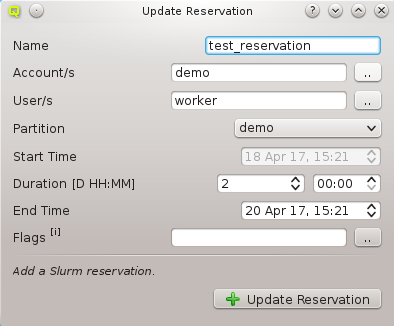
Update Reservation. A window pops up with all the properties set to the values of the existing reservation. To modify the reservation just make the desired changes and click the Update Reservation button.
Note
Start Time of a reservation, the current and the new Start Time have to be in the future. In case a value for Nodes per Core was set, the reservation will not be updateable anymore.
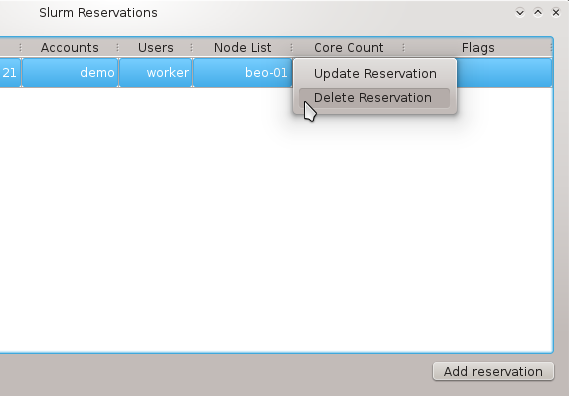
Delete Reservation from its context-menu .
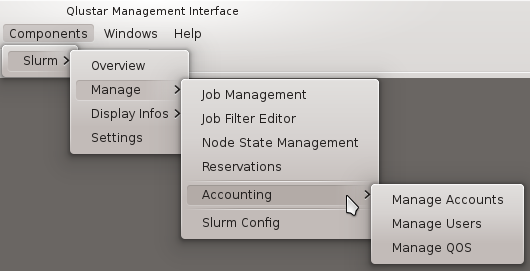
Manage Slurm Accounts dialog go . There will be a tab for every cluster known to the Slurm accounting database. Each tab contains a tree with the accounts and users that are registered in the corresponding


Add Account button will open a new dialog. Here you have to specify a name for the new account. Optionally, you can also specify a parent account and a description. If an account had been selected before, the Add Account button was clicked, this account will be pre-filled as the parent account. When you are finished, confirm with the OK button.
Note


Delete Account.
Delete User.
Note

Show Account Properties or Show User Properties depending on what was selected. Two filters are available in this dialog: One for hiding all properties with a value of 0 or empty and one for hiding exotic properties which are not of interest in most cases. By default, both filters are enabled. To disable them, their corresponding entry has to be checked at the bottom of the dialog.


Manage Users dialog allows to assign accounts to a user, set and change a user's default account, register new users and delete users. When a user is selected, the accounts he is a member of are checked in the Accounts list displayed at the right. His default account is highlighted with the specific color set for default accounts in the Preferences Dialog. By default, system users are hidden. To show them, just check the Show system users (UID < 1000) checkbox.

Unregistered Users and select the desired user. Every user needs a default account, so this has to be defined first. To do so, select Set as Default Account in the context-menu of the account you want to be the default. By doing this, the user will be registered with this default account. If you just select some accounts for an unregistered user by checking them and then pressing the

Create button, the user will be registered with a default account set randomly among the chosen ones.
Remove User.
Note

Accounts list to the right. To add/remove him to/from an account (un)check it and hit the Activate Changes button.
Registered Slurm Users tree and bring up the context-menu of the account you want to set as the new default. Then select Set as Default Account.

Cluster Usage display uses the Slurm utility sreport to generate reports of job usage and cluster utilization. For detailed information about the type of reports and options read the sreport manpage. Select your report type (for example cluster) in the left combo box and then the report options from the combobox right to it. Per

Note
Fair Share view uses the Slurm utility sshare to display Slurm fair-share information. We provide two versions of views, a basic and a long one. The long version shows additional information that is needed less often. By default we show the basic view, but you can easily switch by checking the long checkbox at the bottom right of the window.

Account View shows the Slurm fair-share information for all registered Slurm accounts. The used colors are customizable in the Preferences Dialog.

Detailed Account View shows the Slurm fair-share information for all registered Slurm accounts including the information for individual users that are member of the accounts. The used colors are customizable in the Preferences Dialog.
Note

Job Priorities dialog uses the Slurm utility sprio to display the values of the individual factors that are used to calculate a job's scheduling priority when the multi-factor priority plugin is installed. This is information needed, when analyzing why certain pending jobs run earlier than others.

long checkbox at the bottom right of the window. For more information about sprio read the sprio manpage.
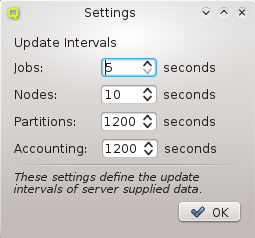
QluMan Slurm Settings dialog allows to customize the update intervals for information about jobs, nodes, partitions and Slurm accounting. This information flow is provided by the QluMan Slurm daemon running on the cluster and the QluMan GUI automatically subscribes to it. Shorter update intervals mean more server load and more network traffic. In most cases, the default values should be adequate.
Note
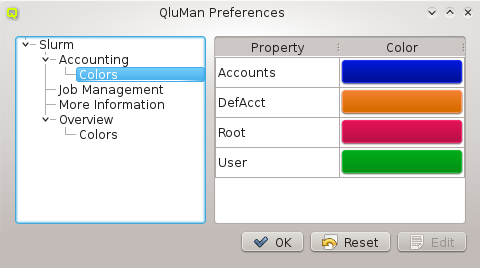
QluMan Preferences dialog, one is able to customize specific parts of the QluMan GUI Look&Feel. The tree on the right shows all the settings available for customization. Each QluMan component may have its specific settings, so the options available there depend on the components installed on a particular cluster.
Edit button. A color-picker dialog will then come up. Select the new color and click OK. Among others, one is also able to customize the column height of the Job Management and More Information tables here.
System Settings dialog. Now click on the Application Appearance icon and you'll have the options to modify fonts, colors and style.
General, Menu and Window Title. Changing one of the values and clicking the button changes the corresponding font on the fly.

System Settings dialog, you can also move /root/.kde/share/config to /root/.kde/share/config.bak and copy your personal configured .kde/share/config directory to /root/.kde/share. As long as you're not using any non-standard KDE themes, this should just apply the favorite desktop settings you're familiar with to QluMan, when running it on a remote machine like the cluster head- or FE-node (restart of QluMan GUI required).
0 user@workstation ~ $ssh -X root@servername qtconfig
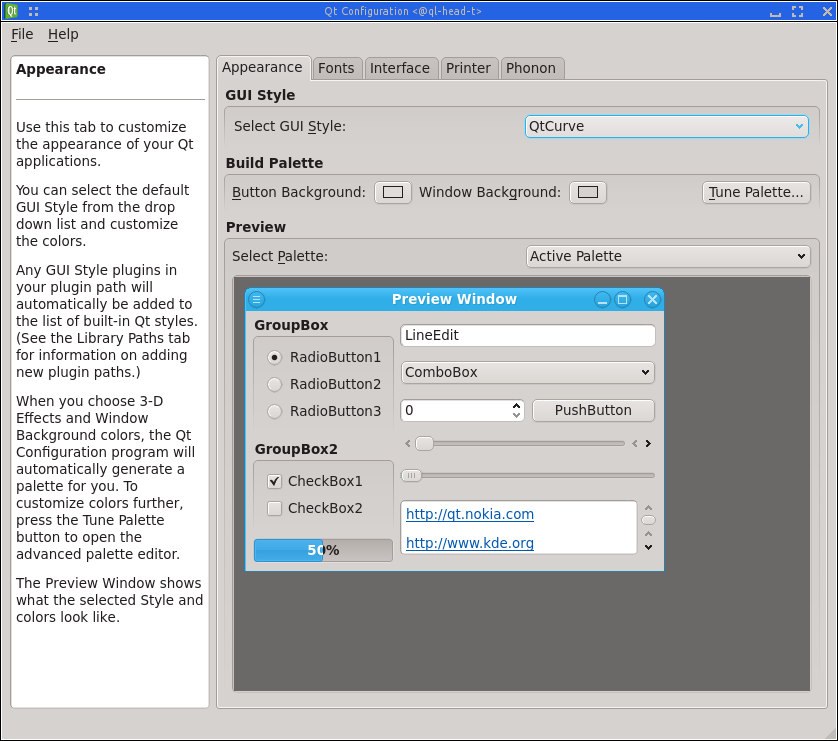
Application Appearance dialog (see above), click on the Style icon, choose the style you've selected in qtconfig as Widget style and press the button. You'll then see a large number of options for

Style - System Settings window. Note, that you will see the resulting changes only after performing some actions (pressing a button, etc.) in the QluMan GUI.
| Revision History | |||
|---|---|---|---|
| Revision 3.0.0-0 | April 18 2017 | ||
| |||
| Revision 2.1.1-0 | July 22 2016 | ||
| |||
| Revision 2.1-0 | Aug 27 2015 | ||
| |||