HPC User Manual
1. Default Shell Setup
1.1. Shell initialization
The Qlustar shell setup supports tcsh and bash. There are global initialization files, that affect the setup of both shell types. Hence, the administrator has to modify only a single file to set environment variables, aliases and path variables for both shells and all users. These global files are:
/etc/qlustar/common/skel/env-
This file is used to add or modify environment variables that are not path variables. The syntax of this file is as follows: lines beginning with a hash sign (
#) and empty lines are ignored. Every other line should consist of the name of an environment variable followed by its value and separated by a space. Example: the following line sets the environment variableVISUALto vi:VISUAL vi
A file
~/.ql-envin the user home directory can be used to define personal environment variables in the same manner. /etc/qlustar/common/skel/alias-
This file is used to define shell aliases. It has the same syntax as the file
envdescribed above. A file~/.ql-aliasin the user home directory may again define personal aliases. /etc/qlustar/common/skel/paths-
This directory contains files with a name of the form <varname>.Linux. The <varname> is converted to upper case and specifies a PATH like environment variable (e.g.
PATH,MANPATH,LD_LIBRARY_PATH,CLASSPATH, …). Each line in such a file should be a directory to be added to this particular environment variable. If the line begins with apfollowed by a space followed by a directory, then this directory is prepended to the path variable, otherwise it is appended. A user may create a personal~/.pathsdirectory, where the same rules apply.
1.1.1. Bash Setup
Qlustar provides an extensible bash setup and bash is the recommended login shell. The bash
initialization procedure consists of global settings and user specific settings. Global
settings are stored in files under /etc/qlustar/common/skel. User specific settings are
stored in files in the corresponding home directory. The following files are used:
/etc/qlustar/common/skel/bash/bashrc-
This file sources the other bash files. Do not modify.
/etc/qlustar/common/skel/bash/bash-vars-
This file is used for setting bash variables.
/etc/qlustar/common/skel/bash/alias-
This file defines bash aliases
/etc/qlustar/common/skel/bash/functions-
This file can be used to make bash functions available to all users.
The file ~/.bashrc also sources the following user specific files which have the same purpose
as the global bash files.
-
~/.bash/env -
~/.bash/bash-vars -
~/.bash/alias -
~/.bash/functions
1.1.2. Tcsh Setup
A similar setup exists for the tcsh. The following files are used:
/etc/qlustar/common/skel/tcsh/tcshrc-
This global tcshrc is sourced first and sources other startup files.
/etc/qlustar/common/skel/tcsh/tcsh-vars-
Used to set tcsh variables.
/etc/qlustar/common/skel/tcsh/alias-
Used to define tcsh aliases.
The file ~/.tcshrc also sources the following user specific files, which have the same
purpose as the global tcsh files.
-
~/.tcsh/alias -
~/.tcsh/env -
~/.tcsh/tcsh-vars
2. Using the Slurm workload manager
2.1. Job Submission
Use the sbatch command to submit a batch script.
Important sbatch flags:
- --partition=<partname>
-
Job to run on partition partname. If no partition is specified, the job will run on the cluster’s default partition.
- -N, --nodes=<<minnodes>[-<maxnodes>]>
-
Minimum number of nodes for the job. A maximum node count may also be specified with maxnodes. If only one number is specified, this is used as both the minimum and maximum node count.
- --ntasks-per-node=<tasks>
-
Number of tasks (processes) to be run per node of the job. Mostly used together with the
-Nflag. - -n, --ntasks=<tasks>
-
Number of tasks (processes) to be run. Mostly used, if you don’t care about how hour tasks are placed on individual nodes.
- -c, --cpus-per-task=<cpus>
-
Number of CPUs required for each task (e.g.
8for an 8-way multi-threaded job). - --ntasks-per-core=1
-
Do not use hyper-threading (this flag is typically used for parallel jobs). Note, that this is only needed, if the compute nodes in your cluster have activated hyper-threading. On most clusters, this is not the case.
- --mem=<mem>
-
Memory required for the job. If your job exceeds this value, it might be terminated, depending on the general Slurm configuration of your cluster. The default memory allocation is cluster specific and might also be unlimited.
- --exclusive
-
Allocate the node exclusively. Only this job will run on the nodes allocated for it.
- --no-requeue | --requeue
-
If an allocated node hangs, determine whether the job should be requeued or not.
- --error=</path/to/dir/filename>
-
Location of
stderrfile (by default,slurm<jobid>.outin the submitting directory). - --output=</path/to/dir/filename>
-
Location of
stdoutfile (by default,slurm<jobid>.outin the submitting directory) - --ignore-pbs
-
Ignore PBS directives in batch scripts. (by default, Slurm will try to utilize all PBS directives)
- --license=<<license type>>
-
Request a license of type <license type>. Only applies for clusters where license bookkeeping is set up. If in doubt, ask your local administrator.
- Submitting a single-threaded batch job
-
0 user@fe-node ~ $
sbatch -N 4 --mem=64G --ntasks-per-node=12 jobscript
This job will be allocated 4 nodes with 12 CPUs each, and 64 GB of memory.
- Submitting a multi-threaded batch job
-
0 user@fe-node ~ $
sbatch --cpus-per-task=12 --mem=128G jobscript
The above job will be allocated 16 CPUs, and 128 GB of memory.
If required, you may use the Slurm environment variable
SLURM_CPUS_PER_TASKwithin your job script to specify the number of threads to your program. For example, to run a job with 8 OpenMP threads of your program <my_program>, set up a batch script like this:#!/bin/bash export OMP_NUM_THREADS=$SLURM_CPUS_PER_TASK <my_program>
and submit with:
0 user@fe-node ~ $
sbatch --cpus-per-task=8  jobscript
When jobs are submitted without specifying the number of CPUs per task explicitly, the
SLURM_CPUS_PER_TASKenvironment variable is not set. - Exclusively allocating nodes
-
Add
--exclusiveto your sbatch command line to exclusively allocate a node.Even if this option is used, Slurm will still limit you to the requested CPUs and memory, or, if not explicitly set, to the possibly defined default values for your cluster.
- Auto-threading apps
-
Programs that 'auto-thread' (i.e. attempt to use all available CPUs on a node) should always be run with the
--exclusiveflag.
2.2. Parallel Jobs
For submitting parallel jobs, a few rules have to be understood and followed. In general they depend on the type of parallelization and the architecture.
- OpenMP Jobs
-
An OpenMP(SMP)-parallel job can only run within a single node, so it necessary to include the option
-N 1. The maximum number of processors for such a program is cluster and possibly node specific. Using--cpus-per-task N, Slurm will start one task and you will have N CPUs available for your job. An example job file would look like:#!/bin/bash #SBATCH --nodes=1 #SBATCH --tasks-per-node=1 #SBATCH --cpus-per-task=8 #SBATCH --mail-type=end #SBATCH --mail-user=user@example.org #SBATCH --time=08:00:00 export OMP_NUM_THREADS=$SLURM_CPUS_PER_TASK <my_program>
- MPI Jobs
-
For MPI jobs, one typically allocates one core per task.
#!/bin/bash
#SBATCH --ntasks=128
#SBATCH --mail-type=end
#SBATCH --mail-user=user@example.org
#SBATCH --time=08:00:00

srun <my_program>
2.3. Allocating GPUs
Allocating GPUs is very much cluster-specific. Depending on your local Slurm setup you might
have dedicated GPU partitions, possibly coupled to QOS definitions, or you might have to
specify GPUs directly using an option like --gres=gpu:<gpu_name>:<# of GPUs>. Ask your local
administrator how to optimally submit GPU jobs on your cluster. Examples:
# one GPU
0 user@fe-node ~ $
sbatch --partition=gpu --gres=gpu:k80:1 script.sh

# two GPUs
0 user@fe-node ~ $
sbatch --partition=gpu --gres=gpu:k80:2 script.sh
2.4. Interactive Jobs
Interactive tasks like editing, compiling etc. are normally limited to the FrontEnd (login)
nodes. For longer interactive sessions, one can also allocate resources on compute nodes with
the commands salloc or directly srun. To specify the required resources, they mostly take
the same options as sbatch.
salloc is special in that it returns a new shell on the node, where you submitted
the job. You then need to use the command srun in front of the following commands to have
them executed on the allocated resources. Please be aware, that if you request more than one
task, srun will run the command once for each allocated task.
An example of an interactive session using srun looks as follows:
0 user@fe-node ~ $
srun --pty -n 1 -c 4 --time=1:00:00 --mem-per-cpu=4G bash
srun: job 13598400 queued and waiting for resources
srun: job 13598400 has been allocated resources

0 user@compute-node ~ $
start interactive work with the 4 cores.
2.5. Walltime Limits
Often, partitions have walltime limits. Use the command sinfo --summarize to see the most
important properties of the partitions in your cluster.
0 user@fe-node ~ $
sinfo  --summarize
PARTITION AVAIL  TIMELIMIT   NODES(A/I/O/T)  NODELIST
demo         up   infinite          0/0/4/4  beo-[201-204]
long*        up   infinite        9/11/0/20  node-[11-30]
gpu          up 1-00:00:00         8/2/0/10  node-[01-10]
short        up   infinite          0/3/0/3  node-[31-36]
If no walltime is requested on the command line, the walltime set for the job will be the
default walltime of the partition. To request a specific walltime, use the --time option to
sbatch. For example:
0 user@fe-node ~ $
sbatch  --time=36:00:00  jobscript
will submit a job to the default partition, and request a walltime of 36 hours. If the job runs over 36 hours, it will be killed by the batch system.
To check the walltime limits and current runtimes for jobs, you can use the squeue command.
0 user@fe-node ~ $
squeue -O jobid,timelimit,timeused -u  username
JOBID               TIME_LIMIT          TIME
1418444             10-00:00:00         5-05:44:09
1563535             5-00:00:00          1:35:12
1493019             3-00:00:00          2-17:03:27
1501256             5-00:00:00          2-03:08:42
1501257             5-00:00:00          2-03:08:42
1501258             5-00:00:00          2-03:08:42
1501259             5-00:00:00          2-03:08:42
1501260             5-00:00:00          2-03:08:42
1501261             5-00:00:00          2-03:08:42
For many more squeue options, see the squeue man page.
2.6. Deleting Jobs
The scancel command is used to delete jobs. Examples:
0 user@fe-node ~ $
scancel 2377
(delete job 2377)

0 user@fe-node ~ $
scancel -u username
(delete all jobs belonging to username)

0 user@fe-node ~ $
scancel --name=JobName
(delete job with the name JobName)

0 user@fe-node ~ $
scancel --state=PENDING
(delete all PENDING jobs)

0 user@fe-node ~ $
scancel --state=RUNNING
(delete all RUNNING jobs)

0 user@fe-node ~ $
scancel --nodelist=node-15
(delete any jobs running on node node-15)
2.7. Job States
Common job states:
| Job State Code | Means |
|---|---|
R |
Running |
PD |
Pending (Queued). Some possible reasons: QOSMaxCpusPerUserLimit (User has reached the maximum allocation) Dependency (Job is dependent on another job which has not completed) Resources (currently not enough resources to run the job) Licenses (job is waiting for a license, e.g. Matlab) |
CG |
Completing |
CA |
Cancelled |
F |
Failed |
TO |
Timeout |
NF |
Node failure |
Use the sacct command to check on the states of completed jobs.
Show all your jobs in any state since midnight:
0 user@fe-node ~ $
sacct
Show all jobs that failed since midnight:
0 user@fe-node ~ $
sacct --state f
Show all jobs that failed since March 1st 2016:
0 user@fe-node ~ $
sacct --state f --starttime 2016-03-01
2.8. Exit codes
The completion status of a job is essentially the exit status of the job script with all the complications that entails. For example consider the following job script:
#! /bin/bash

export OMP_NUM_THREADS=$SLURM_CPUS_PER_TASK
<my_buggy_program>
echo "DONE"
This script tries to run my_buggy_program which fails with an exit code 1. However, bash by default keeps executing, even if a command fails, so the script will eventually print 'DONE'. Since the exit status of a bash script is the exit status of the last command in the script, and echo returns 0 (SUCCESS), the script as a whole will exit with an exit code of 0. This signals sucess and the job state will show COMPLETED, since Slurm uses the script exit code to judge if a job completed sucessfully.
Similarly, if a command in the middle of the job script were killed for exceeding memory, the rest of the job script would still be executed and could potentially return an exit code of 0 (SUCCESS), resulting again in a state of COMPLETED.
Some more careful bash programming techniques can help ensure, that a job script will show a final state of FAILED if anything goes wrong.
Use set -e
Starting a bash script with set -e will tell bash to stop executing a script if a command
fails. This will then signal failure with a non-zero exit code and will be reflected as a
FAILED state in Slurm.
#! /bin/bash
set -e

export OMP_NUM_THREADS=$SLURM_CPUS_PER_TASK
<my_buggy_program>
echo "DONE"
One complication with this approach is, that some commands will return non-zero exit codes. For example grepping for a string that does not exist.
Check errors for individual commands
A more selective and superior approach involves carefully checking the exit codes of the important parts of a job script. This can be done with conventional if/else statements or with conditional short circuit evaluation often seen in scripts. For example:
#! /bin/bash

function fail {
    echo "FAIL: $@" >&2
    exit 1  # signal failure
}

export OMP_NUM_THREADS=$SLURM_CPUS_PER_TASK
<my_buggy_program> || fail "my_buggy_program failed"
echo "DONE"
2.9. Array Jobs
Array jobs can be used to create a sequence of jobs which will be submitted, controlled, and
monitored as a single unit. This job sequence shares the same executable and resource
requirements, but individual executions have different input files. The arguments -a or
--array take an additional parameter that specify the array indices. Within an array job, you
can read the environment variables SLURM_ARRAY_JOB_ID, which will be set to the first job ID
of the array, and SLURM_ARRAY_TASK_ID, which will be set individually for each step.
Within an array job, you can use %a and %A in addition to %j and %N (described above)
to make the output file name specific to the job. %A will be replaced by the value of
SLURM_ARRAY_JOB_ID and %a will be replaced by the value of SLURM_ARRAY_TASK_ID.
Here is an example how an array job may look like:
#!/bin/bash
#SBATCH --array 0-9
#SBATCH -o arraytest-%A_%a.out
#SBATCH -e arraytest-%A_%a.err
#SBATCH --ntasks=256
#SBATCH --mail-type=end
#SBATCH --mail-user=user@example.org
#SBATCH --time=08:00:00

echo "Hi, I am step $SLURM_ARRAY_TASK_ID in this array job $SLURM_ARRAY_JOB_ID"
For further details, please read the corresponding part of the general Slurm documentation.
2.10. Chain Jobs
You can use chain jobs to create dependencies between jobs. This is often the case, if a job
relies on the result of one or more preceding jobs. Chain jobs can also be used, if the runtime
limit of the batch queues is not sufficient for your job. Slurm has an option -d or
--dependency that allows to specify that a job is only allowed to start if another job
finished.
Here is an example of a chain job. It submits 4 jobs (described in a job file) that will be executed one after each other with different CPU numbers:
#!/bin/bash
TASK_NUMBERS="1 2 4 8"
DEPENDENCY=""
JOB_FILE="myjob.slurm"

for TASKS in $TASK_NUMBERS ; do
    JOB_CMD="sbatch --ntasks=$TASKS"
    if [ -n "$DEPENDENCY" ] ; then
        JOB_CMD="$JOB_CMD --dependency afterany:$DEPENDENCY"
    fi
    JOB_CMD="$JOB_CMD $JOB_FILE"
    echo -n "Running command: $JOB_CMD  "
    OUT=`$JOB_CMD`
    echo "Result: $OUT"
    DEPENDENCY=`echo $OUT | awk '{print $4}'`
done
2.11. Monitoring Jobs
squeue will report all jobs on the cluster. squeue -u $USER will report your running
jobs. Slurm commands like squeue are very flexible, so that you can easily create your own
aliases.
Example of squeue:
0 user@fe-node ~ $
squeue
JOBID PARTITION     NAME     USER ST       TIME  NODES NODELIST(REASON)
22392     gpu    gromacs-1   mike PD       0:00      1 (Dependency)
22393     gpu    gromacs-2   mike PD       0:00      1 (Dependency)
22404     gpu    gromacs-2   mike  R      10:04      1 node-07
22391     gpu    gromacs-1   mike  R      10:06      1 node-08
2.12. Email notifications
Using the --mail-type=<type> option to sbatch, users can request email notifications from
Slurm as certain events occur. Multiple event types can be specified as a comma separated
list. For example:
0 user@fe-node ~ $
sbatch --mail-type=BEGIN,TIME_LIMIT_90,END batch_script.sh
Available event types:
| Event type | Description |
|---|---|
BEGIN |
Job started |
END |
Job finished |
FAIL |
Job failed |
REQUEUE |
Job was requeued |
ALL |
BEGIN,END,FAIL,REQUEUE |
TIME_LIMIT_50 |
Job reached 50% of its time limit |
TIME_LIMIT_80 |
Job reached 80% of its time limit |
TIME_LIMIT_90 |
Job reached 90% of its time limit |
TIME_LIMIT |
Job reached its time limit |
2.13. Modifying a job after submission
After a job is submitted, some of the submission parameters can be modified using the
scontrol command. Examples:
Change the job dependency:
0 user@fe-node ~ $
scontrol update JobId=181766 dependency=afterany:18123
Request a matlab license:
0 user@fe-node ~ $
scontrol update JobId=181755 licenses=matlab
Job was submitted to the default partition, resend to gpu partition:
0 user@fe-node ~ $
scontrol update JobID=181755 partition=gpu QOS=gpu-single
Reduce the walltime to 12 hrs:
0 user@fe-node ~ $
scontrol update JobID=181744 TimeLimit=12:00:00
|
Users can only reduce the walltime of their submitted jobs. |
2.14. Binding and Distribution of Tasks
Slurm provides several binding strategies to place and bind the tasks and/or threads of your job to cores, sockets and nodes.
|
Keep in mind that the distribution method may have a direct impact on the execution time of your application. The manipulation of the distribution can possibly speedup or slow down your application. |
The default allocation of tasks/threads for OpenMP, MPI and Hybrid (MPI and OpenMP) applications are as follows:
OpenMP
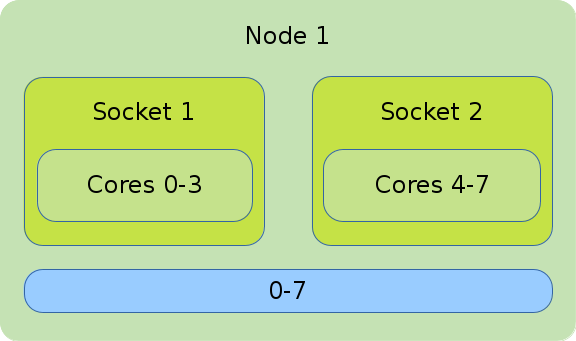
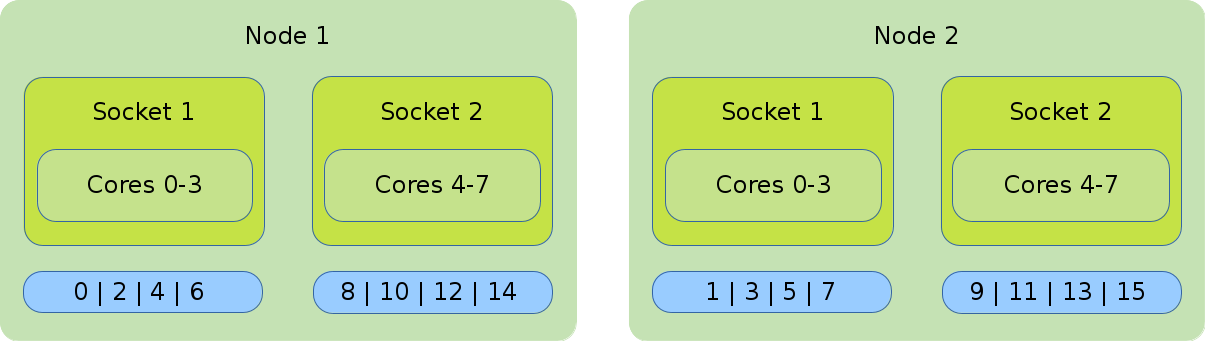
The illustration shows the default binding of a pure OpenMP job on 1 node with 8 CPUs on which 8 threads are allocated.
#!/bin/bash
#SBATCH --nodes=1
#SBATCH --tasks-per-node=1
#SBATCH --cpus-per-task=8

export OMP_NUM_THREADS=$SLURM_CPUS_PER_TASK

srun --cpus-per-task=$SLURM_CPUS_PER_TASK ./application
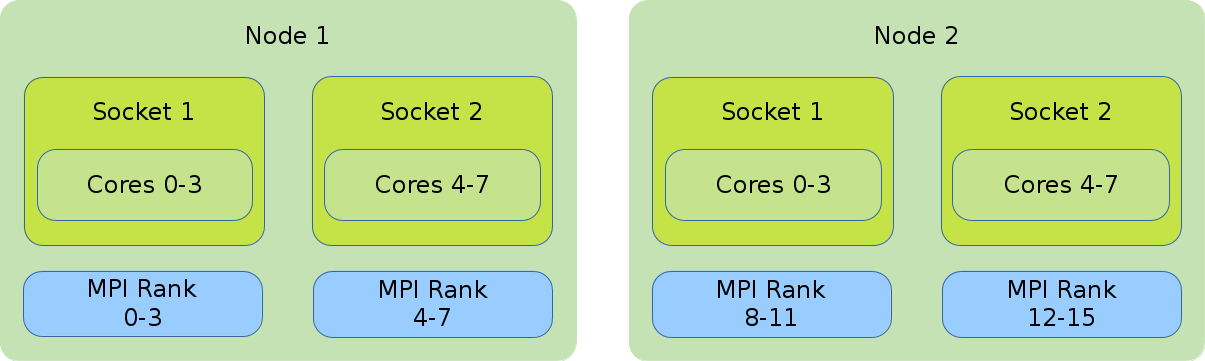
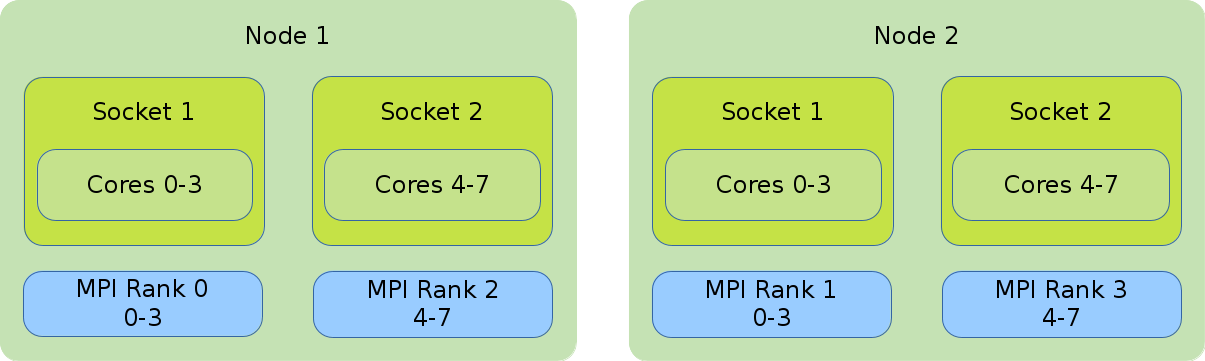
MPI

The illustration shows the default binding of a pure MPI job. 16 global ranks are distributed onto 2 nodes with 8 cores each. Each rank has 1 core assigned to it.
#!/bin/bash
#SBATCH --nodes=2
#SBATCH --tasks-per-node=8
#SBATCH --cpus-per-task=1

srun ./application
Hybrid (MPI and OpenMP)

In the illustration the default binding of a hybrid job is shown. Four global MPI ranks are distributed onto 2 nodes with 8 cores each. Each rank has 4 cores assigned to it.
#!/bin/bash
#SBATCH --nodes=2
#SBATCH --tasks-per-node=2
#SBATCH --cpus-per-task=2

export OMP_NUM_THREADS=$SLURM_CPUS_PER_TASK

srun --cpus-per-task=$SLURM_CPUS_PER_TASK ./application
2.14.1. Detailed Description
2.14.1.1. General
To specify a pattern the commands --cpu_bind=<cores | sockets> and --distribution=<block |
cyclic> are needed. cpu_bind defines the resolution, while --distribution determines the
order in which the tasks will be allocated to the CPUs. Keep in mind, that the allocation
pattern also depends on your specification.
#!/bin/bash
#SBATCH --nodes=2
#SBATCH --cpus-per-task=4
#SBATCH --tasks-per-node=2       # allocate 2 tasks per node - 1 per socket

srun --cpus-per-task $SLURM_CPUS_PER_TASK --cpu_bind=cores \
  --distribution=block:block ./application
In the following sections there are some selected examples of the combinations between
--cpu_bind and --distribution for different job types.
2.14.1.2. MPI Strategies
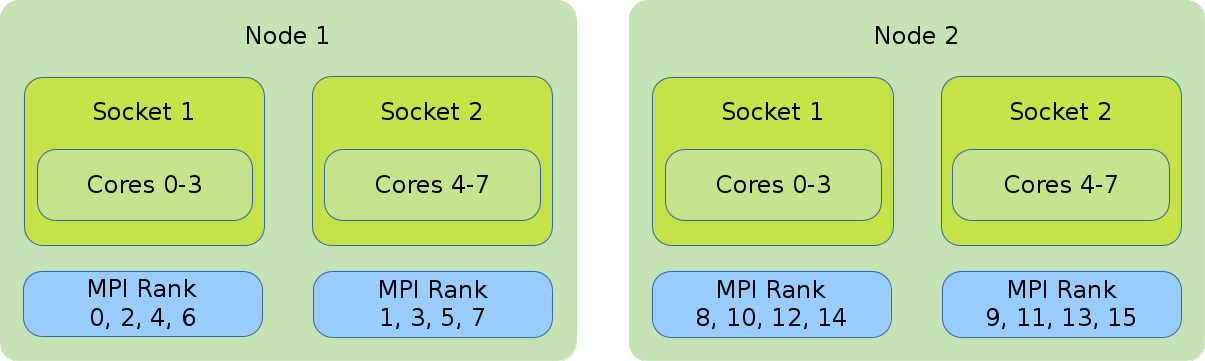
Default Binding and Distribution Pattern
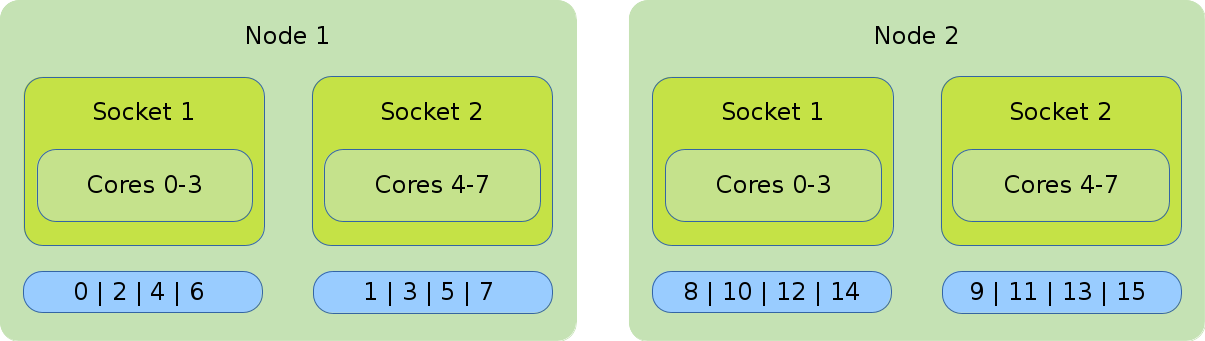
The default binding uses --cpu_bind=cores in combination with
--distribution=block:cyclic. The default (as well as block:cyclic) allocation method will
fill up one node after another, while filling socket one and two in alternation. Resulting in
only even ranks on the first socket of each node and odd on each second socket of each node.
#!/bin/bash
#SBATCH --nodes=2
#SBATCH --tasks-per-nodes=8
#SBATCH --cpus-per-task=1

srun ./application
Core Bound
|
With the following settings, the tasks will be bound to a core for the entire runtime of your application. This usually improves execution speed by eliminating the overhead from context switches occurring when processes/tasks are being auto-moved (by the kernel) from one core to another. |
- Distribution: block:block
-
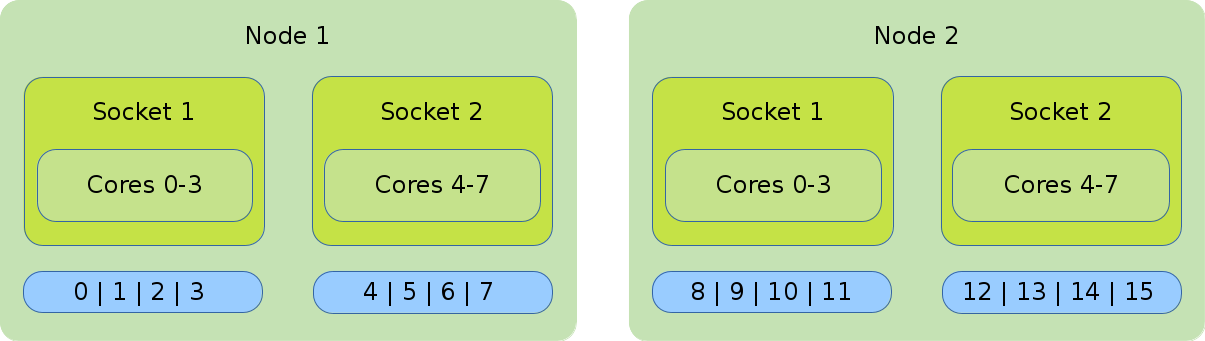
This method allocates the tasks linearly to the cores.
#!/bin/bash
#SBATCH --nodes=2
#SBATCH --tasks-per-node=8
#SBATCH --cpus-per-task=1

srun --cpu_bind=cores --distribution=block:block ./application
- Distribution: cyclic:cyclic
-
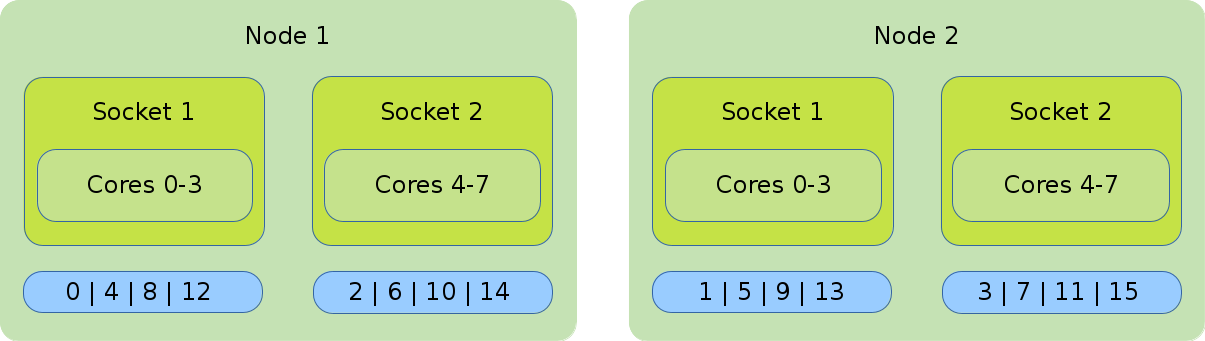
--distribution=cyclic:cyclicwill allocate your tasks to the cores in a round-robin approach. It starts with the first socket of the first node, then the first socket of the second node until one task is placed on every first socket of every node. After that, it will place a task on the second socket of every node and so on.#!/bin/bash #SBATCH --nodes=2 #SBATCH --tasks-per-node=8 #SBATCH --cpus-per-task=1 srun --cpu_bind=cores --distribution=cycle:cycle
- Distribution: cyclic:block
-
The cyclic:block distribution will allocate the tasks of your job in alternation on the node level, starting with the first node filling the sockets linearly.
#!/bin/bash
#SBATCH --nodes=2
#SBATCH --tasks-per-node=8
#SBATCH --cpus-per-task=1

srun --cpu_bind=cores --distribution=clyclic:block ./application
2.14.1.3. Socket Bound
|
The general distribution onto the nodes and sockets stays the same. The major difference between socket and cpu bound lies within the ability of the tasks to jump from one core to another inside a socket while executing the application. These jumps can slow down the execution time of your application. |
- Default Distribution
-
 The default distribution uses
 --cpu_bind=socketswith--distribution=block:cyclic. The default allocation method (as well as block:cyclic) will fill up one node after another, while filling socket one and two in alternation. Resulting in only even ranks on the first socket of each node and odd on each second socket of each node.#!/bin/bash #SBATCH --nodes=2 #SBATCH --tasks-per-node=8 #SBATCH --cpus-per-task=1 srun -cpu_bind=sockets ./application
- Distribution: block:block
-
This method allocates the tasks linearly to the cores.
#!/bin/bash
#SBATCH --nodes=2
#SBATCH --tasks-per-node=8
#SBATCH --cpus-per-task=1

srun --cpu_bind=sockets --distribution=block:block ./application
- Distribution: cyclic:block
-
The cyclic:block distribution will allocate the tasks of your job in alternation between the first node and the second node while filling the sockets linearly.
#!/bin/bash
#SBATCH --nodes=2
#SBATCh --tasks-per-node=8
#SBATCH --cpus-per-task=1

srun --cpu_bind=sockets --distribution=cyclic:block ./application
2.14.1.4. Hybrid Strategies
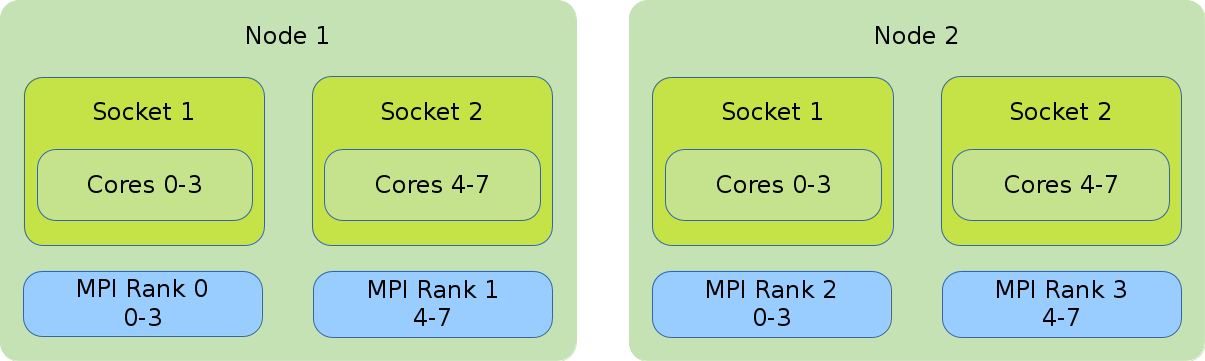
Default Binding and Distribution Pattern

The default binding pattern of hybrid jobs will split the cores allocated to a rank between the sockets of a node. The example shows that Rank 0 has 4 cores at its disposal. Two of them on the first socket inside the first node and two on the second socket inside the first node.
#!/bin/bash
#SBATCH --nodes=2
#SBATCH --tasks-per-node=2
#SBATCH --cpus-per-task=4

export OMP_NUM_THREADS=$SLURM_CPUS_PER_TASK

srun --cpus-per-task $OMP_NUM_THREADS ./application
2.14.1.5. Core Bound
- Distribution: block:block
-
This method allocates the tasks linearly to the cores.
#!/bin/bash
#SBATCH --nodes=2
#SBATCH --tasks-per-node=2
#SBATCH --cpus-per-task=4

export OMP_NUM_THREADS=$SLURM_CPUS_PER_TASK

srun --cpus-per-task $OMP_NUM_THREADS --cpu_bind=cores \
  --distribution=block:block ./application
- Distribution: cyclic:block
-
The cyclic:block distribution will allocate the tasks of your job in alternation between the first node and the second node while filling the sockets linearly.
#!/bin/bash
#SBATCH --nodes=2
#SBATCH --tasks-per-node=2
#SBATCH --cpus-per-task=4

export OMP_NUM_THREADS=$SLURM_CPUS_PER_TASK

srun --cpus-per-task $OMP_NUM_THREADS --cpu_bind=cores \
  --distribution=cyclic:block ./application
2.15. Accounting
The Slurm command sacct provides job statistics like memory usage, CPU time, energy
usage etc. Examples:
# show all of your own jobs in the accounting database
0 user@fe-node ~ $
sacct

# show specific job
0 user@fe-node ~ $
sacct -j <JOBID>

# specify fields
0 user@fe-node ~ $
sacct -j <JOBID> -o JobName,MaxRSS,MaxVMSize,CPUTime,ConsumedEnergy

# show all fields
0 user@fe-node ~ $
sacct -j <JOBID> -o ALL
Read the manpage (man sacct) for information on the provided fields.
2.16. Other
Running on specific hosts
If you want to place your job onto specific nodes, there are two options for doing this. Either
use -p to specify a partition with a host group that fits your needs. Or, use the -w
(alternatively --nodelist) parameter with a single or list of nodes, where you want your job
to be executed.
Useful external Slurm documentation links
-
Slurm Profiling using HDF5
-
sh5util - Tool for merging HDF5 files