QluMan Guide
1. Introduction
1.1. Qlustar Clusters
A Qlustar cluster is designed to boot and manage compute and/or storage nodes (hosts) over the network and make them run a minimal OS (Operating System) image in RAM. Local disks (if present) are only used to preserve log files across boots and for temporary storage (e.g. for compute jobs). Hence all Qlustar cluster nodes apart from head-nodes are always state-less.
One or more head-nodes deliver the OS boot images to the nodes. Additionally, a small NFS share containing part of the configuration space for the nodes is exported from one of the head-nodes. Optionally, the RAM-based root FS (file-system) can be supplemented by a global UnionFS chroot to support software not already contained in the boot images themselves. The head-node(s) of the cluster typically provides TFTP/PXE boot services, DHCP service, NIS service and/or slurm resource management etc. to the cluster.
The management of these and all cluster-related components of a Qlustar installation in general
can easily be accomplished through a single administration interface: QluMan, the Qlustar
Management interface. The QluMan GUI is multi-user as well as multi-cluster capable:
Different users are allowed to work simultaneously with the GUI. Changes made by one user are
updated and visible in real-time in the windows opened by all the other users. On the other
hand, it is possible to manage a virtually unlimited number of clusters within a single
instance of the QluMan GUI at the same time. Each cluster is shown in a tab or in a separate
main window.
1.2. Overview of basic Setup Principles
A central part of Qlustar are its pre-configured modular OS images. Different nodes may have
different hardware or need to provide specific and varying functionality/services. Therefore,
to optimize the use of hardware resources and increase stability/security, Qlustar does not
come with just one boot image that covers every use-case. Instead, a number of image modules
with different software components are provided from which individual custom OS images can be
created as needed. A Qlustar OS image just contains what is actually required to accomplish the
tasks of a node, nothing more. See below for more details about configuring
OS images.
But providing different OS images is still not enough for a flexible yet easily manageable cluster: A node booting a generated image also receives extra configuration options via DHCP, via qlumand and via NFS at boot time, thus allowing to fine-tune the OS configuration at run-time. E.g. it is possible to determine how the local disks are to be used (if any are present), whether additional services like OpenSM or samba should be enabled/disabled and a lot more. Four different configuration/property categories exist in QluMan:
-
Generic-Properties are simple on/off options or key+value pairs applicable to groups of nodes, e.g. to flag the reformatting of the local disks at the next boot, add SMTP mail functionality, etc.
-
Config Classes handle more complex configurations like boot/disk configs, DHCP, etc.
-
Hardware-Properties are not used to configure the nodes themselves but describe their hardware configuration and are of importance e.g. for the slurm workload manager and/or inventory management.
Of course, one can configure every host in a cluster individually. But in most clusters, there are large groups of hosts that need to be configured identically. However, even if there are several groups, they might share only some properties/configurations, but not all of them. To provide a simple handling for such scenarios, while at the same time maintaining maximum flexibility, QluMan allows to combine generic properties, hardware properties and config classes each into sets.
For settings that apply to all hosts of a cluster, there are global sets: A global Generic
Property set, a global Hardware Property set and a global Config set.
Additionally, it is possible to combine exactly one Generic Property set, one Hardware Property
set and one Config set into a Host Template. Assigning a Host Template to a group of hosts
allows to specify all of their specific properties and configuration settings with a single
mouse-click.
For situations where flexibility is required (e.g. one host in a group has a slightly different hardware configuration than all the others), it is also possible to override or extend the settings defined in the chosen Host Template, by assigning either one of the sets and/or individual properties/config classes directly to a host. In case of conflicts, values from individual properties/config classes have highest priority, followed by set values, then the Host Template values and finally the global values. The Enclosure View presents a nice graphical representation of this hierarchy of settings for each host. For more details on this, see Configuring Hosts.
2. Cluster Connections
2.1. Connecting to a Cluster
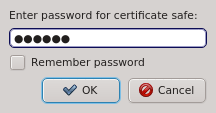
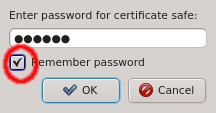
When starting qluman-qt, it requests the password for your certificate safe. This safe
holds the login information for your clusters together with the private keys for the
corresponding QluMan user account. The password for the certificate safe is required on every
start and whenever changes to the safe need to be written. You can have the client remember the
password for the duration it is running by checking the Remember password check-box. Without
enabling this, you will have to input the password again, whenever changes to the safe need to
be written. If you are starting qluman-qt for the first time and therefore have no
certificate safe yet, this dialog is skipped and an empty Connect Cluster dialog opens
directly. See Adding a new Cluster below about how to add a new cluster.
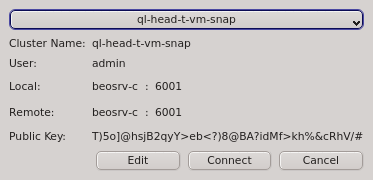
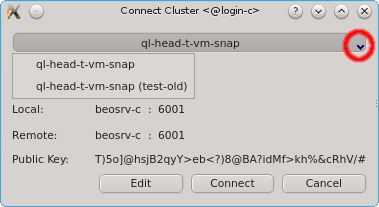
Having entered the correct password for the certificate safe the Connect Cluster dialog
opens. The last cluster used will be pre-selected but a different cluster can be selected from
the drop-down menu. Click the Connect button to connect to the selected
cluster. If this is the first time you connect to this cluster, the client generates a random
public/private key pair. These keys will eventually be used for permanent authentification of
the chosen user with this cluster. Following this, a connection to the server is made with an
attempt to authenticate the client using the one-time token. On success, the server stores the
public key of the client for future logins and the client stores both the private and public
keys in the certificate safe. This finalizes the initial handshake.
|
The GUI client asks for the password of the certificate safe to store the generated public/private key pair. It will only do so, when you initially connect with a one-time token. For future connections, it will use the stored key pair to connect and authenticate. The safe contents will then not be changed again. |
2.1.1. Connection Status
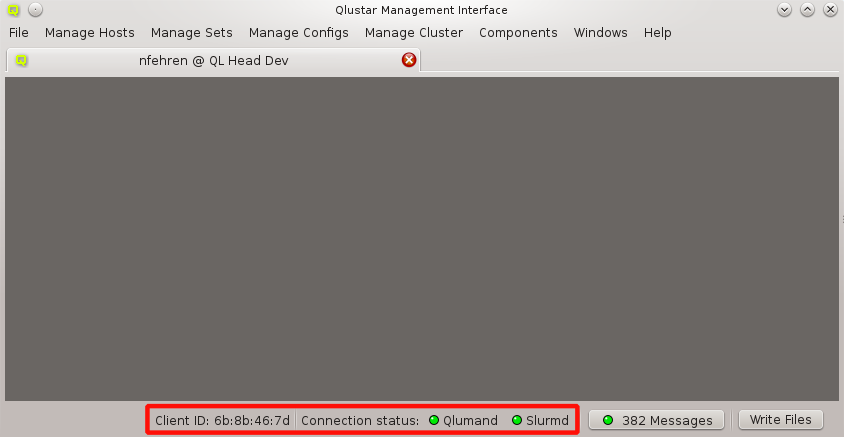
The status of the network connection between a GUI session and the relevant QluMan server
components (qlumand, qluman-slurmd, etc.) is displayed by LEDs in the status bar of the main
QluMan window. The QluNet internal network client ID is also listed there.
2.1.2. Online Version Check
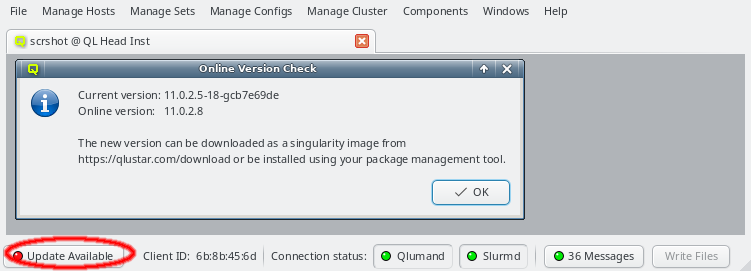
When starting up, the QluMan GUI will check whether there is a newer QluMan version available for download. If a newer version is found, or the major version currently in use is no longer supported, a button Update Available will appear in the lower left corner of the main window. Clicking on it will show more details about the version currently in use and the one available for download.
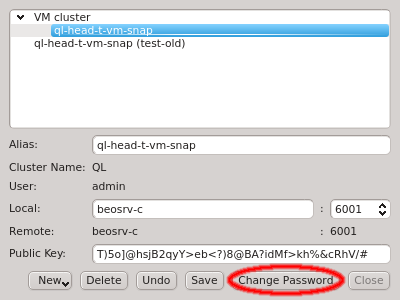
2.2. Managing Clusters
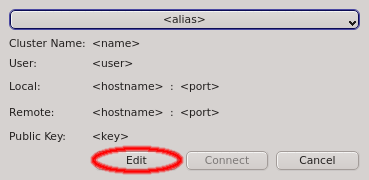
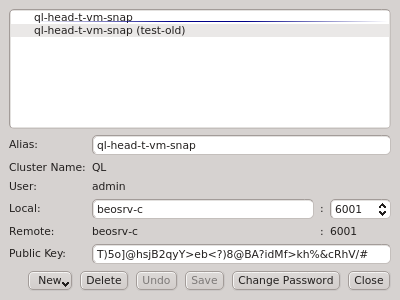
The Manage Clusters dialog manages all your accounts on different clusters or as different
users on the same cluster. It allows adding new cluster connections, editing existing and
removing obsolete ones as well as changing the password for the certificate safe. It can be
opened by clicking Edit in the Connect Cluster dialog.
2.2.1. Adding a new Cluster
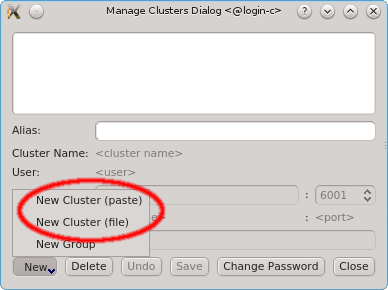
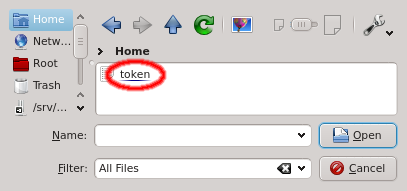
To add a new cluster click the New button and select New Cluster (paste) or New Cluster (file) from the menu depending on whether you want to paste the one-time token or load it from a file. If you don’t have a one-time token for the cluster see Generating the Auth Token.
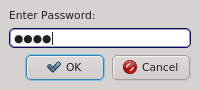
Paste the one-time token data into the dialog and click Decrypt or select the file containing the token. When asked for the password, enter the pin
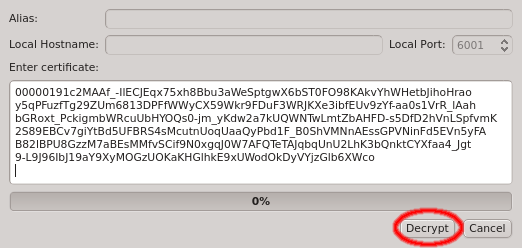
that was used when creating the token (in case you didn’t generate the token yourself, you
should have been told the pin by your main cluster administrator). The dialog should then show
the cluster/head-node infos that where packed into the one-time token. If you started
qluman-qt on your workstation, then you might have to change the Local Hostname to use the
external hostname of the head-node. Similarly, if you changed the port for qlumand or if you’re
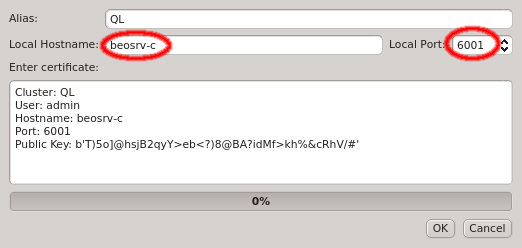
connecting via port forwarding, you have to adjust that too. The Alias is the name this
cluster will be shown as, when using the drop-down menu in the Connect Cluster dialog. Click
Ok to add the cluster connection.
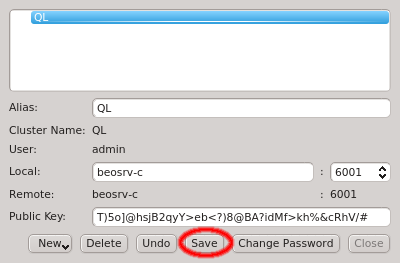
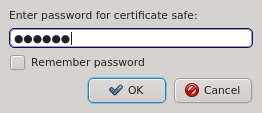
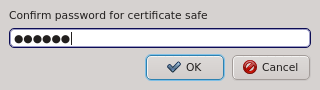
After adding the new cluster select Save to save the changes. If this is your first cluster then it will create the certificate safe and ask you to enter and confirm a password. Otherwise it will ask for the existing password unless the Remember password check-box was enabled.
2.2.2. Sorting multiple clusters
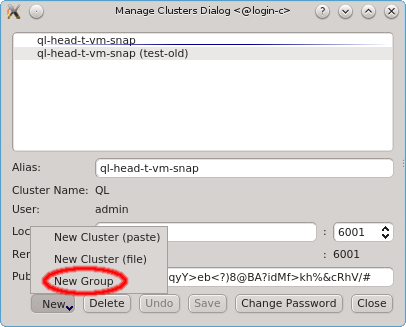
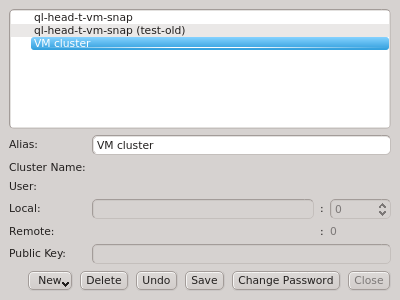
If multiple cluster connections are registered, the corresponding entries can be reordered
using drag&drop. This allows to move them to the desired location in the list. Clusters can
also be grouped in sub-menus by first creating a new group (sub_menu) and then dragging cluster
entries into it. The tree structure of the Manage Clusters dialog will be reflected in the
drop-down menu
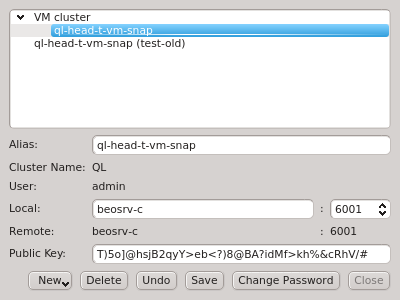
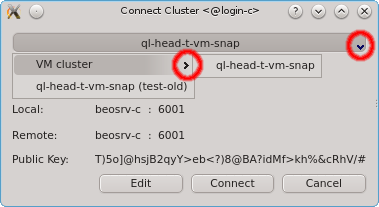
of the Connect Cluster dialog. This allows a nicely structured layout when dealing with a
larger number of clusters as e.g. in the case of service providers. Standard cluster admins
will most likely not need this feature.
2.2.3. Changing the certificate safe password
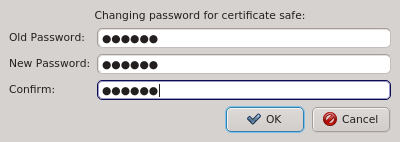
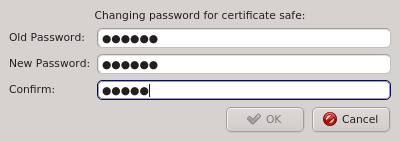
The Manage Clusters dialog allows changing the password for the certificate safe. This
requires entering the old password for the safe as well as the new password and a confirmation
of the new password. The Ok button will only be selectable if the new password
and confirmation matches.
3. Cluster Network Setup
An arbitrary number of networks of different types and with different properties can be configured for a cluster. There is a network config class that allows networks to be grouped in any number of network configs. The idea is, that any such network config reflects the network adapter configuration of a single or a group of nodes. Finally such a network config can be assigned to Config Sets or directly to cluster nodes. According to the chosen network config for a node, individual node network properties like IP or MAC addresses can then be assigned to the node in the Enclosure View.
3.1. Network Definitions
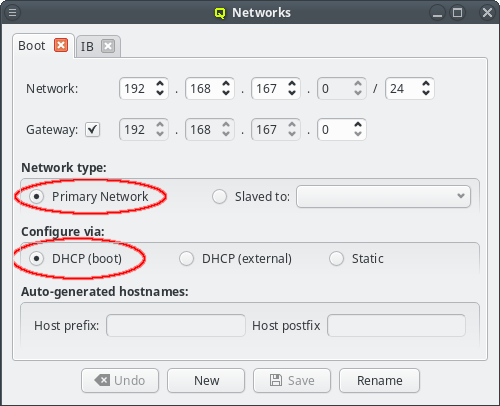
During the installation of Qlustar, the basic configuration parameters for the cluster network had to be entered. Often, additional networks need to be defined later. This can be accomplished within the networks dialog selectable via from the main windows menu.
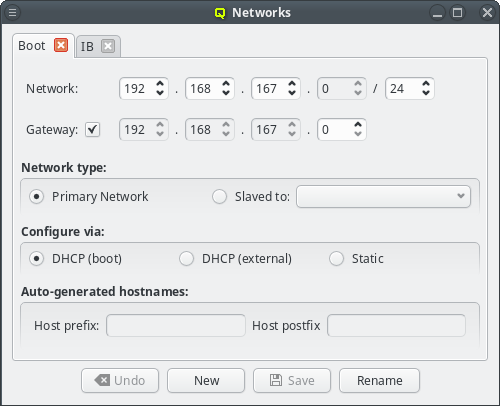
The Networks window displays all defined networks each in a separate tab. Each tab shows all the configurable parameter that define the corresponding network. The base settings of a network are its IP address and netmask as well as an optional gateway address. QluMan distinguishes two types of networks: Primary Networks and Slave Networks.
A primary network is one that determines the IP address of a host using one of the options listed in the Configure via section of the dialog. The available options are:
- DHCP (boot)
-
Configuration via the DHCP server running on the head-node. This allows the host to boot over the network using PXE. Every cluster must have one such network and it is created automatically during the Qlustar installation process according to the data provided from the installer.
- DHCP (external)
-
Configuration by an external DHCP server not under the control of QluMan. This option only makes sense for nodes that have an adapter connected to a cluster-external network, like e.g. a cluster FrontEnd node.
- Static
-
Static configuration for each host individually. Select Static for this method. The last two options are usually used for the external networks of the head-node and login nodes.
A slave network on the other hand, is tied to a primary network. The idea is, that the IP of a host in the slave network is determined by mapping the host part of the IP in the primary network into the network range of the slave network. In most cases, this means that the host IP of the primary and slave networks end in the same number. This is a convenient feature, mostly used for Infiniband and IPMI networks. It saves you from registering/managing additional MAC/IP addresses and makes IPs easily recognizable as belonging to the same host.
|
This mechanism requires the netmask of the slave network to be at least as large as the primary network it is slaved to. Hence, the GUI prevents smaller values to be selected. |
Configuring the Boot network
Qlustar uses network-booting via PXE to start nearly all hosts in the cluster. The only
system(s) that can not be network-booted is the head-node(s) itself. Every cluster should
therefore have a network that is a Primary Network and configured via
DHCP (boot). Such a network is created by the Qlustar installer and called
Boot. Changes to this network are rarely necessary but if changes were made, all nodes must
be rebooted to get the updated configuration.
|
Changing the network address or mask may also require additional manual changes in the config of hosts booting from disk, specifically the head-node itself. |
Individual IP addresses and MACs of a host can be configured in the Enclosure View, once the host has been assigned to a network config. As with other settings/configs, this assignment can also be done in the Enclosure View by assigning a network config in one of the usual ways (direct assignment, host or global template).

The GUI has some safeguards to prevent invalid network configurations. For example different networks must not overlap. Attempting to change the network address so that it overlaps another network won’t be accepted: The Save button at the bottom of the window will be disabled and a red LED icon will appear with a tool-tip explaining why the selected configuration is not allowed.
When changing the network IP address or netmask, the IP addresses of all hosts configured to be in that network will be remapped to reflect the changed values. This requires that a new netmask is large enough, so that the resulting network range can include all existing hosts in the cluster. Therefore, the GUI won’t let you pick anything too small. If there are unused address ranges in the existing network and you need a smaller netmask than currently selectable, you will first have to change some host addresses so that all of them combined occupy a small enough subset of the current network.
Changing the network address IP will automatically remap the cluster internal Head IP address
as well, while changing the netmask will not. Note, that the Qlustar convention, to use the
second last IP of the cluster network as the Head IP, is obviously not a requirement. Hence,
this is not done automatically when changing the netmask. Furthermore, changing the Head IP
involves some additional steps without which the nodes in the cluster won’t function or even
boot. The reason is that the Head IP also appears in the Global DHCP Template and may have
been added to other templates too. These templates are simple, freely editable text blobs. A
change of the network definitions will not change them, so you need to check and adjust each of
them manually.
Changes to the networks definition have wide-ranging effects. To prevent accidental changes or booting hosts while in between configurations any changes to the network are not saved instantly. Instead the Save button at the bottom of the window needs to be clicked to confirm the changes. Alternatively, the Undo button can be used to revert any changes to the last saved values. Any changes to a network must be saved or reverted before switching tabs or closing the window.
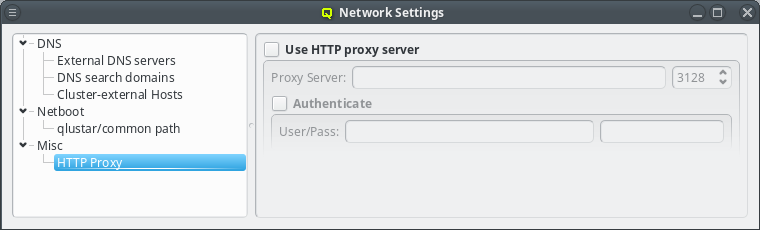
If the head-node does not have direct access to the Internet, a HTTP proxy must be configured. QluMan uses this proxy to download packages from the Qlustar repository, when creating a new chroot. The proxy can be configured under (Other Network Settings).
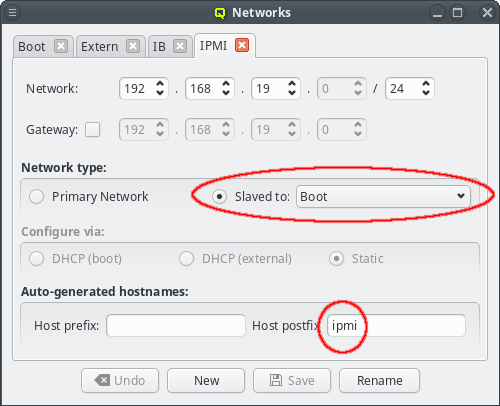
Configuring slave networks
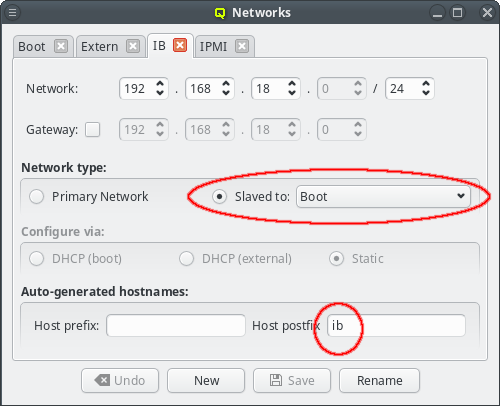
For convenience, in a cluster with Infiniband and/or IPMI, the corresponding networks are usually setup to mirror the Boot network: If the Boot IP of a host ends in .10 then the Infiniband and IPMI IPs will usually also end in .10. Within QluMan, this relationship can be set up by configuring these special networks as a slave to the Boot network: In the tab of the network under consideration, simply select the network to be slaved to from the drop-down menu.
In a slave network, the IP of a host is always derived from its IP in the network it is slaved to. During the initial part of a node’s boot process, the qluman-execd writes the resulting static slave network information into the relevant configuration file, so that the adapter will later be configured via standard OS methods. Hence, the IPs in the slave network don’t need to be set for each host individually.
The hostnames corresponding to the IPs in the slave network are also under control of this
mechanism. The name of a host in a slave network will be auto generated using the QluMan node
name of the host as the stem and adding a prefix and/or postfix separated by a dash to it. The
default Infiniband network setup for example has a postfix of ib, meaning a host named
beo-01 will be reachable on the Infiniband network as beo-01-ib. Such pre-/postfixes may be
set/changed in the configuration dialog of the network.
|
Hostnames generated by QluMan are added to the DHCP (boot network only), NIS and ssh configs allowing them to be used within the cluster where necessary. |
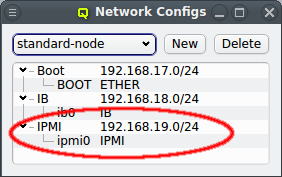
3.2. Network Configs
As part of the above mentioned reimplementation of QluMan network configuration management, a
new config class Network Config has been added. It allows combining multiple network
definitions (as described above) and link each of them to a
physical adapter. Like any other config class, such a Network Config may then be assigned to
the Global Template, Host Templates, Config Sets or individually to hosts. Every host must have
exactly one assigned Network Config which must match its hardware (adapter names).
|
Hosts with different types of network adapters may need different Network Configs even if they are connected to the same networks, because the hardware specific network adapter name of each NIC can differ between these hosts. |
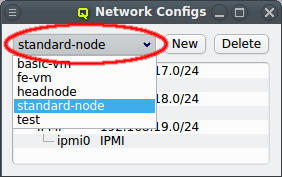
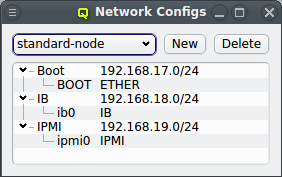
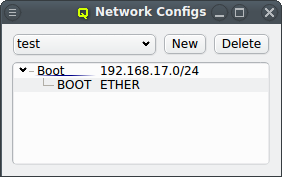
There can be any number of Network Configs, but only one is shown at a time in the corresponding dialog. To view or edit a different Network Config, select the desired entry from the drop-down menu.
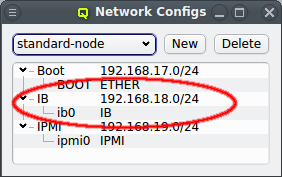
The configuration of the selected Network Config is shown as a tree. The top-level items of the tree list the defined network definitions: Both the name and the network/mask of the corresponding network are shown for each entry. Below each network definition, the NIC information (device name and network type) for that network is displayed. QluMan currently supports three types of NICs: ETHER for Ethernet, IB for Infiniband/OmniPath and IPMI.
3.3. Managing Network Configs
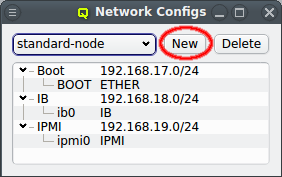
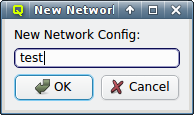
A new Network Config can be created by clicking the New button. This opens a dialog asking for the name of the new Config. Entering an unused name and pressing the Ok button will create it and select the new entry in the Networks Configs dialog. Initially this will be empty.
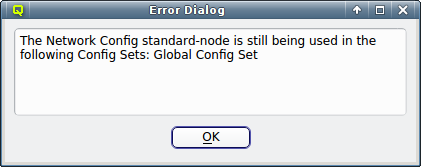
A Network Config may be deleted by clicking the Delete button. It can only be deleted, if it is no longer directly assigned to a host or included in a Config Set. Otherwise an error dialog will pop up describing the locations where it is still in use.
3.3.1. Adding a Network
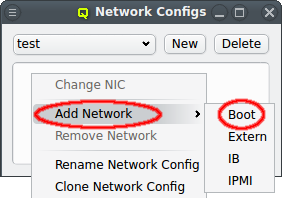
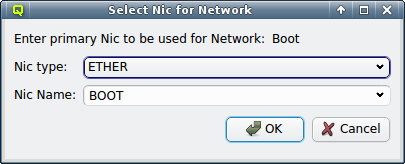
A network can be added to the Network Config by selecting a network definition from the entries below Add Network in the context menu. This opens a dialog where the type and name of the NIC for this network may be selected.
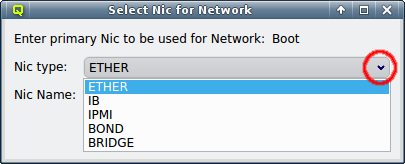
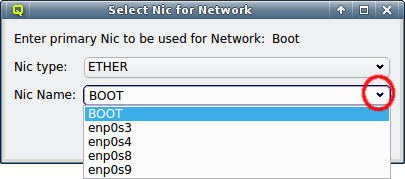
The NIC type should be selected first using the corresponding drop-down menu. A selection of valid types is available to choose from. The drop-down menu for the NIC name lists all the previously used names of the same type for easy selection. A new name can also be entered directly, in case the NIC has a name not previously encountered.
|
The name for Ethernet adapters is generated by systemd according to the way the Ethernet chip is wired into or where the network card is inserted on the mainboard (in case of add-on cards). This mechanism generates names that are predictable even when another NIC fails or a new one is added later on. It guarantees that the same name is used for a NIC on every boot. |
|
The special name |
The default name for Infiniband adapters is the kernel name of the IP-over-IB device, which
usually has the form ib<N> starting with ib0. Even simpler, the name for IPMI adapters is
ipmi0.
After selecting the NIC type and name, click OK and the new entry will appear in the Network Config dialog. If more networks are needed, simply repeat the procedure above for each of them.
3.4. Host specific Network Settings
When all the networks have been defined and required Network Configs were created and assigned to a host through a template or directly, the final step of the network configuration involves the host’s individual settings.
They are displayed by selecting the host in the Enclosure View. For each network the host belongs to, the Host IP, MAC address (where applicable) and optional host aliases are shown and can be set or changed.
If the host already got a Network Config assigned at its creation time, either from the Global Template, by setting a Host Template or by copying the config from an existing host, then the boot network will already have a Host IP and MAC address filled in. Both of these are required for the host to be able to boot from the network and to receive the correct configuration at boot.
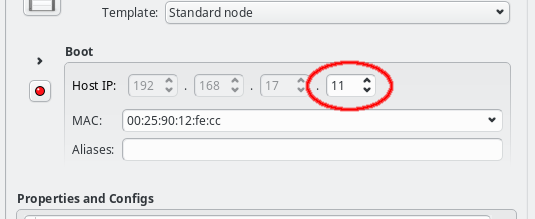
The Host IP can be entered directly or changed using the up or down arrows. Only the host part of the IP can be changed in this way, its network part is fixed and grayed out: The GUI ensures that only IPs being part of the corresponding network can be entered. If no Host IP has been manually set for the host yet, then the lowest IP in the network will be suggested and the Host IP will be color coded to indicate unsaved changes. More info about color coding and how to save changes can be found in this section.
|
The Host IP for slave networks is auto-generated by mapping the host’s IP in the master network into the slave, such that the last digits of the IP are identical in both networks. It can therefore not be edited. |
For networks that use DHCP(boot) to configure the network adapter, the correct MAC address
must be given. It must be entered as six hexadecimal bytes separated by ":". For example:
00:25:90:12:fe:cc. Again, color coding of the MAC label will show whether the
entered MAC address is valid, although most invalid input is rejected by the GUI outright. For
networks defined as DHCP(external), the MAC field is purely informational and not used by
QluMan.
The last part of a host’s network settings are optional host aliases. These are simply alternative names under which the host can be reached and which will be added to the NIS database. Aliases are entered as a space-separated list of hostnames and must be unique. For performance reasons, the uniqueness is not fully checked by the GUI, so care must be taken to avoid collisions.
3.5. Names of a Host
A host can have multiple names. Typically there is at least one name for each network it is
connected to. The primary name of a host in QluMan is its Cluster node name, which is its
name shown in the Enclosure View tree. By convention and default, the head-node is named
beosrv-c and the FrontEnd node login-c. Note, that these are their names in the
cluster-internal boot network and not their real hostname (displayed by the hostname
command). Per default, compute nodes are named beo-<N> with <N> being a two-digit running
number and their Cluster node name will also be used as their real hostname.
|
We strongly advise to keep the head-node |
A host’s Cluster node name will always resolve to its IP in the boot network. It is also used
as the stem, when the name of the host in networks slaved to the boot network is generated with
the configured pre-/suffix of the slave. E.g. per default, the name in the IPMI network has a
suffix of ipmi, which means that a host with Cluster node name beo-01 will become
beo-01-ipmi in the IPMI network.
Sometimes the generated names are inconvenient to remember, or the network does not have generated names at all, when it is neither the boot nor a slave network (e.g. the external network of the FrontEnd node). In such cases, a host can be given additional names by defining host aliases for it.
Even stronger than an alias is the hostname override. The hostname override does not just add
an additional name for the host, but also makes it the real hostname that is displayed by the
hostname command) and will appear on the shell prompt, in logfiles or outgoing mails from
that host. This is commonly used for FrontEnd nodes, so that the visible name matches the
external name of the host that is used to connect to it.
3.6. Infiniband Network
For most practical purposes, Infiniband (IB) adapters need to be configured with an IP address (IPoIB) just like Ethernet adapters. If you have chosen to configure an IB network during installation, this section is mostly about how to review or change the initial settings. If not, a network definition for IB has to be created in the Networks dialog. There, a network IP address and a netmask can be chosen for the IBoIB Network.
The Infiniband network must not collide with any other network. This is prevented automatically in the settings dialog. It is convenient to define the IB network as a slave to the boot network. Then the IB IP of each host is computed by mapping the host part of its Boot IP to the IB network and no further configuration is necessary. Example: If a host’s boot network IP address is 192.168.17.100, the corresponding slaved IB IP address will become 192.168.18.100.
|
This mechanism requires the IB netmask to be at least as large as the Boot Network netmask. Hence, smaller values won’t be selectable. |
In order to have the IB adapter of a node configured correctly during the boot process, the network definition must also be added to the Network Config used by the host. It is not uncommon, that a cluster consists of hosts with IB and hosts without. In such cases, multiple Network Configs must be created (at least one with IB and one without IB) and assigned to the different hosts in one of the standard ways (via templates or directly). If the Network Config for a host includes a NIC of type IB, during its boot process, the necessary Infiniband kernel modules will be loaded and IP-over-IB will be set up with the IP mapping configured in the network definition.
3.6.1. Activating/configuring OpenSM
In an IB fabric, at least one node (or switch) has to run a subnet manager process that manages the IB routing tables. Qlustar provides OpenSM for this task. If the head-node is also part of the IB network, it’s usually best to configure it to run OpenSM. This might have been chosen during installation, in which case there is nothing more to be done. If not, you have the option to run OpenSM on ordinary nodes too.

In this case, it is advisable to run OpenSM on two or three nodes (not more) for redundancy reasons. It is therefore best, to configure this directly for the chosen hosts, rather than using a Host Template or generic property set. After selecting the host(s) where OpenSM should run in the Enclosure View, open the context menu and select . The next time the host(s) boots, the OpenSM daemon will be started on all its Infiniband ports.
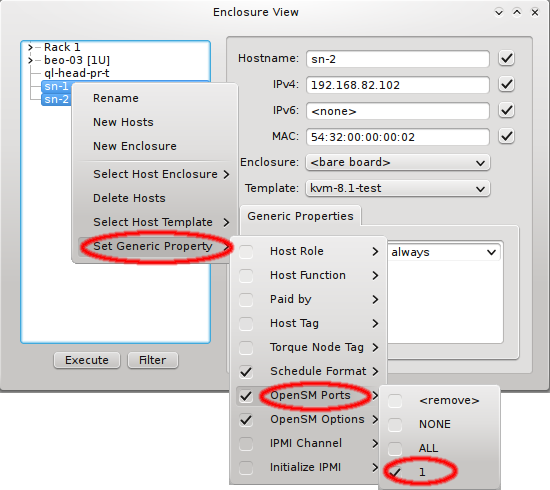
If a host has more than one IB port, OpenSM can also be configured to run only on a specific
one rather than on all of them. The port can be specified by its number or by its unique ID. As
this is an uncommon configuration and the unique ID is unknown beforehand, there is no preset
value for this. To create a new value, first select an existing value, e.g. ALL, for the
generic property OpenSM Ports. You can then edit the value in the Generic Properties box of
a host. Editing the line and pressing Enter will create the new value. Beware
that this will only affect one shown host. To assign the new value to other hosts, select them
and then change the OpenSM Ports property through the context menu.
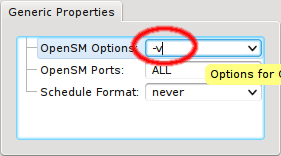
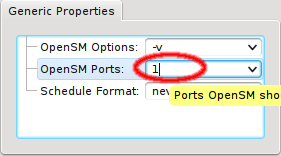
In some circumstances, it might be necessary to run OpenSM with extra options. This can also be
configured via Generic Properties. The only preset value is the empty
string, so you need to create a new value for the options you require. First add the empty
value of the generic property OpenSM Options to one host. Then edit the value to your
requirements and press Enter to create it. Finally add/change the OpenSM Options
generic property for all relevant hosts.
3.7. IPMI settings
Configuring IPMI is similar to Infiniband and also involves multiple steps, because there are a number of options to set. If you have chosen to configure an IPMI network during installation, a larger part of this section is about how to review or change the initial settings. If not, a network definition for IPMI has to be created in the Networks dialog.
There, an IPMI network address and netmask can be chosen. The IPMI network must not collide with any other network. This is prevented automatically in the settings dialog. By making the network a slave to the boot network, the IPMI IP of each host is computed by mapping the host part of its Boot IP to the IPMI Network. Example: If a host’s boot network IP address is 192.168.17.100, the corresponding slaved IPMI IP address will become 192.168.19.100.
Just as in the case of an IB adapter, the network definition for IPMI must be added to the Network Config used by the host. It is not uncommon, that a cluster consists of hosts with IPMI and hosts without. In such cases, multiple Network Configs must be created (at least one with IPMI and one without IPMI) and assigned to the different hosts in one of the standard ways (via templates or directly). If the Network Config for a host includes a NIC of type IPMI, the node is ready for monitoring its temperature and fan speeds.
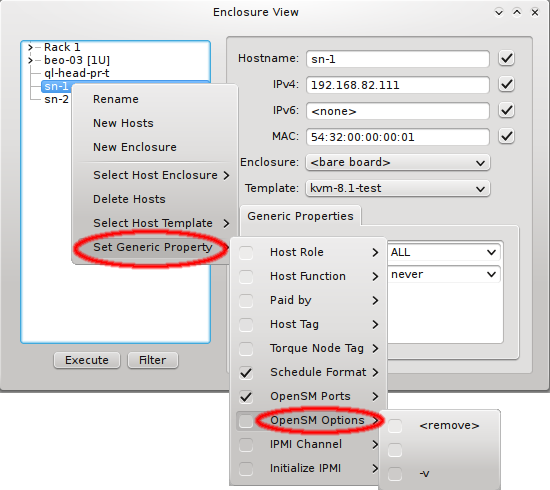
Enabling IPMI nodes for remote control involves one more setting: The generic property
Initialize IPMI. Per default, the settings of the IPMI cards are not touched by Qlustar as
they retain their configuration across boot. However, if the Initialize IPMI generic property
is assigned and set to true, the IPMI card network settings of the corresponding host will be
set every time it boots. Changing the value of this property to true and after booting back
to false, allows a one-time setup of the card’s network properties.
3.8. Global Network Settings
Some network settings can not be assigned to a group of nodes but relate to the cluster as a whole and how it connects to the outside world. This includes the configuration of the DNS and an optional HTTP Proxy. To configure these global network settings, select .
3.8.1. DNS (Domain Name System)
DNS has a hierarchical design. Each correctly configured computer knows about a DNS server that will handle local requests. Should the request fall outside the scope of the local server, it will ask the next higher server in the hierarchy. Starting with Qlustar 11, local DNS requests are handled by dnsmasq which will answer requests concerning any QluMan configured node automatically. The handling of requests about external hosts are affected by three QluMan settings: The external DNS servers, the DNS search domains and Cluster-external Hosts.
3.8.1.1. External DNS servers
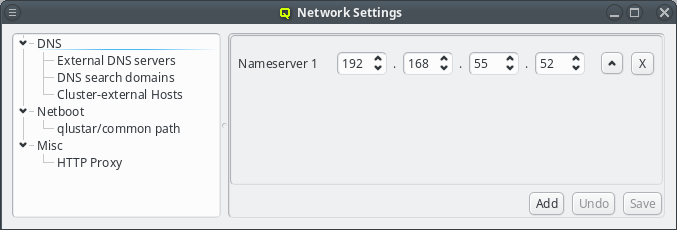
External DNS servers will be needed to resolve any DNS request about hosts outside of the cluster. Since this is used to resolve hostnames into IP addresses a nameserver can not be identified by its hostname, but must be specified by its IP address. This are usually servers maintained by the local IT department or by your internet service provider (ISP). There are also public DNS servers anyone can use as a fallback, for example Googles public DNS server (IP 8.8.8.8).
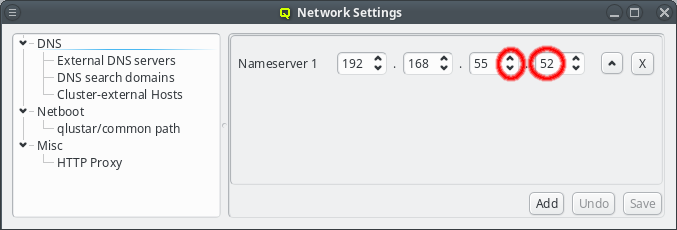
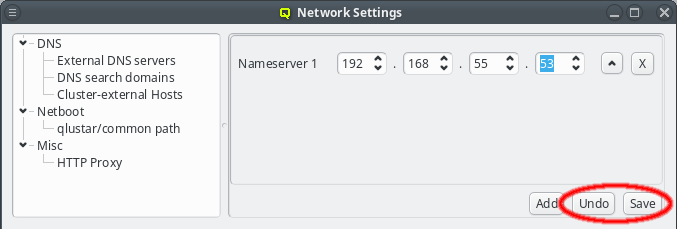
The nameserver specified during the installation process should already be set unless you upgraded from Qlustar 10.1. If the IP of the nameserver changes, it can be edited by either pressing the up/down arrows next to each part of the IP or by clicking at the number and entering it directly. Once the correct IP address has been entered it needs to be saved by either pressing Enter, or by clicking the Save button. The Undo button reverts the nameserver entry to the last saved IP.
|
Saving changes in this dialog doesn’t activate the new config immediately but only saves them
in the QluMan database. To finally activate them, the |
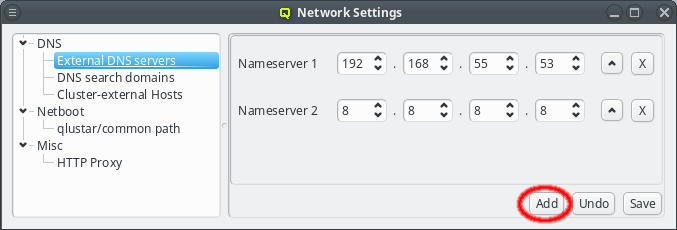
For redundancy purposes more than one nameserver can be set. To add an additional nameserver click the Add button. This will add a new nameserver entry to the GUI defaulting to Googles public DNS server. The entry may then be edited as described above. Use this also when upgrading from a previous version of Qlustar to add the first nameserver.
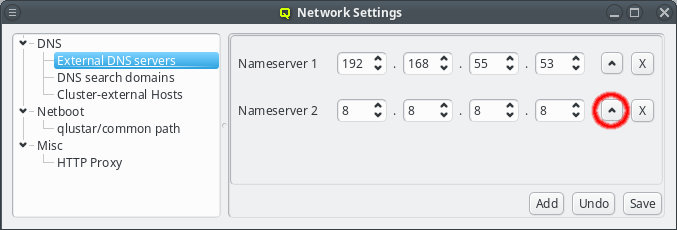
When a DNS request cannot be answered locally, the external nameservers will be asked one by one in the order shown in the GUI. This order can be changed by pressing the Up button next to the nameserver. This will move the respective nameserver up one position in the list.
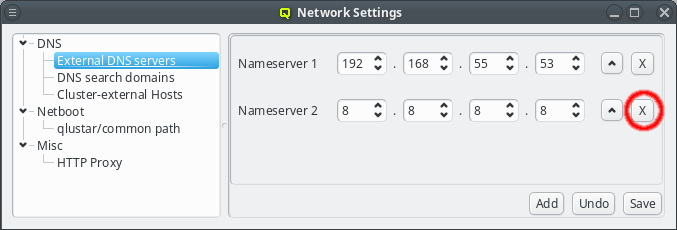
When a server is no longer valid or wanted, it can be removed by pressing the X button next to the nameserver.
3.8.1.2. DNS search domains
A DNS search domain is what the DNS service will use to resolve hostnames that are not fully qualified. A fully qualified domain name is one that can be resolved by working down from the root domain (which is just an empty string) and eventually ending up with an IP address. In less technical terms, it’s one that ends in a top-level-domain such as .de, .net, .org, .com, etc..
In practice, whenever a device tries to resolve a hostname that can not be resolved as is, the resolver code appends search domains to the hostname and tries the resulting names one by one to see if it resolves then. The list of search domains usually contains at least the main domain of the organization the cluster is located at, but often also sub-domains of it. Example: The search domain list contains my-department.my-firm.com and my-firm.com. A look-up for the host mailserv will then first try mailserv as is. If that fails, mailserv.my-department.my-firm.com is tried and if that also fails, finally mailserv.my-firm.com. This mechanism allows using the shorter hostname to refer to some hosts that are outside the cluster.
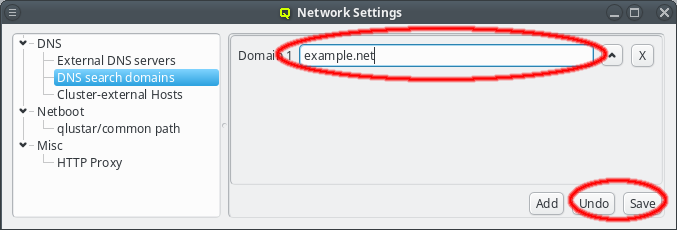
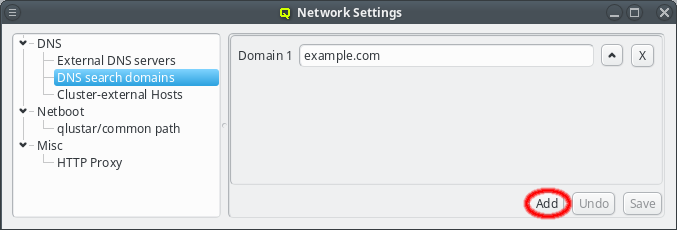
A search domain may be edited by clicking the text-field for the domain. As soon as changes are made, the Undo and Save buttons will become enabled. Changes are saved by either pressing Enter, or by clicking the Save button. An additional search domain can be included by clicking the Add button.
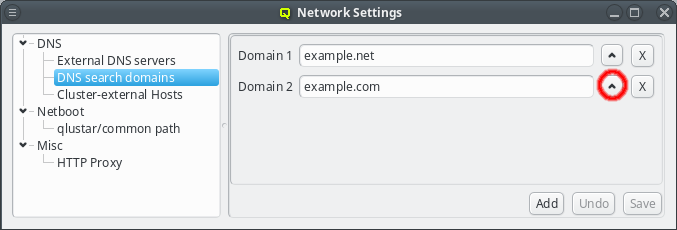
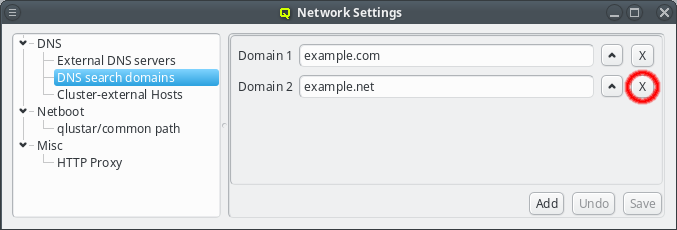
The search domains will be tried in the order shown in the GUI. Just like with the nameserver entries, the order can be changed by clicking the up button. This will move the selected domain one slot upwards. Search domains can also be removed by clicking the X button.
|
The DNS search domains are set via DHCP on each host as it boots and are not updated at runtime. So any changes made, will only affect hosts booted after the change was saved. Already running hosts need to be rebooted to catch the change. |
3.8.1.3. Cluster-external Hosts
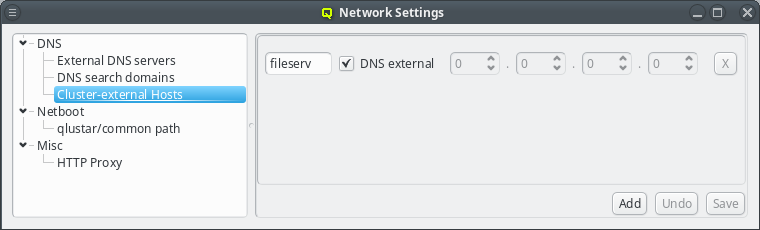
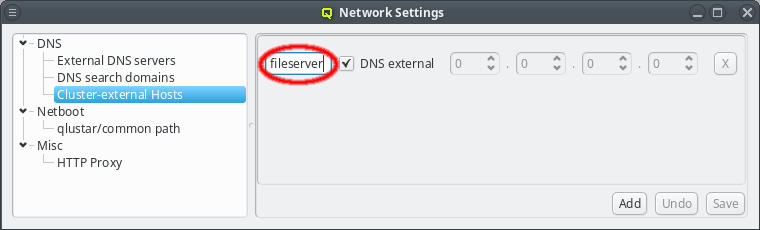
While QluMan automatically manages the DNS entries for the nodes in the cluster (any node that is shown in the Enclosure view), sometimes there are also hosts outside of the cluster networks that QluMan should know about, e.g. external file-servers that are used in Filesystem Exports.
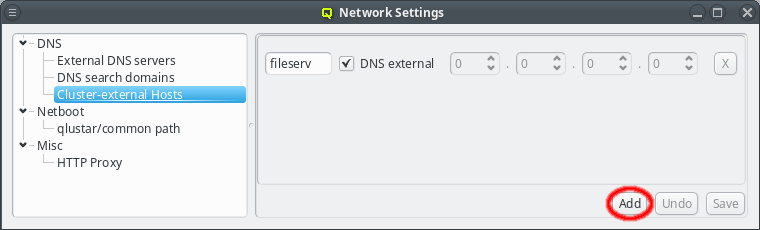
To add an entry for such an external host, simply click the Add button and enter its name. QluMan also allows to add the host to the DNS config for the cluster, but by default, for new entries that is not the case, and the DNS external checkbox is checked.
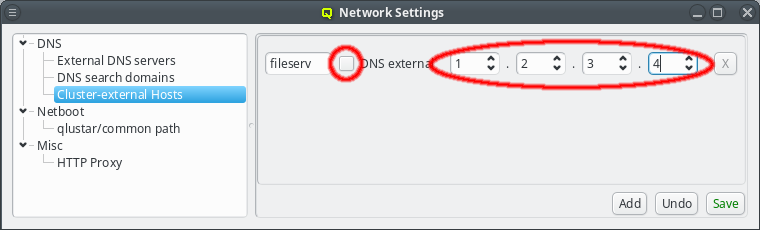
To add a DNS entry for a cluster-external host, uncheck the DNS external checkbox. This activates the IP widget and you can enter the correct IP. To finalize the input and save the IP, press Enter or click the Save button.
The name or IP of a cluster-external host may be edited at any time by selecting it, or by clicking the Up / Down arrows on the IP. Don’t forget to press Enter or click the Save button to confirm the changes.
|
To finally activate the changes to cluster-external hosts the |
3.8.2. Netboot
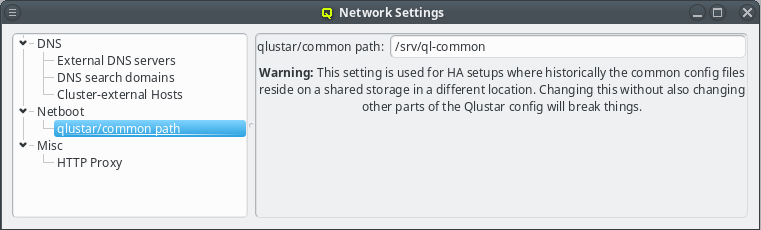
The qlustar/common path specifies the location of the cluster-wide configuration directory on the head-node that is used for its NFS export. This path value should not be changed unless there is a good reason for it. A custom value is usually required only for a head-node setup in high-availability mode.
3.8.3. Other Network Settings
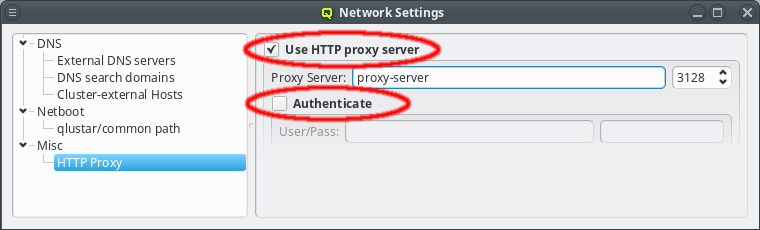
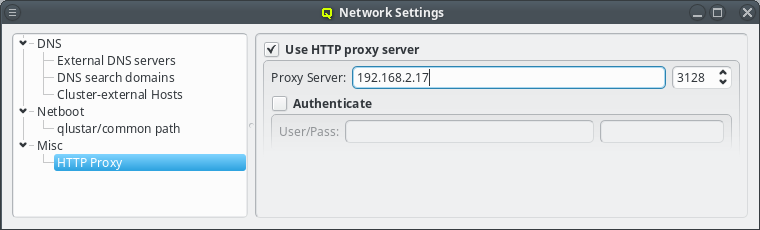
Sometimes the cluster head-node does not have direct access to the internet and requires a proxy server for a connection to the Qlustar repository servers. To enable support for such scenarios, click the check-mark before Http Proxy and enter the hostname of the proxy server together with the proxy port.
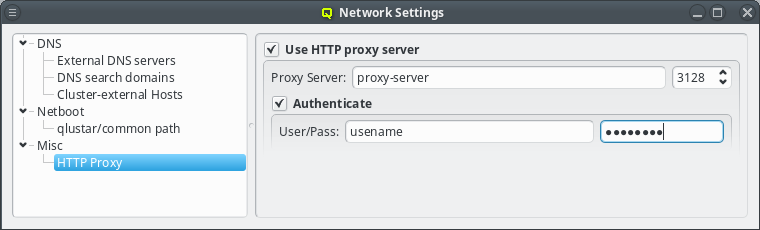
If the proxy requires authentication, click the check-mark before Authenticate and enter a username and password. The Http Proxy and User/Pass label will turn green when entries are edited with acceptable input but have not been saved yet. The labels will turn red when the current input is invalid and turn back to black once the input has been saved. The input can be saved by pressing Enter, or will be saved automatically when the input field looses focus. Leaving the user name field empty will disable authentication just the same as clearing the Authenticate check-mark.
3.8.4. Qlustar Multicast Daemon (ql-mcastd)
The boot process for Qlustar has 2 stages. First the kernel and a minimal initramfs is loaded using PXE support from the nodes hardware. The initramfs then downloads a squashfs image using multicast provided by the Qlustar Multicast Daemon (ql-mcastd).
The ql-mcastd is configuration is generated to include any configured network that has bootable
nodes and can be previewed and written as part of the DNSMasq file class. The generated
configuration also includes IP and port parameters taken from the
/etc/qlustar/qluman/qlumand.cf in the MCastd section:
[MCastd]
multicast_ip = 232.1.0.0
multicast_control_port = 5000
multicast_port_min = 5001
multicast_port_max = 5999
In the unlikely event of a conflict with other services in the same network the multicast IP, control port and port range used for transfers can be changed. After editing the file the qluman-server service must be restarted so the new settings will be included in the ql-mcastd.conf. If the control port was changes then, after writing ql-mcastd.conf, all Qlustar images must be rebuild as well using:
0 root@beosrv-c ~ #
qlustar-image-reconfigure all
4. Enclosures
4.1. Enclosure View
The Enclosure View shows an overview of the cluster in a tree structure. The tree is designed
to reflect the physical structure of the cluster. At the lowest level are the hosts. A host can
be a head, storage or compute node but also a switch e.g. In general, anything in the cluster
that has a name, IP and MAC address is a host.
A host is represented by its bare board and should be placed into a host enclosure. 1U, 2U,
3U or 4U enclosures contain exactly one board, while others like a Twin or Blade chassis can
have multiple boards. Once defined, host enclosures can be placed into racks, racks grouped
into rows, rows into rooms and so on. The tree has a simple drag&drop interface. E.g. you can
select a number of nodes (by holding the Ctrl key and clicking or holding the
Shift key and dragging the mouse) and drag&drop them into a Blade enclosure.
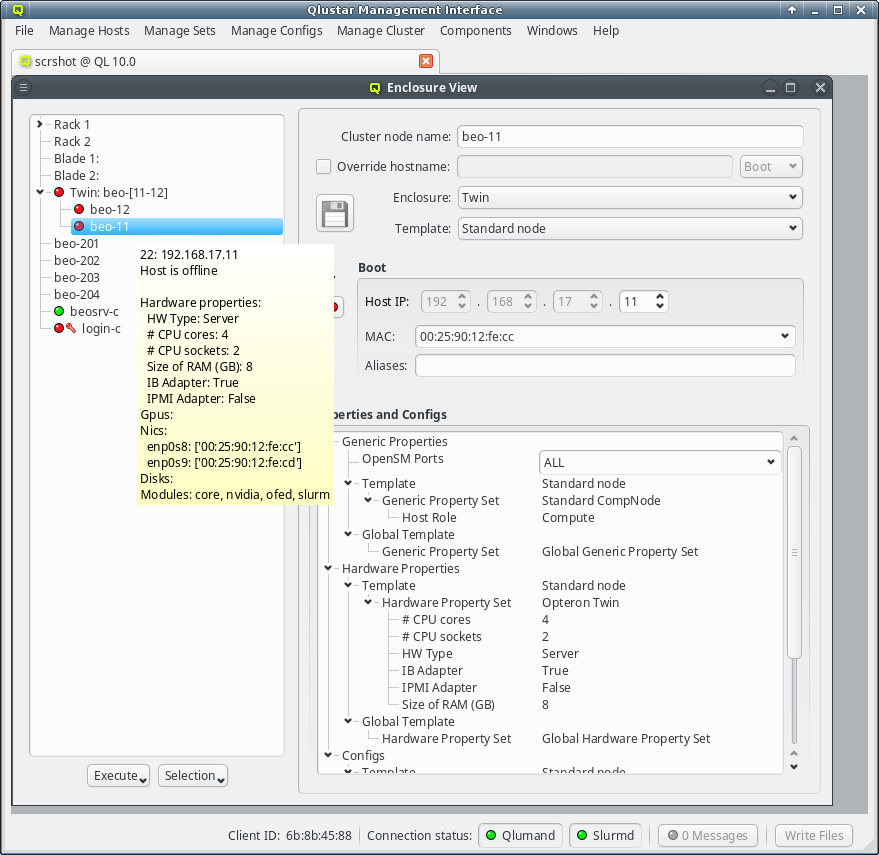
Selecting a node in the tree displays its configuration info on the right hand side. Hovering over a host entry in the tree view brings up a tool-tip with additional info about the host.
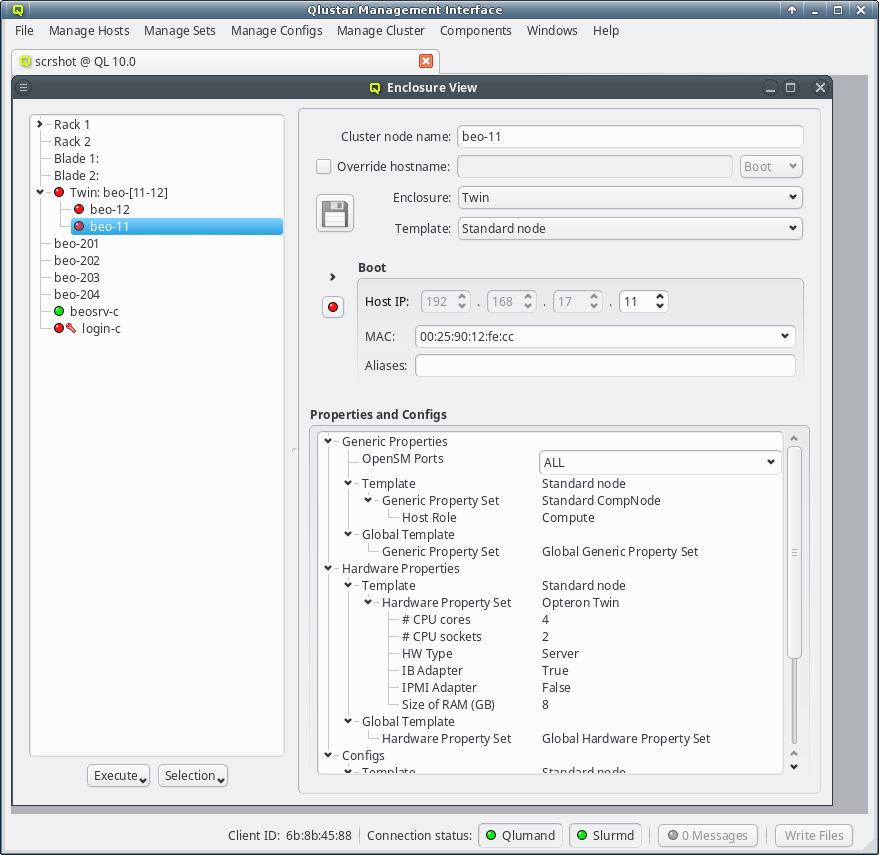
4.1.1. Editing a host’s individual network information
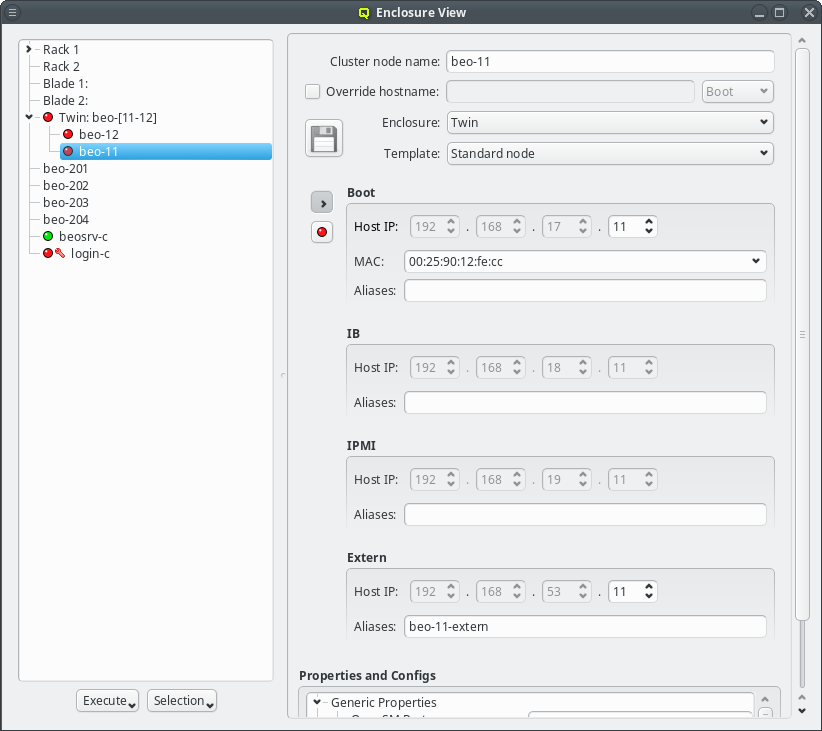
The cluster node name can be edited at the top. Normally, the node name will also be used as
the real hostname (displayed by the hostname command). If a different hostname is desired, it
can be entered by clicking the Override hostname check-mark and entering the name
in the text field next to it.
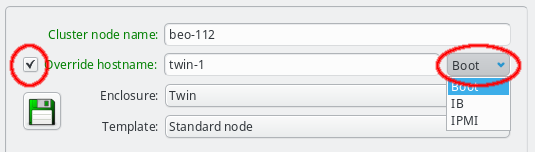
To complete the change of the hostname, the network that the chosen new hostname should be part of, must be selected from the list offered in the drop-down menu at the right of the text-field. This choice determines the IP address of the host, which will be used for the hostname in the NIS config, and which applications will see when they resolve the hostname.
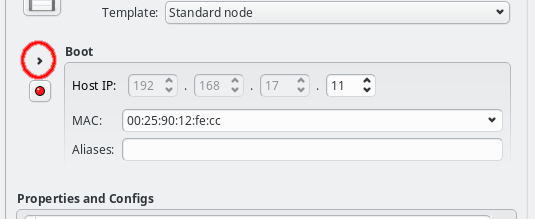
In the center of the window, the host’s individual network config is shown. Initially, only the boot network is visible, as shown in the screenshot. Clicking the > button will display the complete list of networks assigned to the host through its Network Config. For each network, the Host IP, MAC address and optional aliases are shown (more details in section Host Networks Settings).
While editing a field, the label corresponding to it, will change color indicating the validity and state of the information entered so far. A green label means that the current input is a valid choice, but has not been saved yet. A yellow label means that the input is incomplete, but can still be completed to become valid (this only applies to the MAC address field, in case a partial address is entered). A red label indicates that the current input is invalid and can not be used.
The tool-tip, displayed when the mouse moves on top of the label, states the reason, why the entered value is invalid. The most likely reason is, that the input is already used by another host. The node name, hostname override, the host IPs, MAC addresses and aliases must all be unique.
Along with the color coding of the label, the Save button will also become enabled and change color, whenever a field is edited and not yet saved. It will turn red if any of the changes are invalid, even if some of them are. Again, the tool-tip will point to the reason why values are invalid. Changes can be saved by pressing return in the text field or by clicking the Save button. Once all changes have been saved in the database, the corresponding labels will turn black again and the Save button will become disabled.
|
As long as changes have not been saved, trying to work on a different host by clicking on it in the tree view, or closing the Enclosure View all together, will pop up a reminder dialog asking to save/undo the changes or cancel the action. |
4.1.2. Other host specific settings
For nodes that are not part of a multi-host enclosure (like a Blade or Twin chassis) the
enclosure type can be changed to one of the single-slot host enclosures (1U, 2U, etc.). A new
enclosure of the chosen type will then be created if the node is not already part of one. If a
node is included in a multi-host enclosure, this field will be ghosted.
The template field allows to select a so-called Host Template for the node. Usually, large groups of nodes have an identical hardware and software configuration and will use the same template. Deviations from the properties coming from the template can be set for individual hosts by direct assignment of either a property/config set or individual properties/configs directly to the host through its context menu. In case of unique properties, direct assignments override settings from the template (or property set), for non-unique properties this is additive.
|
Any changes made in the configuration only affect the active node (as indicated by the hostname in the info part of the enclosure view), and not all selected nodes. Configurations for all selected nodes can be made by using the context menu (right click) in the tree view. |
4.2. Managing Enclosures
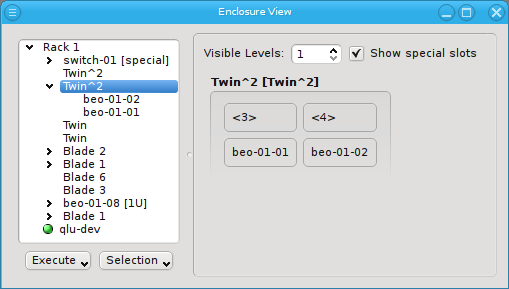
Similar to host nodes, selecting an enclosure entry displays the physical layout of the corresponding enclosure on the right. Controls to select the visibility level and special slots are available at the top of the display. See below for more details about these. The name of the enclosure and its type (in brackets) is shown in the title. In the above case, both name and type are "Twin². Below the title you have a representation of the physical layout of the enclosure. For this example, you see the 2x2 slots that are characteristic of a
Twin² enclosure. Two slots are filled with beo-01 and beo-02 and two slots remain empty,
showing only the number of each slot in brackets.
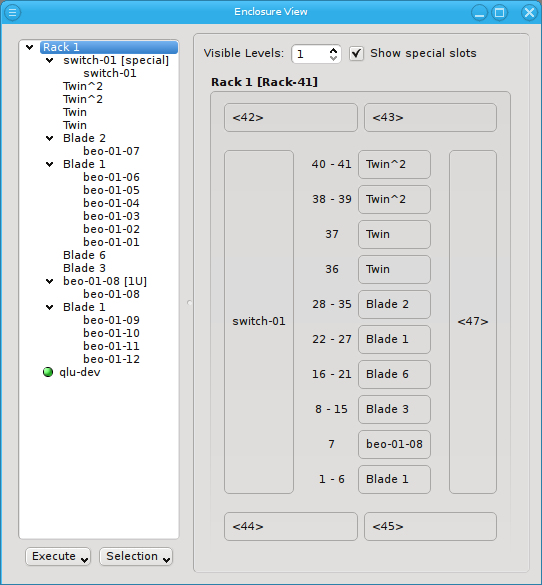
Selecting a rack shows a more complex picture. The current example rack holds ten enclosures in
its central 19 inch slots: A FatTwin, a Twin, a Twin², a Blade 1, 3 Blade 2, another Twin² and
two 1U enclosures containing beo-11 and beo-12. The special top, left, right and bottom
(not visible) slots are empty. In future versions a network switch or power controller, that is
mounted at some special position of the rack, can be placed into these special slots.
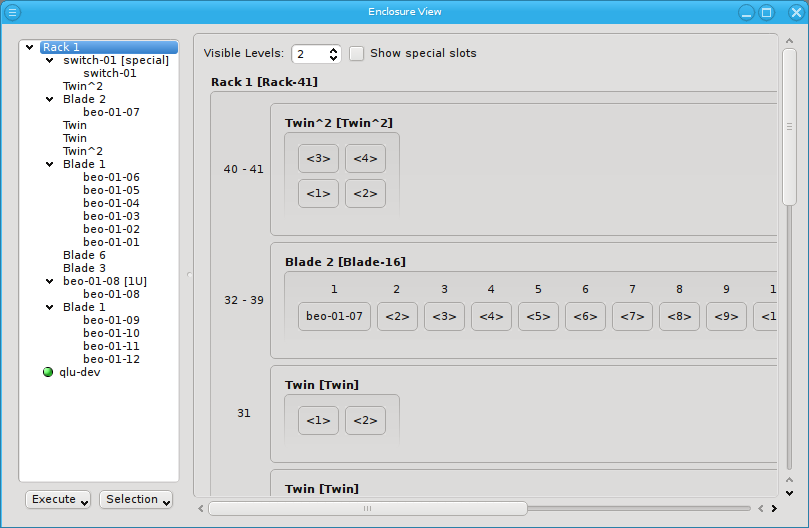
Now let’s explain the effect of the two controls at the top in more detail: The Show special slots check-box controls the visibility of the top, left, right and bottom special slots. Especially if these slots are empty, this will provide a more compact view of the interesting central slots. The other control, the visibility level, controls how many levels of the enclosure hierarchy are shown: Selecting a depth of 2 shows not only the selected rack with its slots but also the contents of the enclosures in each slot.
Since the current version of QluMan only supports host enclosures (Twin, Blade, …) and racks, a depth larger than 2 has no effect yet. In future versions, it will be possible to group racks into rows, rows into rooms, rooms into buildings and so on. This will allow you to reflect the physical layout of your cluster in as much detail, as you like.
4.2.1. Populating Enclosures
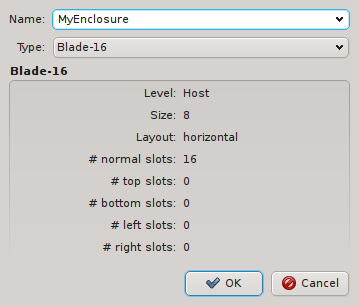
New enclosures can be added through the context menu. The new enclosure must be given a name and its type can be selected. Currently, enclosure types cannot be manipulated yet. This will change in a future version.
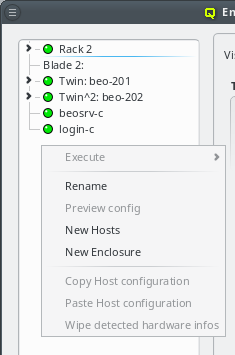
Suitable for ordinary servers, a host being selected in the enclosure view can be placed into a single slot host enclosure directly by selecting the correct type in the host info part of the window (see Enclosure View). For host enclosures that can hold more than one server/node (twin servers, blades etc.), drag&drop may be used to move hosts into them. Moreover, it’s also possible to create larger (non-host) enclosures (like racks) and move host enclosures into them also by using using drag&drop. Note, that a bare host cannot be placed directly into a non-host enclosure, only if it is already inside a host enclosure.
Another option to place hosts into enclosures is by selecting a number of them and then choosing a host enclosure from the context menu. This way, a new enclosure of the selected type is automatically created and all selected hosts are moved into it. If more hosts than can fit into a single enclosure of the chosen type are selected, additional enclosures of the same type will be created such that all hosts can be placed into one of them. This makes it easy to position large numbers of identical hosts into their enclosures. If the selected hosts were in an enclosure before and that enclosure becomes empty and is not itself part of a larger enclosure then the empty enclosure is automatically removed.
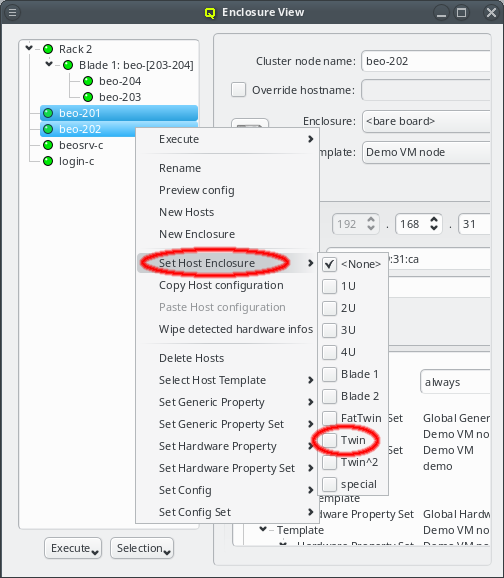
Relocating hosts by selecting a different host enclosure is supported not only on directly selected hosts but also on hosts inside selected enclosures. This allows changing the type of enclosure a group of hosts is in by selecting the old enclosure(s) and choosing a new one from the context menu. Note that this procedure does not change the type of the old enclosure but rather creates a new one, moves all the hosts to it and then deletes the now empty old enclosure(s).
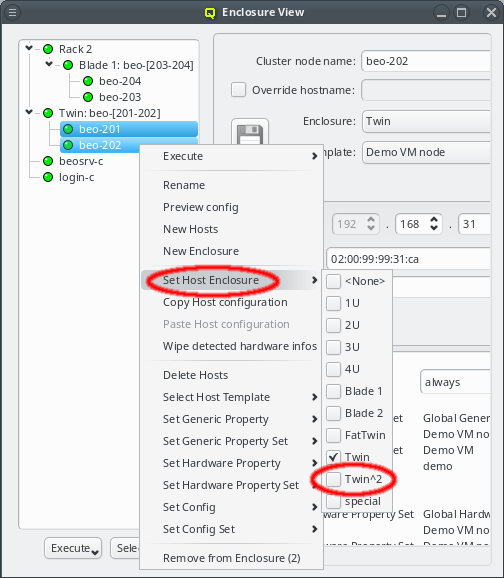
Try it out: Place a number of hosts into a large enclosure (like a blade), then select the enclosure and choose a small enclosure (like 1U) to relocate them. In general, such an operation will create one enclosure of the new type and fill all its slots before creating a second one. Hosts having been in different enclosures before, can end up in the same enclosure and hosts that were in the same enclosure before can end up in different enclosures after this operation.
When using drag&drop for the relocation, the host or enclosure is always placed into the lowest suitable slot of the target enclosure. This reflects our experience, that usually enclosures are simply filled from left to right and bottom to top.
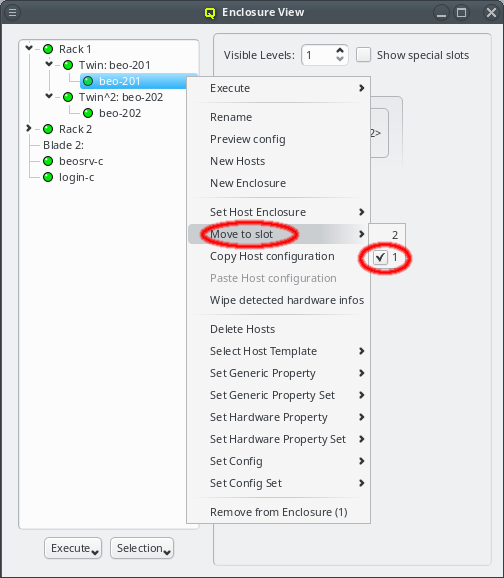
But sometimes this is not the case and a host or enclosure should be in a different slot as compared to the automatic placement. In this case, the host or enclosure can be moved through the context menu. The latter shows all the free slots the host or enclosure can be relocated to and a checked mark indicates the current location. Of course the relocation is only allowed into free slots. Hence, it may require removing (drag&drop out of the enclosure) a host or enclosure temporarily to free space for moving things around.
4.2.1.1. Host Selections
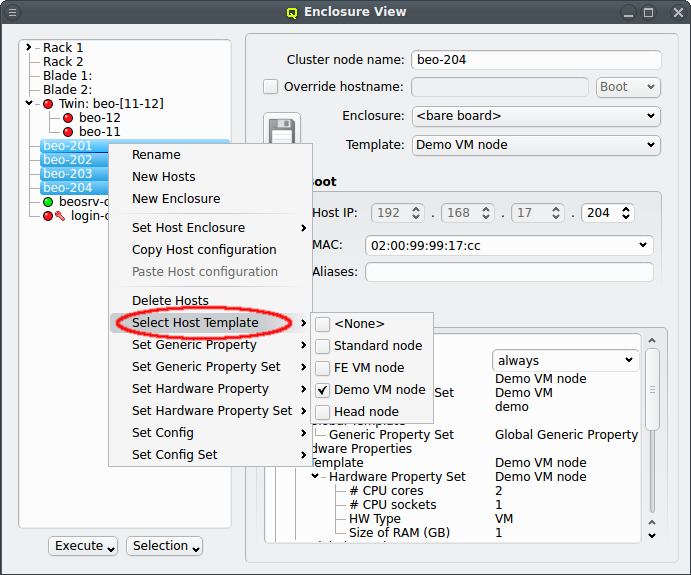
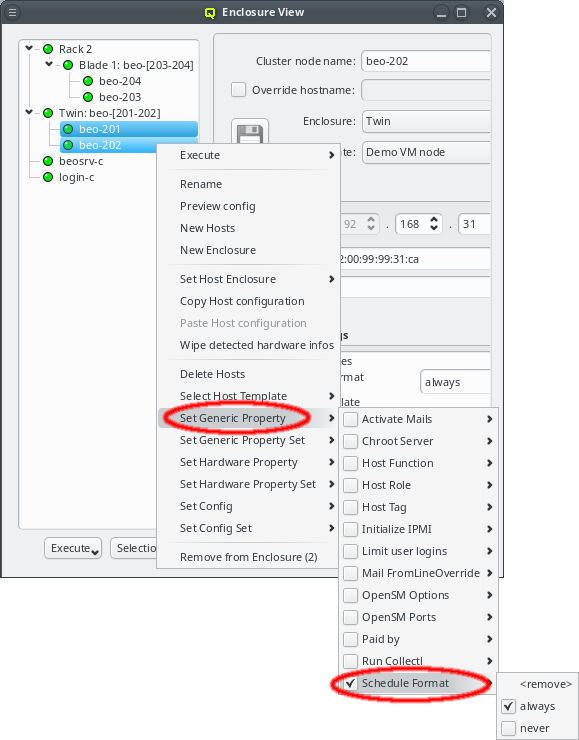
There are situations, where one wants to change a property or config of a whole set of hosts. For example, you may want to change all nodes located in a particular blade to no longer format their disk on boot. This can be achieved by selecting a set of hosts in the enclosure view with the mouse. A range of hosts can be selected by clicking on the first host and then clicking on the last host, while pressing the Shift key. Hosts can also be added or removed from the selection by clicking on a host while pressing the Ctrl key. Once a set of hosts is selected, changes can be made to all selected hosts through the context menu. For instance, this allows changing the Host Template or add/alter a generic property of a set of hosts.
|
When a host is part of an enclosure, selecting the enclosure will also select the host(s) inside of the enclosure, provided it is collapsed. However, hosts inside of expanded enclosures must be selected individually. |
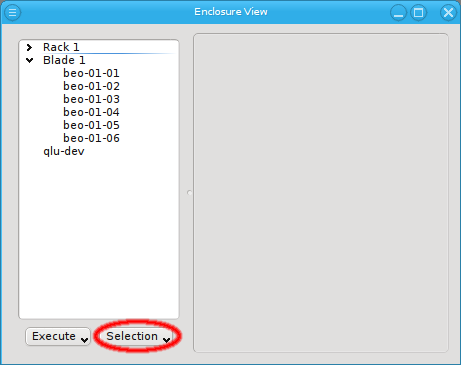
An alternative and more powerful way to select a set of hosts is available via the
Selection button at the bottom of the Enclosure View. When pressed, at the top
of the appearing selection menu you’ll find 3 items: To select all hosts, clear the selection
or to invert the selection.
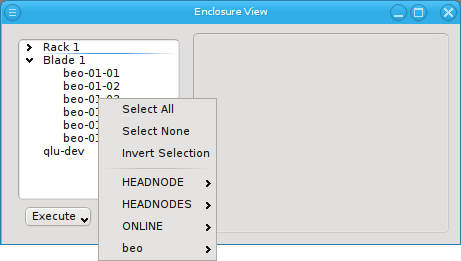

Below these items is a list of filters by which subsets of hosts were defined according to specific criteria. For more details on how to construct such Host Filters see Host Filters. When pressing Select, the selection is set to the hosts defined by the corresponding filter, dropping any previously selected hosts. Add to adds, while Remove from removes the hosts defined by the filter from the current selection. Intersection sets the selection to only those hosts in the current selection, that are also part of the set defined by the filter.
5. Adding/Configuring Hosts
5.1. Adding Hosts
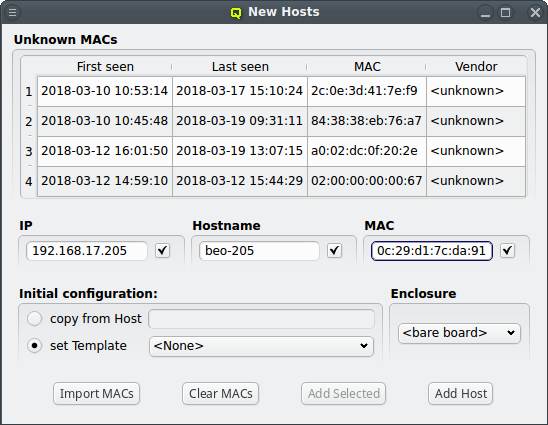
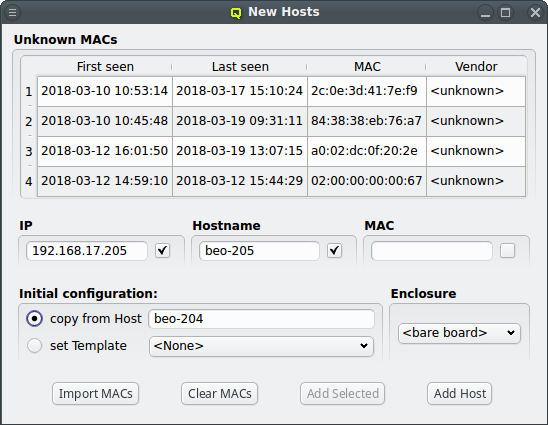
To add new hosts to the cluster you can either select "New Hosts" from the context menu in the Enclosure View tree or from the "Manage Hosts" menu. This opens the "Hosts Window".
Adding a new host requires the specification of an IP address, hostname and MAC in the corresponding three text fields of the dialog. The entered values are checked for their validity. If one of them is not valid, the check-box to its right remains cleared. The tool-tip of the check-box will then show, why it is invalid. If all the values are valid, all check-boxes will show a solid check and the Add Host button will become selectable.
For convenience and if it makes sense, the IP address and the numeric part of the hostname (if there is one) will automatically be incremented by one, after a host was added. So in most cases, these fields will not have to be changed manually to add the next host. Only the new MAC will need to be entered.
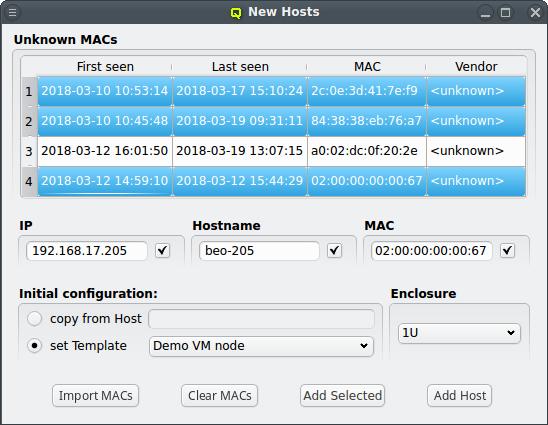
To help adding new hosts, qlumand scans the DHCP log file for unknown hosts that have
requested an IP address. For each unknown host found in the logs, the table at the top of the
window shows the time of the first and last appearance in the log, its MAC address as well as
the hardware vendor this MAC is assigned too (if known). Selecting a MAC in the table copies it
into the MAC text field at the bottom and a double-click adds the host with the
selected MAC. One can also select multiple lines (by holding the Ctrl key and
clicking or holding the Shift key and dragging the mouse) and then click the
Add Selected button at the bottom to add them all using the auto-increment
feature for the IP address and hostname. If unsure, try adding a single host first and check
the auto-increment does the right thing before adding a group of hosts.
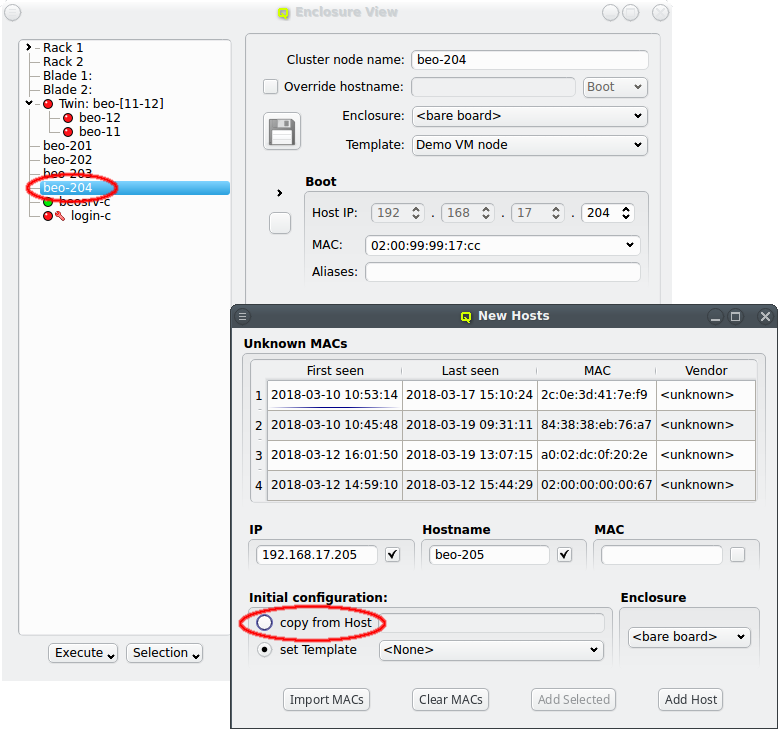
One easy way to add groups of hosts is to power them on one at a time with a short delay (say 30 seconds). The hosts will then appear in the Unknown MACs table in the order they were powered on and can be added as a group with the click of a single button.
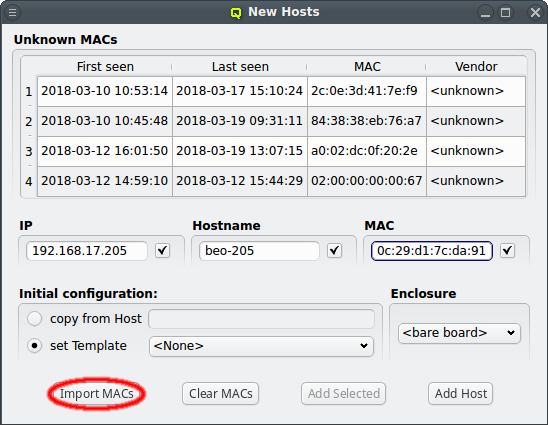
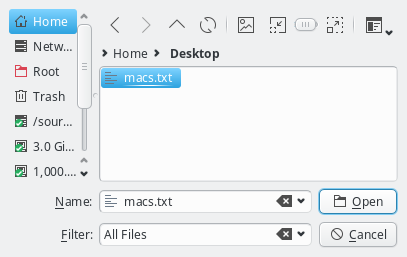
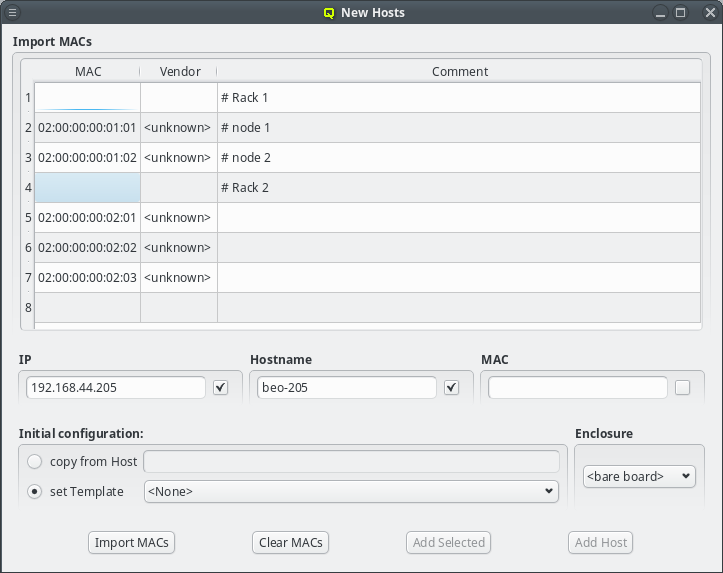
Another option is to import a list of mac addresses from a file by clicking Import MACs. Network switches with a management interface often have an option to list the MAC addresses for each port, so you could capture this list and save it in a file. The file might need some editing to conform to the syntax qluman-qt expects, which is as follows: Lines starting with an '#' and empty lines are treated as comments. Everything else must start with a MAC address in the standard hexadecimal notation using ':' as separator. Any text following the MAC address is displayed in the comment column after importing. Example (see also the corresponding screenshot):
# Rack 1
02:00:00:00:01:01 # node 1
02:00:00:00:01:02 # node 2
# Rack 2
02:00:00:00:02:01
02:00:00:00:02:02
02:00:00:00:02:03
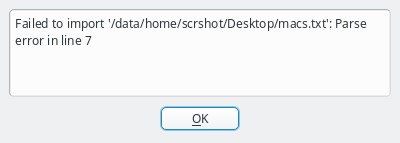
In case the file can not be parsed an error is shown with the line number at which parsing failed. Otherwise the MAC addresses will be shown in place of the unassigned MAC addresses detected by the DHCP server. Adding single hosts or groups of host from the list works the same way as with the detected MACs as described above. Clicking the Clear MACs button clears the imported MACs and returns to the list of MACs detected by the DHCP server.
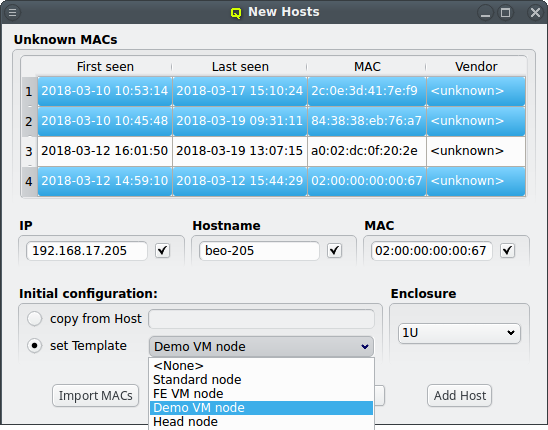
At the bottom of the window a Host Template can be selected that will be used as the default for new hosts. Most of the time, no additional configuration is needed for a new host. As an alternative way to make settings for the new hosts, one can select an existing properly configured host and choose to copy its settings to the new ones.
5.2. Configuring Hosts
5.2.1. Four Levels of configuration
The configuration of a host results from the assignment of different types of properties and
Config Classes to it. A property is always a key + value pair. They are further divided into
Generic Properties and Hardware Properties. Generic/hardware properties and config classes
can be individually assigned to a host. This is the configuration level with highest priority,
meaning that such an assignment will always be effective.
They can also be used to define Generic Property Sets, Hardware Property Sets and Config
Sets. This is simply a means of grouping them together, so they can be used as a single
entity. These sets may also be individually assigned to a host. This is the configuration level
with second highest priority.
The third level of configuration are Host Templates. A Host Template consists of exactly one
Config Set, one Generic Property Set and one Hardware Property Set.
The fourth and most generic level of configuration is the Global Template. It applies to all
hosts in the cluster and consists of the Global Generic/Hardware Property and Config Set. In
principle, the latter are just like any other set, with the one difference that they always
apply to all hosts. This is useful when defining a base configuration for a cluster.
If a generic/hardware property or config is defined and assigned to a host in a particular hierarchy level, it overwrites the corresponding assignment(s)/value(s) from all lower priority levels. This introduces a lot of flexibility while retaining consistency.
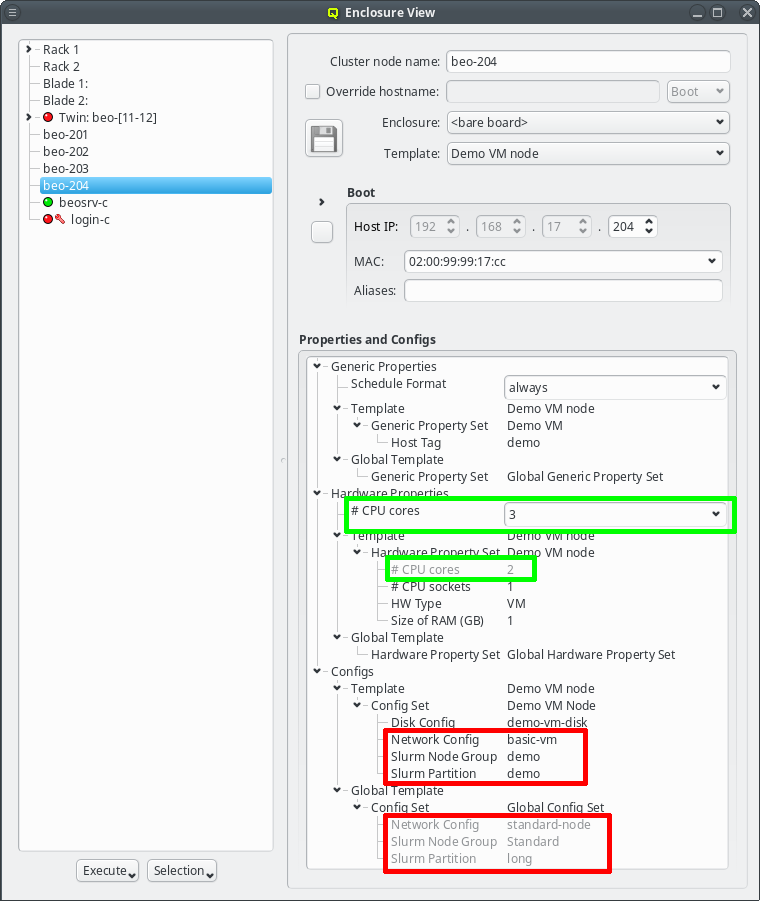
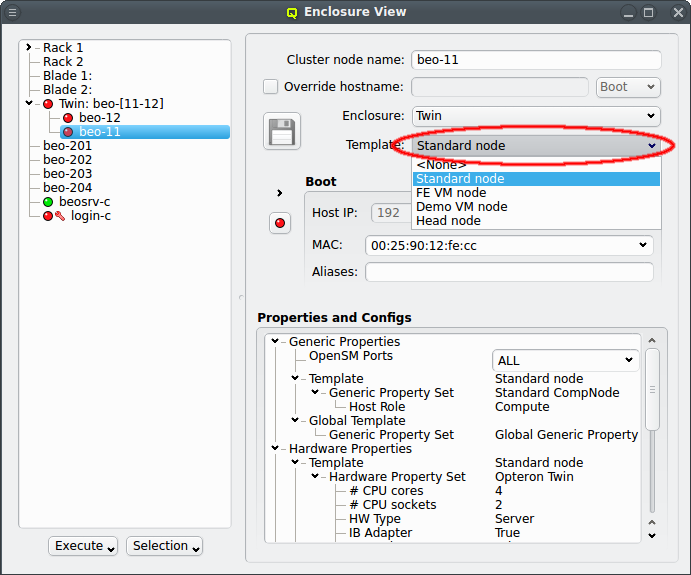
For example it allows setting a property in the Global Template that is right for most hosts
and then replace it in a particular Host Template being used for a few exceptional hosts. The
screen-shot shows two examples of this strategy: The assigned Host Template of the chosen host
replaces the configs for Net Config, Slurm Partition and Slurm Node Group of the Global
Template (red box) and the number of CPU cores is directly assigned replacing the value from
the Host Template (green box).
|
The tree representation of a host’s properties/configs in the Enclosure View clearly indicates overwritten assignments by displaying them in a light gray. |
5.2.2. Generic and Hardware Properties
Hardware Properties
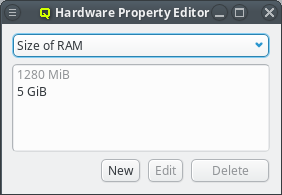
Hardware Properties are used to describe the hardware of a host. Among others, hardware
properties like the amount of RAM or number of CPU cores are used to configure the Slurm
workload manager, so jobs can be assigned to the desired hosts. Others, like e.g. the HW type,
are purely informational and might be used for inventory management.
Hardware Properties usually don’t have to be entered by hand. When a host boots, the basic
hardware properties are detected and reported to the server. They are shown as a tool-tip in
the Enclosure View when hovering over a host. The Hardware Wizard uses the
reported values to create the correct configuration for a set of hosts and is the best way to
create their initial configuration. It can also be used to correct the configuration of hosts
in case their hardware was changed.
Generic Properties
A property that is not hardware related is called generic. Generic Properties can be
configuration options, like OpenSM Host, or purely informational, like Paid by. While
hardware properties are meant to be more rigid, typically with a configurable set of fixed
values, generic properties are more flexible and can be defined at will. Generic Properties
are also not necessarily unique, making it possible to assign multiple values for a single
generic property. This is useful e.g. to put hosts in multiple groups for dsh/pdsh (via the
'Host tag').
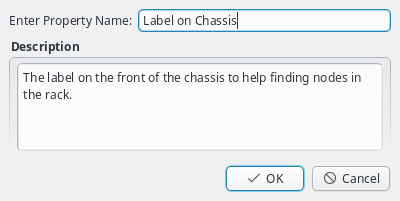
Generic/Hardware properties and their values are managed by the corresponding Property
Editor. It is reachable from the Generic/Hardware Property Sets windows. A new
Generic/Hardware property can be created by clicking the New button. Each
property has a name and a description. The name must be unique and the Ok button
will only be enabled if that is the case. The description is optional and will be shown as a
tool-tip when hovering over the property in other windows.
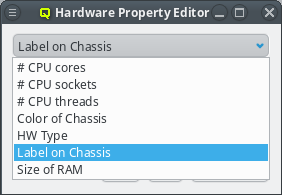
Once a property exists, values can be added to it. To accomplish this, the property must first be selected from the drop-down menu at the top of the Property Editor. Then values may be added or deleted using the context-menu.
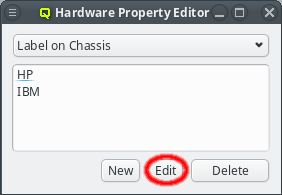
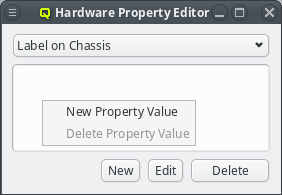
With the exception of essential pre-defined properties, a property can be edited by clicking
the Edit button. Examples of properties that can not be edited (or deleted) are
the ones used to generate the slurm.conf. Changing their name would lead to errors in the
generated file. Similarly, some property values can not be deleted and will be shown
grayed out.
5.2.3. Property/Config Sets

Generic/hardware sets and config sets simplify the configuration of hosts substantially. They
are a means of grouping generic/hardware properties or configs, so they can be used as a single
entity and be assigned to individual hosts directly or via a Host Template. There is also a
global set of each type which is always assigned to every host. The generic/hardware and
config sets can be managed by opening the corresponding window from the Manage Sets menu.
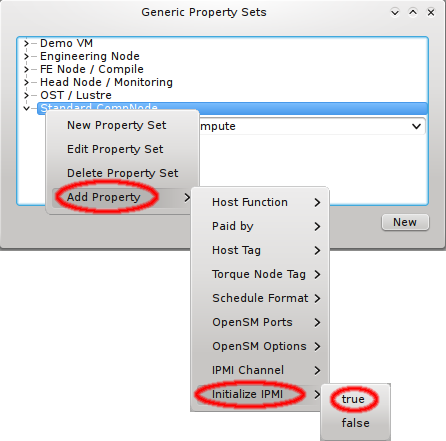
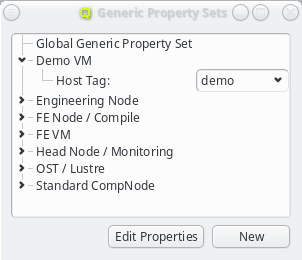
Hardware/Generic Property Sets
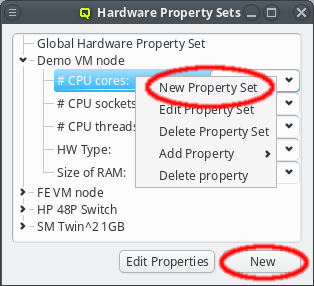
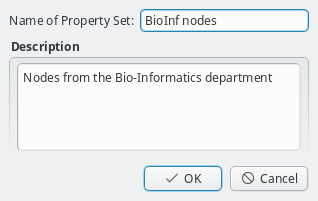
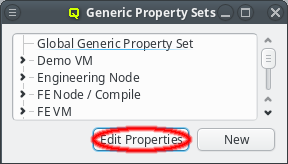
Property sets are shown in tree form with the name of each set as the top level item and the key/value pairs of assigned properties as children. The first entry is always the global property set. A new property set can be created by clicking the New button or from the context menu. An existing property set can be renamed or the description changed by selecting Edit Property Set from the context menu. Deletion of an unused property set is also possible via the context menu.
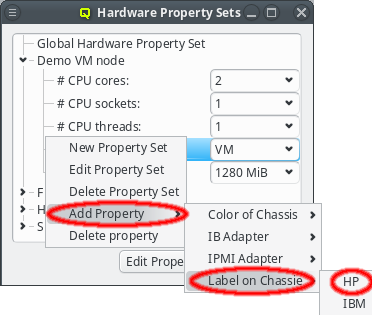
New properties can be added to a property set by opening the Add Property sub-menu in the context menu: Select the desired property and its value. Only properties and values that don’t conflict with already included properties or values are shown in the sub-menu. Already included properties may be changed in two ways: Either a different value is selected from the drop-down menu or the value is edited directly, in which case the change must be confirmed by pressing Enter. If the entered value for the property doesn’t exist yet, a new value is automatically created. Another way to create new values and the only way to delete them is through the property editor by clicking Edit Properties.
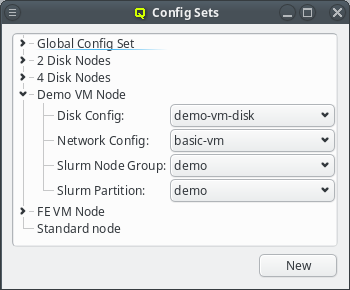
Config
Sets
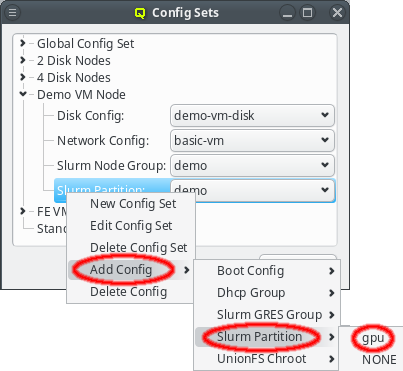
Config sets are managed the same way as property sets. They are displayed as a tree with the global set at the top and the key/value pairs of assigned config classes as children. Creating a new config set can be done by clicking the New button or from the context menu just like for property sets. Adding and removing config classes to/from a set also works the same way.
Unlike property sets though, the list of usable config classes is fixed and values can not be
edited directly from this window. Config classes require a more
complex and individual config. So for each config class there is a menu item in the
Manage Configs menu. Depending on the type of config class, one or more values
for that class can be assigned to a Config Set (slurm partitions are an example where
multiple values are assignable).
|
The sub-menu only shows config classes and values that can be added without conflicting with already assigned entries. |
5.2.4. Assigning a configuration to hosts
As mentioned in the beginning of this chapter there are 4 levels of configuration. Going from
lowest to highest priority these are: Global Template, Host Template, directly assigned
sets and directly assigned properties and configs.
Global Template
The Global Template is the most generic way to assign configurations to hosts. It applies to
all hosts in the cluster and consists of the Global Generic/Hardware Property and Config Set.
Host Templates
The next level of configuration is the Host Template. When a correct Host Template exists,
a host can be configured by selecting the desired template in the Enclosure View window. For
a single host, this can be done by selecting it in the tree view. This brings up the host
information on the right and a template can be selected from the drop-down menu. To configure
multiple hosts, you would select them in the tree view and choose a Host Template from the
context menu. The check-marks in the sub-menu indicate which Host Templates are currently
assigned (if any) for the selected nodes. This action will override the previous assignment for
all selected hosts.
Alternatively, especially when no correct Host Template exists yet, the Hardware Wizard can be used to to create a new or modify an existing Host Template and
assign it to hosts.
Directly assigned properties, configs and sets
Generic/hardware properties, configs and their corresponding sets can also be individually assigned to a host. Such assigned properties take precedence over ones of the same type selected through the Host or Global Template. This is useful when a particular (or a few) node(s) require a special property/config (set) while everything else should be set the same as for other hosts with the same template.
|
By default, every new host has the generic property |
6. Hardware Wizard
6.1. Purpose
When setting up new hosts, there are a number of configuration or other settings to be made. They are used to specify their hardware configuration, to determine what OS they should boot and to fine-tune the behavior of applications running on them. All the necessary steps for the desired configuration of the nodes can be done manually and also be changed later through the various dialogs from the main window.
As a convenient alternative, the Hardware Wizard guides you through the necessary
configuration steps with a special emphasis on the hardware configuration. It uses the
auto-detected hardware properties of hosts to suggest their optimal configuration
options. Furthermore, it tries to keep a balance between the available configuration
strategies: Using templates, property/config sets or individual properties/config classes.
6.2. Selecting Hosts
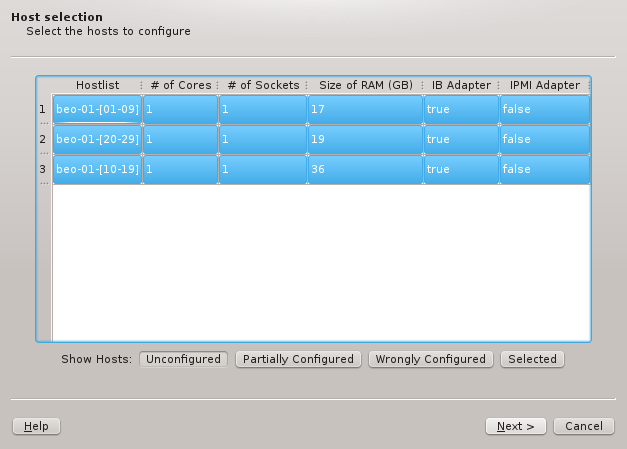
The first step is to select the hosts that should be configured. Initially, the lists of hosts
is empty. One or more of the four buttons at the bottom have to be pressed to pre-select hosts
that should be considered. The Unconfigured button adds all hosts that do not have any
hardware configured at all. A freshly added host without an assigned Host Template will fall
into this category. The Partially Configured button adds hosts that already have some
hardware configured correctly but not all of it. The Wrongly Configured button adds
hosts, where the configured hardware properties do not match the hardware detected at boot,
e.g. when nodes have been updated with more ram. Finally, the Selected button adds hosts,
that have been selected in the enclosure view, including hosts that are configured correctly
already.
Once one or more of the buttons are pressed, the affected hosts will show up in the table. To
keep things compact, hosts with identically detected hardware are grouped together and shown in
hostlist syntax. By default, all shown groups are selected and will be configured using a
single Host Template and therefore single Hardware Property, Generic Property and Config
Set. The possible differences in hardware configurations within the list of selected hosts
will be handled by the wizard with the per host settings. In case all the groups shouldn’t
use the same Host Template, groups may be selected or deselected individually and the
remaining ones can be configured by running the wizard again later. Groups of hosts with
identical hardware can’t be split up though. If this is required, select the hosts individually
in the Enclosure View and use only the Selected button. Once the desired groups
of hosts have been selected click Next to continue configuring them.
6.3. Configuring the Host Template
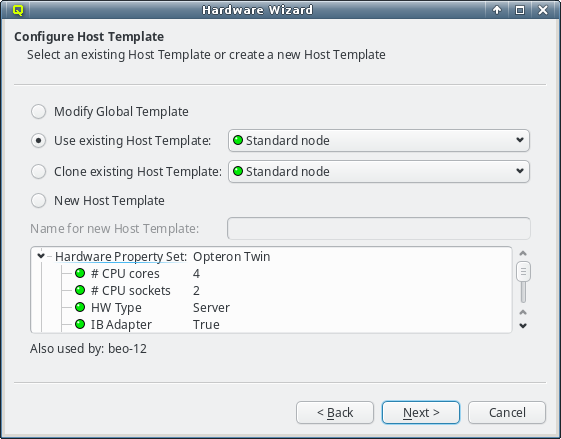
As explained in Configuring Hosts the major part of a hosts
configuration is derived from a Host Template. One of the wizard’s goals is, to find an
existing Host Template with a Hardware Property set that optimally matches the detected
hardware for at least some of the selected hosts. If such a Host Template is found, it will
be pre-selected and the Use existing Host Template choice will be active.
The settings inherited from this template, are shown underneath in tree format and below the property tree, a list of hosts, that currently use the selected template, is shown for informational purpose.
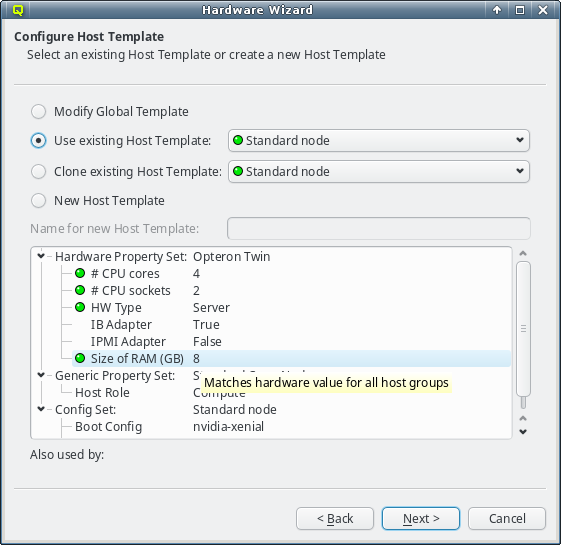
The individual properties belonging to the Hardware Property Set of the selected Host
Template are color-coded, to show how well they fit the detected values of the host groups
being configured. Hovering over a hardware property brings up a helpful tool-tip explaining the
coloring. A green bulb indicates, that the property matches the detected value for all hosts. A
yellow one, that it matches some but not all hosts. This happens, when some of the selected
hosts have different hardware and means that the selected template is still a good fit. A red
bulb indicates that the value matches none of the hosts and is a bad fit. Such a property value
may be changed later in the follow-up pages or a different Host Template can be selected
right-away.
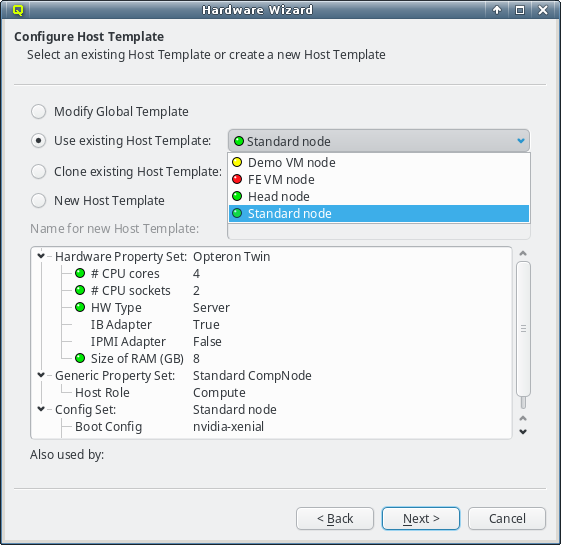
In case the pre-selected Host Template is not the desired choice, a different one can be
selected from the drop-down menu. The choices are again color-coded to indicate how well they
match the detected properties of the selected hosts. Here a green bulb means that the Host
Template matches the detected hardware of at least one host perfectly. A yellow one means that
not all hardware properties for the hosts are part of the template, but at least nothing is
configured wrongly.
Finally, a red bulb indicates, that the Host Template includes a hardware property, that
matches none of the hosts and would be a bad fit. Nonetheless such a template might still be
the right choice, since it can be modified for an optimal fit in the follow-up
page. Alternatively, the correct hardware properties can be set on a per host basis by the
wizard at a later stage .
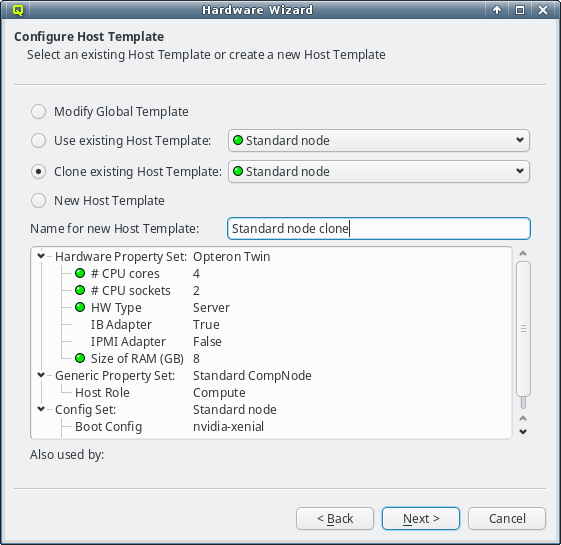
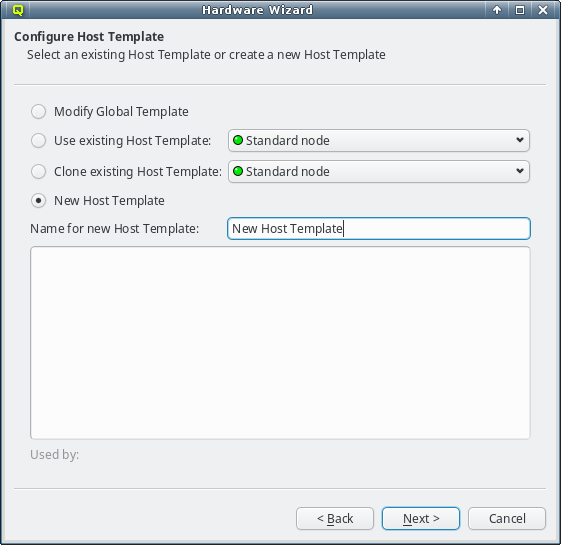
If none of the existing Host Templates are suitable, a new one can be created in one of two
ways: Either an existing template can be cloned or a completely new one can be created. In both
cases, a name for the new template must be given.
For clusters with identical node hardware, it can also make sense to directly change the
Global Template. Click Modify Global Template to go that way.
|
Changing the |
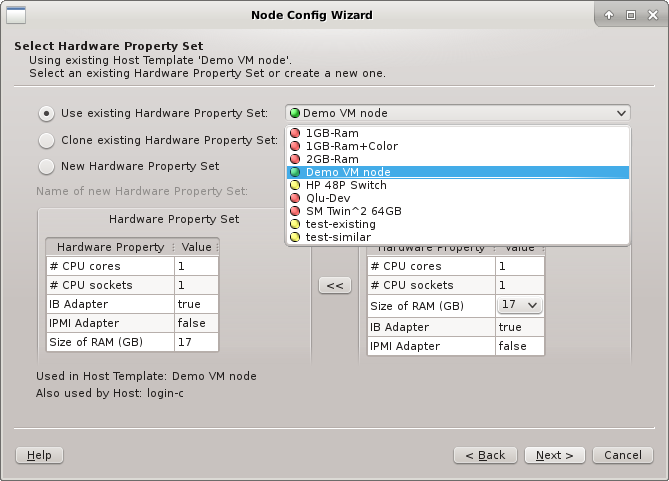
6.4. Selecting a Hardware Property Set
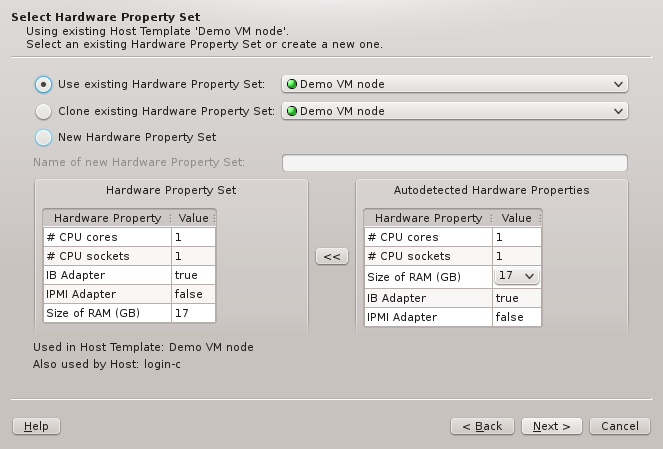
This page selects the HW Property Set to be used in the selected Host Template. It is the
main source for the node’s hardware configuration. Like in the previous page an existing HW
Property Set can be used/cloned or a new one may be created. Most likely an existing set will
be suggested by the wizard. Alternatives are selectable from the drop-down menu. The available
choices are again color-coded indicating how well they match the detected host properties.
Changing the HW Property Set at this stage, will affect the selected Host Template. If an
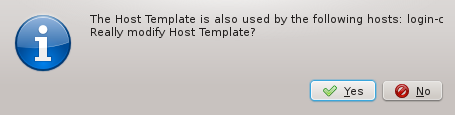
existing Host Template was chosen in the previous page, changing it might affect hosts other
than the ones being configured in the wizard. In such a case, the wizard will ask for
confirmation that such a change is desired.
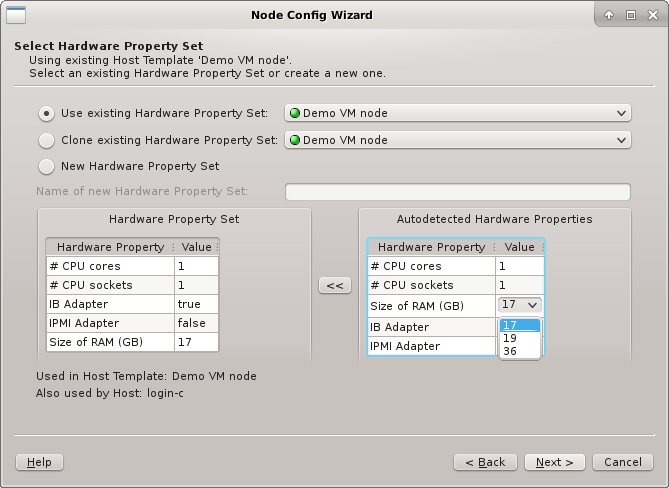
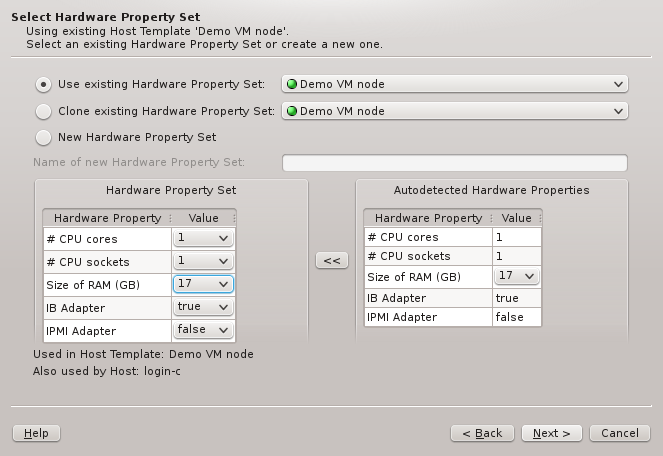
A selected existing HW Property Set may be modified for a better fit by using the
auto-detected HW Properties displayed at the bottom right. If multiple groups of hosts are
being configured at the same time, the properties, where hosts differ, will have a drop-down
menu to select the most suitable value. Once the desired selection is made, the properties can
be copied over the existing HW Property Set by clicking the << button. The
wizard will ask for confirmation, in case this would impact hosts not currently being
configured. Finally, it will set the HW Property Set displayed at the bottom left into
edit-mode.
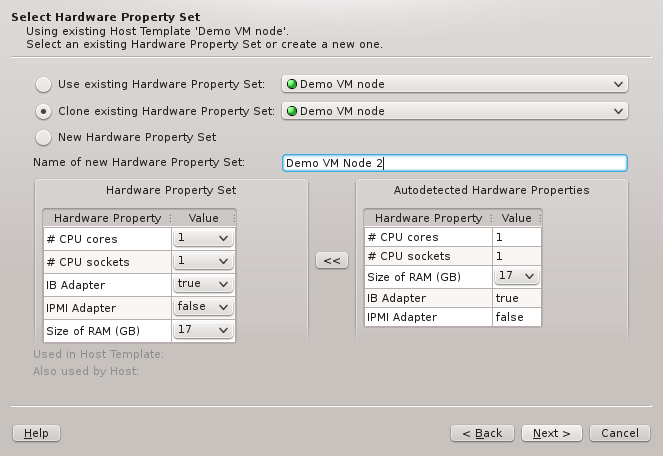
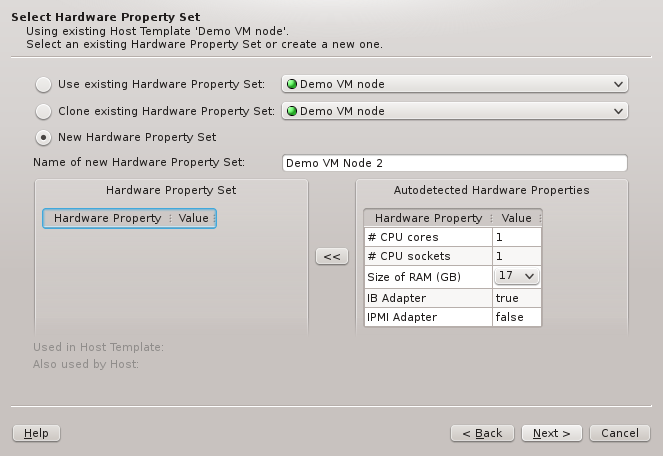
The described behavior is analogous when cloning or creating a new set. The difference between
the two cases lies merely in the HW Properties that will be pre-selected: While cloning will
start with the properties of the cloned set, creating a new one initially will have none.
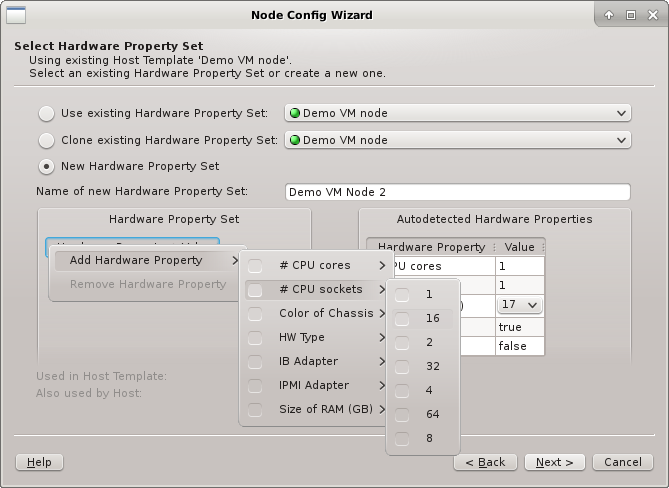
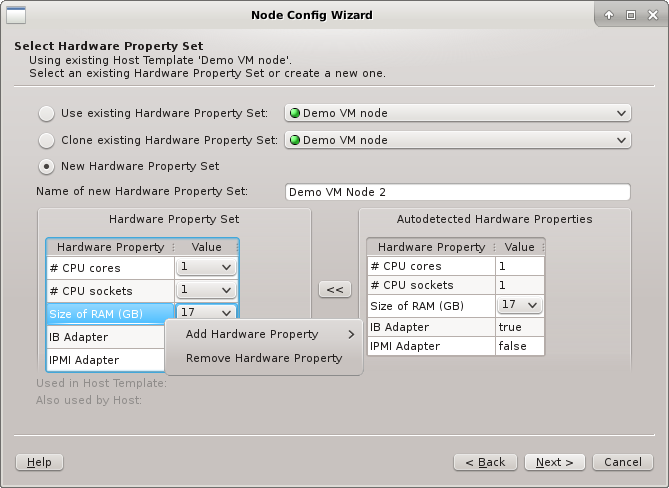
In all three cases, the HW Property Set can be further edited by selecting different values
for properties, adding new ones or by removing some of them (both from the context-menu). Once
the desired HW Properties are selected, click Next to continue.
|
If |
6.5. Resolving Hardware Conflicts
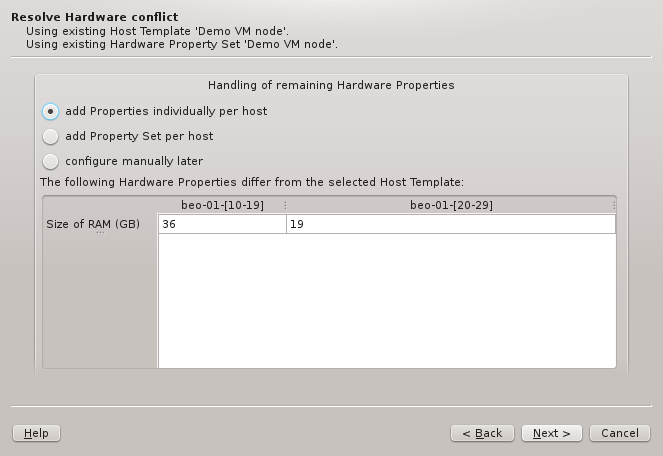
If more than one group of hosts is being configured at the same time or if the selected HW
Property Set doesn’t match all properties of the hosts to be configured, then the Resolve
Hardware Conflict page will appear next. At the bottom of it, the conflicting or missing HW
Properties are listed showing the detected value for each group of hosts. If only a single
property is missing, the wizard will suggest to add this property individually per host.

On the other hand, if multiple properties are missing, adding a directly assigned HW Property
Set per host might be preferable and will be the pre-selected choice. There is not really a
wrong choice here. To some extent, the chosen option is a matter of taste.
|
One can also choose Configure manually later to tell the wizard to ignore the conflict. Be aware, that this will result in hosts that are only partially or wrongly configured and hence will need to be corrected later. |
6.5.1. Resolving by per-host Hardware Property Sets
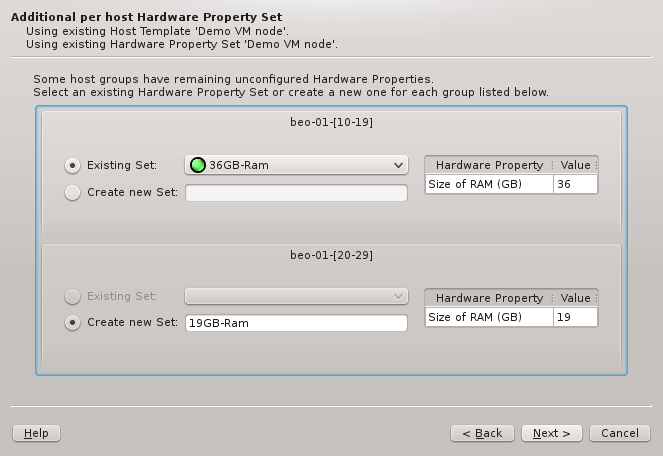
If per-host HW Property Sets was chosen in the previous page, the set to be used for each
group must be picked here. The Wizard will try to find an existing HW Property Set that
already contains the correct Hardware Properties for each group. If such a set is found, it
will be pre-selected. Otherwise, the only option is to generate a new set, for which a name
must be entered, before it’s possible to continue.
6.6. Selecting a Generic Property Set / Config Set

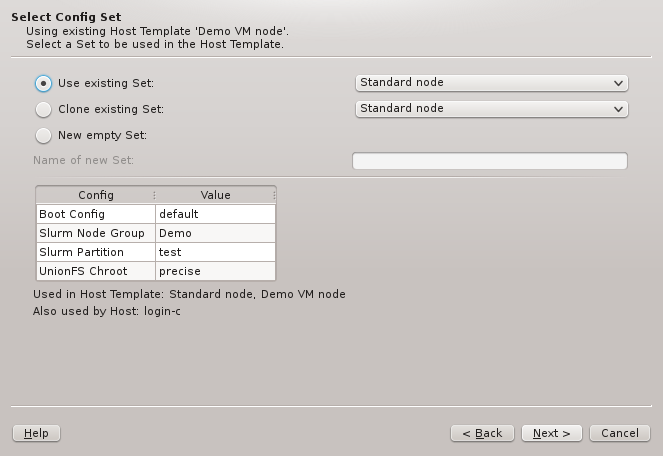
To complete the setup of the Host Template, a Generic Property Set and a Config Set must
be selected. The two wizard pages handling this are very much alike, and similar to the one for
selecting the HW Property Set. Again, there are three main options: Using/cloning an existing
set, or creating a new empty one. Since there is no auto-detection for the values in these two
types of sets, there is no color-coding of the choices in this case.
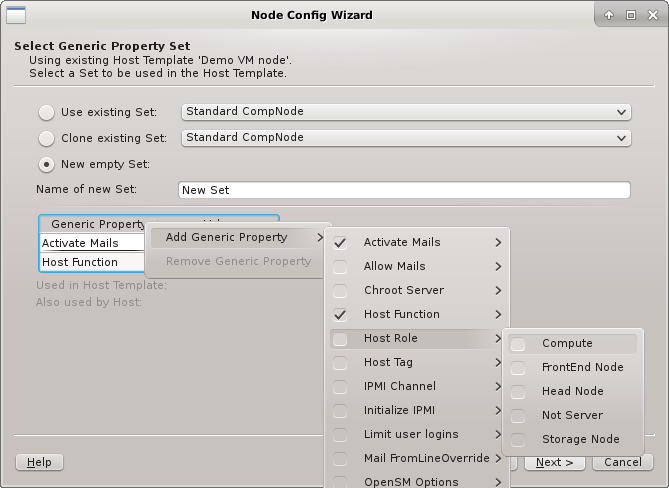
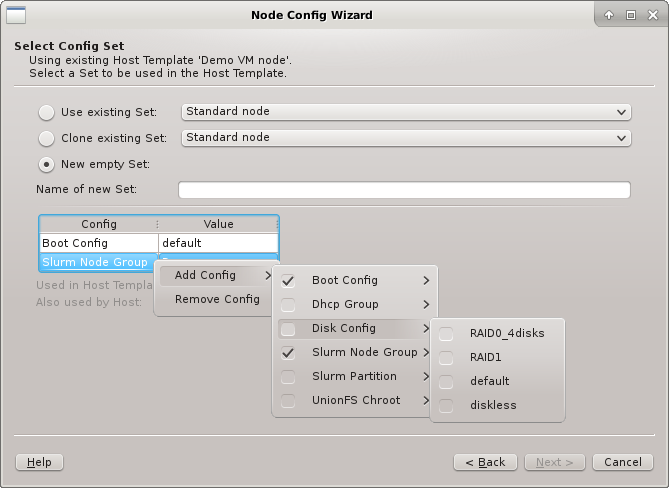
An existing set can not be modified in the current QluMan version, but if btn[Clone
existing set] or New empty set is chosen, the properties and configs can be added
to or removed from the new set. If the hosts have IPMI, the IPMI properties might need to be
set in the Select Generic Property Set page. On the other hand, in the Select Config Set
page, the Boot, Disk, and Slurm configs, are the most likely candidates for settings that need
to be selected and fine-tuned.
|
If |
6.7. Summary Page
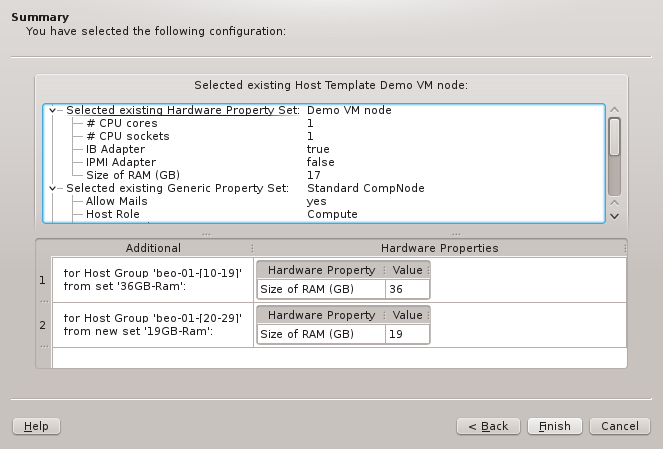
This is the concluding page of the wizard. It asks for the final confirmation of all the
choices made, before the corresponding settings will actually be stored in the database. At the
top of the page, the configurations derived from the Host Template (hence common to all
hosts) are shown in tree-form. At the bottom, the additional Hardware Properties and/or
Hardware Property Sets, that will be set for each group of hosts on a per-host basis, are
listed. In case of conflicts, they potentially override the values of the Host Template. Host
groups with no per-host overrides are not shown here.
|
If an existing |
7. Common Config Classes
7.1. Overview
Config Classes manage configurations that are too complex to fit into the key + value scheme
used by properties. Therefore, there is no common interface to configure all classes. Instead,
each class has its own configuration dialog, presenting the specific options it
provides. Furthermore, some classes depend on sub-classes (e.g. Boot Configs depend on
Qlustar Images). Only the top-level Config Classes are directly assignable to a Config
Set or a host. Sub-classes are assigned indirectly via their parent class. Most of the
functional subsystems of Qlustar have a dedicated Config Class. Currently, there are five of
them: Network, Boot, DHCP, Disk, and Slurm Configs (Slurm is optional) complemented
by a single sub-class, Qlustar Images. Please note that the Network Configs has already
been described in a previous chapter
7.2. Writing Config Files
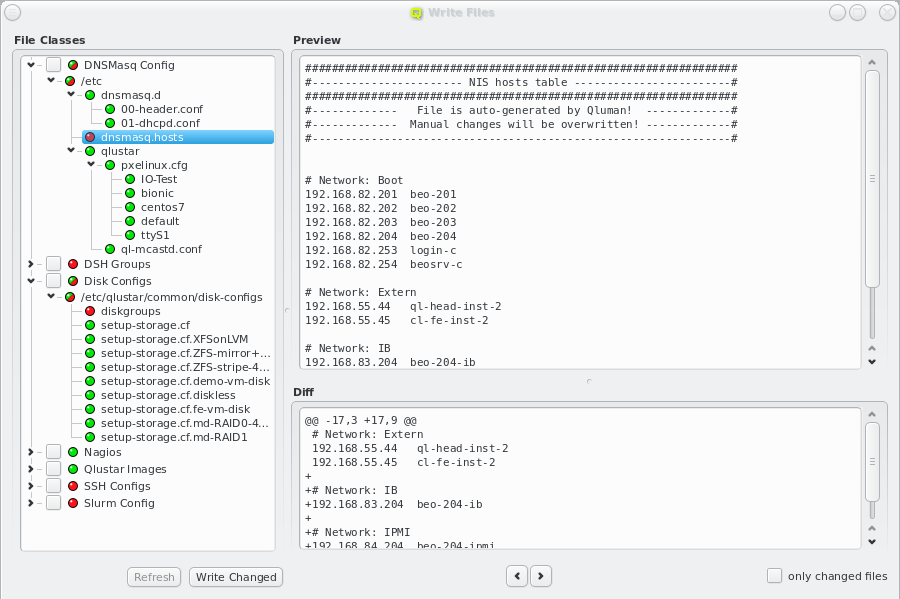
Many of the configurations managed in the QluMan GUI via Config Classes and sub-classes are
translated into automatically generated configuration files located in the filesystem of the
head-node(s). While QluMan configuration options are usually saved in the QluMan database
immediately after they have been entered in the GUI, the write process of the real
configuration files on disk is a separate step, that needs to be explicitly initiated and
confirmed.
Each configuration dialog of a Config Class has a Preview button that opens the Write
Files window with its own config files already expanded. If a Config Class has no pending
changes, the Preview button becomes a View button, while its function remains the
same.
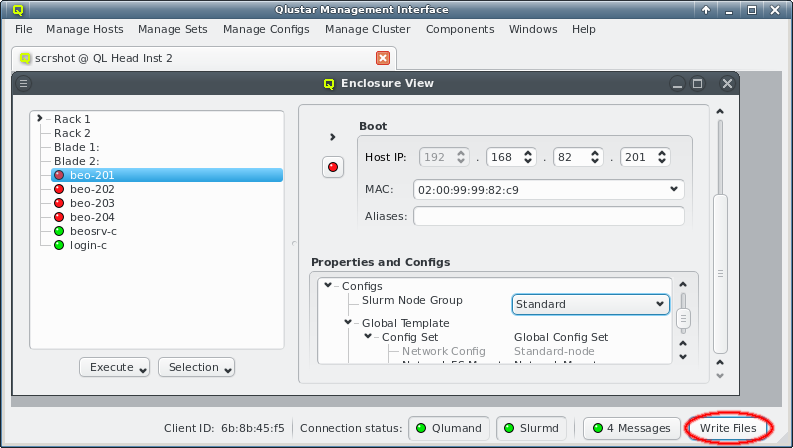
The Write Files window can also be opened from or via the
Write Files button at the bottom right of the main window. This button is an indicator
for the presence of pending changes: It is grayed out if there aren’t any, and fully visible
otherwise.
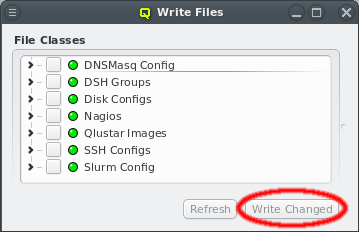
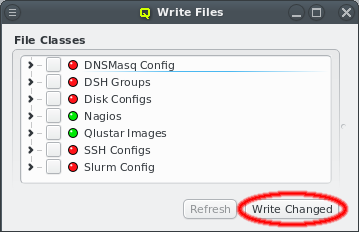
When the Write Files window is opened, on the left it shows the list of all QluMan Config
Classes that may be written. Each Config Class has a status LED. It is red if there are
changes pending to be written, otherwise green. The files of all Config Classes with pending
changes can be written by clicking the Write Changed button at the bottom. It
will be grayed out if there are no changes.
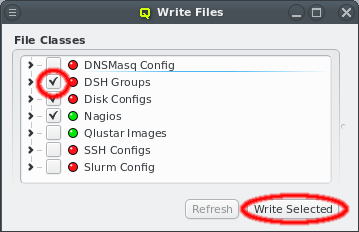
Config Classes can also be written individually by setting the check-mark before each
class. This converts the button at the bottom to Write Selected. Pressing it will
then write the files of all checked classes regardless of whether they have changes or not.
|
Writing a |
|
The actual write command is performed via the Qlustar RXengine. This allows for consistent management of multiple head-nodes e.g. in a high-availability configuration. |
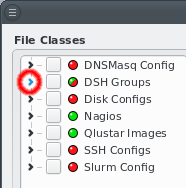
Before writing the generated files for each Config Class, they can be inspected by expanding
their entry in the tree view. Under the hood, this expansion initiates a request by the GUI to
the QluMan server, asking to send the generated files together with a diff against the current
files on disk. For the latter to work, the execd on the Headnode needs to be up and running.
The generated files are shown in a tree structure where nodes represent directories and leafs the individual files. For compactness, directories with only one entry are combined

into a single node. Each entry has its own status LED. It’s red if there are changes pending to be written, otherwise green. A red-green LED is shown if some files in a directory have changes and some do not. Selecting a file will show its contents on the right. If changes are pending, a diff of the changes will also be shown below that.

Besides selecting files from the tree, there is also a second method of navigating between files. At the bottom of the right side, there are two arrow buttons that will switch to the previous and next file in the tree respectively. This allows to quickly browse through all files with single clicks without having to move the mouse. Per default, the Prev and Next buttons will cycle through all files. After checking the Only changed files checkbox, only files with pending changes will be switched to.
While the Write Files window is open, further changes may have been made to the cluster
configuration, either by the current user or another one. The Write Files window will detect
this. As a result, a yellow component will be added to all LEDs and the Refresh
button at the bottom be activated . Until the latter is clicked, the displayed information will
not reflect the latest changes and trying to write will also fail with an error message. This
is to prevent the activation of files with a content that is different from what has been
previewed.
|
Generating the files for each This delay reduces the load on the server if multiple changes are made within a short time. The
downside of it is that the LEDs can turn red or yellow for a short time, even though no actual
change exists. Clicking the Refresh button in this situation will abort the delay
and generate the files for each |
7.2.1. Host-specific Configs
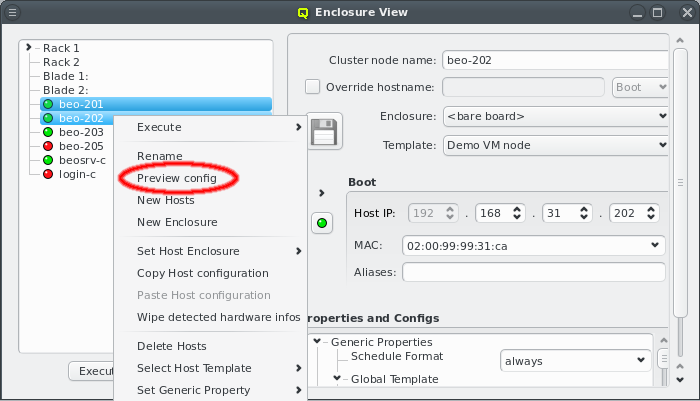
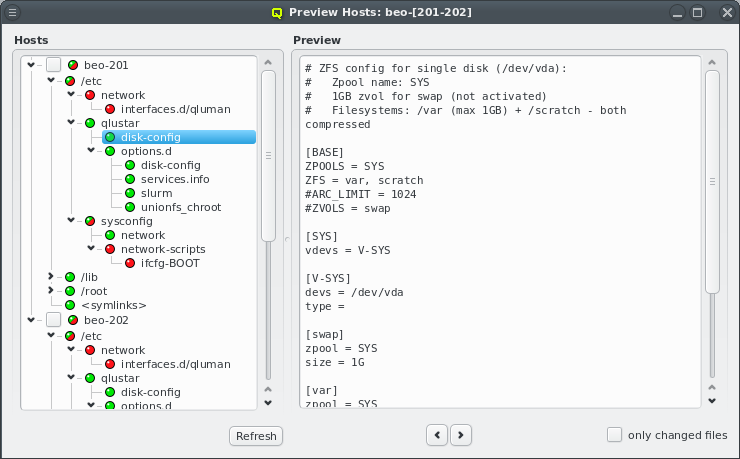
Various configurations managed in the QluMan GUI via Config Classes and sub-classes
translate into automatically generated configuration files for the individual hosts. In the
pre-systemd phase of their boot process, these files will be sent to them and written by their
execd. At this stage, there is no general update mechanism concerning these files for running
nodes and changes only take effect during the next boot. A preview of the generated configs can
be initiated by selecting Preview config from the host’s context menu. More than
one host may be selected for this.
|
Changes to the current config files of a host will only be shown if the host is online. If the host is offline (for example due to network problems) but not powered down, possible changes might not be shown. |
7.3. Boot Configs
The Boot Config dialog allows to define settings for the PXE/tftp boot server. A boot
configuration determines which Qlustar OS image is delivered to a
node, and optionally permits the specification of PXELinux commands and/or Linux kernel
parameters. When opened, the Boot Config window shows a collapsed tree-list of all boot
configs currently defined, sorted by their names.
|
Note that the |
By expanding a Boot Config item, the configured Qlustar image, PXELinux command, and kernel
parameters become visible. You can change any of the values, by simply selecting a different
option from the drop-down menus. In case of kernel parameters, you can also directly edit the
entry and save the result by pressing Enter. Furthermore, it is possible to add
multiple kernel parameters or remove them through the context menu. Each selected kernel
parameter will be added to the kernel command line.
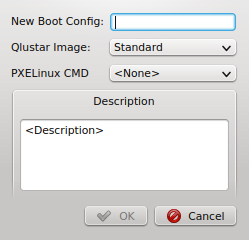
The context menu also lets you create new Boot Configs and edit or delete an
existing one. Alternatively, a new Boot Config can be created by clicking the
New button at the bottom of the dialog. Both, the context menu and the button
bring up the New Boot Config dialog. Simply enter the name and description for the new
config, select a Qlustar image and (optionally) a PXELinux command. Finally press
OK to create it. The new config will then appear in the Boot Config window and
will be ready for use.
Pressing the Boot Parameter Editor button at the bottom of the dialog, will bring up a small edit dialog, where kernel parameters can be created, edited, or deleted.
7.4. Disk Configs
Qlustar has a powerful mechanism to manage the configuration of disks on a node. It basically allows for any automatic setup of your hard drives including any ZFS/zpool variant, kernel software RAID (md) and LVM setups.
Since the OS of a Qlustar net-boot node is always running from RAM, a disk-less configuration is obviously also possible. Valid disk configurations require definitions for two filesystems /var and /scratch, swap space is optional (see examples). To permit the initial formatting of a new disk configuration on a node, it must have assigned the Schedule Format: always generic property during the initial boot.
Disk configurations can be managed using the Disk Configs dialog accessible from the main
menu . You can select the config to be viewed/edited from the
drop-down menu at the bottom left. A couple of example configurations are created during the
installation. Note that there are two special configs: (a) disk-less (not editable or
deletable) and (b) default (editable but not deletable). The default config is used for any
node that doesn’t have a specific assignment to a disk config (via a Host Template, config
set).
The configuration itself can be edited in the text field at the top of the dialog. New configs can be created by choosing New disk config from the drop-down menu. As usual, enter the name of the new config in the text field and fill in the contents and description.
To prevent multiple QluMan users from editing the same config simultaneously and overwriting each others changes accidentally, a lock must be acquired for the template by clicking the Edit button. If another user is already editing the config, the button will be ghosted and the tool-tip will show which user is holding a lock for it.
After having finished editing a template, don’t forget to save your changes by clicking the Save button. It will be ghosted, if there is nothing to save. You can undo all your changes up to the last time the template was saved by clicking the Undo button. In case another admin has made changes to a disk config while you are viewing or editing it, the Refresh button will become enabled. By clicking it, the updated disk config is shown and you loose any unsaved changes you have already made in your own edit field. To delete a disk config click the Delete button.

The template lock expires automatically after some time without activity so that the template is not dead-locked if someone forgets to release the lock. In such a case an info dialog will pop up to notify you about it. By selecting OK a new lock will be requested. If another user is starting to edit the template at exactly that time though, the request will fail and an error dialog will inform you of the failure.
7.5. Network Filesystem Exports/Mounts
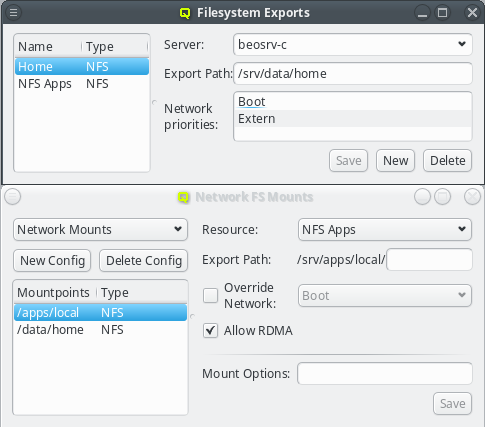
QluMan also supports the configuration and management of Network Filesystem (FS) and bind mounts for cluster nodes. The setup for this consists of two parts:
-
For a network FS, a
Filesystem Exportsresource must be defined using the dialog at Manage Cluster→Filesystem Exports. -
A
Network FS Mountsconfig must be created using the dialog at .
Such a config may contain multiple network and bind mount definitions. As with other config classes, once defined, it can be assigned to nodes through the Global or a Host Template, Config Set or direct assignment.
7.5.1. Filesystem Exports
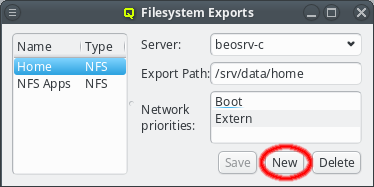
The Filesystem Exports dialog shows the list of exported filesystems by name and FS
type. Selecting an entry will show the details for this FS export on the right. A new
Filesystem Exports resource can be added by clicking the New button. This
requires choosing a unique name that will be used inside QluMan to identify the resource. The
Resource Name field will turn green if the entered name is unique. QluMan currently supports
three types of network filesystems: NFS, Lustre and BeeGFS. The FS type of the resource
can be selected from the drop-down menu.
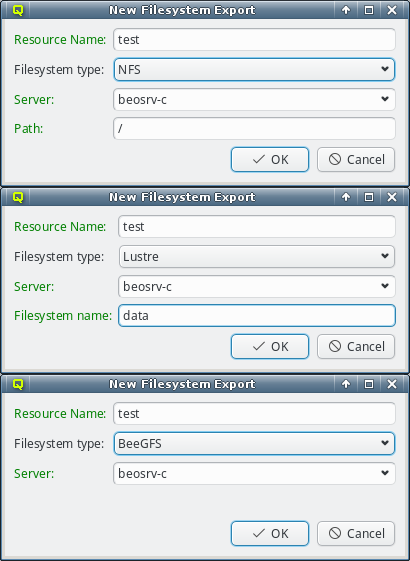
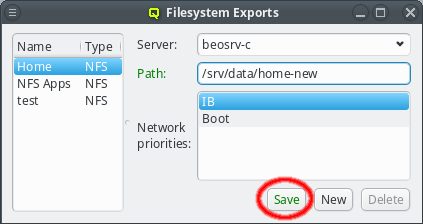
Next the server exporting the FS has to be selected. The default is beosrv-c, the cluster-internal hostname of the head-node, as the most likely server to export a FS. Using the drop-down menu, the server can be selected from a list of servers already used for other exports. To use a new server, the name has to be entered manually. It can be any hostname known to Qluman. The Server label will turn green if the entered name is a known host. This includes all nodes configured in the Enclosure View and any cluster-external host defined in .
|
For a |
|
For a |
The remaining options depend on the selected FS type. In case of NFS, the path of the FS to
be exported on the server has to be entered. Because the path will later be used in a systemd
mount unit file, there are some restrictions on the syntax. For example the path must start
with a "/" and must not have a trailing "/". The Path label will turn green if
the entered path is acceptable, otherwise it will turn red.
For a Lustre resource, the Lustre FS name has to be specified. Lustre limits this name to
eight characters and again, to avoid complications in the systemd mount unit file later, only
alphanumeric characters and some punctuation will be accepted.
In the case of BeeGFS, you have the option to define the TCP and UDP ports on which the
management server listens for this FS resource. If the management server manages just one
BeeGFS FS, the default ports are usually fine.
Once all fields are entered correctly, the OK button will be enabled and the
export definition can be added. It will then appear in the Filesystem Exports window.
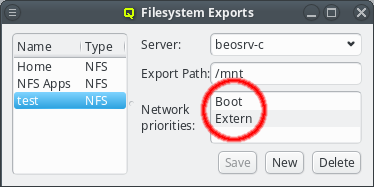
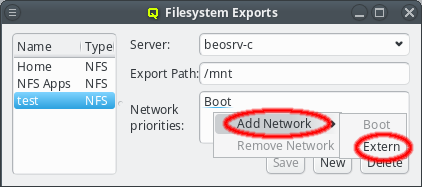
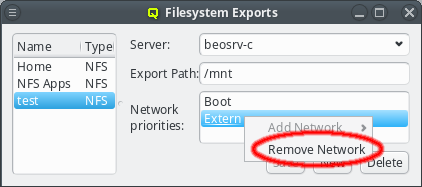
Qluman automatically adds the networks available on the selected server(s) to the Network
priorities. Later, when a node boots and requests its config files from the head-node, the
networks available on the client are checked against this list and the first common entry is
used for the network path via which the FS will be mounted. Shown entries can be removed or
additional networks added from the context menu. Entries can also be moved up or down using
drag&drop. This is useful e.g. to ensure that an NFS export is mounted via Infiniband/RDMA on
all hosts that are connected to the IB fabric and via Ethernet on nodes without IB.
|
If the selected server is cluster-external, it will obviously not have a choice of network priorities. |
7.5.2. Network Filesystem Mounts
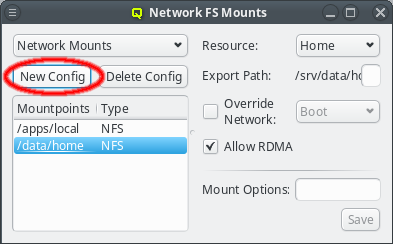
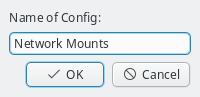
Once Filesystem Exports have been defined, they can be used to configure Network FS Mounts
configs. Each config is a collection of filesystems mounts combined with their mount
options. As usual, such a config can be assigned to hosts either directly or indirectly through
a template. Only one Network FS Mounts config can be assigned per host, so all mounts that
should be available on the booted node must be added to it. Click the New Config
button to create a new Network FSMounts config.
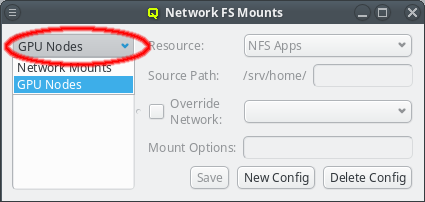
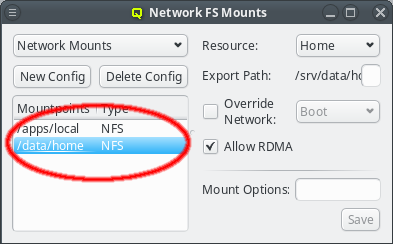
A newly created Network FS Mounts config will be automatically selected for viewing and
editing. Previously defined configs may be selected from the drop-down menu in the top
left. Below that, the list of mountpoints for the selected config is shown along with the FS
type for each mount. Selecting one of the mountpoints will show its configuration details on
the right.
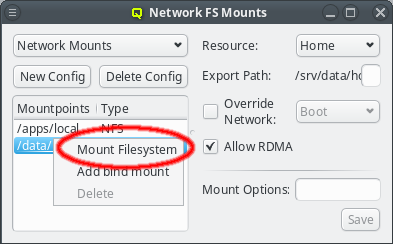
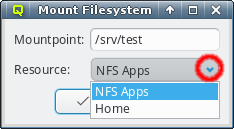
A mount definition can be deleted or a new one added to the config from the context menu. To
define a new one, enter the path where the FS should be mounted in the Mount Filesystem
dialog. Also select one of the Filesystem Exports resources declared earlier from the
drop-down menu. In most cases this information is already sufficient. The next time when a node
assigned to this Network FS Mounts config boots, it will mount this FS.
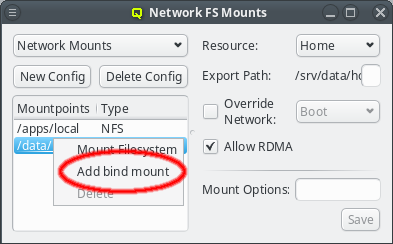
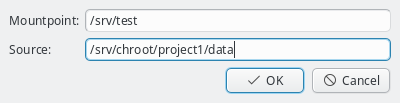
A bind mount can be added in a similar way. However, instead of selecting an external resource to be mounted, the source path of the bind has to be specified. QluMan is unable to verify the existence of the specified, so it is worth to double check before adding the bind mount config.
7.5.2.1. Advanced common mount options
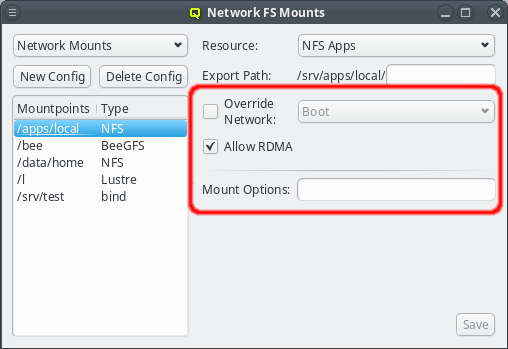
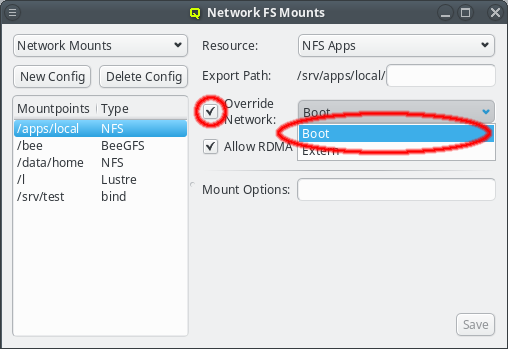
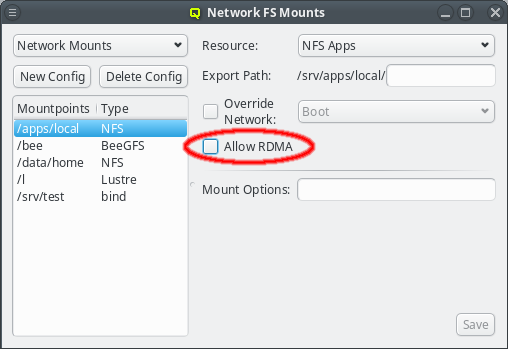
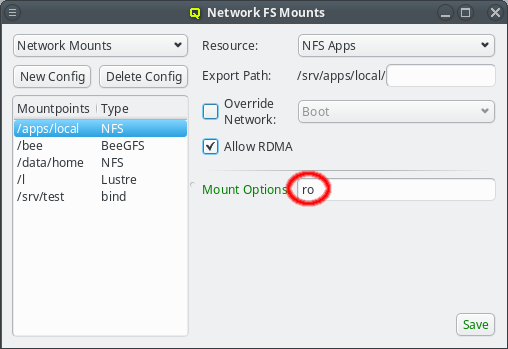
To set special options for a FS mount, first select the corresponding mountpoint from the list on the left. Once selected there are advanced options that can be set common to all FS types (except bind mounts have even less).
-
The automatic selection of the network used to mount the FS may be overridden. First the override must be activated by setting the check-mark for Override Network. A network can then be selected from the drop-down menu to force the mount to use this particular one regardless of what the network priorities of the associated export resource say.
-
Qluman will automatically detect if an IB network is being used to mount a Network FS and will use RDMA (remote direct memory access) for improved performance at lower CPU load. To mount a Network FS without using RDMA that feature has to be disabled for the mount by clearing the Allow RDMA checkbox.
-
Last, any option that the mount command accepts for a mount can be set in the Mount Options field. There are too many of them to explain them all here. Please refer to
man mountfor the full list of possible options and their meaning.
After editing either the the mount options, be sure to press Enter, or click the Save button to save the changes.
|
Filesystems are only mounted on boot. Any changes made to a |
7.5.2.2. Advanced NFS mount options
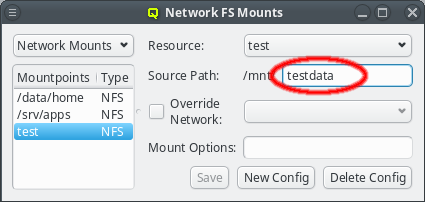
For NFS filesystems a sub-directory can be added to the Source Path to mount
just a part of the exported FS.
There are also a number of custom mount options specific to NFS. Please refer to man nfs
for the full list of possible options and their meaning. After editing either the source path
or the mount options, be sure to press Enter, or click the Save button to save the
changes.
7.5.2.3. Advanced Lustre mount options
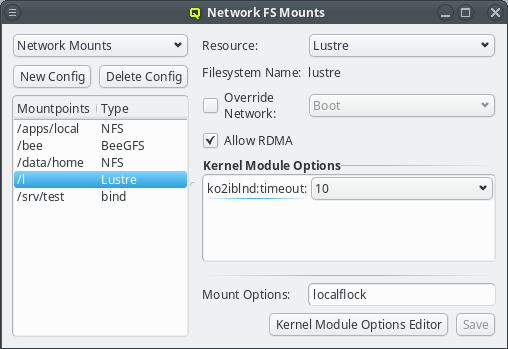
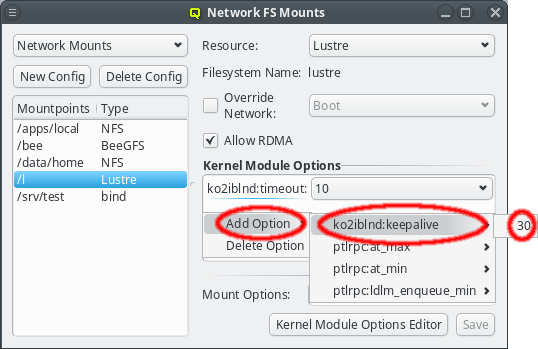
For Lustre filesystems, some advanced settings may be set via kernel module
parameters. QluMan pre-defines commonly used parameters together with their suggested default
values. They may be added using the context-menu in the Kernel Module Options box. Additional options or values can be added using the Kernel Module Options
Editor. This works the same way as for generic properties. New options
must take the form module_name:option_name. Please refer to the Lustre documentation for a
list of available parameters and their meaning.
|
Per default, new |
7.5.2.4. Advanced BeeGFS mount options
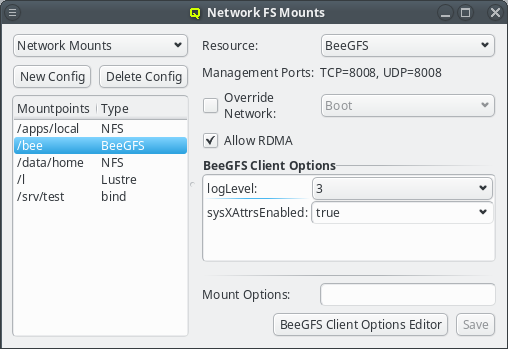
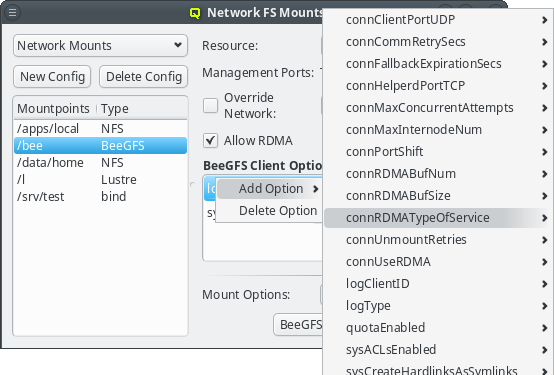
BeeGFS clients allow a lot of customization. For most options, the default values are
sufficient and don’t have to be explicitly set. Anything diverging from the defaults, can be
added via the BeeGFS Client Options box. The most likely options to add are
quotaEnabled (to enable the support of quota), sysACLsEnabled (to enable the support of
POSIX ACLs) and sysXAttrEnabled (to enable the support of extended attributes).
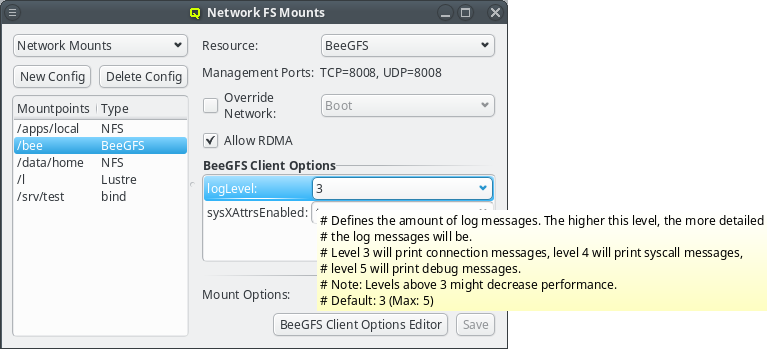
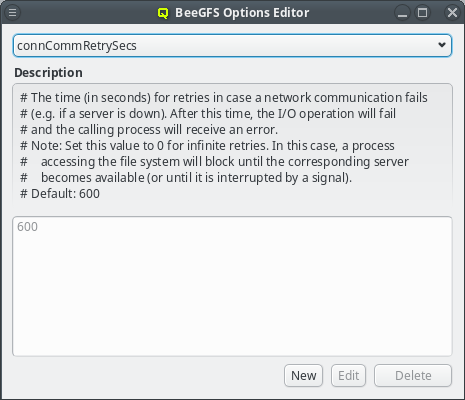
The pre-defined BeeGFS client options shown by QluMan are automatically generated from the
example configuration file distributed in the BeeGFS packages. Each option has a description
that can be seen as a tool-tip when hovering over an option that was already selected. The same
description is also shown in the BeeGFS Client Options Editor for the option that is selected
there. The editor can be opened by clicking the BeeGFS Client Options Editor
button and works the same way as for generic properties,
For options where a default value is provided in the example config file, this value will be
pre-defined and immutable in QluMan’s BeeGFS Client Options Editor. In case of boolean
options, both true and false will be pre-defined regardless of the default. For other
options, additional values must be added using the editor, before they can be assigned to a
BeeGFS mount config entry.
|
Options without a default, like e.g. |
8. Other Configs
8.1. Qlustar OS Images
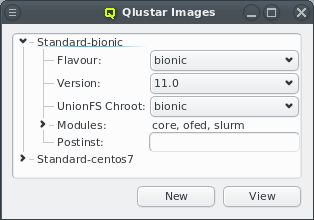
Qlustar OS images can be defined and configured in the Qlustar Images dialog accessible via
Manage . Each image has a unique name, a flavor (e.g. bionic), a
version, an optional chroot and one or more image modules.
8.1.1. Image Versioning
Currently available image versions are 11, 11.0 (all meta-versions) and 11.0.0. Note, that
selecting meta-versions (like e.g. 11) has implications on the update process. They allow
tracking the newest x.y (x.y.z) releases automatically. Example: If you have installed version
11 of the modules, you will currently get the 11.0 (most recent 11.y) versions, but if a 11.1
would become available, apt-get dist-upgrade will update to 11.1 versions automatically. So
with this choice, updates will usually include larger changes, since new feature releases
(like 11.1) will automatically be installed.
Similarly, if you have selected the 11.0 version (currently default after a fresh installation)
you will currently get 11.0.0 (most recent 11.0.z version) and apt-get dist-upgrade will
update the modules/images to 11.0.1 automatically once available. So this choice will update to
new maintenance releases automatically. The most conservative choice would be to explicitly
select a x.y.z version (currently 11.0.0), since then images will only receive bug fix updates
without explicitly changing the version in Qlustar. See also the discussion in the general
Qlustar Update Guide
8.1.2. Image Properties
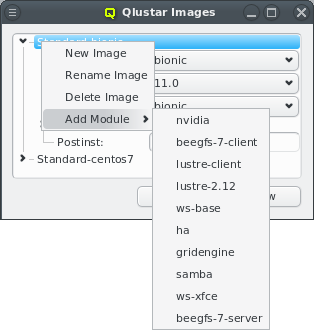
A couple of images are pre-defined during the installation process. The dialog shows the images
sorted by their names. Expanding an entry shows its configuration and allows to select a
UnionFS chroot via the drop-down menu. Each image contains at least
the core module. Additional modules can be added or removed using the context menu when
hovering over an entry. Only modules that are not already chosen are available for selection.
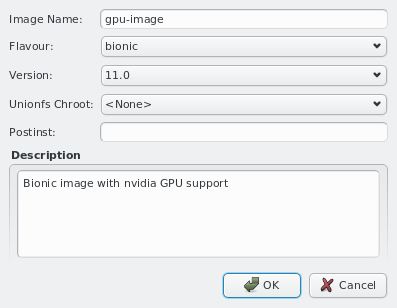
New images can be added through the context menu or by pressing the New button at the bottom of the dialog. Like before, you should then enter the name for the new config, choose a UnionFS chroot and optionally provide a description for the new image. Existing images can be removed via the context menu.
8.2. SSH host files
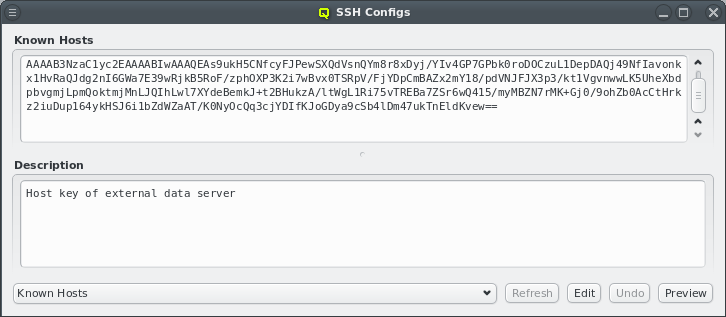
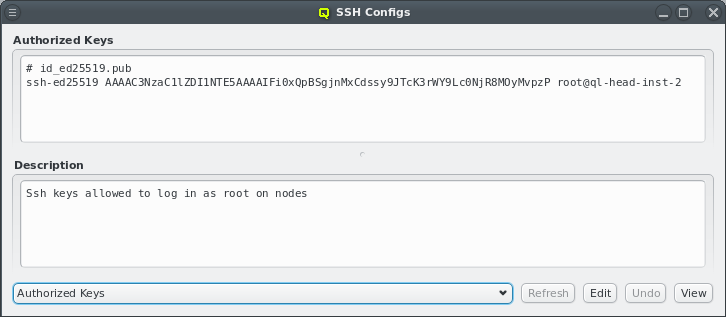
To simplify ssh remote logins to cluster nodes, three ssh configuration files are provided and
managed by QluMan: (a) ssh_known_hosts (holds ssh host keys of cluster nodes), (b)
shosts.equiv (enables login without password between machines within the cluster) and (c)
authorized_keys (used to allow password-less root login to nodes with the specified ssh
public keys).
The first two config files consist of a configurable header part, where additional hosts can
freely be entered and an auto-generated part for the hosts managed by QluMan. The
authorized_keys one just has the configurable part.
|
The auto-generated part includes the optional hostname override and aliases for all networks of
a host. The default headers for |
Management of the three configs is similar to the NIS hosts dialog: To edit the header part
of either config, select from the main menu. Then choose the
config to work on by using the drop-down menu at the bottom left and press Edit. The top
part of the window popping up can then freely be edited. When done press Save. Finally,
the resulting ssh host files can be previewed and written to disk by pressing the corresponding
buttons at the bottom of the dialog.
|
There is no preview of the |
8.3. UnionFS Chroots
In most practical cases, a Qlustar image should be configured with an associated UnionFS
chroot. Exceptions are single purpose images e.g. for Lustre servers. By design, images are
stripped down to the functionality (programs) that is most often needed on a compute/storage
node. This keeps them small while still providing fast, network-independent access to
programs/files typically used.
To complement the image and provide the full richness of the packages/programs available in the
chosen Linux distribution, the UnionFS chroot (holding a full installation of e.g. Ubuntu) is
exported via NFS by one of the head-nodes and technically merged below the content of the
Qlustar OS image. In practice, this means that all files belonging to the chroot will be
available on the nodes configured to use the chroot, but if a file/program is also in the
node’s image, that version will be used. Hence, this method combines the compactness and
speed of the imaging approach with the completeness of a full OS installation to give you
the best of all worlds.
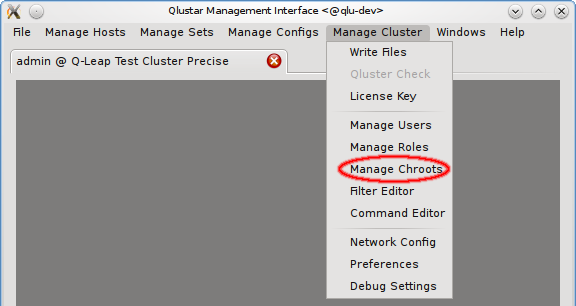
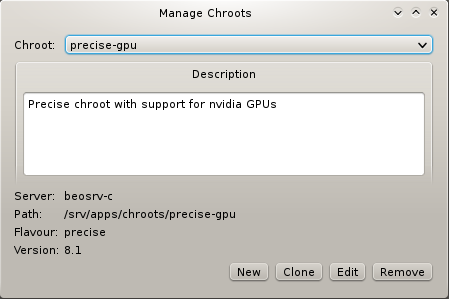
As explained before (see Qlustar OS Images), the chroot associated
with an image is easily selectable via the Qlustar Images dialog. The management of the chroots
themselves is possible via the Manage Chroots dialog. It is accessible via the main menu at
and provides a number of actions related to
chroots. Manipulation of the contents of chroots is explained
elsewhere.
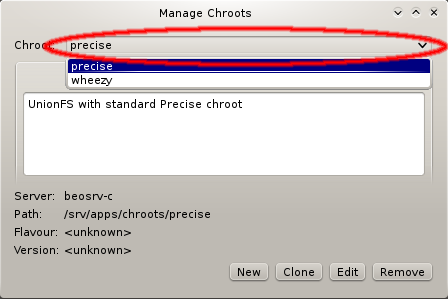
To specify a chroot to operate on, select it via the corresponding pull-down menu. This will show its description, as well as its properties like the NFS server that serves it, the filesystem path on the server, the flavor (edge platform, trusty/wheezy/…) and the version of the Qlustar feature release (always being of the form x.y, e.g 11.0).
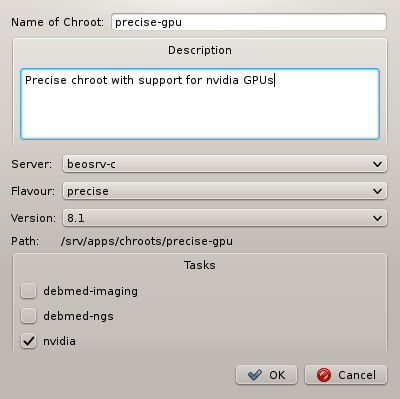
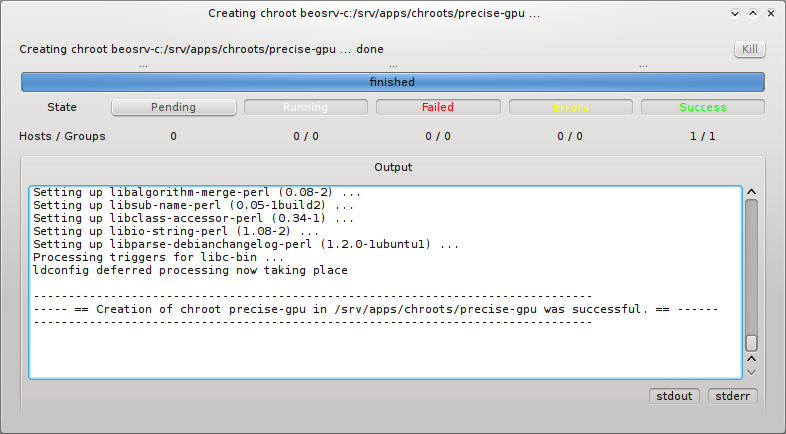
When generating a new chroot, a name for the chroot must be specified and optionally a
description of its purpose. Furthermore, you can select an NFS server where the chroot will be
located (currently only one option), a flavor (aka edge platform) and Qlustar version. Finally
you have the possibility to select Qlustar tasks. These are topic package bundles, each
consisting of a collection of packages relevant to a certain field of HPC
applications. Pressing the OK button then starts the generation of the
chroot. You can follow the rather lengthy process (count a couple of minutes) in its own
window.
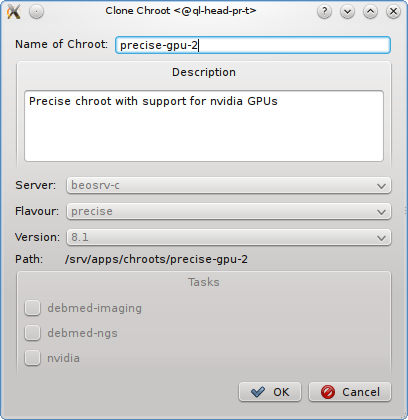
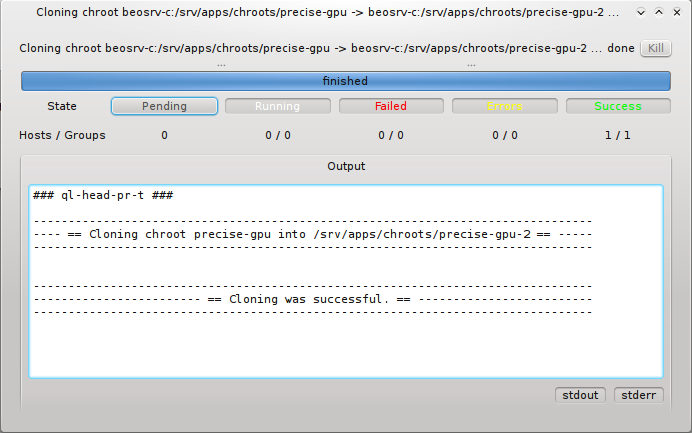
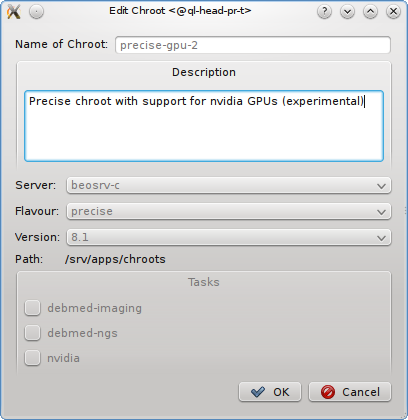
Cloning an existing chroot is mostly useful when you want to test an upgrade to a new release or for other tests. Pressing the Clone button, opens a sub-window in which you can specify the name of the new cloned chroot and optionally a description of its purpose. Pressing the OK button then starts the cloning process. You can again watch this in its own window. Editing a chroot allows to modify it’s description.
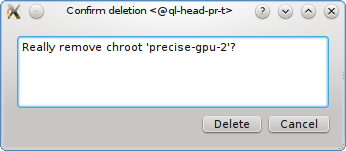
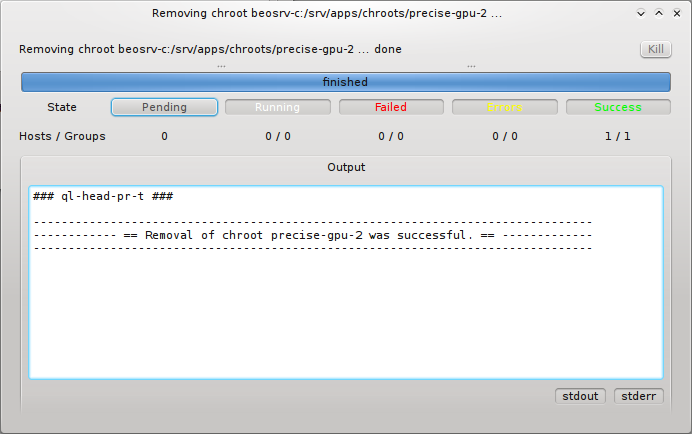
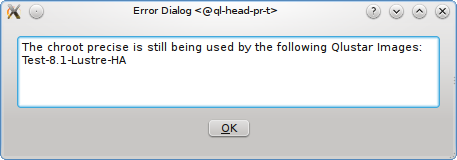
Removal of a chroot, by pressing the Remove button, first asks you for a final confirmation. If you then press the Delete button, the chroot will be removed provided it is not still in use by a Qlustar image. If it is, a list of images that are associated with the chroot is displayed. You would then first have to reconfigure these images to use another chroot before trying to remove again. Renaming of a chroot is not supported directly. To rename, you’d have to clone the original chroot, giving the clone the new desired name and afterwards remove the old chroot.
9. RXengine / Remote Execution Engine
9.1. RXengine Overview
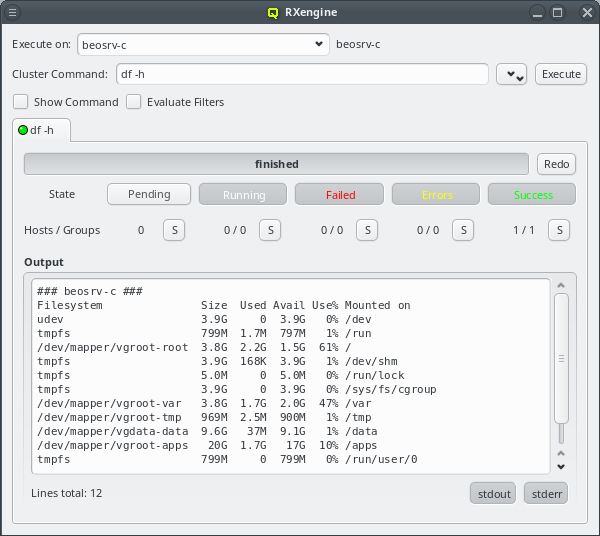
QluMan provides a powerful remote command execution engine, that allows to run shell commands
on any number of hosts in parallel and analyze their output/status in real-time. Commands
fall into two categories: Pre-defined and custom commands. The RXengine has the following
capabilities:
-
The command can be a single command or a series of commands in bash shell syntax.
-
The hosts are specified in
Hostlist formator through a Host Filter, so that even large groups can be represented by a short string. -
The commands run in parallel on all hosts.
-
The network connection used for remote execution is both encrypted and authenticated. It employs the same high-speed/high-security elliptic-curve cryptography that is used for the connection between the QluMan server and the QluMan GUI.
-
Multiple commands can be run in tabs from the same
RXenginewindow and multipleRXenginewindows can be opened simultaneously. -
The output is analyzed and updated in short intervals during the execution phase.
-
Hosts with equal output are grouped together to display a compact view of command’s messages.
-
The output can further be filtered by the return code of the command and by (de)selecting
stdoutand/orstderr. -
A history of executed commands is kept a) in the database on the cluster head-node (hence accessible to all QluMan users of that cluster) and b) locally in the user’s home directory. The user database logs commands executed on any cluster managed with QluMan by that user. Commands can be re-executed or saved to the execution menu from the
Command Historyviewer.
9.2. Executing a pre-defined command
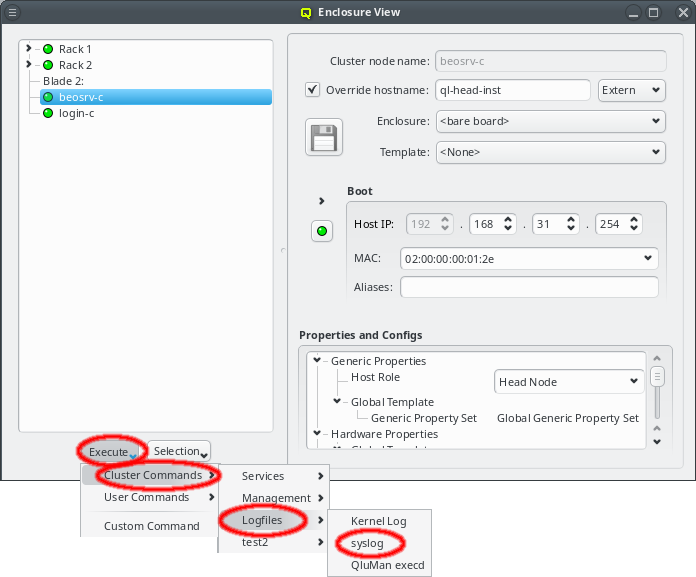
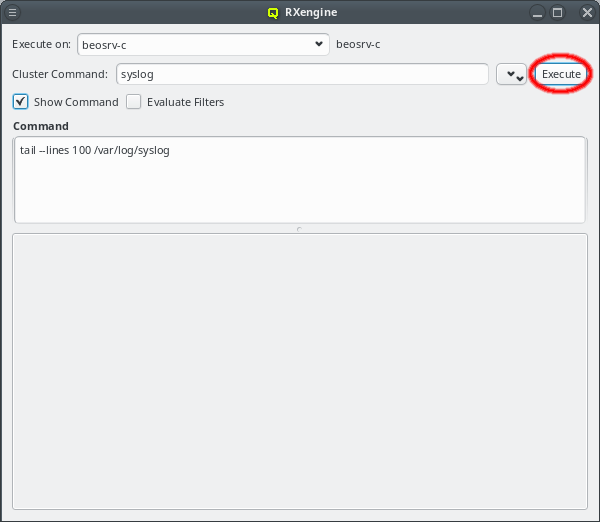
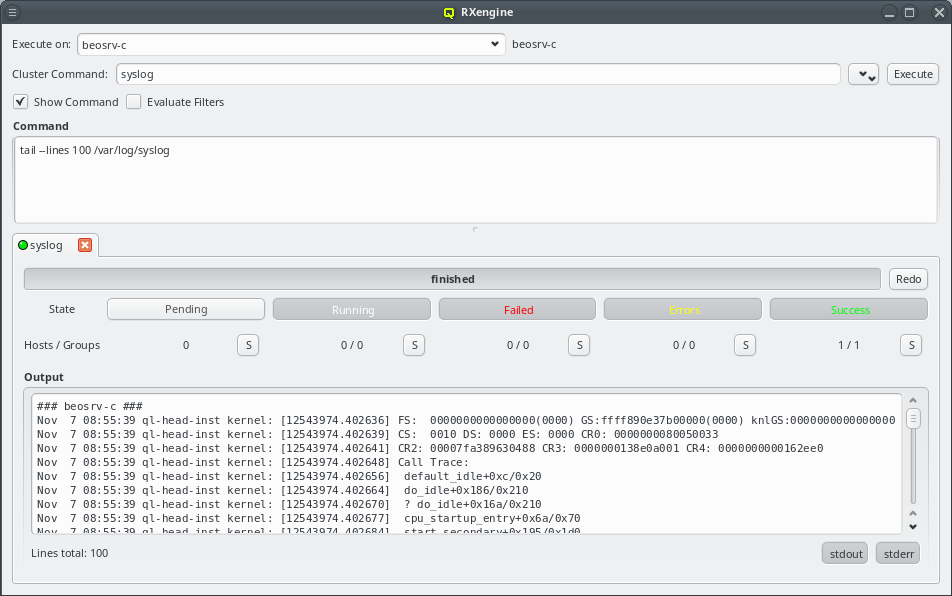
Pre-Defined commands can be created using the Command Editor (see Command Editor for details). They can be defined as cluster commands stored in the DB of
the cluster currently connected to and usable by different users on that cluster or as user
commands stored in the user’s home directory and usable only by that user but on all clusters
the user has access to.
To execute a pre-defined command, open the pull-down menu of the Execute button
at the bottom of the Enclosure View and select a command from either the Cluster Commands or User Commands sub-menu. This opens a new RXengine window with the
chosen command already selected. At the very top of the window, the Execute on
field shows the hosts on which the command will be executed. Below that, the selected
pre-defined command is shown. It can be changed at any time by choosing a different entry via
the Pull-down button. If defined, additional arguments of the command are
displayed underneath. If Show Command is checked, the actual command code is
shown further below. If Evaluate Filters is checked, the final command will be
shown with all its arguments inserted at the right places and filters evaluated to their
respective hostlists. Upon clicking the Execute button, execution of the command
on all selected hosts starts.
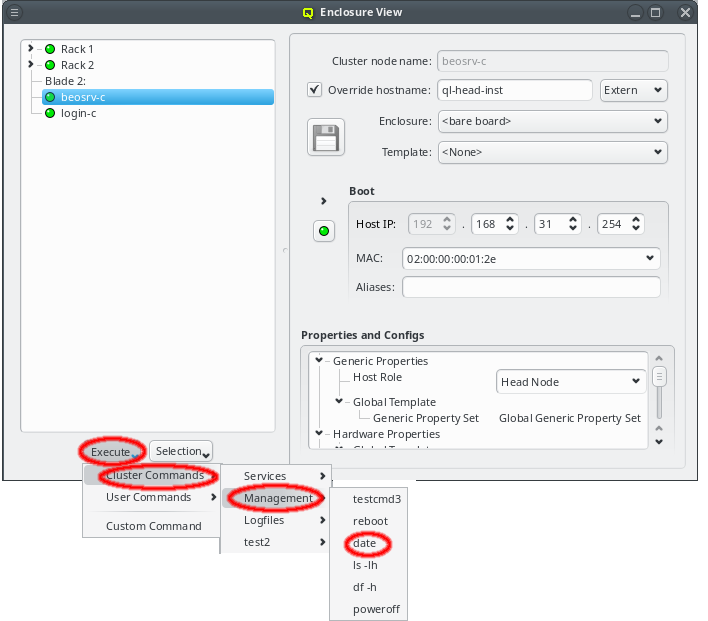
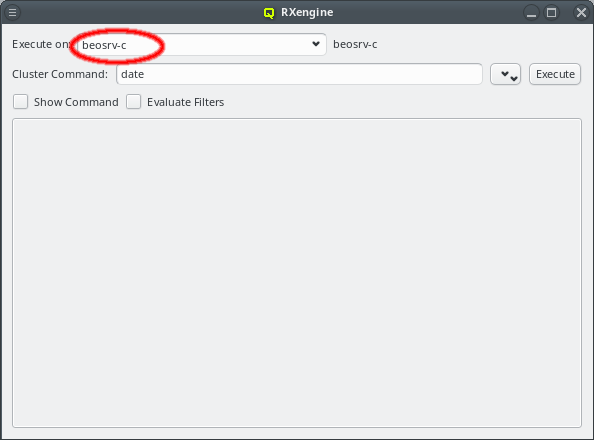
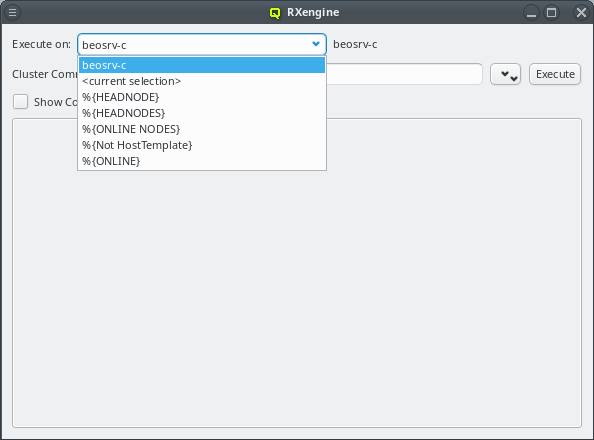
Arguments to a pre-defined command can be set fixed to a Host Filter ,
in which case the filter and its resulting hostlist are shown as plain text and can not be
edited. Optionally, specification of arguments in Hostlist format may also be left up to the
user. In that case, a combo-box is shown, followed by the evaluation of the specified input
shown as plain text. When hosts were selected in the Enclosure View, the combo-box will
contain the hostlist corresponding to the selection as default. The text can be edited directly
or a filter can be chosen from the dropdown menu. Any argument starting with "%" is assumed to
be a filter. If this is not intended, the "%" must be escaped by another "%", but only at the
start of an argument. For more details about specifying arguments in pre-defined commands see
Command Editor.
9.3. Executing a custom command
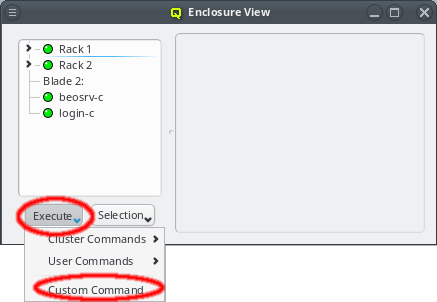
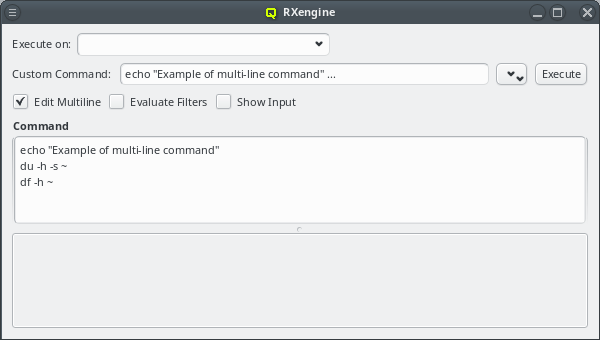
To execute a custom command, open the pull-down menu of the Execute button at the
bottom of the Enclosure View and select custom command from the menu. This opens a new blank
Command Execution window.
|
The initial hostlist is empty in the screenshot examples, since no hosts where selected in the
|
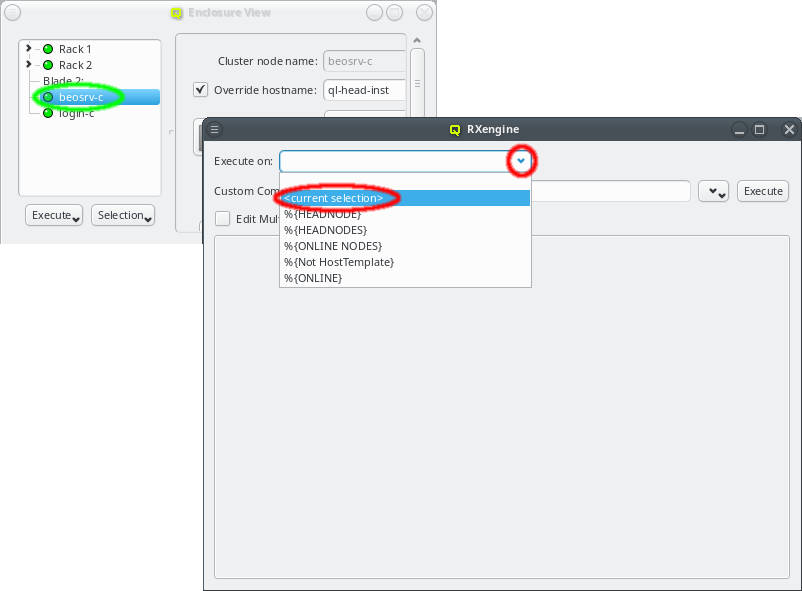
In case hosts were selected in the Enclosure View before clicking the Execute
button, a hostlist representing these hosts will be present in the RXengine window. This
allows easy selection of hosts to run a command on by selecting them
in the Enclosure View.
The hostlist can also be updated at a later time with the currently selected hosts in the
Enclosure View by selecting menu:<current selection> from the drop-down menu for
filters. This makes it easy, to run the same command on different sets of hosts. When a command
is executed, it is added to both the cluster and user Command
History.
The Command History viewer can be opened from . It allows
viewing previous commands as well as re-executing or saving them in the Command Editor (see
Command Editor).
|
The main purpose of the history is as a log of commands (possibly for auditing) rather than a repository of useful commands. The preferred way to manage frequently used commands is by pre-defining them. |
Passing input to a command

Sometimes it is necessary to pass some input to a command. This can be done by checking the
Show Input checkbox. Another text box will then be added to the window where text
can be entered that will be passed as stdin to the command on each host.
Command Syntax
Commands will be interpreted/executed by the BASH shell on every host matching the
hostlist. The full bash syntax is supported. Redirection of output to files, as in the last
example, and working with variables works as expected. Please refer to the bash documentation
(e.g. man bash) for more details.
9.4. Analysis of Command Status/Output
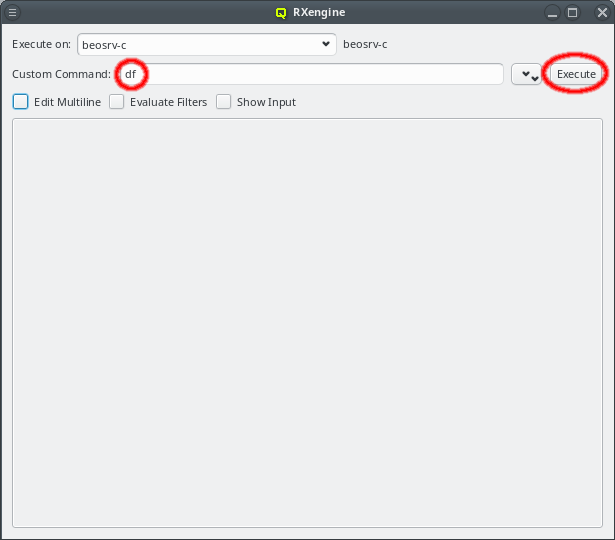
Once the hostlist is added, a command can simply be run by entering it in the command box and hitting the Execute button. It will then start in parallel on all listed hosts and the command output will be collected. Periodically, in short but increasing intervals, the output will be sorted and displayed. Hence, for short running programs you will see it immediately. Due to the increasing display intervals, long running and noisy commands won’t cause constant flickering of the output, allowing you to more easily follow it.
9.4.1. Command Status
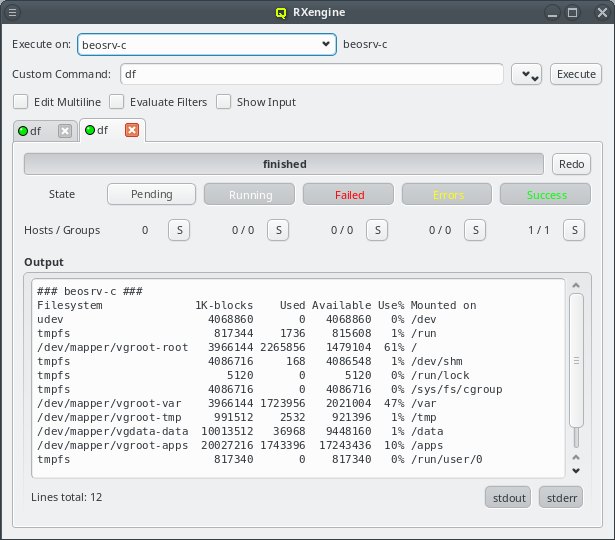
After the Execute button has been pressed, all hosts will start in the Pending
state. Once a host confirms that it has started its command, it will change to the Running
state. When the command concludes, the state becomes one of Failed, Errors or
Success. If the command exited with a return code other than 0, the host will enter the
Failed state. If the command exited with a return code of 0, but produced output on stderr,
it will enter the Errors state. Otherwise, it enters the Success state.
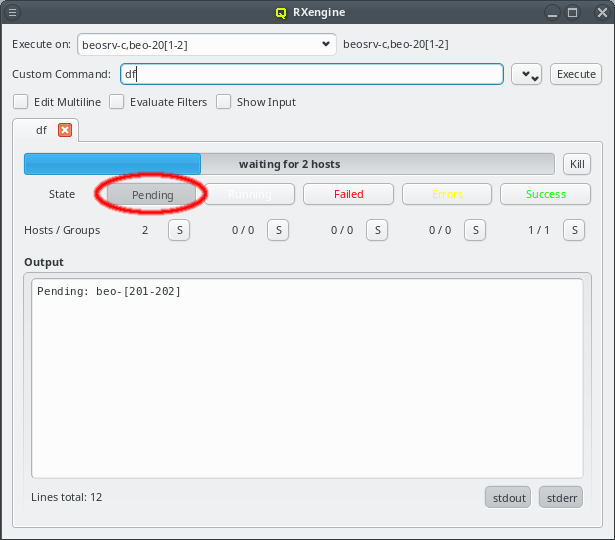
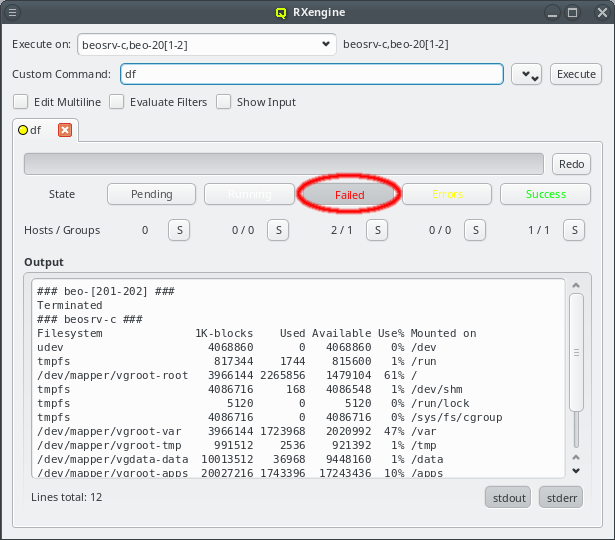
In the screenshot example, the hosts beo-201 and beo-202 were down, so they remained in the
Pending state. By clicking the Pending button, a hostlist of the pending hosts
is displayed. The QluMan server will start the command on those hosts, when they become online
again. If you do not want that to happen, or if the command does not terminate on its own, then
the Kill button allows you to stop the command. A killed command counts as
failed, so beo-201 and beo-202 now enter that state. The command output also reflects, that
the command was killed.
9.4.2. Host Grouping by Status and Output

Hosts executing a command are not only grouped by their execution state, the command output produced by the different hosts is also analyzed and compared to each other. Hosts with identical output are put into a group. Their output is only displayed once, prefixed with the hostlist representing the hosts in each group. For a quick overview, the number of hosts and groups is also displayed below each state button.
In the screenshot example, two hosts (beo-201 and beo-202) have failed, because they where
offline and the command was killed before starting. The output of both was identical, so they
form one group. Similar, one host (beosrv-c) completed the command successfully and builds
its own group.
The S buttons next to the numbers add or remove the hosts in each state to form a new hostlist for the next command. Press the button to include the corresponding hosts and press it once more to exclude them again. This is convenient, e.g. to quickly select only the hosts for which a command failed: Analyze the errors and later relaunch with an adjusted command. Another example: Select only the successful hosts to run a follow-up command etc.
9.4.3. Filtering by stdout and stderr
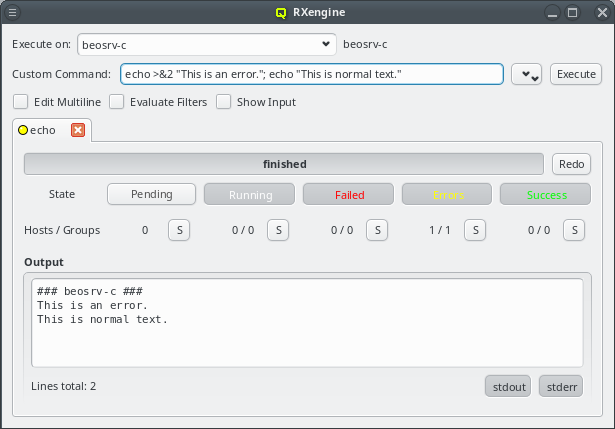
Commands usually output regular text to stdout and warnings as well as errors to stderr. In
the latter case, the command ends up in the Errors state, because this is usually something
that needs further inspection. The screenshot example prints two lines, one to stderr and one
to stdout. Unfortunately Unix does not enforce any order between output to stdout and
stderr. Therefore, as in this example, it can happen, that a small delay between the command
output and reading from the file descriptors causes the order to slightly change.
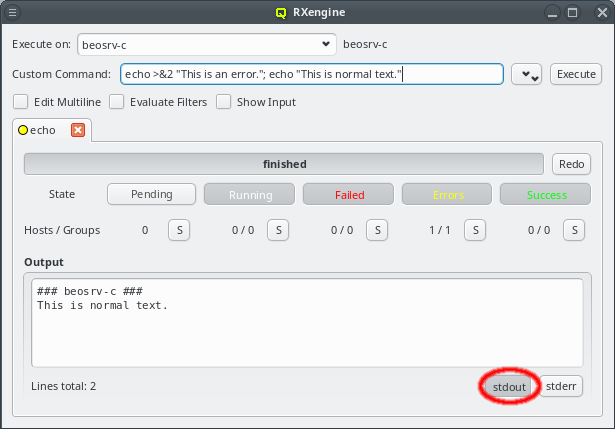
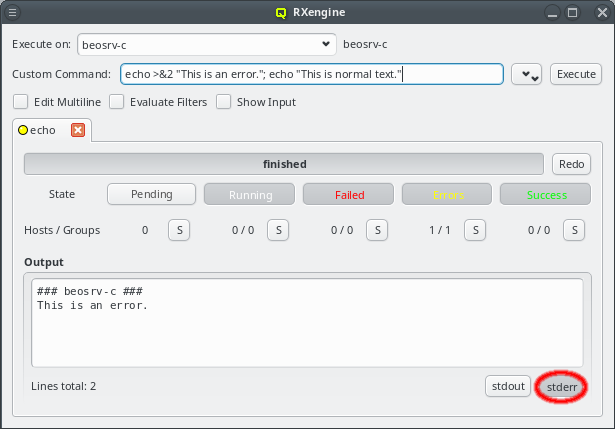
Some commands produce a lot of output. Error messages are then easily overseen in between the
lines. Similarly a command might report a lot of harmless errors, that hide the interesting
output going to stdout. To simplify an analysis of the command output for such cases, the two
buttons stdout and stderr at the bottom of the window allow
toggling the visibility of stdout and stderr output selectively on and off.
9.4.4. Searching in the Command Output
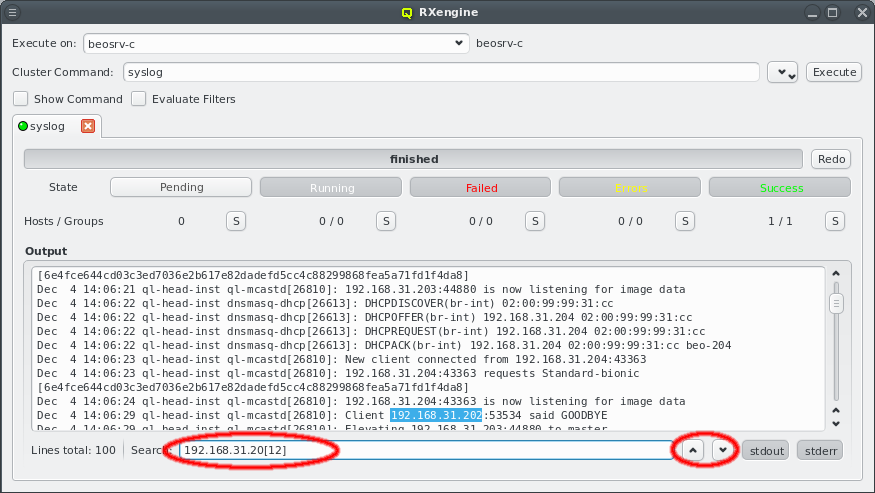
Searching in the command output is possible by entering text in the search field at the bottom of the execution window. The text is interpreted as a regular expression and a match is searched in the text starting at the current position in the output. If a match is found, the matching text is highlighted. The up/down buttons next to the search field allow skipping to the previous/next match respectively. If no match is found, the Search label will turn red.
9.5. Command Editor
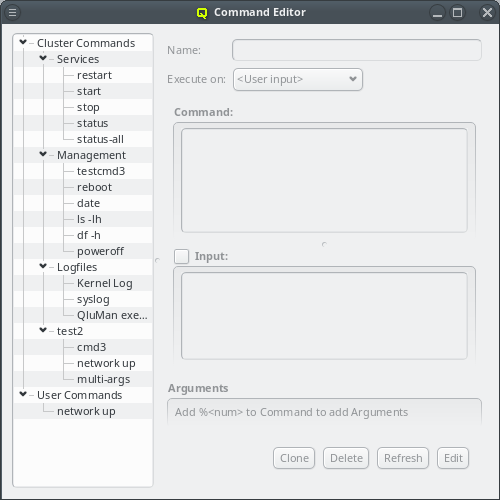

The Command Editor shows all the pre-defined commands in a tree view on the left. The tree
consists of two top level items, Cluster Commands on top and User Commands
underneath. Cluster commands are stored in the cluster’s QluMan DB and user commands in the
user’s home directory. Selecting a command shows its definition on the right, where it can also
be edited. Every command has a name/alias under which it appears in the tree view on the left
as well as in the Execute menu in the Enclosure View and in the drop-down menu
of an RXengine window.
There are three Admin Rights concerning pre-defined commands: "Can create, modify and delete
predefined commands" refers to the right to create Cluster Commands while "Can execute
predefined commands on nodes" refers to their execution. User commands on the other hand can
always be created, modified or deleted by the user. But to execute them, the right "Can execute
custom commands on nodes" is required just like when executing custom commands directly.
9.5.1. Sorting commands
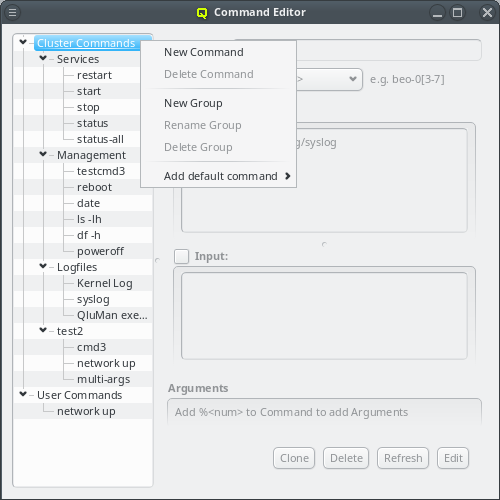
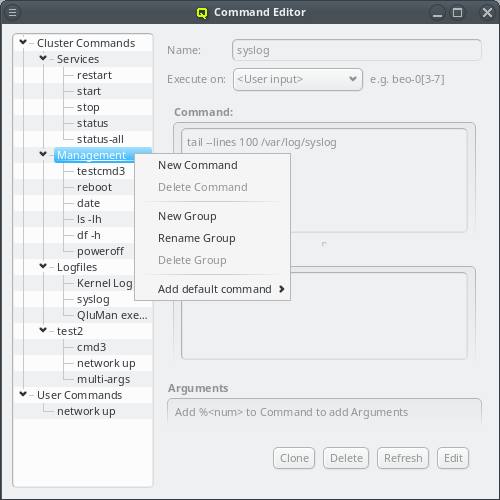
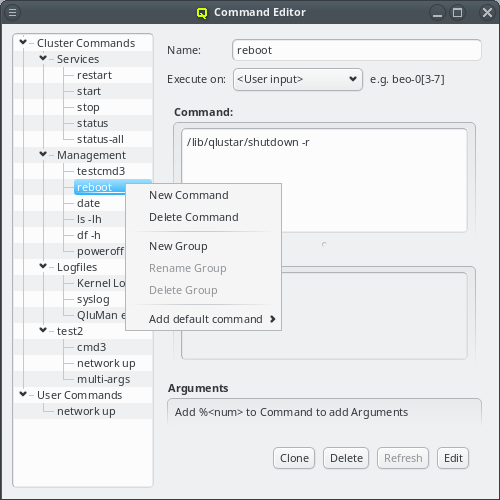
Commands are kept in a tree structure, grouping similar commands together. They can be sorted freely using drag&drop. You may select one ore more commands or groups and drag them where they should appear. Items are moved if they remain inside the same top level item (cluster or user) otherwise they are copied, since the two are stored in different places. Groups can be created, renamed, moved and deleted to achieve any desired hierarchy of commands.
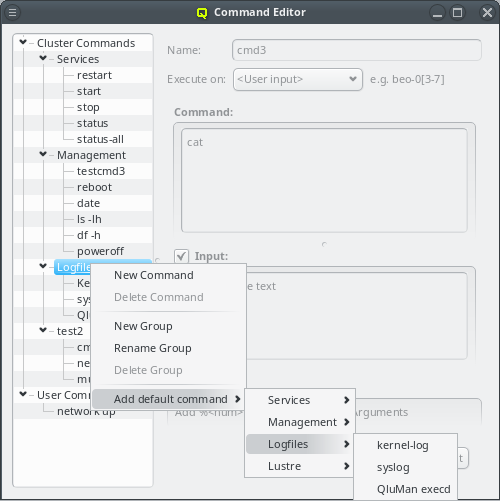
When a cluster is first installed, a number of pre-defined commands are added to the cluster automatically. A few more default commands can be added from the context menu by selecting Add default command and following the tree structure there. This also includes all the commands added at installation time. So in case one of these was deleted, it can always be restored again.
9.5.2. Defining or editing a command
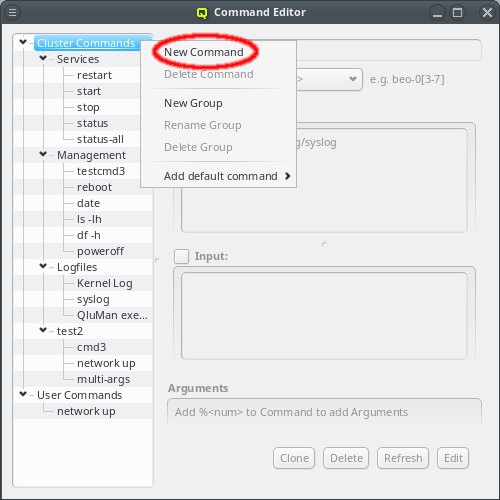
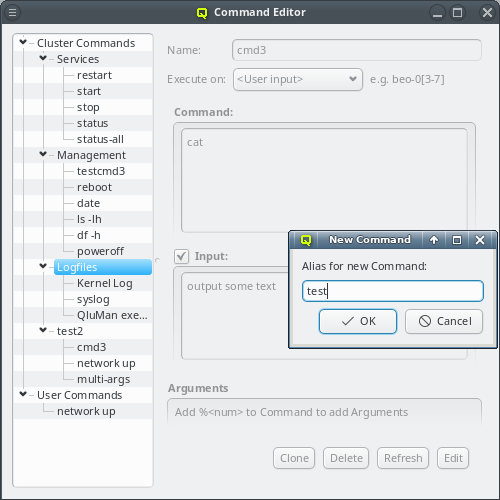
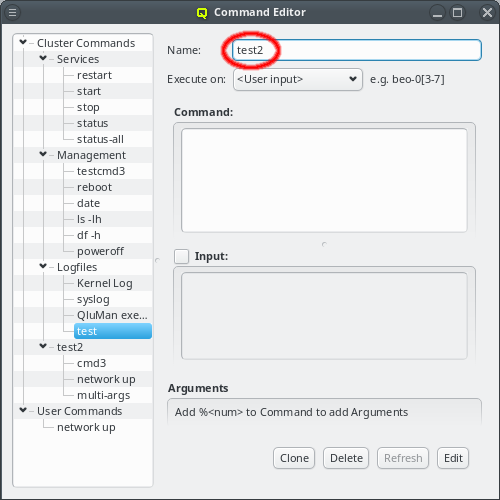
To define a new command, select New Command from the context menu and set its name. The new command will be created in the group, where the context menu was opened or in the root, if the mouse is outside of any group. Initially, the command will have no definitions.
To edit a command, it needs to be selected first. Then its definitions will be shown on the right. The name/alias of a command can be edited by clicking in the text box at the top and entering the new name. Press return, to save the new name and the check-box will become fully checked again. To undo editing, simply reselect the command in the tree view.
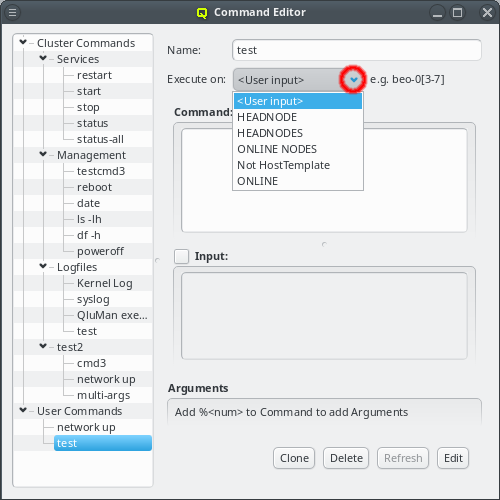
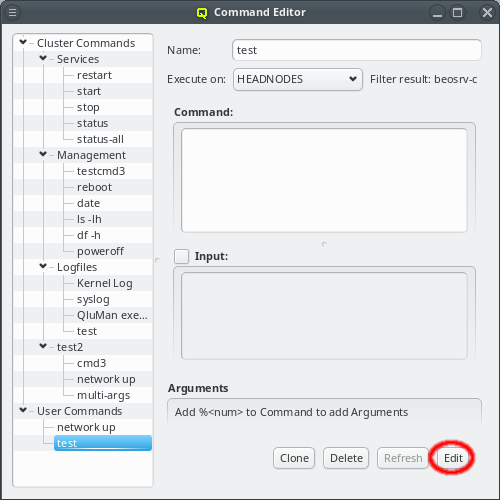
A command can be executed on any host or set of hosts in the cluster. The Execute on
field governs how that host or set of hosts is constructed. The default is User
input. This means, the user will have to choose the hostlist, where the command will run, at
the time, when it will be executed. Alternatively, the hostlist of the command can be preset by
selecting one of the filters from the dropdown menu. If a filter is selected, the hostlist, it
currently evaluates to, is displayed below it.

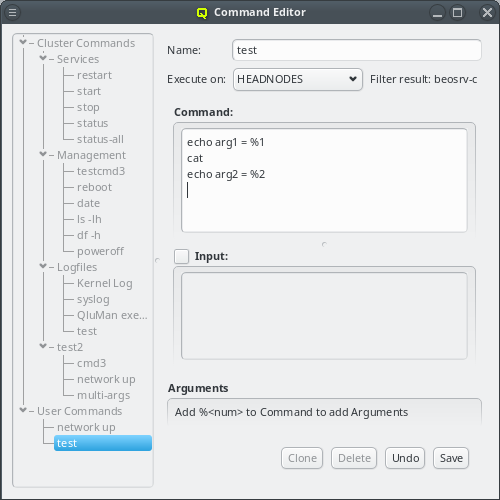
Editing the command itself may take a while. To avoid conflicts from concurrent editing
attempts by different QluMan users, only one person can edit a command at a time. To start the
editing process, click the Edit button at the bottom. After that, changes to the
command can be entered. Commands will be interpreted/executed by the BASH shell on every host
matching the hostlist. The full bash syntax is supported. Redirection of output to files and
working with variables works as expected. Please refer to the bash documentation (e.g. man
bash) for more details. There is one exception to this: A "%" character followed by a number
specifies additional arguments for the command, as explained in more detail below.
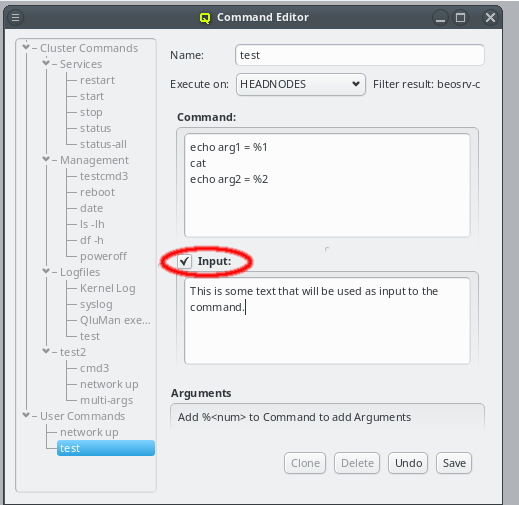
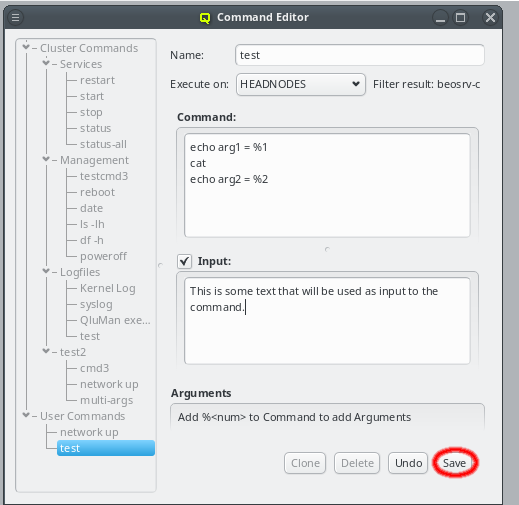
Sometimes it is necessary, to pass some input to a pre-defined command. This can be done by clicking the Input check-box. It will bring up an input text-box, where the desired input text can be entered.
To finish editing the command, click the Save button at the bottom. This actually
saves the command text and input, if any, in the database and releases the lock on the
command. This also scans the command text for argument placeholders and updates the entries in
the Arguments box.
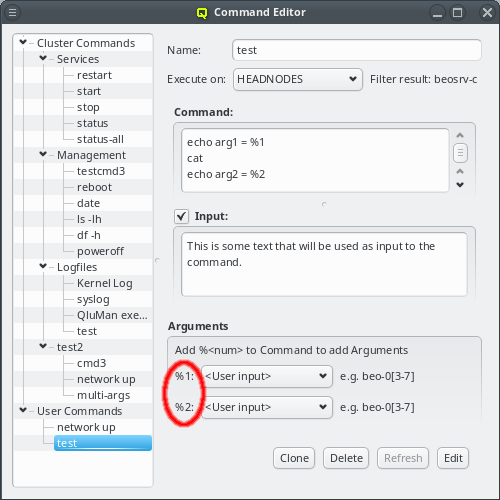
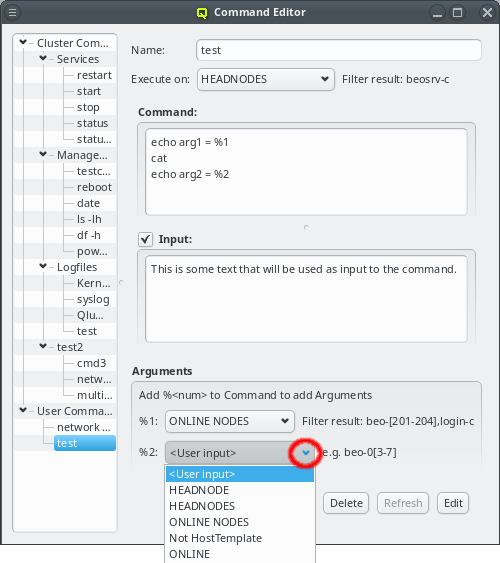
The definition of command arguments use the same mechanism as detailed for the Execute on
definition. They can either be left up to the user, to be filled in when the command is
executed or be specified by a filter selectable from the drop-down menu. When executed, the
<num> placeholders in the command text are replaced by the user specified arguments or the
resulting hostlist of the filter. There are always as many arguments as there are placeholders
in the command. To add an argument, edit the command text and add a placeholder there. To
remove an argument, edit the command text and remove the placeholder.
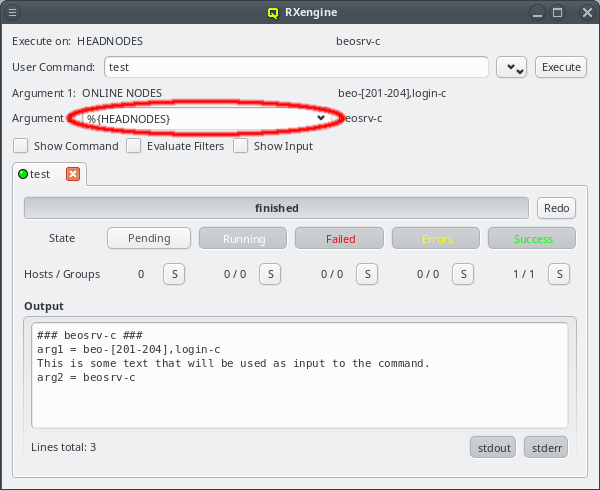
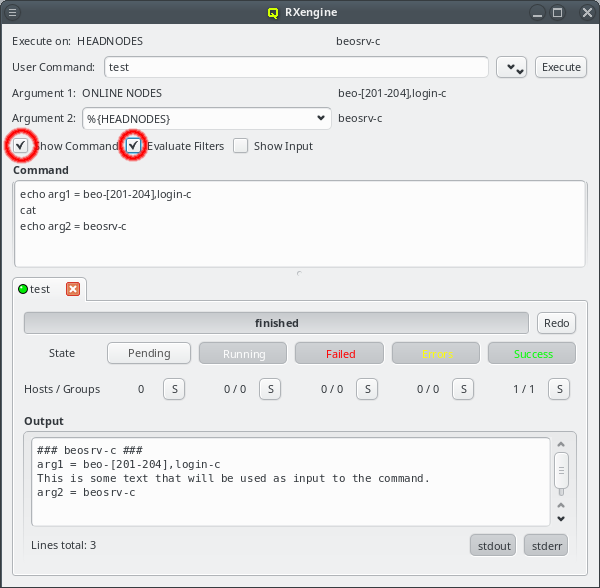
In the screenshot example, the test command is defined to execute on all head-nodes (beosrv-c
is the only head node in the cluster). It has some input and two extra arguments. The first one
is fixed to the ONLINE NODES filter that evaluates to any host reported as online. The second
one is left for the user to be specified, hence, when executing the command, only the second
argument is editable. In the screenshot, the HEADNODES filter was chosen for this argument,
but any other text would have been possible too. For easy verification, the command text, with
all the arguments substituted, is shown together with the command input (if defined).
|
In the example, the specified input is simply output by the |
9.6. Command History
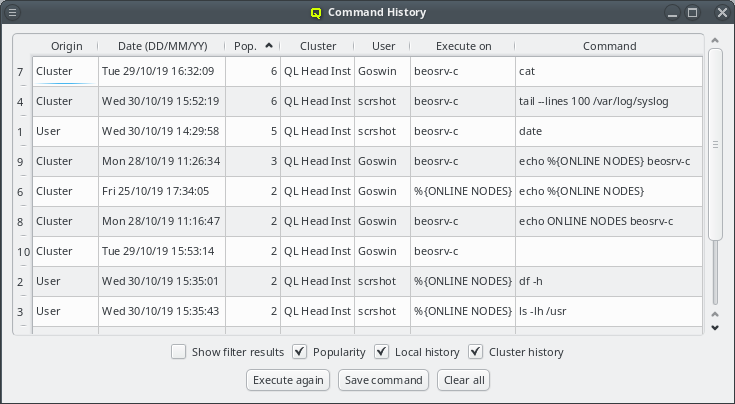
Every time a command is executed using the RXengine the command is logged in the command
history. There are two separate history logs: One for the QluMan user and one for the
cluster. The user history is stored locally in a sqlite database located in the user’s home
directory and contains a list of all the commands executed by the user on any cluster she/he
has access to. This history is only accessible to and managed by the user himself. The cluster
history is stored in the QluMan database on the cluster head-node and holds all the commands
executed on that particular cluster. It is accessible to all QluMan users but entries can be
removed only by users with the specific Admin Right that exists for this.
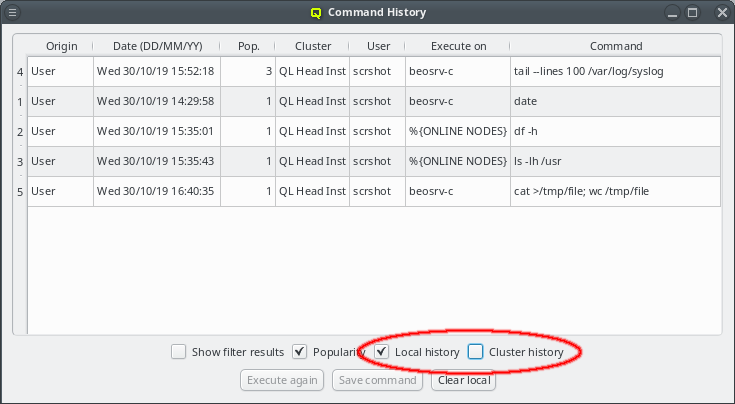
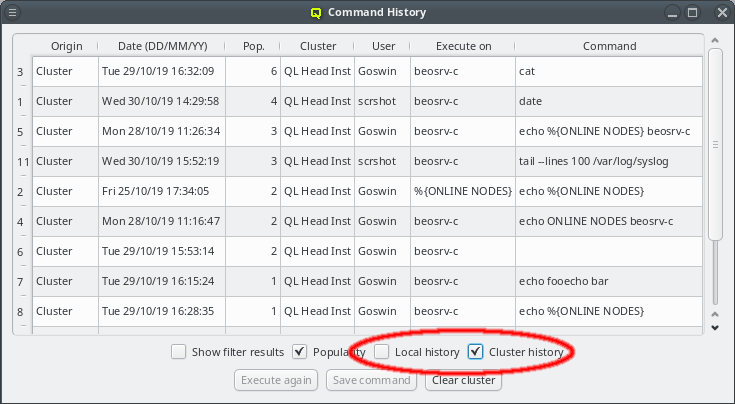
When first opened, the Command History viewer will show a merge of the user history with the
cluster history of the cluster currently connected to. Commands will be sorted with the most
popular command at the top. Popularity is defined by the number of times a command has been
executed. If the popularity is equal, the newer command will be at the top. The view in the
Command History viewer can be altered in several ways:
The display of the user and cluster history can be toggled on and off using the two check boxes User history and Cluster history. If a box is unchecked, the corresponding history will not be shown.
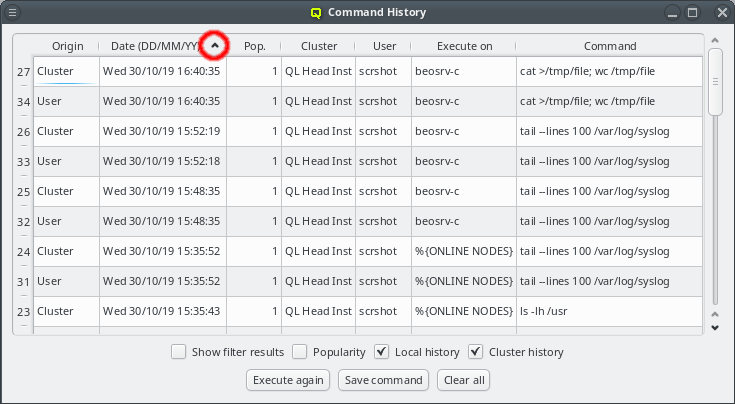
The history can also be sorted with respect to any displayed column of the table by clicking at the column header. Repeated clicks will reverse the direction of the sort as shown by an up or down arrow at the right side of the column header used to sort.
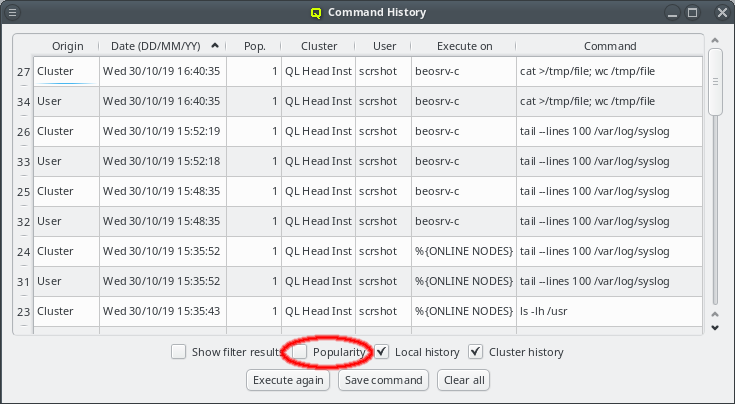
When first opened, the Command History viewer will group identical commands together and show
the number of times each command was executed in the popularity count column Pop.. Removing
the checkmark from the Popularity checkbox will list each command separately,
allowing for a full audit of the history.
|
The state of the |
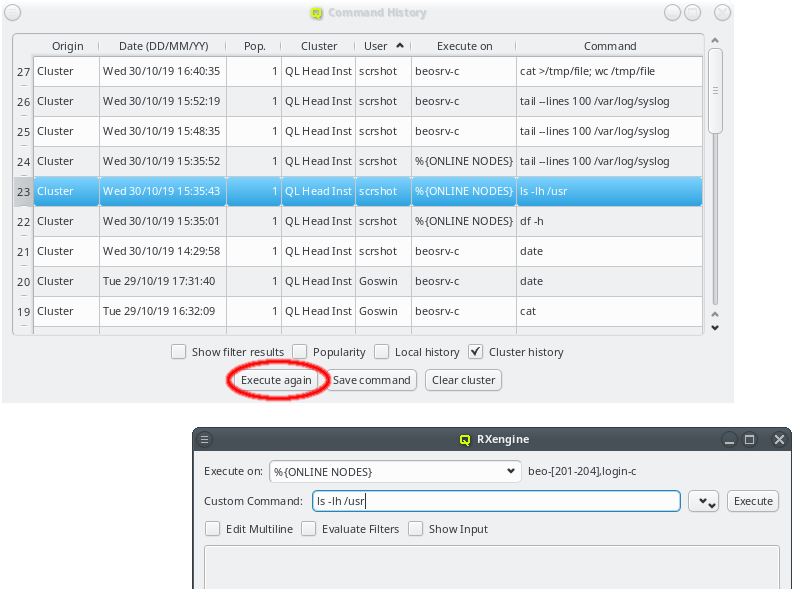
Besides being a log for excuted commands the Command History viewer has two more useful
functions: A command can be re-executed by first selecting the command from the list and then
clicking the Execute again. This will open the RXengine window with the
selected command already filled in. The command may then still be edited or the Execute on
hostlist be altered before clicking Execute to actually initiate the execution.
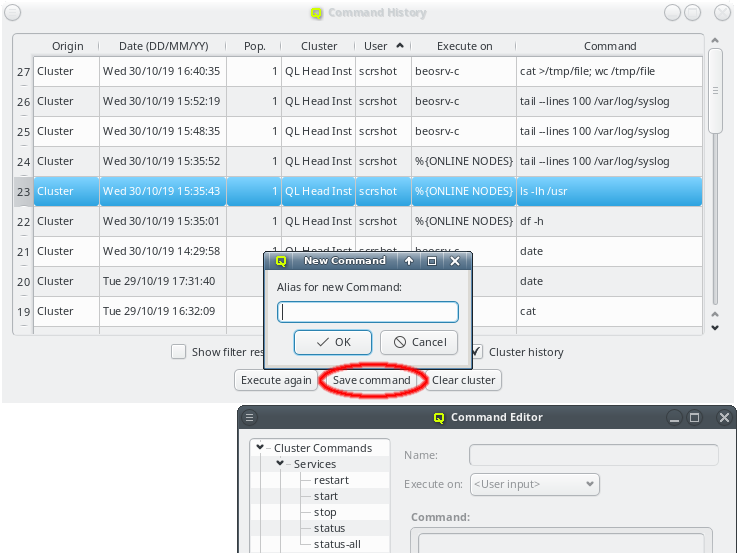
Additionally a command in the history may be used as a template for a pre-defined
command. Clicking the Save command button will ask for an alias of the command
and will then open the Command Editor window to start the creation of a new entry. The
command will be created as a user pre-defined command. Later it may be edited and moved around
in the pre-defined command trees like any other entry.
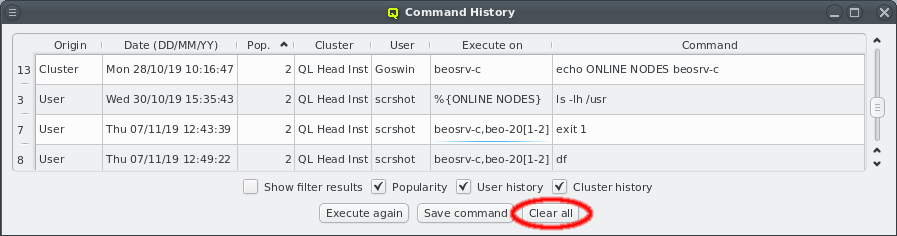
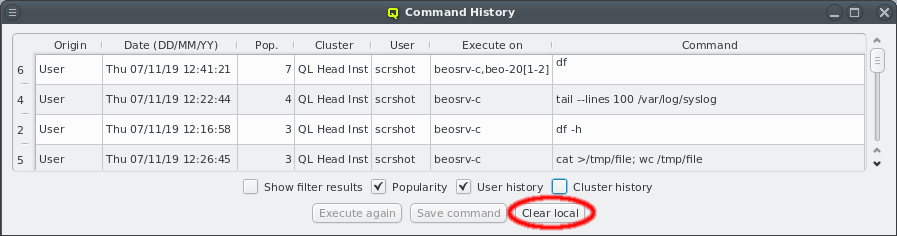
As time passes, the command history continues to grow and at some point you might want to clean up old or unimportant entries. There are various ways to truncate the list: If both histories are displayed and no lines are explicitly selected, the full history can be removed by clicking the Clear all button. If only the user or cluster history is selected to be shown, this button changes accordingly to clear only the history currently displayed.
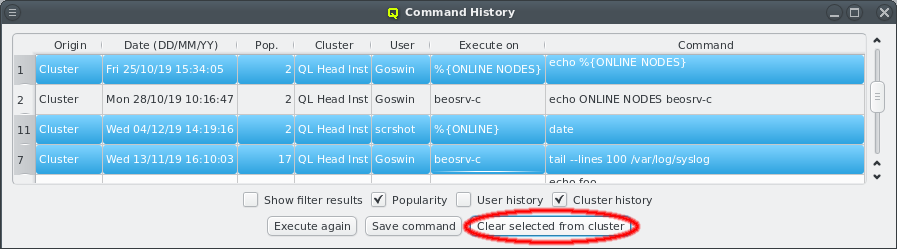
To delete individual history elements, select the corresponding entries in the history. Ranges of entries can be selected using the Shift key, individual ones using Ctrl. The button then changes to Clear selected and will remove all selected entries from the history.
|
When |
10. Host Filters
10.1. Overview
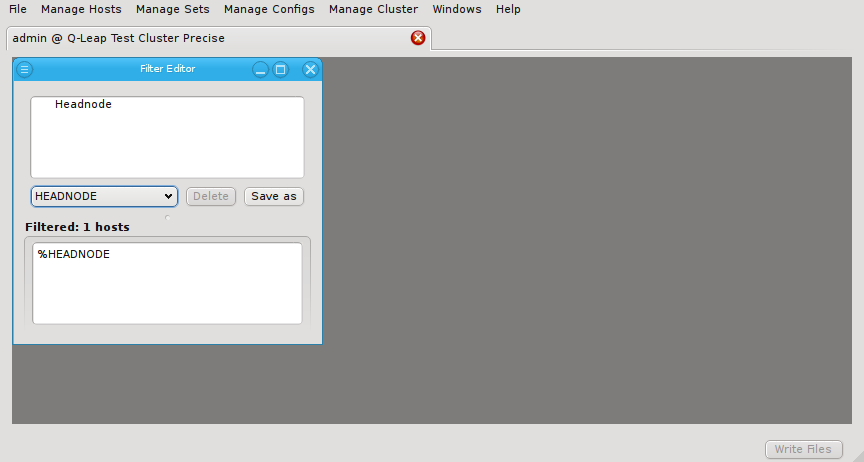
Host filters define a set of hosts by specifying any number of criteria. The set of hosts
defined by a filter is dynamic: Changes made to the properties of hosts are automatically
reflected in the hostlist a filter evaluates to. Every time a filter is used, the criteria
defining it are evaluated from scratch. Hence, host filters provide a powerful tool to classify
hosts into groups, in a way that will dynamically take into account changes made to the
cluster. They can be used in various ways within QluMan:
-
In pre-defined commands, to either specify, the set of hosts, where a command should be executed or to supply the resulting hostlist as an argument to the command.
-
As user input for pre-defined or custom commands.
-
In the Enclosure View to modify the selection.
10.2. Host Filter Editor
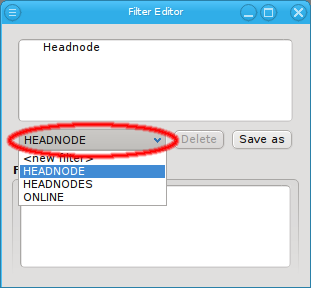
The filter editor window is split into two areas. At the top, the definition of the currently selected filter is shown. You can select the filter to be displayed from the drop-down menu. At the bottom, the hosts that currently pass all the filters are displayed in the compact hostlist format. This format is used by a number of other programs including pdsh and SLURM (the pdsh Wiki has a detailed discussion on the syntax).
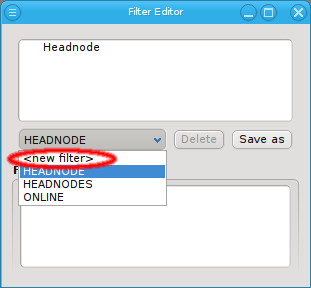
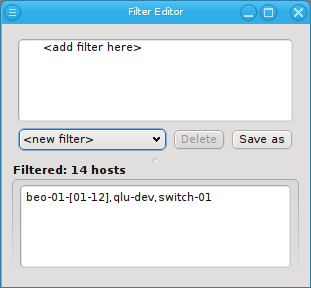
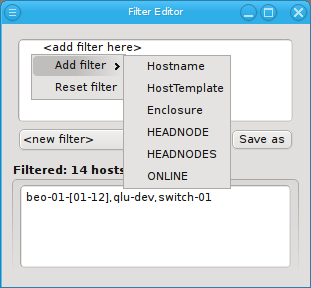
Select New filter from the drop-down menu to start defining a new filter. Then add specific sub-filters from the context menu, until the desired subset of hosts is displayed in the bottom half of the window. Using their context-menu, filters can be edited or removed and sub-filters be added.
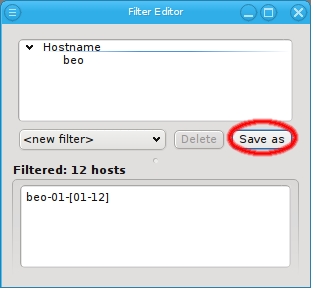
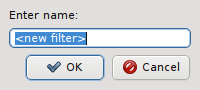
The Reset filter menu item clears the filter, so one can start from scratch. To finally create (save) the new filter click Save as and enter a name for it.
10.2.1. Editing a Filter
Editing a filter is similar to creating a new one. First select the filter from the drop-down menu to display it’s current definition. Then add, edit or remove individual filters as desired. Finally click Save as to save the altered filter, Using an existing name will replace the old filter. Using a different name will create a new filter.
10.2.2. Types of Filters
A filter can be added from the context menu (right mouse click) in the top area. For a host to
show up in the filtered list (bottom part), it must pass all the filters added. Each filter may
narrow down the list. Any number of filters can be added and they do not have to be unique. For
example you can add a Hostname filter that selects all hosts that begin with beo and a Host
Template filter that selects all Demo VM nodes. A host has to pass all top-level filters to
show up. Currently, QluMan provides six top-level filters: Hostname, HostTemplate, Enclosure,
HEADNODE, HEADNODES and ONLINE. Additional ones will be added in the future.
10.2.2.1. Hostname Filter
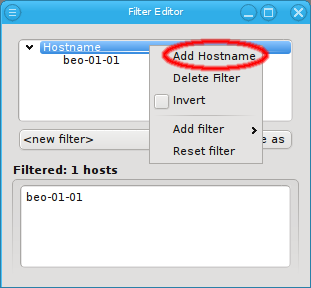
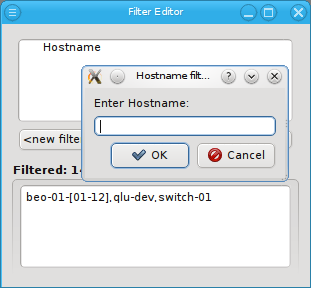
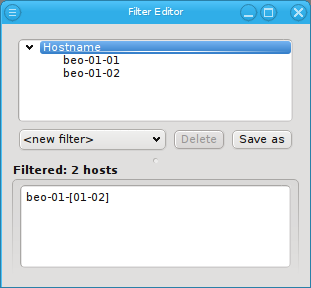
Adding a Hostname filter opens up a pop-up dialog asking for the hostname or a regular
expression to filter for. The input must be a regular expression in python syntax and is
matched against the beginning of the hostname. If a match against the full hostname is desired
then "$" should be added at the end. A ".*" can be added to the front, to match anywhere in the
hostname instead of matching against the beginning.
|
Multiple hostname patterns can be added to a Hostname filter through the context menu. This is additive: If a host matches at least one pattern, it will be included in the resulting list. |
10.2.2.2. Host Template Filter
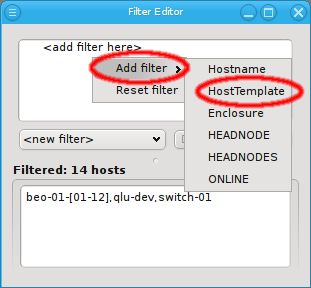

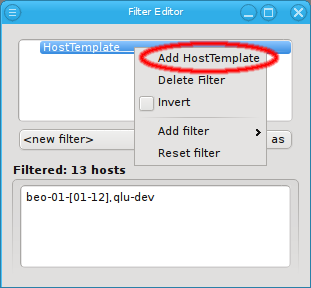
Adding a Host Template filter does not pop up a dialog. Instead it adds an empty Host Template filter. This simply selects all hosts with an assigned Host Template. Hosts that do not have a Host Template will not pass this filter. The filter can be made more specific by adding Host Template patterns to it through the context menu. This opens up a pop-up dialog, from where an existing Host Template name can be selected.
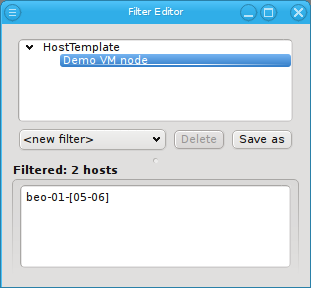
The result is a list of hosts, for which the associated Host Template matches the given pattern. Adding multiple Host Template names is again additive, just like with Hostname patterns.
10.2.2.3. Enclosure Filter
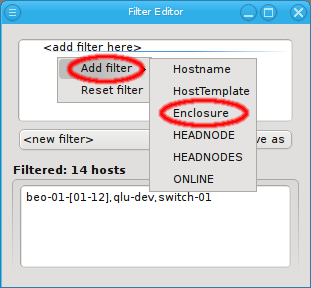
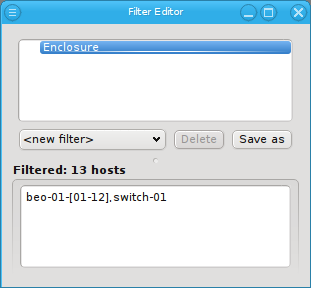
Adding an Enclosure filter does not bring up a dialog either. Like a Host Template filter, it selects all hosts that are part of an enclosure. Unlike the Hostname and Host Template filters though, an Enclosure filter allows for two different specifications: The name and/or the type of an enclosure can be matched. Just like Hostname and Host Template filters the Enclosure filter is additive. Adding sub-filters for both the Enclosure name and the Enclosure
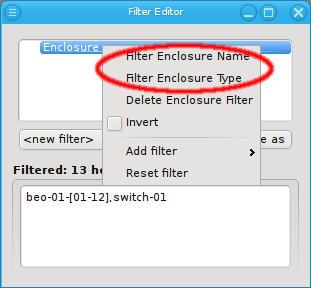
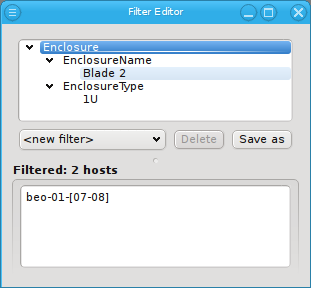
type will filter hosts that match at least one of those criteria. To filter for hosts that match both, an Enclosure name and an Enclosure type, two separate Enclosure filters have to be used to get the intersection of both filters. The first one to filter the name and the second one to filter the type.
10.2.3. Inverting a Filter
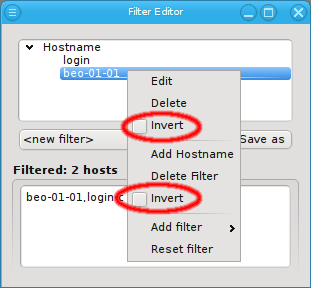
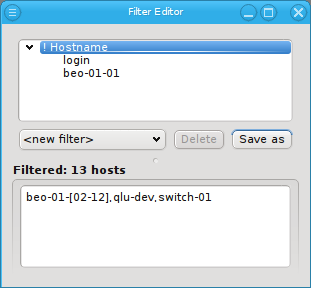
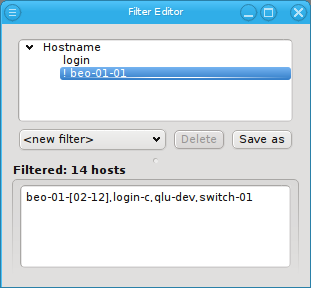
Every filter, sub-filter and pattern can be inverted through the context menu. The context menu for a pattern contains menu entries for both, the pattern and the enclosing filter separated by a line. The first Invert entry will invert the specific pattern that was selected, while the second Invert will invert the whole filter.
Besides the obvious, this can also be useful in finding hosts that are not configured correctly. For example, adding an empty Host Template filter and inverting it, will show all hosts without a Host Template. Adding a second filter, that selects all switches, power controllers and other special devices (they usually don’t need a Host Template) and also inverting that, results in a list of all hosts, that are neither properly configured nodes (missing Host Template) nor special devices.
10.2.4. Additive versus subtractive
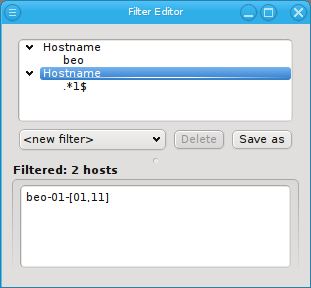
When constructing a filter, it is important to remember, that all top-level filters are
subtractive. A host must pass all top-level filters to show up in the result. On the other
hand, all patterns and sub-filters are additive. Matching any one of them within a top-level
filter adds the host to the result of that filter. Hence, when subtractive behavior is desired
for patterns or sub-filters, each pattern or sub-filter must be added to its own top-level
filter. For example, to select all hosts that start with beo as well as end on "1", two
Hostname filters have to be added.
11. QluMan User and Rights Management
11.1. Overview
QluMan is multi-user capable and provides an interface to configure and control users as well
as their permissions when they work with QluMan. The QluMan users are not connected to system
users in any way. To simplify permission management, the concept of user roles can be
used. User roles allow to pre-define a collection of permissions for QluMan operations. Once
defined, they can be assigned to a user.
11.2. Managing QluMan Users
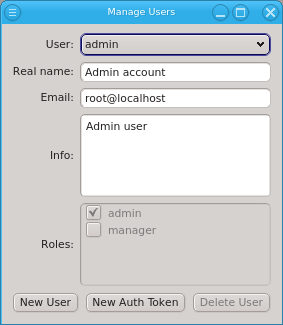
The admin user is pre-defined and has the admin role, meaning all possible rights. Roles
for the admin user can not be changed, just like the root user in a Linux system always has all
rights. When running QluMan for the first time, you should set the correct email address for
the admin user.
11.2.1. Adding a User
To create a new user, click New User and enter the name for the
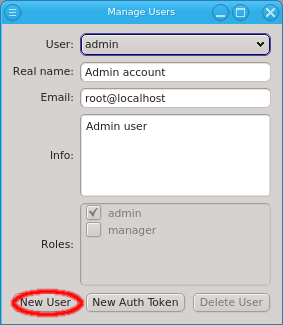
new user to create it. Then select the user from the drop-down menu and fill out the remaining fields. The changes will be saved automatically when Enter is pressed or the input field looses the focus. New users have no roles assigned to them and will have no rights to change something. They can only inspect the cluster config (read-only mode). See Managing User Roles/Permissions for how to create new roles and assign them to the user by checking the respective check-boxes. If the
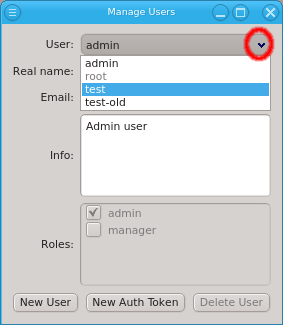
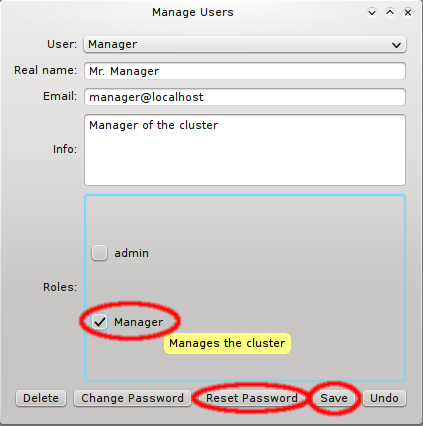
New User button is not selectable, then the user lacks sufficient rights to create new users. The Roles buttons will then also be disabled, preventing an unauthorized user from giving himself or others extra roles.
11.2.2. Generating the Auth Token
A new user also lacks login credentials, so initially, he can’t connect to QluMan. Hence, the
next step is to generate a one-time token for the user, by clicking New Auth Token.
Generating the one-time token may take a little time to finish and happens before the New Auth
Token dialog opens. The dialog shows a certificate containing the
generated one-time token, as well as the other login information required to connect to the server. The certificate is protected by an auto-generated 8 digit pin, so that it can be transferred over unencrypted communication channels like e-mail or chat programs. In such a case, the pin should be sent over a second, different, communication channel, e.g. reading it over the phone.
|
If a new cluster has been setup, an initial auth token for the admin user needs to be generated on the cmdline of the cluster head-node. This is explained in detail in the Qlustar First Steps Guide. |
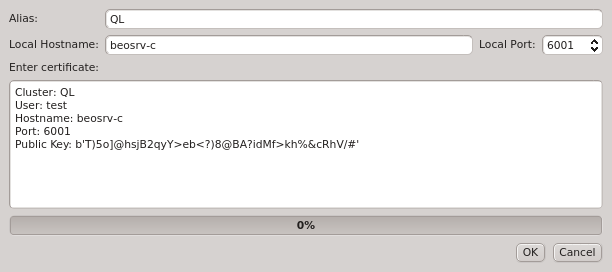
As a special case, when a user clicks New Auth Token for himself, the generated token is imported into his running client and replaces the current login credentials. A reconnect of the GUI client is then triggered automatically. It forces the client to generate a new random public/private key pair and use the new one-time token to authenticate itself to the server. This procedure should be used to invalidate the old keys and replace them with fresh ones, in case a user suspects the certificate safe might have been compromised by an attacker.
The New Auth Token dialog also has 3 useful buttons at the right bottom corner. The
Import button allows adding the certificate directly to the running client. The
use case for this is when creating a user account for oneself when working as admin. It is
recommended, that for clusters with multiple users having the admin role, that every user has
his own user account and the admin user is only used to initially create the new users.
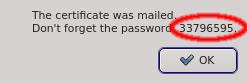
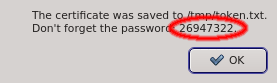
The Save button allows saving the certificate into a file and the Mail button sends the certificate to the email configured for the user. In both cases, only the certificate is saved or mailed and the password needs to be send separately.
For optimal security, it is recommended to leave a new user without roles, until he has logged in using the one-time token. That way, if the certificate was intercepted, it will be useless to an attacker, since he won’t be able to perform any actions within QluMan. Also, if the attacker manages to intercept and use the certificate before the real intended user does, the real user won’t be able to use it anymore, and notice that something is wrong, most likely reporting to the main cluster administrator.
|
The certificate contains the connection information of the cluster and the public key of the
On the first login with a correct one-time token, the client’s public key (generated randomly and uniquely for the cluster/user pair) is stored by the server and used to authenticate the user in the future. When establishing a connection, the client’s and server’s public and private keys are used, to safely exchange session keys enabling encryption with perfect forward-security. |
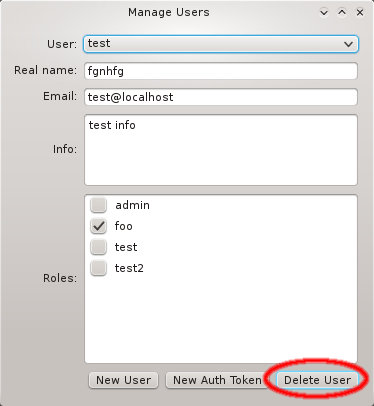
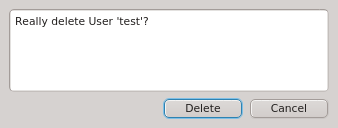
11.3. Managing User Roles/Permissions
The QluMan server performs many individual rights checks, before it allows/performs an
operation. Many of those correspond directly to a specific window in the GUI, giving the user
the right to alter settings in that window. For example, the right to configure Qlustar images
corresponds directly to operations available from the Qlustar Images window opened from
. Others govern the right to specific actions or to alter
specific properties. For example, the right to configure OpenSM on hosts, enables the user to
add, alter or delete the OpenSM Ports and OpenSM Options property of hosts in the
Enclosure View.
The rights are grouped into 4 categories: Admin rights covers rights with global impact and
root access to nodes, Booting covers all settings that affect how nodes will boot, Services
covers the configuration of daemons and Host Config covers the general configuration of
hosts.
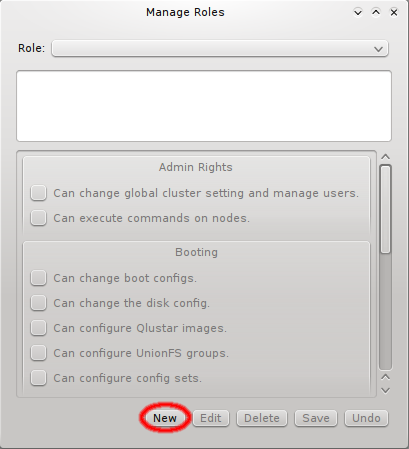
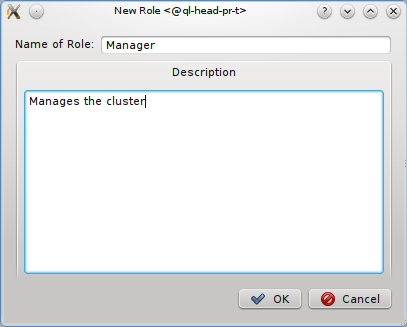
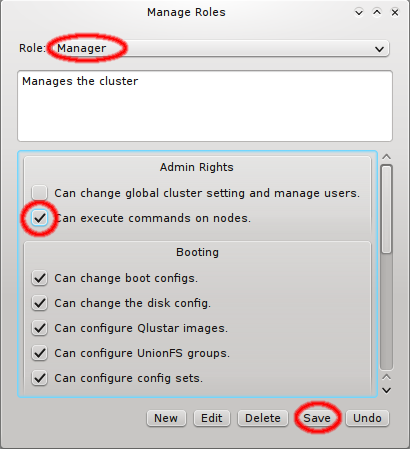
Creating and editing roles is simple: Click New to create a new role, fill in a name and description for it and click OK. To change the rights associated with a role, first select it using the dropdown menu at the top. Next, click the checkmark boxes to the left of the rights you want to change, grant or remove from the role. Click Save, to save the changes, or Undo to reset the rights to the last saved settings.
12. Log Viewer
12.1. Purpose
QluMan comes with a Log Viewer that allows to inspect important events in the
cluster. Messages are categorized depending on the type of event, when it occurred, which
component(s) it involved and how important it was.
12.2. Messages indicator button
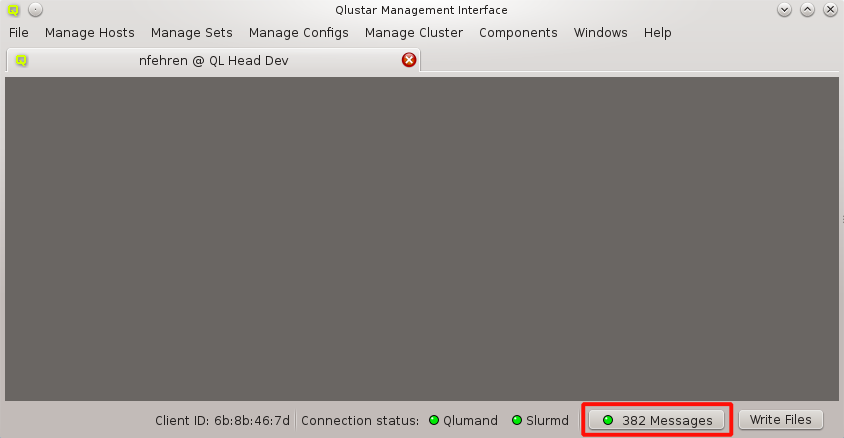
At the right bottom of the main window the QluMan GUI displays a Messages indicator. The button shows the highest priority of uninspected messages, as well as their number. Clicking the button opens the Messages window. The Messages window can also be opened through the menu item.
|
As time goes on, the number of saved messages rises, using up more and more space in the database. More serious, all the messages are transmitted to the GUI client when connecting. Having more than 1000 messages starts to introduce a noticeable delay. More than about 30000 saved messages can become really problematic, causing timeouts on connect. It is therefore recommended to review and clear messages from time to time. Be aware, that deleting several 1000 messages will take quite some time. |
12.3. Log Viewer window
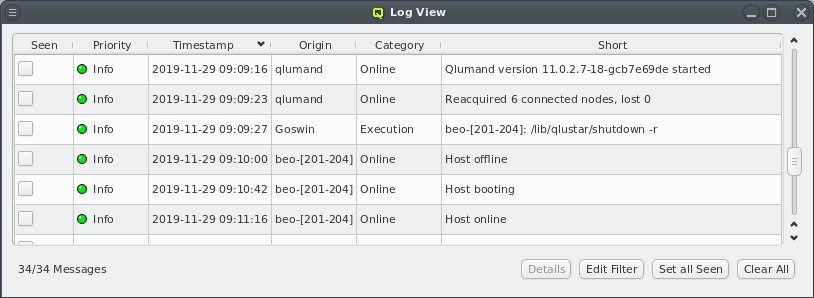
Opening the Messages window shows a list of messages sorted by time, the oldest message displayed at the top. The messages can be sorted ascending and descending by clicking on any of the column headers. Only the short text of each message is shown to keep the window compact. Hovering over a row will show the long text for that row as a tool-tip. The long text can also be seen in a separate window by clicking the Details button. The extra window makes it easier to read multi-line messages and allows copy+paste.
Starting with Qluman 11.0.2.8, a number of improvements have been implemented concerning cluster logging:
-
New message categories were added to better track state changes of the cluster. Creating, cloning or removing a chroot now adds a message in the
Chroot category. On clusters running slurm, starting, stopping or restarting slurmd on a node will now also add a message. -
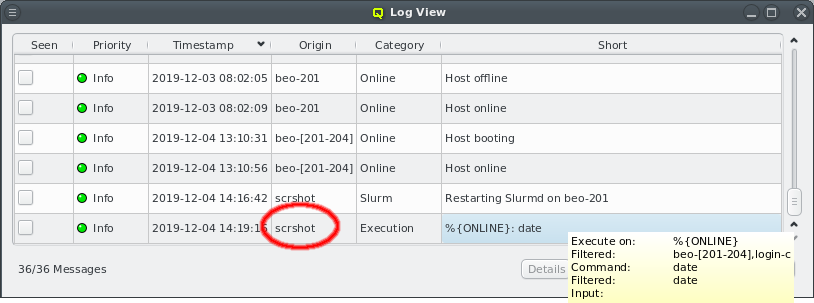
RXEngine command executions are now also logged. For such messages, the origin is the name of the user executing the command. The short message contains the hosts the command was executed on as either a hostlist or a filter followed by the command. For predefined commands, the alias of the command is shown instead of the actual command. The actual list of hosts the command was executed on, as well as the full command text, can be seen in the tool-tip or by clicking the Details button.
-
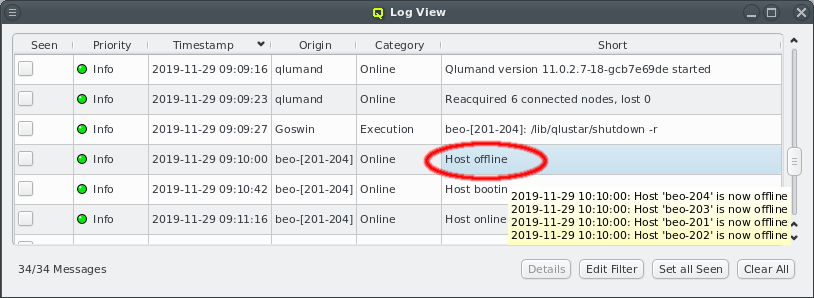
To enhance compactness of the Log Viewer, messages of category
Onlinehave been dramatically reduced in number. For example when restarting Qlumand, the messages originating from individual hosts when reconnecting have been suppressed. Instead, after a short time, a single message is now added showing a summary of all nodes that have reconnected or failed to do so within a given time interval. The full list of nodes can then be seen in the tool-tip or by clicking the Details button.Similarly, when the whole cluster is started up or nodes are rebooted, individual messages are now replaced by summaries as shown in the screenshot. Instead of adding one message per node going offline or coming online, such events when occuring within a short time interval, are now merged into a single entry. The origin for the merged message shows the hostlist of nodes in compact form, while the tool-tip or Details view displays a list with individual timestamps per host.
A new message type, Host booting was added to the
Online category. This message is generated when a node requests its QluMan configuration settings in the pre-systemd phase of the boot process right after its OS image has been downloaded and unpacked. As with the other messages in this category, messages from individual nodes are merged into summary entries.The timestamp displayed for merged messages is the one of the last individual node message of the entry. This means that it is possible for messages to appear out of order. For example the
Host onlinemessage for hosts can appear before theHost bootingmessage if the last node inHost bootinghasn’t come online (yet). If in doubt, compare the individual timestamps for each host.
12.4. Message Filter
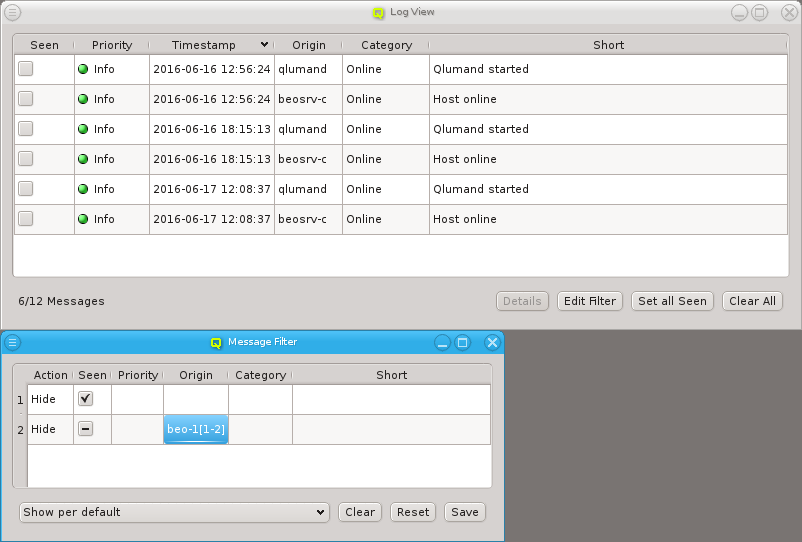
Not every message is of interest to a user, especially messages that have already been seen. Therefore, each user can create his own filter for messages by clicking on the Edit Filter button. A filter consist of a number of matches shown as rows, with an action, as well as a default action. The filtering process goes through the rows one by one. If all fields set in a row match a message, then the action set for that row is executed: Either the message will be hidden or included in the messages window. If none of the rows match a message, the default action applies to it.
There is one message filter per cluster connection tab. It can be freely edited. The message filter remains in effect till the tab for the cluster is closed. The filter can also be saved as a user-specific setting, so it is reloaded the next time a connection to the cluster is opened again. Alternatively, the filter can be reset to the last saved config or cleared so that the viewer starts without any filtering.
12.4.1. Default Action
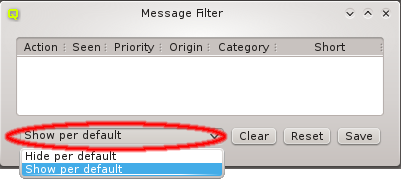
A filter can be constructed as a positive or negative filter. This means it can hide all messages that are not specifically matched or show all messages that are not specifically chosen as hidden. The default action can be chosen at the bottom left corner of the message filter window.
12.4.2. Adding a Filter
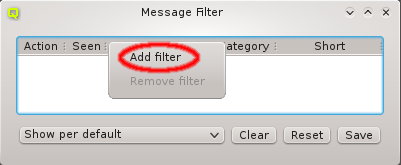
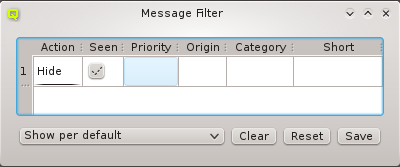
A new filter row can be added by selecting Add filter from the context menu. The new filter has an action of hide and ignores all fields. It therefore hides all messages. To be useful, at least one column should be changed through the context menu, to match only some messages. The context menu in each column contains the possible values the filter can match against in that column. The Origin and Short columns can also be edited freely by double clicking them. The action for the row can be changed between Hide and Show.
12.4.3. Filtering Seen Messages
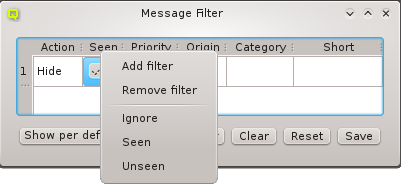
The most common filter is to hide messages with the Seen flag. It is recommended, to always
start a new filter by adding a row with action Hide and the seen column set to Seen. If
none of the filter rows match against the Seen flag, then it will have no effect in the
Messages window. The Seen filter can also be toggled between Seen and Unseen by
clicking the checkmark. The column can only be disabled by selecting Ignore from the context
menu.
12.4.4. Filtering by Priority
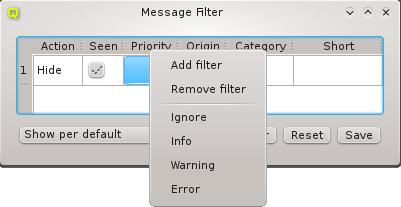
Messages can be purely informational, warnings or errors. Informational messages include information about nodes coming online or the server being restarted. There are usually a lot of informational messages and they can be safely ignored. On the other hand, warnings and errors should be inspected more carefully. In the Log Viewer, the priority of a message is color-coded for quicker visual recognition. Informational messages are green, warnings yellow and errors red. The highest priority of any shown message is also shown in the Messages button in the lower right corner of the main window. This indicates at a single glance, if anything important happened recently.
12.4.5. Filtering by Origin
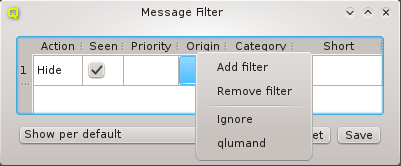
The origin of a message shows the node or service that generated the message. When configuring the filter, the origin can also be expressed as a hostlist to match multiple hosts.
12.4.6. Filtering by Category
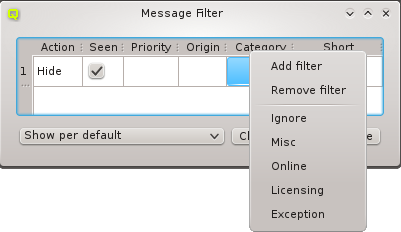
Messages fall into different categories, pooling similar messages for easier filtering. Generally information is categorized under Misc, while messages about nodes becoming online or going offline under category Online. The Licensing category includes all messages concerning changes in the license status. This could be something simple as a reminder that the license key expires soon. Or more important, a warning or error, that the cluster, as currently configured, exceeds the available license count. The last category is Exception. It usually signals a software error, that should be reported.
12.4.7. Filtering by Short text
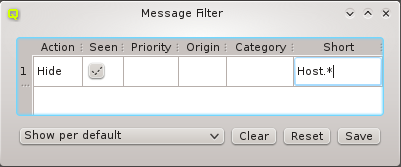
Messages may also be filtered by their short description. Like Origin, this column can be edited by double clicking. Short descriptions are matched using standard regular expressions. To match only part of a short description, prefix and/or suffix the text by ".*" to match any remaining characters.
12.4.8. A Filtering Example
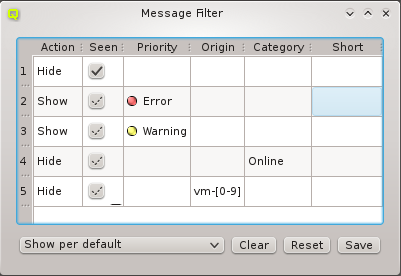
The example filter shows a more involved setup: It contains five rows showing how rows can be combined to achieve the desired filtering result. The default action for this filter is set to show messages. Hence, only messages that are explicitly filtered as not wanted will be hidden.
Row 1 excludes messages with the seen flag set. Rows number 2 and 3 might look odd at first, because their action is the same as the default action: Show. But these two rows prevent any of the later rows from hiding messages with priority error or warning. In other words, warnings and errors will always be shown, no matter what additional filter rows follow. Row number 4 hides messages in the category online and row 5 hides messages that originate from hosts matching the hostlist "vm-[0-9]".
13. Optional Components
The fact that Qlustar is a modular Cluster OS with standard core functionality and many optional add-on components is also reflected in QluMan. Depending on the Qlustar modules installed and activated for a cluster, the QluMan GUI will have optional functionality accessible via its Components submenu. These optional components are documented below.
13.1. Slurm Configuration and Management
13.1.1. Slurm Configuration
13.1.1.1. Overview
The slurm configuration module comes in four parts:
-
The overall slurm configuration, controlled via two templates in the
Config Headertab. -
The configuration of slurm nodes, done via the
Node Groupstab. -
The configuration of partitions, achieved by using the
Partitionstab. -
The configuration of GRES (generic resources) groups, settable using the
Gres Groupstab.
Assignment of hosts to node groups and/or partitions is possible by adding the latter to the
relevant Config Sets and Host Templates or by direct assignment
through the config (set) context menu in the enclosure view.
13.1.1.2. Slurm Config Header
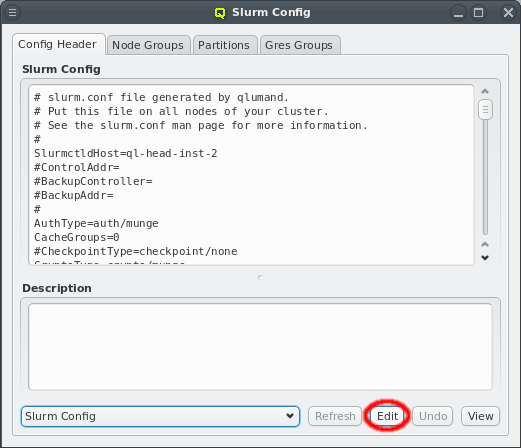
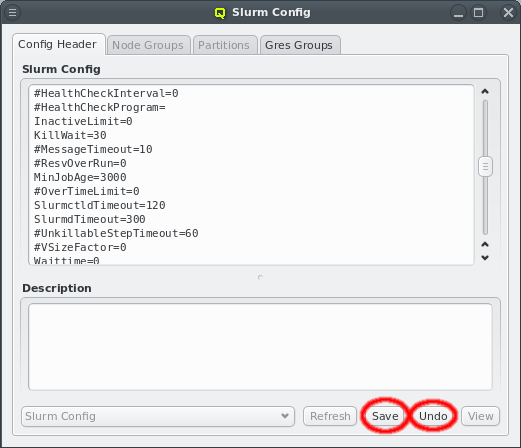
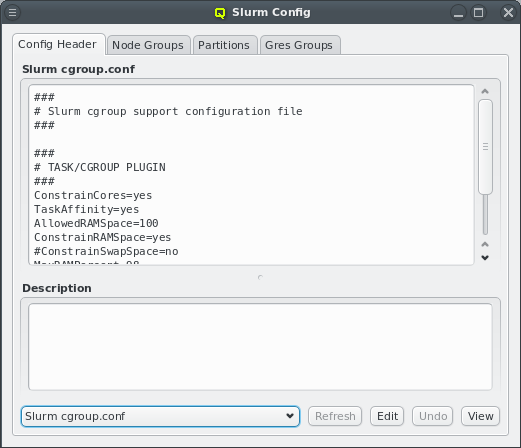
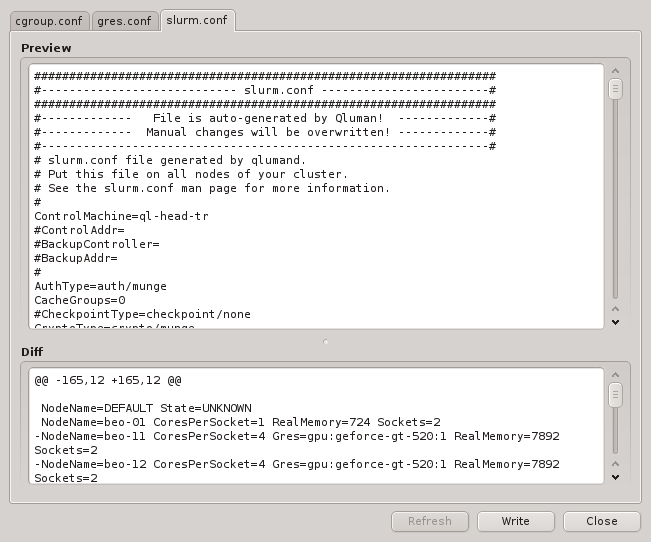
The overall slurm configuration is split into two templates, the slurm config and
cgroups.conf. On write, QluMan adds the NodeName and PartitionName lines at the end of the
slurm config template to generate the slurm.conf file, while the cgroup.conf file gets
written as is. For the syntax of both templates, please refer to the slurm documentation
(e.g. man slurm.conf). To edit one of the templates, select it, click the Edit button
and start making changes. Click Save to save the changes or Undo to discard
them. Use the Preview button to check changes before writing them.
13.1.1.3. Slurm Node Groups
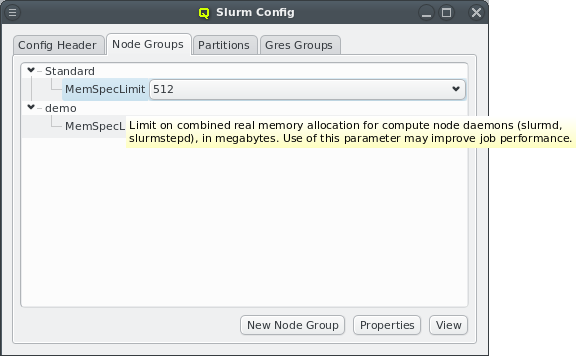
Slurm node properties are configured from two sources:
a) The slurm node groups. Every host can belong to at most one such group. The membership is assigned (see Assigning Hosts to Slurm Node Groups, Partitions and Gres Groups) by adding the desired node group to the Config Set that is assigned to the node via its Host Template or via the alternative ways to assign config classes.
+
Each Node Group is a collection of slurm node properties, that will be set for the members of
the group. Per default, only the MemSpecLimit property is defined, but other properties like
Feature or Weight can be added by using the Slurm Property
Editor.
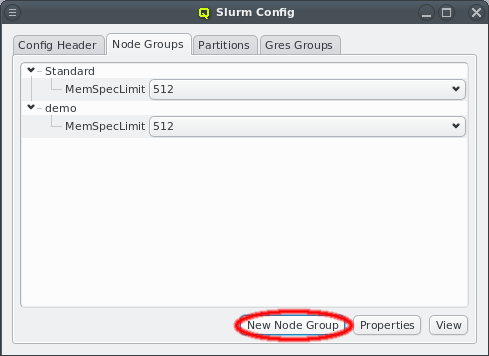
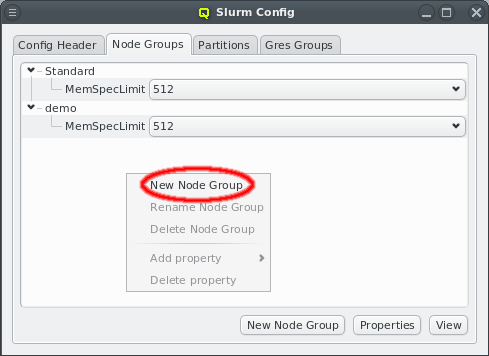

A new node group can be created by clicking the New Node Group button or selecting New Node Group from the context menu. This opens a dialog asking for the name of the new group. An existing node group can be renamed or deleted from the context menu.
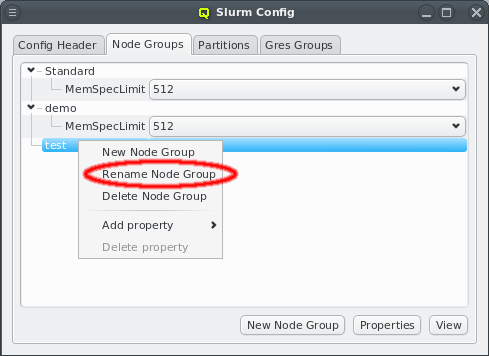
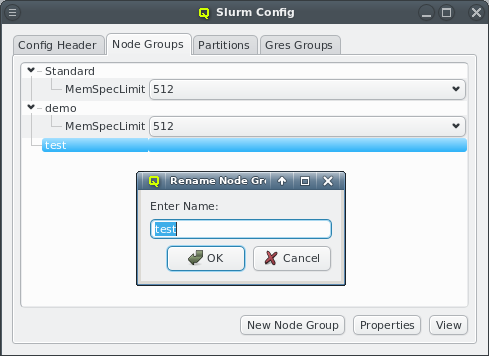
The context menu also allows to add properties to a group. Note, that some properties are unique, i.e. only one value can be selected for the property. Adding a second value of the same property will automatically replace the old value in that case. Other properties are not unique. Adding multiple values to such properties results in a comma separated list of values in the
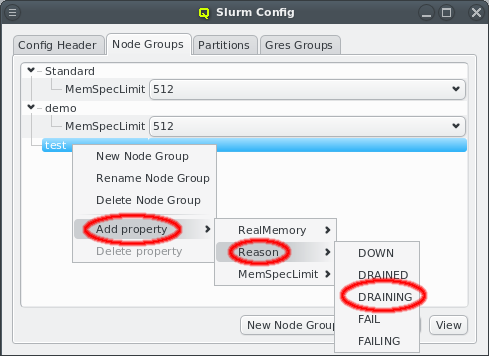
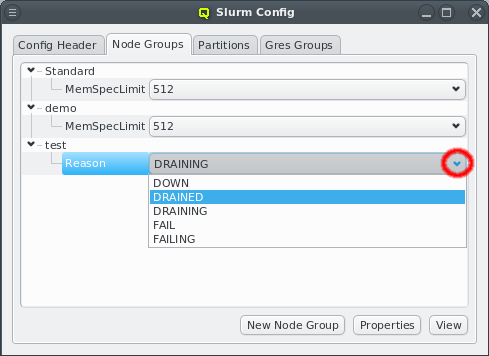
b) The slurm.conf file. An example for this is the Feature property. Properties can also be
changed directly using the pull-down menu. If a change will cause a duplicate value, the
previous (duplicate) value is automatically removed.
13.1.1.4. Slurm Partitions
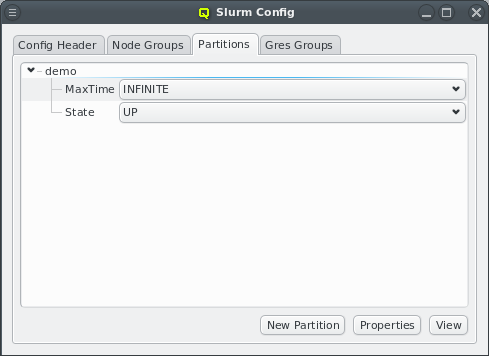
The management of Slurm partitions works exactly the same way as that of slurm node groups. Please see Slurm Node Groups for how to create, rename and change partitions.
13.1.1.5. Slurm Property Editor
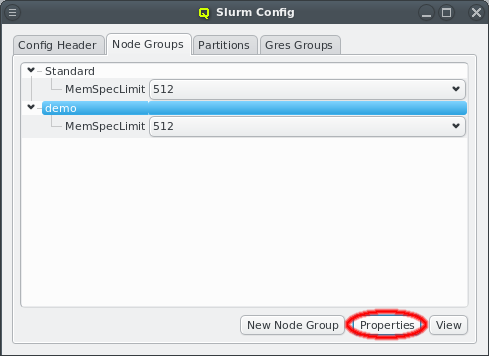
The Slurm property editor for node or partition properties can be opened by clicking the
Properties button at the bottom of the Slurm main dialog. If the Node Groups
tab is selected, the editor for node properties will be opened. If the Partitions tab is
selected, the editor for partition properties will be opened.
To add a new property, enter the name of the property in the name field. If the name does not already exist, the New Property button will be
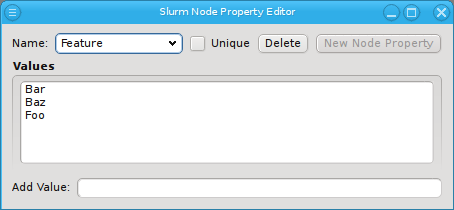
enabled. Click on it to create the property. QluMan has a white-list of known valid
properties, e.g. Weight and allows adding such a property without further questions. In this
case, QluMan will also set the unique flag and add all known property values automatically.
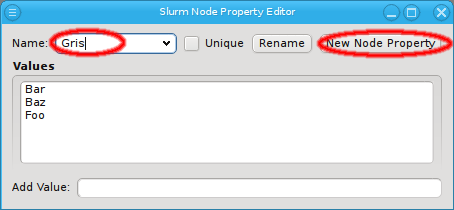
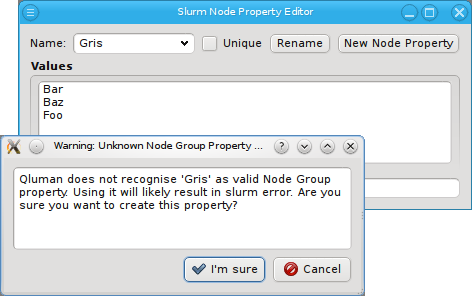
When a property is created that is not part of the white-list (Gres in the screenshot) a
dialog opens up, asking for confirmation. Note that adding an unknown property can lead to a
failure when trying to restart slurm. Therefore make sure to only add properties you are
certain slurm will know about. A property without values can be deleted by clicking the
Delete button.
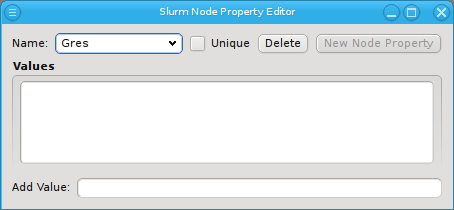
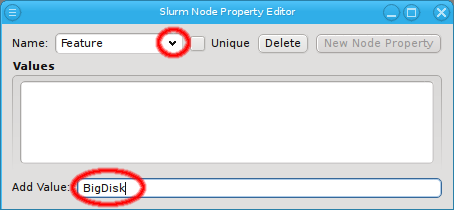
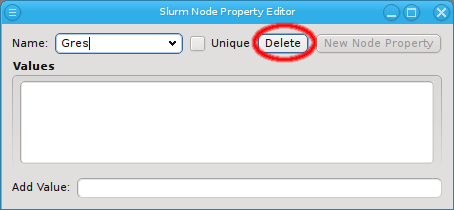
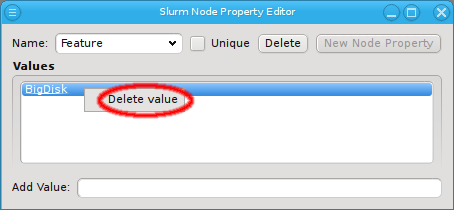
To add values to a property, first select the desired property using the pull-down menu from the name. Then enter the new property using Add Value at the bottom and finally press Enter to add it. To delete a value, select Delete value from the context menu.
13.1.1.6. Slurm Gres Groups
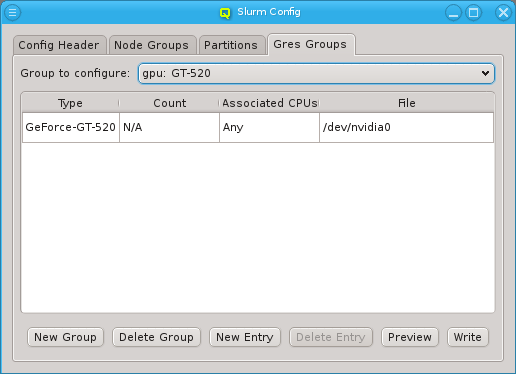
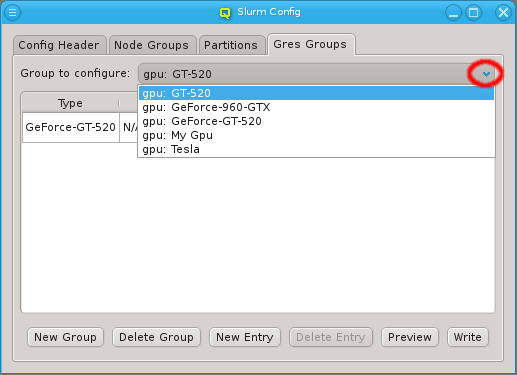
Currently, Slurm Gres Groups are used in Qluman mainly to handle the setup of GPUs for slurm. The GPU Wizard is the most convenient and accurate way to create such resource groups. Supplementing the wizard, the Gres Groups tab allows creating and managing any type of resource group, as well as binding GPUs to specific CPU sets, which is not possible via the wizard. To view or modify a Gres Group, select the group from the drop down menu. Use the Preview button to check the resulting config file changes before writing them.
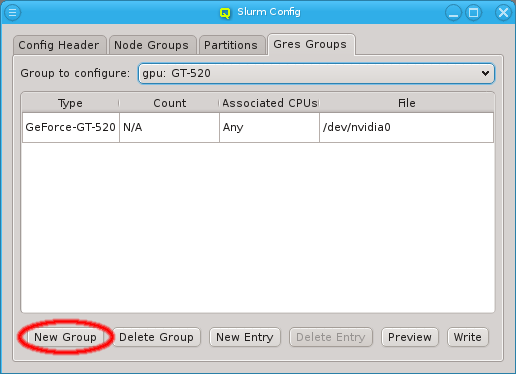
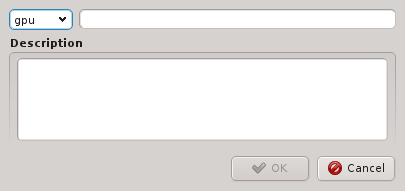
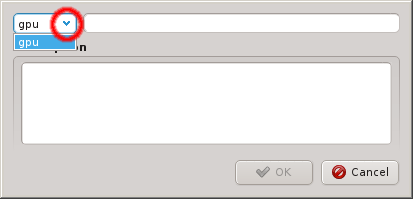
A new Gres Group can be created by clicking the New Gres Group button. This opens a dialog asking for the type, name and description of the new group. An existing type can be selected from the drop down menu or a new type can be
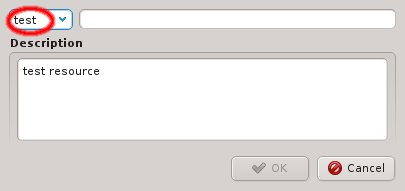
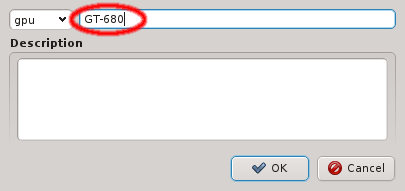
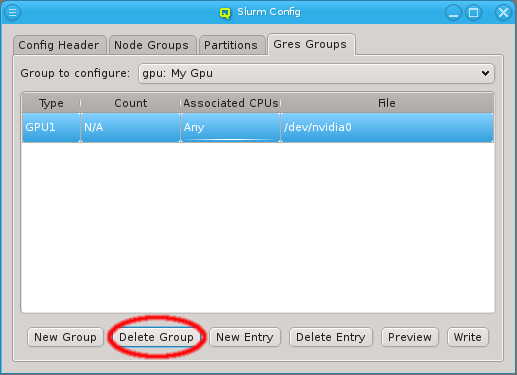
entered directly. After entering a new unique group name the OK button becomes selectable. A group that is not in use can be deleted by clicking Delete Group.
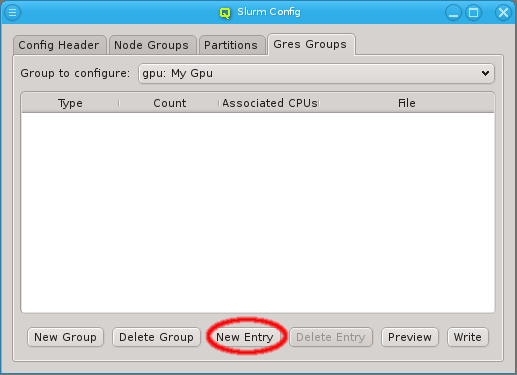
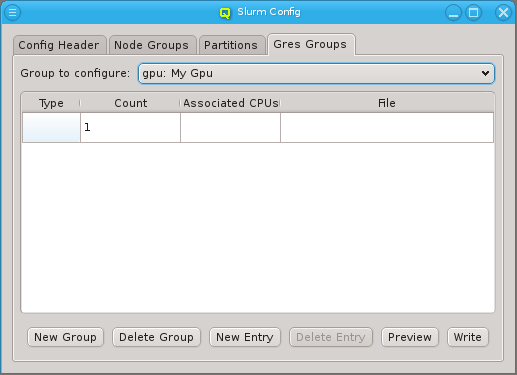
A Gres Group can have multiple entries. A new entry may be added to a group by clicking on
New Entry. Initially, the entry is blank and at least the type column must be
filled in. For resources that can be allocated in multiple pieces, a count can be set,
indicating the number of resource
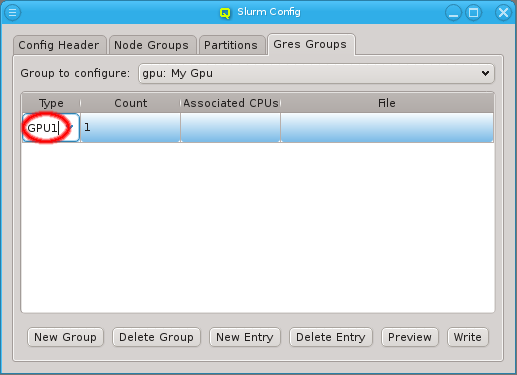
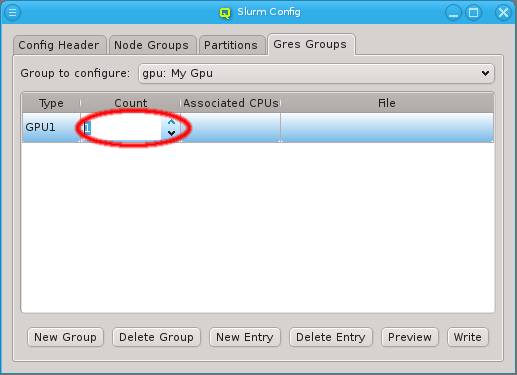
pieces available. For resources that have a device file associated with it, its path can be set
in the file column.
|
For resources that have an associated file, the count is not applicable, since there is always only exactly one file. |
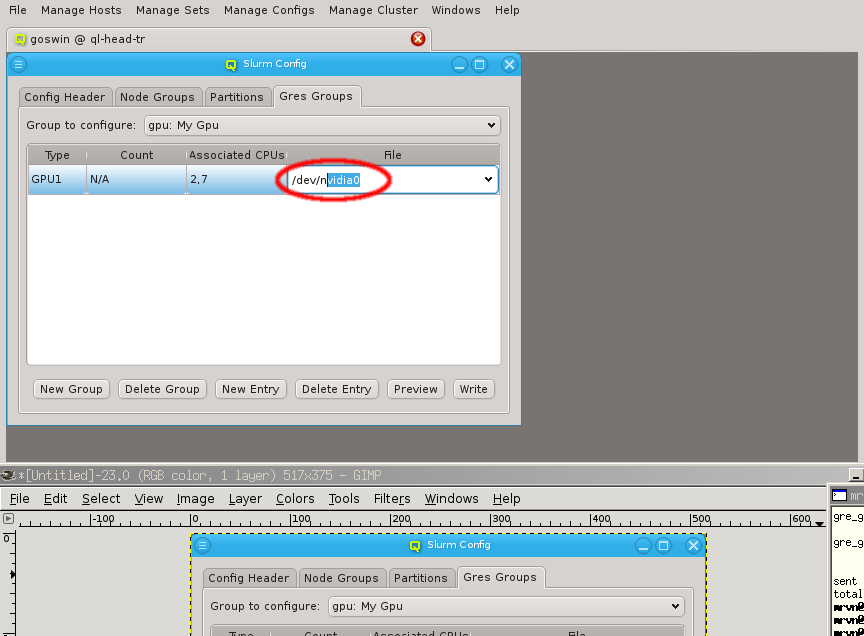
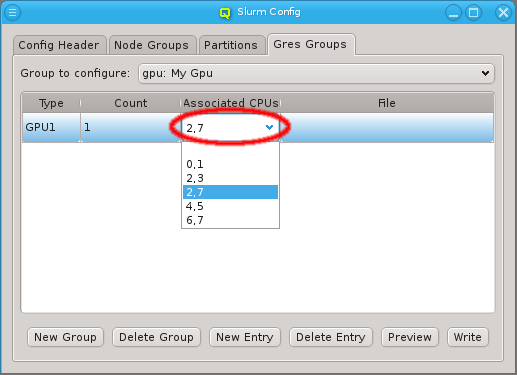
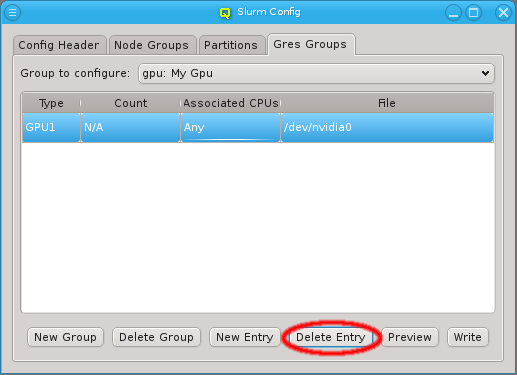
Optionally, an entry can also be associated with a set of CPUs. The CPUs to be used can be entered as a comma-separated list or, for recurring sets, selected from the drop-down menu. An entry can be deleted from the group by selecting Delete Entry. A group that is no longer in use can be deleted by selecting Delete Group.
13.1.1.7. Assigning Hosts to Slurm Node Groups, Partitions and Gres Groups
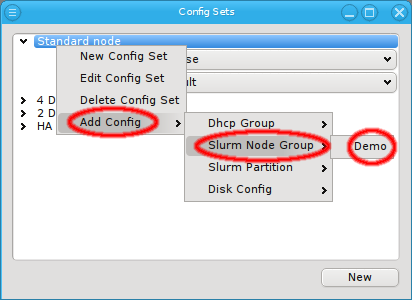
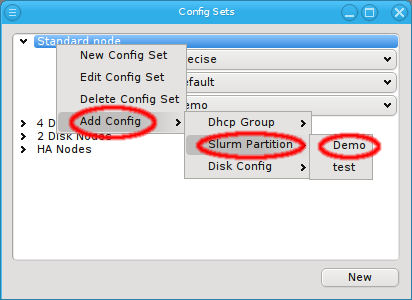
Hosts are assigned to Slurm Node/Gres Groups and Partitions by use of the global or a
Host Template (through its corresponding Config Set)
or by direct assignment, i.e. the standard
four levels of configuration. A Config Set may contain at
most one Node Group but any number of Gres Groups or Partitions,
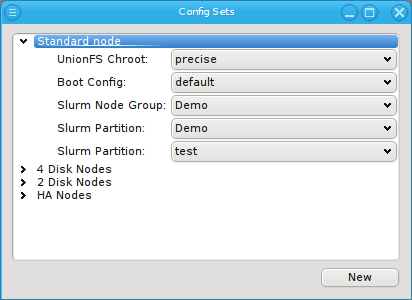
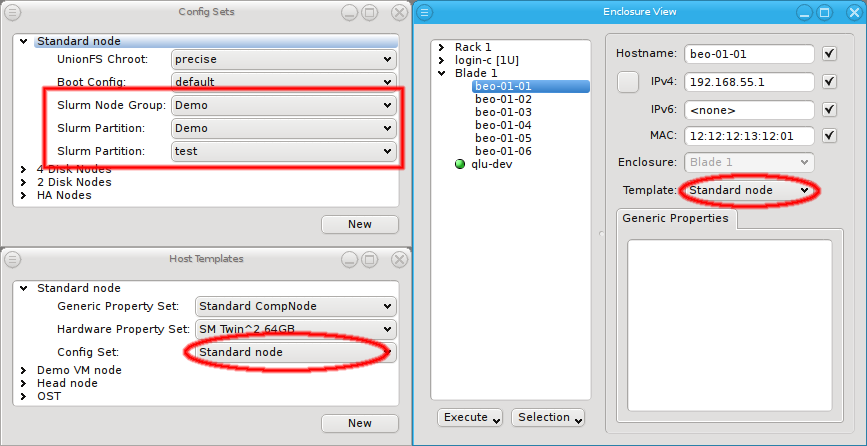
since a host can be member of an arbitrary number of Slurm partitions. They can all be assigned
by selecting them via Add Config in the context menu of a Config Set or via the
Enclosure View context menu of the host(s).
|
The four levels of configuration allow overriding a setting in
one particular level with a different value in a higher level. They do not allow removing a
setting though. For this purpose, there exists a |
13.1.1.8. GPU Wizard
13.1.1.8.1. Purpose
When setting up Slurm, the basic node config is derived from the hosts Hardware Properties. However, configuring GPUs is more complex: This is done through the
Slurm Gres Groups as part of the slurm config class. Gres Groups
are used to specify the type and number of GPUs of a host. When submitting jobs that require
GPUs, this information is then used to determine the nodes that satisfy the job
requirements. All the necessary settings for the desired configuration of the nodes may also be
done manually and can be changed later through the slurm config dialog from the main window.
As a convenient alternative, the GPU Wizard guides you through the necessary configuration
steps. It uses the auto-detected GPUs of hosts to suggest their optimal configuration
options. Furthermore, it attempts to establish a balance between the available configuration
strategies: Using templates or individually assigned config sets and/or config classes.
|
For Nvidia GPUs to be detected on a host, it must have booted a Qlustar image that includes the nvidia module. Otherwise GPUs will be missed. Only nodes on which GPUs have been detected, can be configured through the GPU Wizard. |
13.1.1.8.2. Selecting Hosts
The first step in the wizard is to select the hosts that should be configured. Initially, the lists of hosts is empty. One or more of the four buttons at the bottom have to be pressed to pre-select hosts that should be considered.
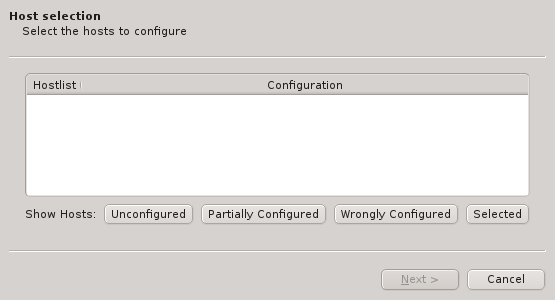
The Unconfigured button adds all hosts that do not have any GPU configured at all. The Partially Configured button adds hosts that already have some GPUs configured correctly, but not all of them. The Wrongly Configured button adds hosts, where the configured GPUs do not match the GPUs detected at boot, e.g. when the GPU cards have been swapped for a newer model on the hosts. Finally, the Selected button adds hosts, that have been selected in the enclosure view, including hosts that are already configured correctly.
|
Only hosts with auto-detected GPUs will be shown, even if others are selected. |
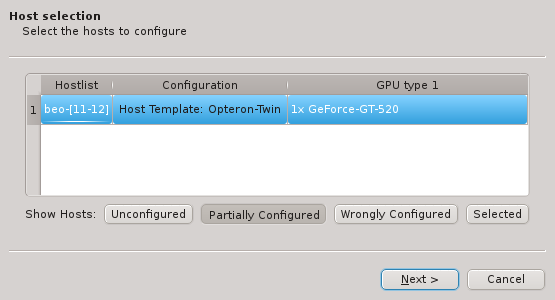
Once one or more of the buttons are pressed, the affected hosts will show up in the table. To keep things compact, hosts with identically detected GPUs are grouped together and shown in hostlist syntax. Select one of the shown groups by clicking on the corresponding row and then press Next to start the configuration.
13.1.1.8.3. Choosing the assignment option
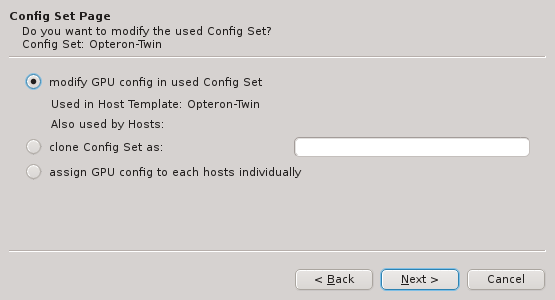
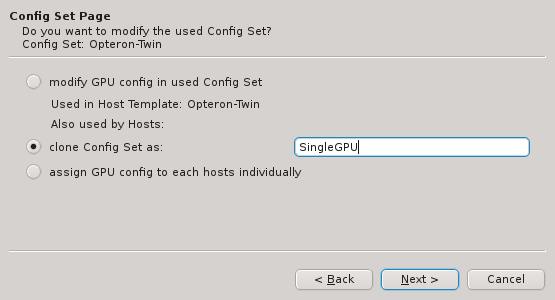
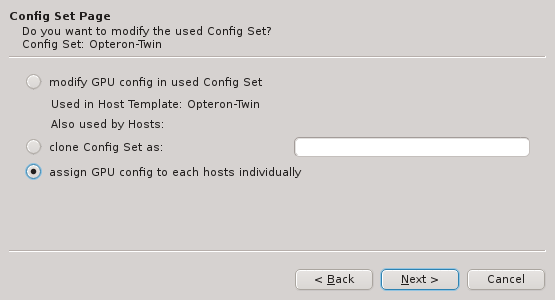
There are three different ways, how the GPU configuration can be achieved: On the wizard’s
Config Set Page you have the option to a) add (modify) the GPU config to the Config Set of
the currently assigned Host Template, b) clone the Config Set currently active or c) assign
Gres Groups directly to the group of selected hosts. Select the
desired method and press Next to continue to the next step.
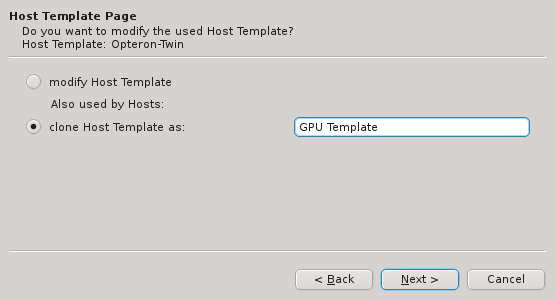
In case the clone Config Set option is selected, the Host Template Page will appear and
offer the choice to either modify the currently used Host Template or to
create a clone of it for further modification.
|
For the options that would modify an existing entity (Config set or Host template), the wizard dialogs always show other non-selected hosts, that would also be affected by the modifications. |
13.1.1.8.4. Creating/assigning Gres groups
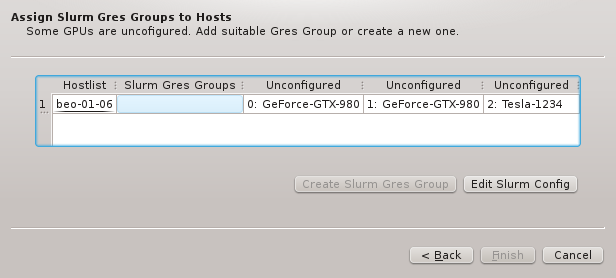
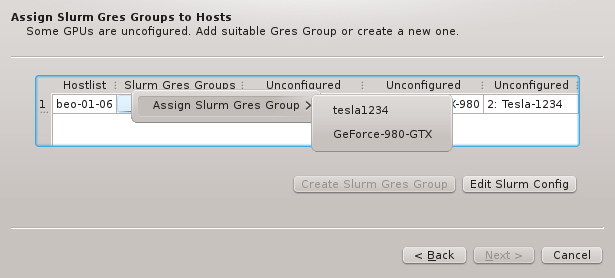
The next step is to possibly create and finally assign Gres Groups
to the list of selected hosts. The corresponding wizard page shows the unconfigured GPUs, each
in a separate column. If an existing Gres Group exists that includes all or a subset of the
unconfigured GPUs, the context menu allows to select it. This would conclude the assignment
process.
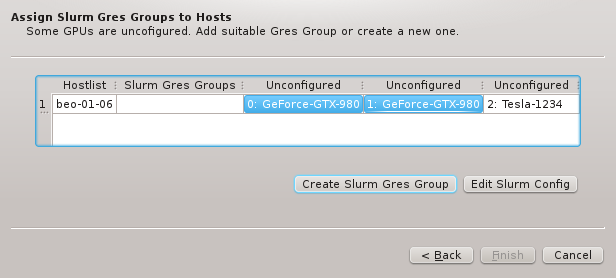

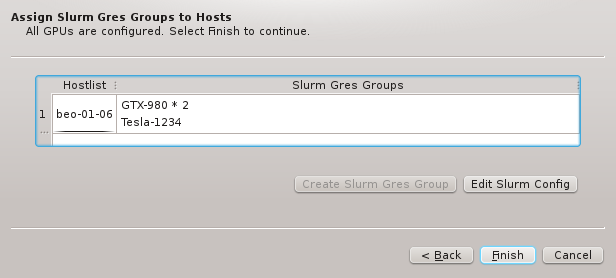
Alternatively, when one or more GPUs are selected, a new Gres Group can be created that the
GPUs will be a member of. The new group will have to be given a name and optionally a
description. Once all GPUs are assigned to a Gres Group, you can finish the process by pressing
Finish.

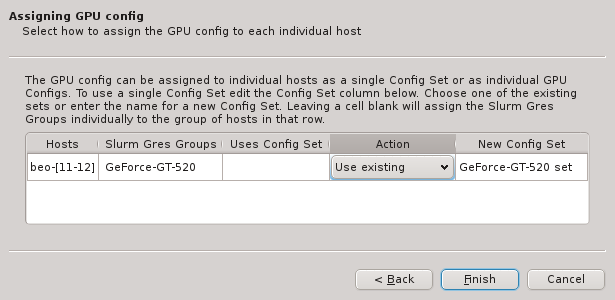
In case direct assignment has been selected, one more wizard page allows to fine-tune the
assignment. An additional Action column appears that allows to a) either use and assign an
existing Config Set, b) create and assign a new one
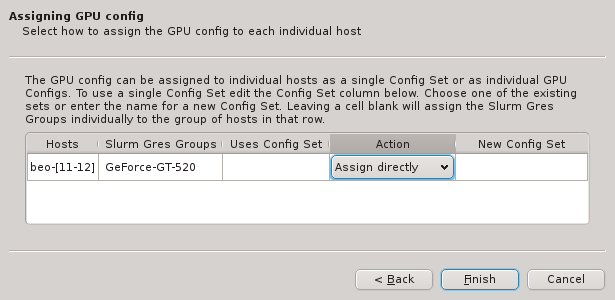
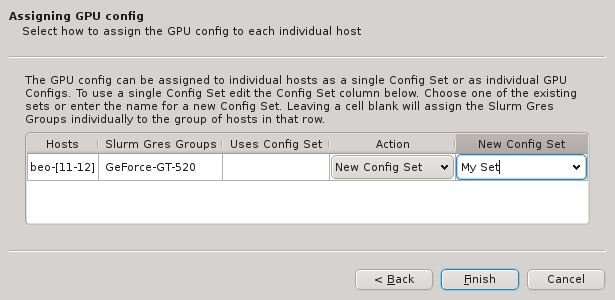
or c) directly assign the Gres Groups to the selected hosts. When choosing option b), the
blank field of the New Config Set column becomes editable by double-clicking.
Like with other properties, the optimal way for configuring (via template or different direct assignment variations) is often a matter of taste and a trade-off between simplicity, clarity and precision concerning your individual configuration policy.
13.1.2. Slurm Management
The QluMan Slurm Component provides extensive functionality to manage and operate most aspects and features of the Slurm workload manager. All QluMan Slurm functionality is accessible underneath the top-level menu entry.
The following management and operation sub-components are available:
13.1.2.1. Slurm Overview
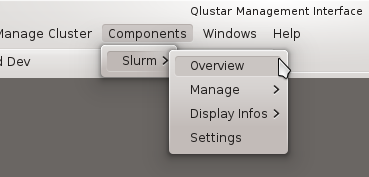
The Slurm Overview window provides a summary of the utilization of the cluster. It is split
into 2 parts: The Cluster Usage Overview tab and the Job Overview tab.
Cluster Usage Overview
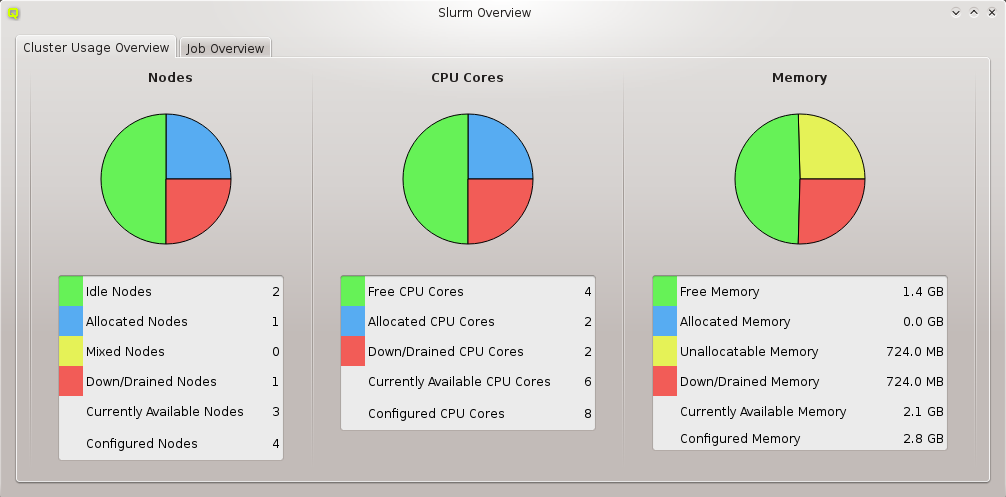
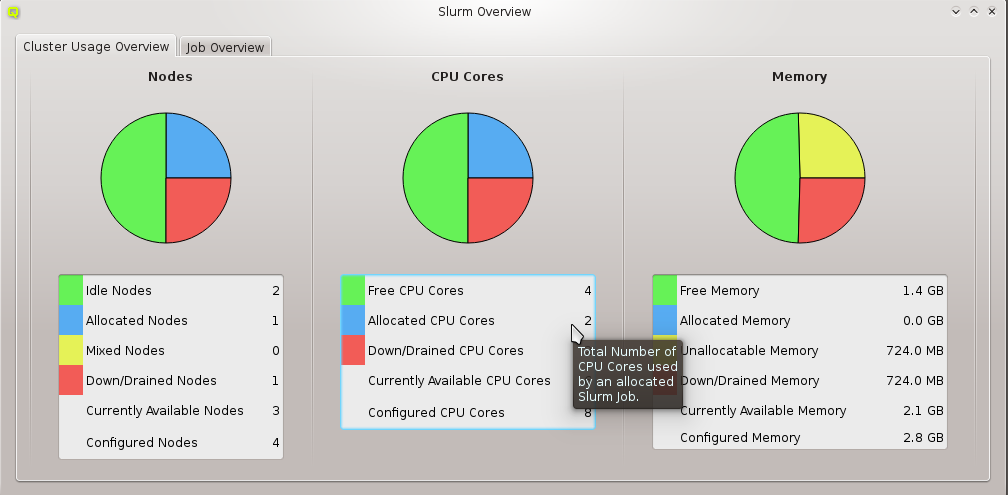
The Cluster Usage Overview provides continuously updated information and charts about Node,
CPU Core and Memory utilization by Slurm jobs. Every information field in the tables has a
tool-tip that supplies more detailed information about it.
|
The colors used in the |
Job Overview
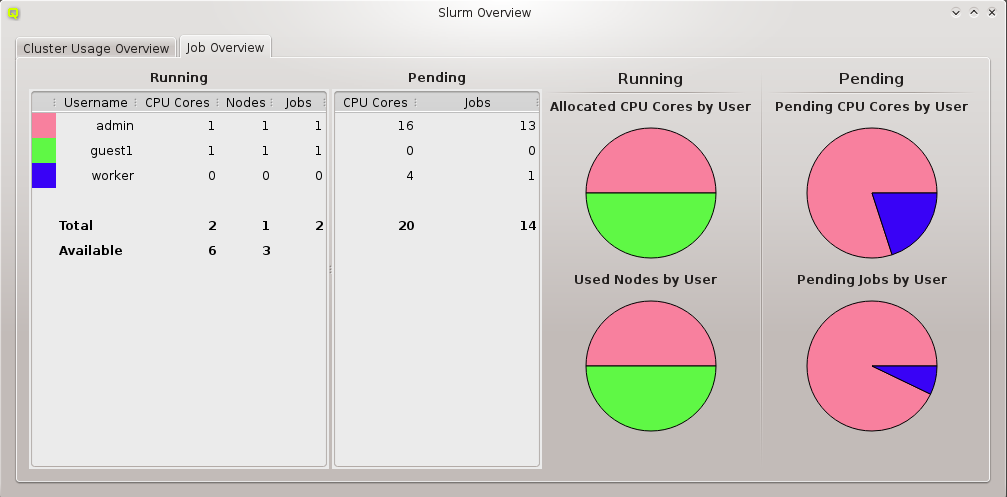
The Job Overview display consists of two tables and four charts being continuously
updated. The Running table provides summary information about running jobs of users. It shows
the color representing the user (if his share is displayed in one of the charts), his username,
the count of utilized CPU cores, the number of used nodes and the number of running jobs. The
Pending table provides the total number of requested CPU cores and the number of pending jobs
for the same user.
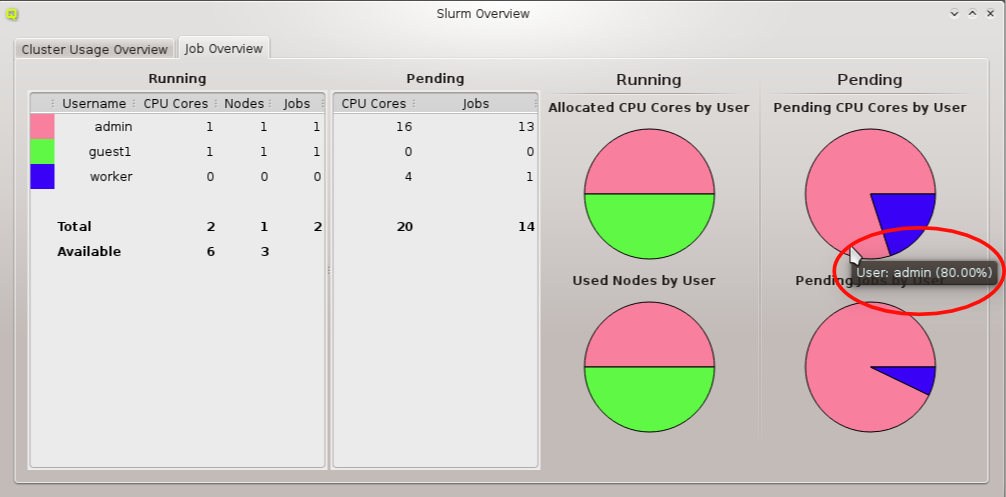
The job statistics is graphically displayed in the four pie-charts Allocated CPU Cores by
User, Used Nodes by User, Pending CPU Cores by User and Pending Jobs by User. Every
slice of the pie-chart has a tool-tip showing the name of the user it corresponds to together
with his share in percentage of the corresponding resource. The used colors change randomly
with every new invocation of the window.
|
Only the users with the highest percentage of jobs are shown in the pie-charts (a maximum of 10 users being displayed). |
13.1.2.2. Job Management
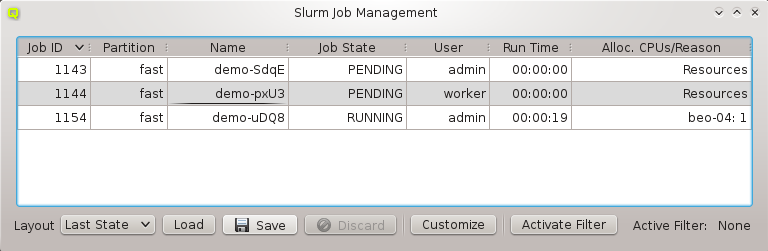
The Job Management window shows a continuously updated table with all current jobs of the
cluster. Since a single job has about 100 properties, every QluMan user is able to customize
the job properties he wants to be displayed and which ones should be hidden in the table (see
Customize Columns for more detailed information).
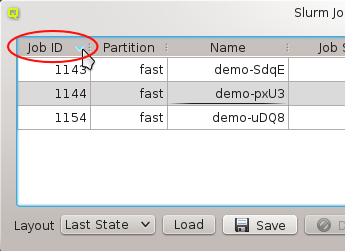
To sort the job table entries, one just has to click on the title of the property one wants to sort for (for example Job Id). Clicking the title again changes the sort order. You can also move a column with drag and drop and change its width.
These settings can be stored in layouts. Just modify the Job Management the way you want it and hit the Save Button. You can restore a layout by selecting it in the Layout combo box and press Load. When the Job Management gets opened it always uses the last state as layout. This is the layout that was set when you closed the Job Management the last time.
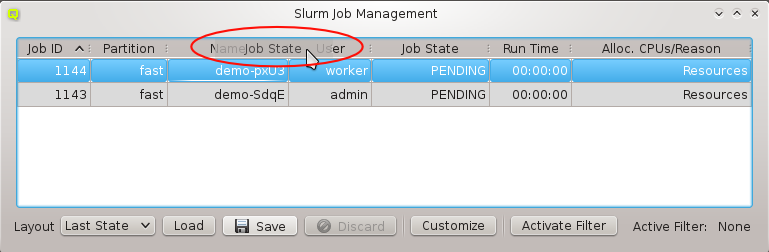
If you want to change the state of a job you just have to open its context-menu and select one of the following actions:
- Kill Job
-
This kills a job and sets its state to CANCELED.
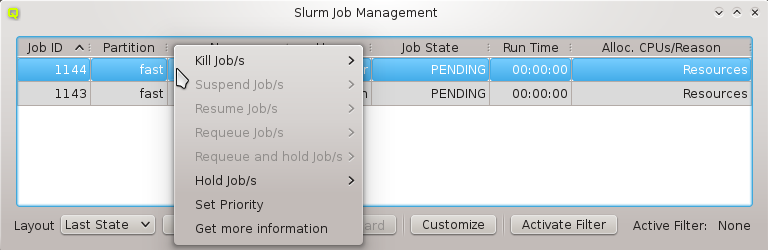
- Suspend Job
-
This suspends a job and sets its state to SUSPENDED.
- Resume Job
-
This resumes a suspended job and sets its state to RUNNING.
- Requeue Job
-
This kills a job and puts it back into the queue with state PENDING.
- Requeue and Hold Job
-
This kills a job, puts it back in the queue with state PENDING and places a hold on it.
- Hold Job
-
This prevents a pending job from getting started.
- Release Job
-
This releases a job that was in the HOLD state.
- Set Priority
-
This allows to manually set the priority of a job.
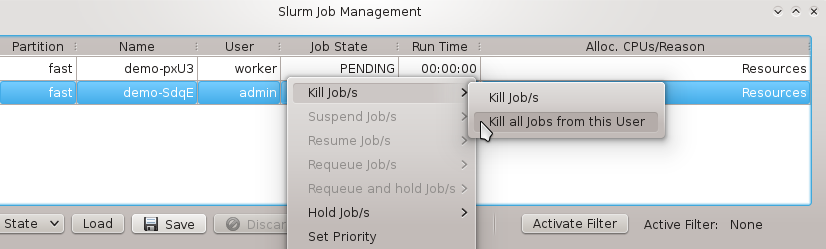
Depending on the state of a selected job some actions might be disabled (e.g. a job cannot be released if it wasn’t on hold before). As long as there is no conflict concerning their job states, it is possible to collectively manipulate either a list of jobs selected with the mouse or all jobs of the user of the currently selected job. If you want to get more information about a job, open the context-menu and select More Information (see More Job Information for details).
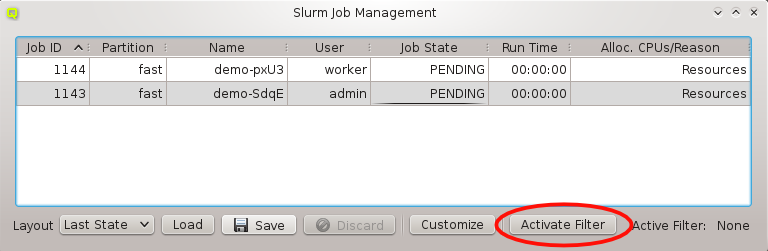
Clicking on Activate Filter at the bottom of the window, allows to activate one
or more custom filters (created using the Job Filter
Editor) by checking the corresponding entry. This can be useful to restrict the list of
displayed jobs according to some criteria (e.g. a certain user). All currently active filters
are shown in the bottom left corner of the Job Management window. They can be deactivated
again by unchecking their entry in the Activate Filter sub-window.
|
The column height of the job table is customizable in the Preferences Dialog. |
13.1.2.3. Customize Columns
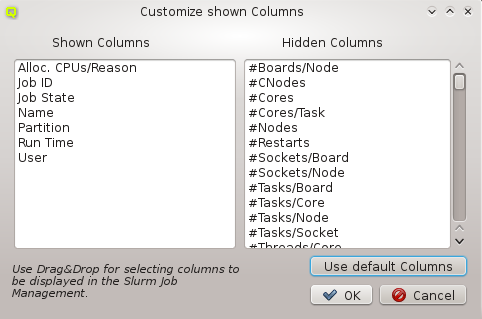
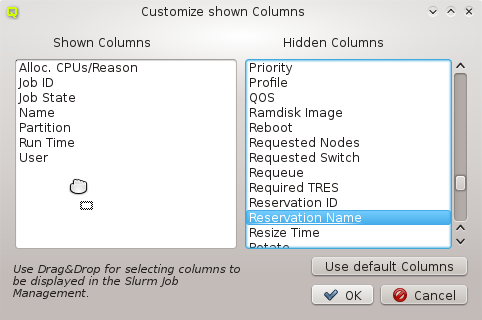
The Customize Columns dialog displays all known columns (properties of a job) in two
lists. The columns in the left list will be shown in the jobs table, the ones in the right list
won’t. To show or hide columns just select them and drag them either into the left or right
list. Confirm your changes with OK.
|
The order of the columns in the left list is not important, because it is not the order how
they will be shown in the |
13.1.2.4. More Information
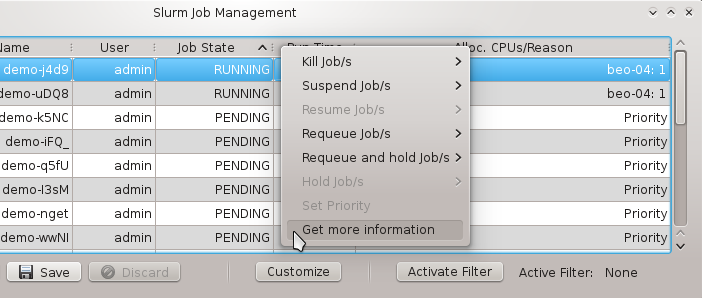
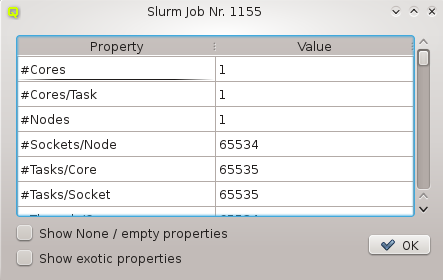
This dialog opens after you select Get more information in the context-menu of a job. It
shows the properties and their corresponding values of the selected job in a table. There are
two filters that may be applied: One is for hiding all properties with a value of 0, None,
False or empty, the other one for hiding exotic properties which one is rarely
interested in. Per default, both filters are enabled. To disable them, you have to check the
corresponding entry at the bottom of the dialog.
|
The column height of the table is editable in the Preferences Dialog. |
13.1.2.5. Activate Filter
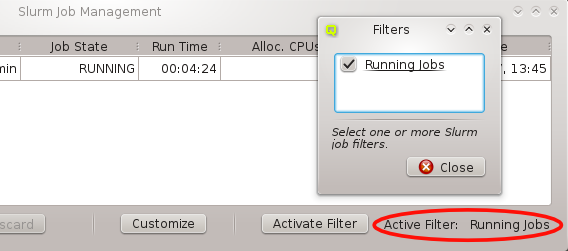
If you created some custom filters, they will be listed here (For information about creating
custom filters see Job Filter Editor). Select one or
more filters to be applied to the current job table. All active filters are shown as a
comma-separated list in the bottom-left corner of the Job Management window.
13.1.2.6. Job Filter Editor
As mentioned before, in the Job Filter Editor dialog it is possible to create custom filters
for the Job Management table. After it has been opened, a new filter may be created by
clicking New Filter and then insert a name for the filter. After confirming with OK the
filter is created and a new window comes up, where properties can be assigned to it. To add
properties, right-click for the context-menu and select the property you want to filter with.
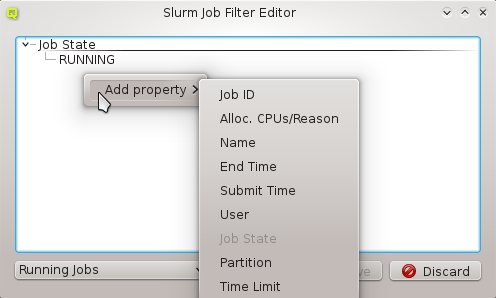
In the current example, we chose to filter by Job Id. A new dialog pops up. Now one can select a range of job ids to be displayed. Since a job id is always an integer, one has the option to select among the filter types between x and y, bigger than x and less than x.
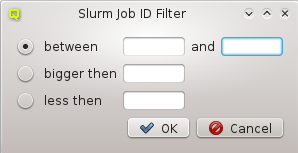
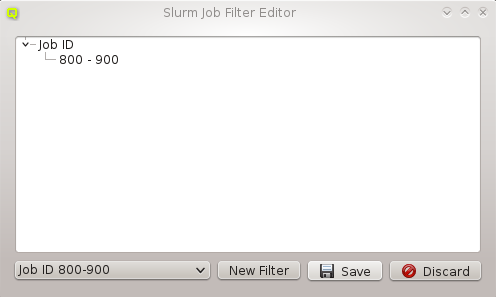
Choose the filter type you want, set the values and confirm with OK. Consequently, the property
is now part of the new filter. One can combine multiple properties in one custom filter. Each
additional property narrows down the possible jobs to be displayed. After adding all desired
properties, hit the Save button. Now the new filter can be applied in the Job
Management window.
13.1.2.7. Node State Management
The Node State Management dialog lists all hosts that are registered with Slurm. There are
three different kind of views showing the existing hosts. The color of the LED in front of the
hostname indicates the Slurm state a node is in. When hovering over a particular node, a
tool-tip describing the state appears.
- Partition View
-
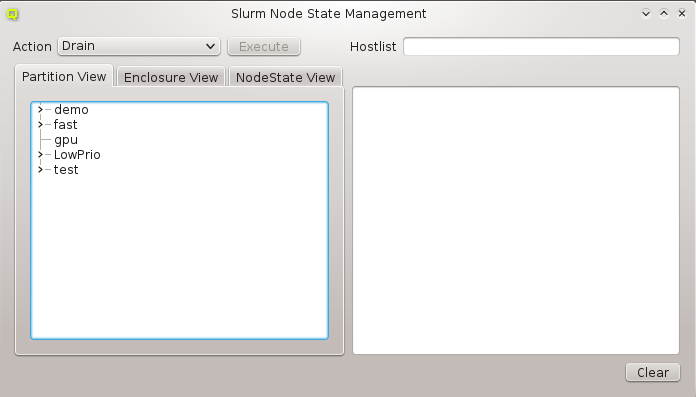 This tree shows all Slurm partitions and their assigned compute nodes when uncollapsed. This
can be used to act on all nodes found in one or more partitions.
This tree shows all Slurm partitions and their assigned compute nodes when uncollapsed. This
can be used to act on all nodes found in one or more partitions. - Enclosure View
-
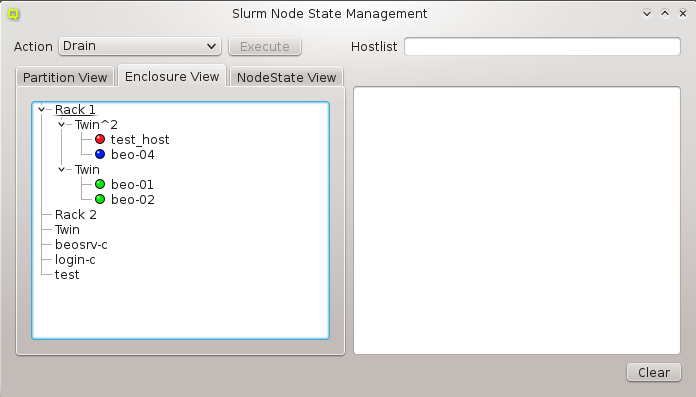 This tree has the same structure as the
 Enclosure Viewdialog. It is useful when acting on a group of nodes located in specific enclosures (e.g. to drain all nodes in a certain rack, because of a planned maintenance for that rack). - NodeState View
-
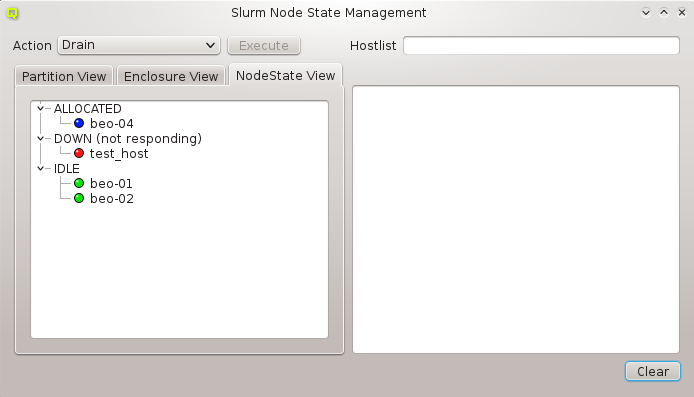 This tree shows all current node states in the cluster and their corresponding nodes when
uncollapsed. It can be used to conveniently act on all nodes in a specific state (e.g. to
undrain all previously drained nodes).
This tree shows all current node states in the cluster and their corresponding nodes when
uncollapsed. It can be used to conveniently act on all nodes in a specific state (e.g. to
undrain all previously drained nodes).
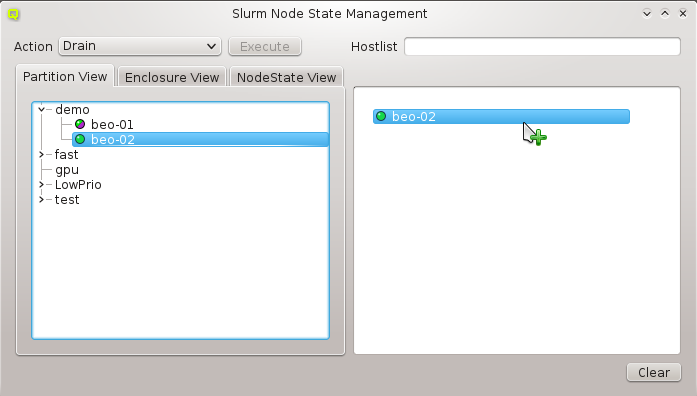
To manage one or more nodes, they have to be selected first. Use the preferred view and move the node(s) to the right list via drag&drop. One can also move a whole group of nodes, for example all nodes from a rack by dragging the name of the rack to the right tree. All nodes in this list are available for later actions. You
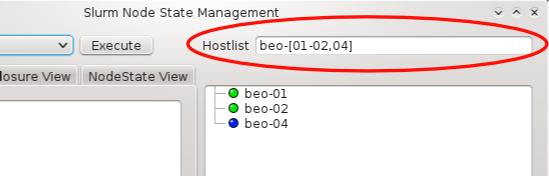
can also select multiple nodes for drag&drop or enter a hostlist in the Hostlist field
(e.g. beo-[01-04]). The nodes will appear in the right list, if the hostlist is valid.
There are seven possible actions that may be applied to the selected nodes:
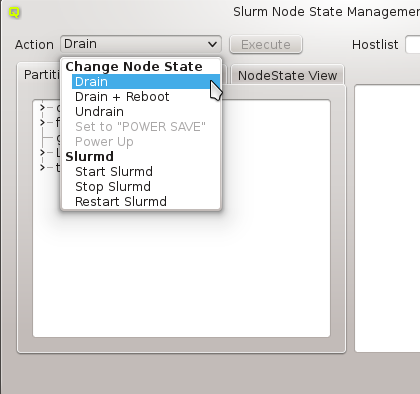
- Drain
-
The node is currently executing a job, but will not be allocated additional jobs. The node state will be changed to state DRAINED when the last job on it completes.
- Undrain
-
This will undrain all selected nodes.
- Set to POWER SAVE
-
The nodes will be put into power save mode. Power management mode needs to be configured in the slurm config for this to work.
- Start Slurmd
-
This starts the Slurmd on the selected nodes.
- Stop Slurmd
-
This stops the Slurmd on the selected nodes.
- Restart Slurmd
-
This restarts the Slurmd on the selected nodes.
Once the desired nodes are selected, an action can be chosen and then executed by clicking the Execute button. In case the action was operating on the nodes slurmd, an RXengine window comes up, in which one can track the success of the remote slurmd operation. To clear the complete list of selected nodes, one can click the Clear button. To remove only a subset of nodes, one can select them in the right list and remove them via the context-menu.
13.1.2.8. Slurm Reservations
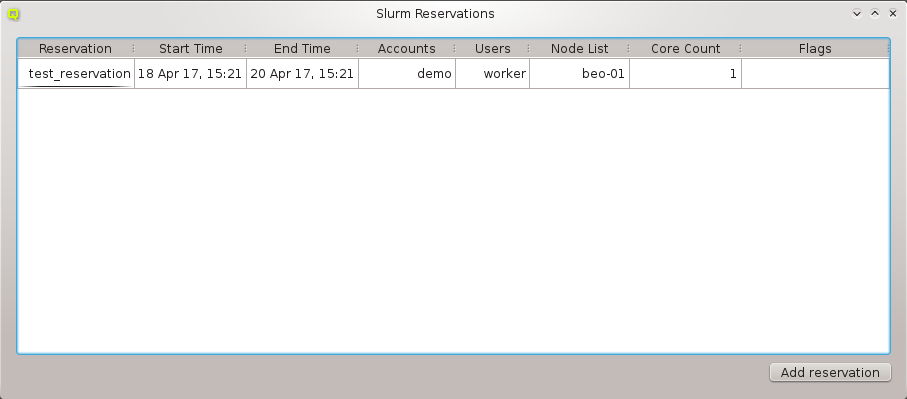
The Slurm Reservations window shows a table of all active reservations and their most
important properties. Furthermore, it allows to manipulate the reservations and create new
ones.
Creating a new Reservation
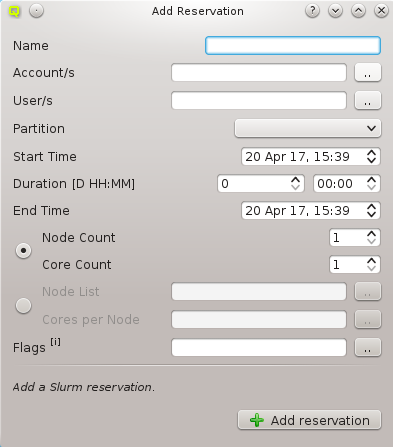
To create a new reservation, click the Add reservation button. A new dialog pops up. The following parameters can be specified:
- Name
-
Here a custom name can be specified for the reservation. If no custom name is given Slurm automatically creates one based on the first user or account name chosen for the reservation and a numeric suffix.
- Account(s)
-
To create a reservation, one has to either select one or more accounts and/or one or more users who will be allowed to use it. Select one or more accounts by checking their entries in the pop-up. All users of the selected accounts may utilize the reservation.
- User(s)
-
To create a reservation, one has to either select one or more accounts and/or one or more users who will be allowed to use it. Select one or more users by checking their entries in the pop-up. In case accounts are also set, the Select User dialog shows only the users belonging to the selected accounts.
- Partition
-
The partition the reservation applies to.
- Start Time
-
The start time of the reservation. The default value is now. By changing the Start Time, Duration or End Time all timing values will be recalculated.
- Duration
-
The duration of the reservation. Set a count of days and/or hours and minutes. By changing the Start Time, Duration or End Time, all timing values will be recalculated.
- End Time
-
The End Time of the reservation. By changing the Start Time, Duration or End Time, all timing values will be recalculated.
- Nodes and Cores
-
One may either choose to set a Node Count and Core Count or a fixed Node List and Cores per Node. In the former case, Slurm will randomly select the nodes and cores for your reservation. By choosing the second variation one can explicitly select the nodes for the reservation and the number of cores from every node.
- Node Count / Core Count
-
Number of nodes and cores to be reserved.
- Node List / Cores per Node
-
Identify the node(s) to be reserved. For every node you can set the number of cores.
- Flags
-
Flags associated with the reservation. The following flags can be set: +
-
ANY_NODES: Use any compute nodes
-
DAILY: Set DAILY flag
-
FIRST_CORES: Use only first cores on each node
-
IGNORE_JOBS: Ignore running jobs
-
MAINT: Set MAINT flag
-
OVERLAP: Permit to overlap others
-
PART_NODES: Use partition nodes only
-
STATIC_ALLOC: Static node allocation
-
TIME_FLOAT: Time offset is relative
-
WEEKLY: Set WEEKLY flag
-
Confirm by clicking the Add reservation button.
Updating a Reservation
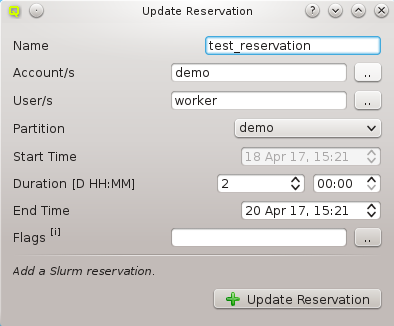
To update a reservation one just has to select it and open its context-menu. Choose Update Reservation. A window pops up with all the properties set to the values of the existing reservation. To modify the reservation just make the desired changes and click the Update Reservation button.
|
Not all properties are changeable. To edit the |
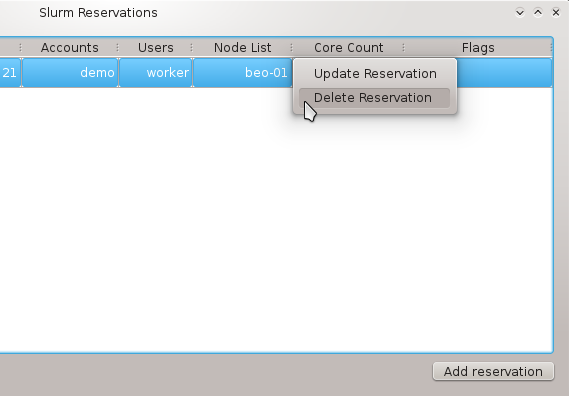
Deleting a Reservation
To delete a reservation one just has to choose Delete Reservation from its context-menu .
13.1.2.9. Slurm Accounting
13.1.2.9.1. Manage Slurm Accounts
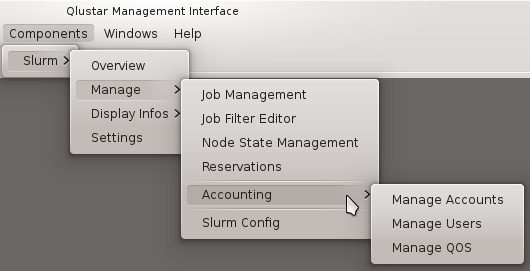
To open the Manage Slurm Accounts dialog select
. There
will be a tab for every cluster known to the Slurm accounting database. Each tab contains a
tree with the accounts and users that are registered in the corresponding
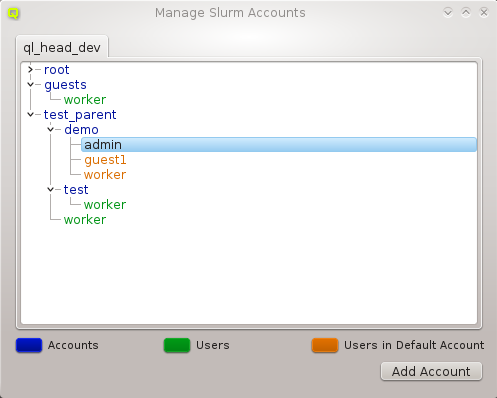
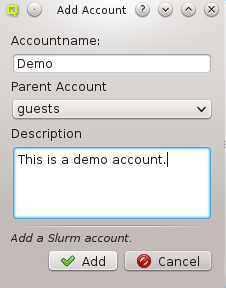
Slurm instance. To better distinguish between accounts and users, they are identified by pre-defined color codes (See Preferences Dialog for changing the corresponding colors). At the bottom of the dialog you can see a legend for the color codes.
Adding an Account
Clicking the Add Account button will open a new dialog. Here you have to specify
a name for the new account. Optionally, you can also specify a parent account and a
description. If an account had been selected before, the Add Account button was clicked, this
account will be pre-filled as the parent account. When you are finished, confirm with the OK
button.
|
Account names have to be unique! |
Deleting an Account
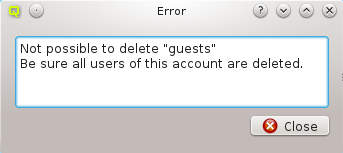
Before being able to delete an account, it has to be assured, that the account contains no more users (See below to learn how to remove users from an account). Optionally, one can remove users from an account in the Manage Slurm Users dialog.
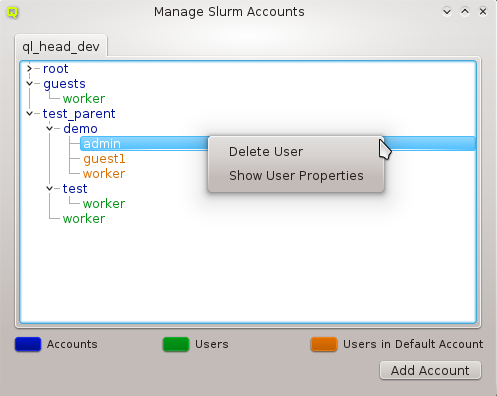
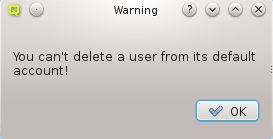
After all users are removed from the account, one can delete it via its context-menu by selecting Delete Account.
Deleting a user from an Account
To delete a user from an account use its context-menu and select Delete User.
|
You can’t remove a user from his default account. First change the default account of the user and then delete the old one. |
Show Account/User Properties
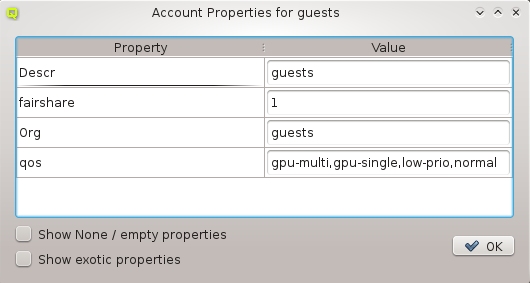
To show the properties of an account or user bring up its context-menu and select
Show Account Properties or Show User Properties depending on what
was selected. Two filters are available in this dialog: One for hiding all properties with a
value of 0 or empty and one for hiding exotic properties which are not of interest in most
cases. By default, both filters are enabled. To disable them, their corresponding entry has to
be checked at the bottom of the dialog.
13.1.2.10. Manage Slurm Users
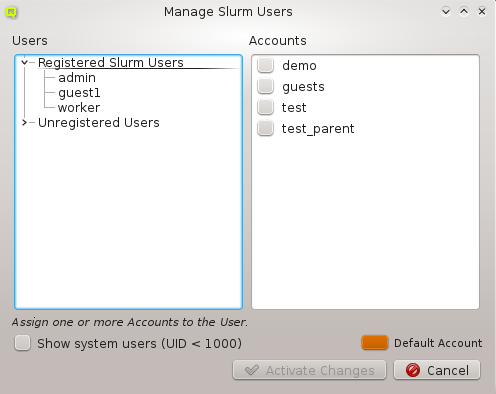
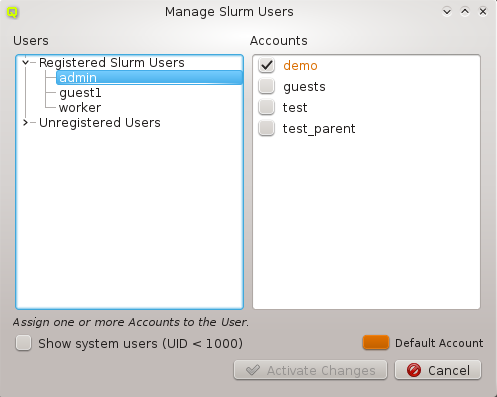
The Manage Users dialog allows to assign accounts to a user, set and change a user’s default
account, register new users and delete users. When a user is selected, the accounts he is a
member of are checked in the Accounts list displayed at the right. His default
account is highlighted with the specific color set for default accounts in the
Preferences Dialog. By default, system users are hidden. To show
them, just check the Show system users (UID < 1000) checkbox.
Registering a User with Slurm
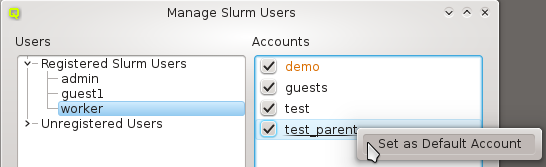
To register a user with Slurm, uncollapse the Unregistered Users and select the desired user. Every user needs a default account, so this has to be defined first. To do so, select Set as Default Account in the context-menu of the account you want to be the default. By doing this, the user will be registered with this default account. If you just select some accounts for an unregistered user by checking them and then pressing the
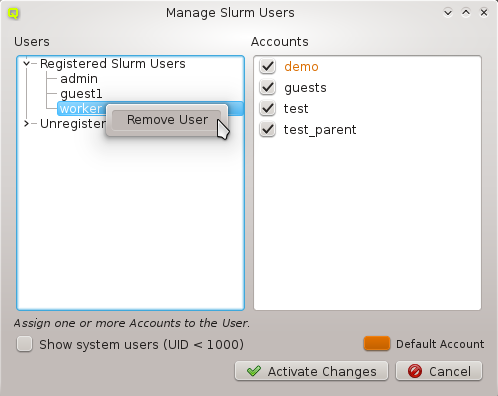
Create button, the user will be registered with a default account set randomly among the chosen ones.
Deleting a User
To delete a user, bring up his context-menu and select Remove User.
|
Be sure that the user has no active jobs. |
Assigning a User to Accounts
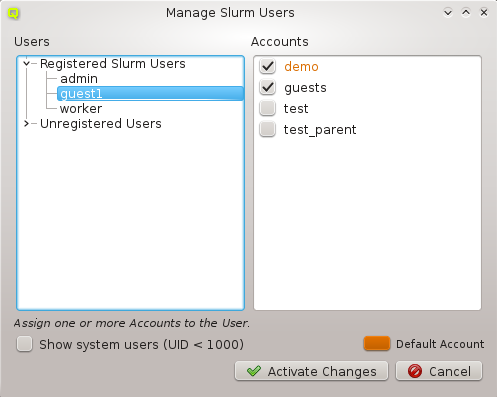
Selecting a registered Slurm user displays the accounts he is member of in the Accounts list to the right. To add/remove him to/from an account (un)check it and hit the Activate Changes button.
Changing the Default Account of a User
To change the default account of a user, select him in the Registered Slurm Users tree and bring up the context-menu of the account you want to set as the new default. Then select Set as Default Account.
13.1.2.10.1. Cluster Usage
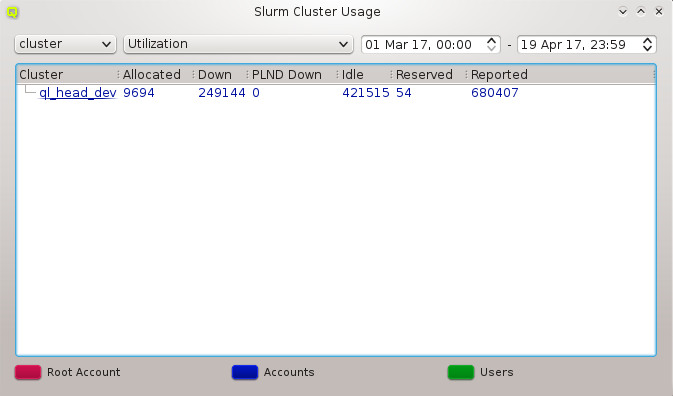
The Cluster Usage display uses the Slurm utility sreport to generate reports of job usage and cluster utilization. For detailed information about the type of reports and options read the sreport manpage. Select your report type (for example _cluster_) in the left combo box and then the report options from the combobox right to it. Per
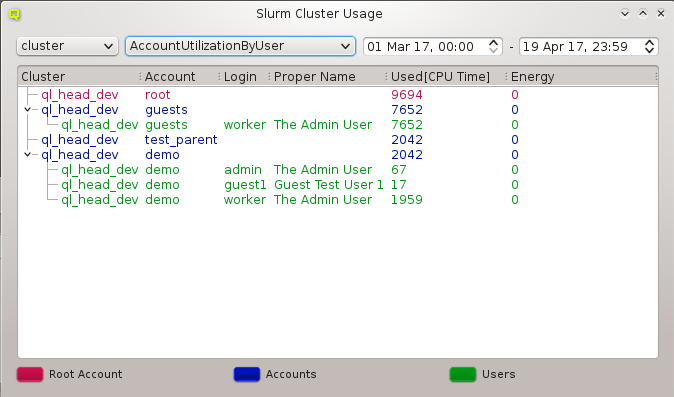
default the time period used for the report is the past day. You can change this by modifying the start and the end time. The colors used in the window are customizable in the Preferences Dialog.
|
sreport will only be able to show utilization data if Slurm Accounting is activated. This is the default on Qlustar clusters. |
13.1.2.10.2. Fair Share
The Fair Share view uses the Slurm utility sshare to display Slurm fair-share
information. We provide two versions of views, a basic and a long one. The long version shows
additional information that is needed less often. By default we show the basic view, but you
can easily switch by checking the long checkbox at the bottom right of the
window.
Account View

The Account View shows the Slurm fair-share information for all registered Slurm accounts. The used colors are customizable in the Preferences Dialog.
Detailed Account View
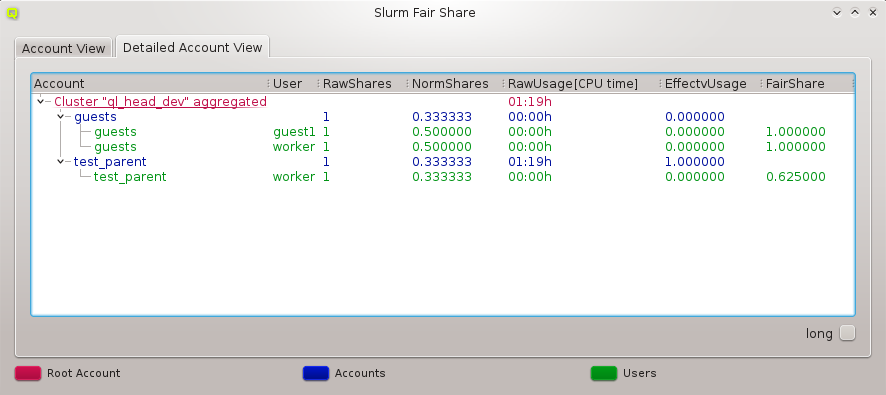
The Detailed Account View shows the Slurm fair-share information for all registered Slurm accounts including the information for individual users that are member of the accounts. The used colors are customizable in the Preferences Dialog.
For more information about sshare and the meaning of the displayed quantities, read the sshare manpage.
|
sshare will only be able to show fair-share data if the fair-share option is activated in the Slurm config. This is the default on Qlustar clusters. |
13.1.2.10.3. Job Priorities
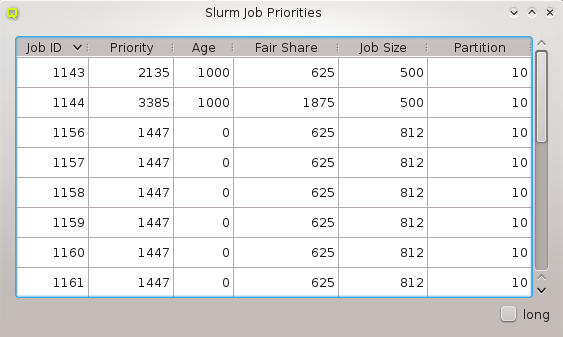
The Job Priorities dialog uses the Slurm utility sprio to display the values of the individual factors that are used to calculate a job’s scheduling priority when the multi-factor priority plugin is installed. This is information needed, when analyzing why certain pending jobs run earlier than others.
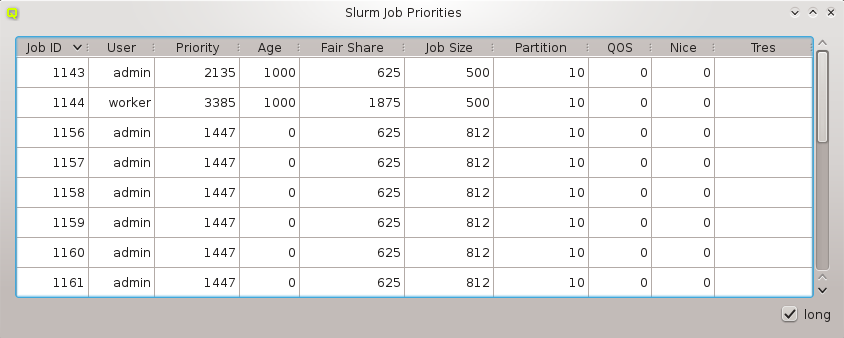
We provide two versions of the view, a basic and a long one. The long version shows additional information that is needed less often. By default we show the basic view, but you can easily switch by checking the long checkbox at the bottom right of the window. For more information about sprio read the sprio manpage.
13.1.2.10.4. QluMan Slurm Settings
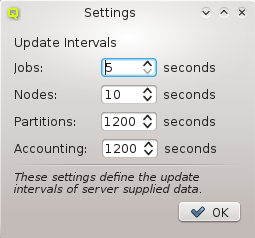
The QluMan Slurm Settings dialog allows to customize the update intervals for information about jobs, nodes, partitions and Slurm accounting. This information flow is provided by the QluMan Slurm daemon running on the cluster and the QluMan GUI automatically subscribes to it. Shorter update intervals mean more server load and more network traffic. In most cases, the default values should be adequate.
|
Whenever you modify some property/value in the QluMan GUI for example for a job the GUI will always get an immediate update for that. The update intervals only affect changes that are not the consequence of an explicit action by a QluMan user. |
14. Customizing the Look&Feel
14.1. Overview
There are a number aspects of QluMan’s appearance that can be customized: Specific component dependent customization is possible as well as choosing general fonts, colors and the widget style.
14.2. QluMan Preferences
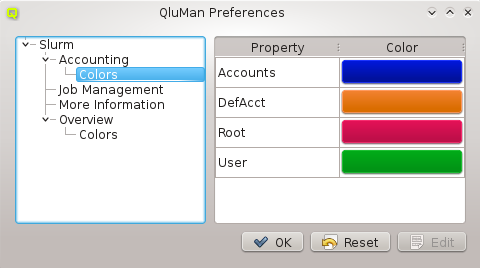
In the QluMan Preferences dialog, one is able to customize specific parts of the QluMan GUI Look&Feel. The tree on the right shows all the settings available for customization. Each QluMan component may have its specific settings, so the options available there depend on the components installed on a particular cluster.
To change a setting, select the component to be customized,
e.g. . In this example, one can set the colors that are used to
indicate Slurm accounts, users, users in their default accounts and the root user. To change a
color, select the property in question and hit the Edit button. A color-picker dialog will
then come up. Select the new color and click OK. Among others, one is also able to
customize the column height of the Job Management and More Information tables here.
14.3. Customizing general Properties
Since QluMan is a QT application, it’s general Look&Feel can be controlled with KDE tools. Select the menu entry to bring up the _KDE System Settings dialog. Now click on the Application Appearance icon and you’ll have the options to modify fonts, colors and style.
14.3.1. Customizing general Fonts
When you click on the Fonts icon, you’ll see a list of different font identifiers, for which
you can change the font settings. The relevant identifiers affecting QluMan are: General,
Menu and Window Title. Changing one of the values and clicking the Apply
button changes the corresponding font on the fly.
14.3.2. Customizing general Colors
Click on the Colors icon and choose the Colors tab. There you can adjust the color of the different elements of the QluMan GUI. You can narrow down the color identifiers to the ones affecting particular GUI elements, by choosing a specific color set with the corresponding pull-down menu. Changing one of the values and clicking the Apply button, changes the corresponding color on the fly.
14.3.3. Cloning KDE Settings
If you’re using KDE4 on you’re desktop, instead of configuring using the System Settings dialog, you can also move /root/.kde/share/config to /root/.kde/share/config.bak
and copy your personal configured .kde/share/config directory to /root/.kde/share. As long
as you’re not using any non-standard KDE themes, this should just apply the favorite desktop
settings you’re familiar with to QluMan, when running it on a remote machine like the cluster
head- or FE-node (restart of QluMan GUI required).
14.3.4. Customizing the Widget Style
Changing the widget style can be a little more involved. First you need to start the QT configurator qtconfig and choose a GUI style (default is QtCurve). The following assumes, you’re running qluman-qt on the head- or FE-node. In case you have it installed on your workstation, just execute qtconfig there.
0 user@workstation ~ $
ssh -X root@servername qtconfig

When you’re done, select and you’ll already see the changes. After this, you
can exit qtconfig. If you want further customization of the widget style (note that only some
styles are configurable, among them QtCurve), you can now go back to the Application Appearance dialog (see above), click on the Style icon, choose the style you’ve selected in
qtconfig as Widget style and press the Configure… button. You’ll then see a large
number of options for
customization. When you’re satisfied with your modifications, press the OK button and finally the Apply button of the window. Note, that you will see the resulting changes only after performing some actions (pressing a button, etc.) in the QluMan GUI.
For additional widget style variants apart from the default of QtCurve, you can install additional kde-style packages (.e.g kde-style-oxygen) on the machine, where you’re executing the QluMan GUI.
14.3.5. Making 'graying out' work
Depending on the KDE theme and settings, disabled texts, buttons, icons or menu entries are not
rendered as grayed out. Instead they are rendered like normal text, buttons, icons and menu
entries, but can not be selected with the mouse. This is rather confusing. A quick fix we found
for this issue is editing ~/.kde/share/config/kdeglobals and removing/commenting out all
lines of the form "ForegroundNormal=…". After saving and restarting qluman-qt graying out
should work.