First Steps Guide
1. First Boot
1.1. Running qlustar-initial-config
After the server has booted the newly installed Qlustar OS, log in as root and start the post-install configuration process by running the command
0 root@cl-head ~ #
/usr/sbin/qlustar-initial-config
This will first thoroughly check your network connectivity and then complete the installation by executing the remaining configuration steps as detailed below. During the package update process, you might be asked whether to keep locally modified configuration files. In this case always choose the option
keep the local version currently installed.
Remaining configuration steps run-through
If your chosen hostname can’t be resolved via DNS, you will see a non-fatal error message reminding you that the hostname should be registered in some (external) name service (typically DNS).
-
Cluster name

First, you will be asked for the name of the new Qlustar cluster. This can be any string and is used in some places like the slurm or ganglia configuration.
-
NIS Setup
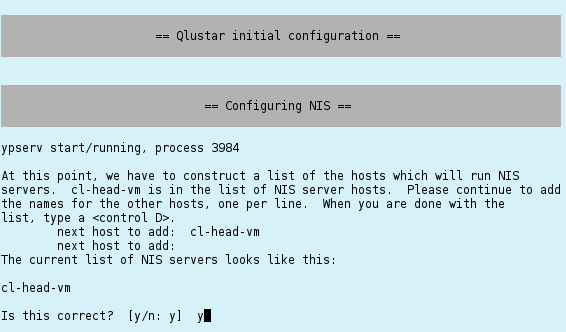
Next is the setup of the NIS database. Just confirm the suggested NIS server by pressing Ctrl-d and Enter to proceed.
-
Configuring ssh
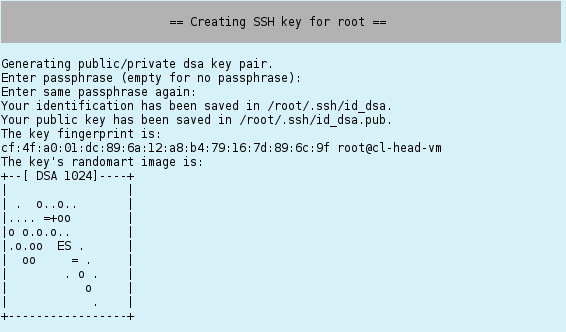
An ssh key for the root user is generated next. You can enter an optional pass-phrase for it. This key, will be used to enable login by root on the head-node to any net-boot node of the cluster without specifying a password.
Be aware, that having a non-empty pass-phrase means, that you will have to specify it any time you try to ssh to another host in the cluster. If you don’t want that, work without a pass-phrase.
-
Configuring Nagios
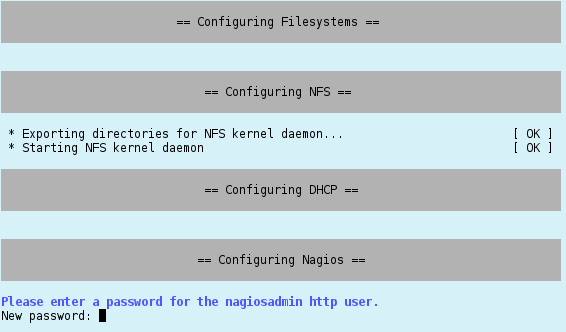
The configuration of Nagios requires you to choose a password for the Nagios admin account. Please type in the password twice.
-
Configuring QluMan
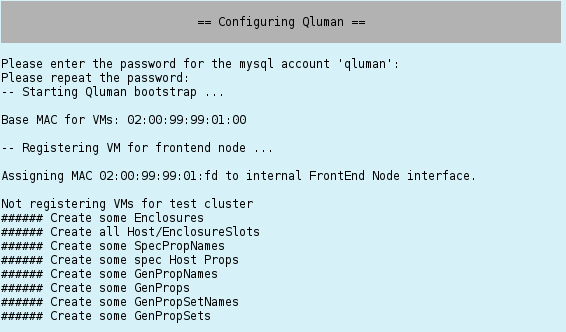
QluMan, the Qlustar management framework (see the QluMan Guide), requires a mysql (mariaDB) database. You will be asked for the password of the QluMan DB user next. After entering it, the QluMan database and configuration settings will be initialized. This can take a while, since a number of OS images and chroots (see Adding Software) will be generated during this step.
-
Configuring Slurm
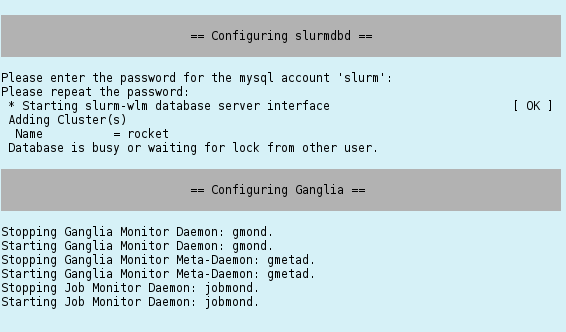
If slurm was selected as the cluster resource manager, its configuration requires the generation of a munge key and the specification of a password for the slurm mysql account. Enter the chosen password twice when asked for it.
The slurm database daemon is also being configured by this process. Hence, you will be ready to take full advantage of the accounting features of slurm.
-
Configuring the virtual Demo Cluster
If you have chosen to setup some virtual demo nodes during installation, you will be asked for the user name of a test account that can be used to explore the cluster. The account will be generated with the default password for the cluster (see the information on the screen).
-
Setting the MariaDB root password
To conclude the configuration procedure, you will be asked to set the password for the MariaDB/MySQL root account. Setting a password here is important. It prevents unauthorized access to the Qlustar or other databases on your head-node.
1.2. Final Reboot
Reboot again once all the previous steps are complete by pressing Enter. After the head-node is up and running again, test its network connectivity by pinging its public IP address (hostname). Do the same for the virtual front-end node, if you have chosen to configure one. It should have booted as well, after the head-node is up and running. You can try to login to it using ssh.
A test mail should have been sent to the e-mail address(es) you specified during the
installation. If you didn’t receive one, review your settings in /etc/aliases and/or
/etc/postfix/main.cf. In case some of them are wrong, you can execute
0 root@cl-head ~ #
dpkg-reconfigure postfix
to modify them.
1.3. Starting the virtual Demo Cluster
If you have chosen to configure a virtual demo-cluster, you can start it by executing the command:
0 root@cl-head ~ #
demo-system-start
and to stop it
0 root@cl-head ~ #
demo-system-stop
These commands use the configuration file /etc/qlustar/vm-configs/demo-system.conf. If you
find that the (automatically calculated) amount of RAM per VM is not right, you can change the
variable CN_MEM to some other value in that file. The consoles of the virtual nodes (and also
of the virtual front-end node if you chose to set one up) are accessible in a screen
session. Type
0 root@cl-head ~ #
console-fe-vm
to attach to the console session of the virtual FE node and
0 root@cl-head ~ #
console-demo-vms
to attach to the console sessions of the virtual demo cluster nodes. Note that the tmux
command character is Ctrl-t. To detach from the tmux session, type
Ctrl-t d, to switch to the next/previous window type Ctrl-t n /
Ctrl-t p. More details on the usage of tmux is available in the corresponding man
pages. To check whether all nodes are up and running, type
0 root@cl-head ~ #
dsh -a uptime
dsh or pdsh can be used to execute arbitrary commands on groups of nodes. Check their man
pages and the corresponding section in the QluMan guide for further information.
1.4. Installed Services
At this stage, the following services are configured and running on your head-node:
-
Nagios3 (monitoring/alerts) with its web interface at
http://<headnode>/nagios3/(<headnode>is the hostname of the head-node you have chosen during installation). You may login as usernagiosadminwith the password you specified previously. -
Ganglia (monitoring) at
http://<headnode>/ganglia/ -
DHCP/TFTP boot services and DNS name service provided by dnsmasq.
-
NTP time server as client and server
-
NFS-Server with exports defined in
/etc/exports -
Depending on your choice of software packages: Slurm (DB + control daemon), Corosync* (HA), *Munge (authentification for slurm), BeeGFS management daemon. Note that among the *latter, only Slurm, Munge and BeeGFS are configured automatically during *installation. Corosync requires a manual configuration.
-
NIS server
-
Mail service Postfix
-
MariaDB server (mysql fork)
-
QluMan server components (Qlustar Management)
|
Please note, that you shouldn’t install the Ubuntu MySQL server packages on the head-node, since QluMan requires MariaDB and packages of the latter conflict with the MySQL packages. MariaDB is a complete and compatible substitute for MySQL. |
1.5. Adding Software
1.5.1. Background
As explained elsewhere, the RAM-based
root file-system of a Qlustar compute/storage node is typically supplemented by a global
NFS-exported chroot to allow access to software not already contained in the boot images
themselves. During installation, one chroot per
selected edge platform was automatically
created. The chroots are located at /srv/apps/chroots/chroot name, where <chroot name> would
be e.g. bionic or centos7. Each of them contains a full-featured installation of the
corresponding Qlustar edge platform. To change into a chroot, convenience bash shell aliases of
the form chroot-<chroot name> are defined for the root user on the head-node. You may use them
as follows:
1.5.2. Ubuntu/Debian
Example for Ubuntu/Bionic, if it was selected at install
0 root@cl-head ~ #
chroot-bionic
Once you’re inside a chroot, you can use the standard Debian/Ubuntu tools to control its software packages, e.g.
(bionic) 0 root@cl-head ~ #
apt update
(bionic) 0 root@cl-head ~ #
apt dist-upgrade
(bionic) 0 root@cl-head ~ #
apt install package
(bionic) 0 root@cl-head ~ #
exit
1.5.3. Centos
Example for CentOS 7, if it was selected at install
0 root@cl-head ~ #
chroot-centos7
Once you’re inside a chroot, you can use the standard CentOS tools to control its software packages, e.g.
(centos7) 0 root@cl-head ~ #
yum update
(centos7) 0 root@cl-head ~ #
yum install package
(centos7) 0 root@cl-head ~ #
exit
|
The Qlustar CentOS edge platform integrates four package sources via the corresponding yum
repository config files below
All four repositories are enabled per default, so you can easily install packages from any of them. |
1.5.4. Comments
The nice thing about this overlay mechanism is that software from packages installed in a particular chroot will be available instantaneously on all compute/storage nodes that are configured to use that chroot.
|
Apart from the chroot, there is usually no need to install additional packages on the head-node itself, unless you want to add functionality specifically running on it. Be aware, that software packages installed directly on the head-node will not be visible cluster-wide. |
1.6. Running the Cluster Manager QluMan
1.6.1. Generating a one time token for the first admin login
The Qlustar management GUI qluman-qt uses public/private keys for both encryption and authentication of its connection with the QluMan server processes. For this to work, there needs to be an exchange of public keys between the GUI client and the QluMan server. Later this can be done by a user with admin role via the GUI. But for the first admin login, it must be accomplished using a root shell on the head-node as follows:
0 root@cl-head ~ #
qluman-cli --gencert
Generating one-time login token for user 'admin':
Cluster  = QL
Hostname = beosrv-c
Port     = 6001
Pubkey   = b'T)5o]@hsjB2qyY>eb:7)8@BA?idMf>kh%^cRhV/#'
Enter new pin for one-time token:
Server infos and one-time login token for user 'admin':
---[ CUT FROM HERE ]---
00000191c2MAAcMuyCNQR0DPILx-y-BLCHpITepvG7R3I6452Cdqiu98u4PsM1VWFGqEAG
V8YN9K5kyJKHtQHGTB1JqZIwt4q0PLArnyNmhCkGLS6VxWWBDtBB9_dGPqLH4OeQ7sZ725
6XDGgrKo4Dldc_wuCALegczjYV8oc_yZ07X0oIYlzhDlDpk-hTm5bfW8_x904YF0wcv-G-
nK1ztRg854O7pC_p1YpEJuzWFqWv0e7ffi-ZgkxwfdGGKF3imp4d9yGY4h6Ixdn8TLG2gk
Z4XQ4dymvSO9hp8mUabfq7prVUOTYeChB2pOrom8XSQxjOoe4Yll5yv6da_CdGq50KrO8Q
C12Z4Pz2eSbvqXbo7c7DdLRjMc0v0Km3WyljgdsDYbKC5iT75Bgryc
---[ TO HERE ]---
The token can also be saved directly to a file using the -o <filename> option. The user the
token is for can be specified by the -u <username> option like this:
0 root@cl-head ~ #
qluman-cli --gencert -u admin -o token
Generating one-time login token for user 'admin':
Cluster  = QL
Hostname = beosrv-c
Port     = 6001
Pubkey   = b'T)5o]@hsjB2qyY>eb:7)8@BA?idMf>kh%^cRhV/#'
Enter new pin for one-time token:
Server infos and one-time login token for user 'admin' saved as 'token'
The server infos and one-time login token are protected by the pin you just entered. This is important when the data is sent via unencrypted channels (e.g. email or chat programs) to users or when it is stored on a shared filesystem like NFS. The pin does not need to be a strong password. It is only used to make it non-trivial to use an intercepted token.
|
The token can only be used once. So once you use it yourself, it becomes useless to anybody else. On the other hand, if somebody intercepts the token, guesses the pin and uses it for a connection, it will no longer work for you. If that happened, you’d know something went wrong. |
1.6.2. Starting the QluMan GUI
Per default, the Qlustar management GUI qluman-qt is not installed on any node of the cluster. This is because the installation on the head-node (or a chroot) pulls and installs a lot of other packages that qluman-qt depends on, which will slow down updates. If you have the possibility, install qluman-qt on your workstation and work from there. If you still like to have it available on the head-node, just install it there like any other package:
0 root@cl-head ~ #
apt install qluman-qt
Then you can launch qluman-qt remotely on the head-node, per ssh (with X11 forwarding enabled /
-X option) as follows:
0 user@workstation ~ $
ssh -X root@servername qluman-qt
This should bring up the Management Console. Using the one-time token generated as explained above, you will now be able to add the cluster to the list of available connections. (Details about this are explained in the QluMan Guide).
1.6.3. Running the QluMan GUI on a workstation
If your workstation runs one of the edge platforms currently supported by Qlustar, or if it allows executing containers, you can install/run the QluMan GUI directly there. This is recommended, since the responsiveness of a GUI, that is locally started, is a lot better as compared to one that is running via remote X11. We explain the two alternatives below.
1.6.3.1. Installing/running using the Debian package
To install the qluman-qt package on your Ubuntu workstation, you need to add the correct
Qlustar repository to your apt sources list. This can be accomplished by executing the
following as root on your workstation.
0 root@workstation ~ #
dpkg -l software-properties-common > /dev/null 2>&1 || apt install software-properties-common
0 root@workstation ~ #
gpg --no-default-keyring --primary-keyring /etc/apt/trusted.gpg --recv-keys E6BA110F3C0BC307
The second one should have imported the Qlustar PGP archive key, and must output a line like:
gpg: key 3C0BC307: public key "Q-Leap Networks (automatic archive key) <info@q-leap.com>" imported
|
The gpg command above might fail, the first time you execute it. This happens, if gpg has never been executed before for the root user. In this case, simply execute it a second time. |
Then if you have Ubuntu/Bionic execute:
0 root@workstation ~ #
add-apt-repository 'deb http://repo.qlustar.com/repo/qluman 11.0-bionic main non-free'
0 root@workstation ~ #
add-apt-repository 'deb http://repo.qlustar.com/repo/qluman 11.0-bionic-proposed-updates main non-free'
After this you can install qluman-qt the usual way:
0 root@workstation ~ #
apt update
0 root@workstation ~ #
apt install qluman-qt
|
On Ubuntu you need to have the |
Finally, the QluMan GUI can be launched as an ordinary user in a shell on the workstation:
0 user@workstation ~ $
qluman-qt &
1.6.3.2. Installing/running from a container
Singularity container
Singularity container images with the QluMan GUI
are available on our Download page. This makes
it really easy to start the GUI as a non-root user on any machine with Singularity installed
(minimum Singularity version is 3.2 for QluMan 11 containers): Just download the desired
version of the image, check its sha256sum, make it executable and execute it (assuming you
saved it as $HOME/qluman-11.0.0.16-singularity.sqsh):
0 user@workstation ~ $
sha256sum $HOME/qluman-11.0.0.16-singularity.sqsh
0 user@workstation ~ $
chmod 755 $HOME/qluman-11.0.0.16-singularity.sqsh
0 user@workstation ~ $
$HOME/qluman-11.0.0.16-singularity.sqsh
You can view the changelog of the QluMan version inside the container by executing the following command:
0 user@workstation ~ $
singularity exec $HOME/qluman-11.0.0.16-singularity.sqsh \
  zless /usr/share/doc/qluman-qt-11/changelog.gz
|
The base version (e.g. 11.0.0) of the QluMan packages/containers on the workstation should be the same as on the head-node(s) to ensure correct operation. Some close unequal version combinations (e.g. 11.0.0.9 and 11.0.0.16) usually work too, but are not well tested. |
1.7. Creating Users
Authenticating users in the cluster can be done in many ways, hence the creation of users depends on what method is used. The most basic method is to use NIS. If there is no requirement of keeping user authentification in sync with some external service like e.g. LDAP, this is sufficient. A NIS database is setup during the initial installation process and cluster users can be authenticated against it. Creating accounts that should use other authentification mechanisms is more complex and beyond the scope of this guide. Some options are explained in the admin manual. Add a test user by executing a command like this:
0 root@cl-head ~ #
adduser.sh -u test -n "Test User"
The behavior of the adduser.sh script can be customized in its configuration file
/etc/qlustar/common/adduser.cf. It also contains the definition of the initial default user
password.
1.8. Compiling an MPI program
MPI (Message Passing Interface) is the de facto standard for distributed parallel programming on Linux clusters. The default _MPI variant in Qlustar is OpenMPI and is automatically installed in the standard chroot during installation under Ubuntu and also under CentOS if OpenHPC has also been selected.
You can test the correct installation of MPI with two small hello world test programs (one in C ,the other one in FORTRAN90) as the test user you created earlier. The procedure is slightly different depending on whether you’re on Ubuntu or CentOS. Login on the front-end node as this test user and if on Ubuntu execute
0 testuser@cl-front ~ $
mpicc.openmpi-gcc -o hello-world-c hello-world.c
0 testuser@cl-front ~ $
mpif90.openmpi-gcc -o hello-world-f hello-world.f90
On CentOS, you need to activate the correct compiler and openmpi stack from OpenHPC first via the modules infrastructure
0 testuser@cl-front ~ $
module load openmpi3/3.1.4 gnu8/8.3.0
0 testuser@cl-front ~ $
mpicc -o hello-world-c hello-world.c
0 testuser@cl-front ~ $
mpif90 -o hello-world-f hello-world.f90
After this you should have created two executables. Check it with
0 testuser@cl-front ~ $
ls -l hello-world-?
Now we’re prepared to test the queuing system with these two programs.
1.9. Running an MPI Job
Before running a multi-node MPI job via slurm on the demo nodes, the slurm config most likely needs to be updated with the exact RAM values available to these nodes for slurm jobs. This is due to the fact that Qlustar nodes report their available RAM during the boot process to the qlumand on the head-node, and these values can be different to the ones originally assumed by the installer. To accomplish this, write the slurm config as explained here.
It is also possible, that the demo nodes will still be in the slurm state DRAINED after this. To check this and possibly change the state, use the Slurm Node State Management dialog of the QluMan GUI. If the nodes are indeed in state DRAINED, first restart slurmd on the nodes and then undrain them using this dialog.
Once all this is done and the nodes are in state IDLE, still being logged in as the test user and assuming at least two demo nodes are started, we can submit the two "hello world" programs created previously to slurm as follows:
0 testuser@cl-front ~ $
salloc -N 2 --ntasks-per-node=2 --mem=20 -p demo srun hello-world-c
This will run the job interactively on 2 nodes with 2 processes each (total of 4 processes). You should obtain an output like this:
salloc: Granted job allocation 3
Hello world from process 1 of 4
Hello world from process 2 of 4
Hello world from process 3 of 4
Hello world from process 0 of 4
salloc: Relinquishing job allocation 3
salloc: Job allocation 3 has been revoked.
Similarly, the F90 version can be submitted as a batch job using the script
hello-world-f90-slurm.sh (to check the output, execute cat slurm-<job#>.out after the job
has finished):
0 testuser@cl-front ~ $
sbatch -N 2 --ntasks-per-node=2 --mem=20 -p demo hello-world-f90-slurm.sh
1.10. Running the Linpack benchmark
The Linpack benchmark is used to classify supercomputers in the Top 500 list. That’s why on most clusters, it’s probably run as one of the first parallel programs to check functionality, stability and performance. Qlustar comes with an optimized pre-compiled version of Linpack (using a current version of the OpenBlas library), and a script to auto-generate the necessary input file given the number of nodes, processes per node and total amount of RAM for the run.
The test user has some pre-defined shell aliases to simplify the submission of Linpack
jobs. Type alias to see what’s available. They are defined in $HOME/.bash/alias. Example
submission (assuming you have 4 running demo nodes):
0 testuser@cl-front ~ $
linp-4-demo-nodes
Check that the job is started (output should be similar):
0 testuser@cl-front ~ $
squeue
JOBID PARTITION     NAME     USER  ST  TIME  NODES  NODELIST(REASON)
   27      demo linstres     test   R  2:46      4     beo-[201-204]
Now ssh to one of the nodes in the NODELIST and check with top that Linpack is running at
full steam, like:
0 testuser@beo-201 ~ $
top
  PID USER  PR  NI  VIRT  RES  SHR S %CPU %MEM    TIME+  COMMAND
18307 test  20   0  354m 280m 2764 R  100 28.0   6:42.92 xhpl-openblas
18306 test  20   0  354m 294m 2764 R   99 29.3   6:45.09 xhpl-openblas
You can check the output of each Linpack run in the files:
$HOME/bench/hpl/run/job-<jobid>-/openblas/job-<jobid>--<run#>.out where <<jobid>> is the
slurm JOBID (see the squeue command above) and <<run#>> is an integer starting from 1. The
way the script is designed, it will run indefinitely, restarting Linpack in an infinite
loop. So to stop it, you need to cancel the job like
0 testuser@cl-front ~ $
scancel <jobid>