Slurm Configuration and Management
Slurm Configuration
Overview
The slurm configuration module comes in four parts:
-
The overall slurm configuration, controlled via two templates in the
Config Headertab. -
The configuration of slurm nodes, done via the
Node Groupstab. -
The configuration of partitions, achieved by using the
Partitionstab. -
The configuration of GRES (generic resources) groups, settable using the
Gres Groupstab.
Assignment of hosts to node groups and/or partitions is possible by adding the latter to the
relevant Config Sets and Host Templates or by direct assignment
through the config (set) context menu in the enclosure view.
Slurm Config Header
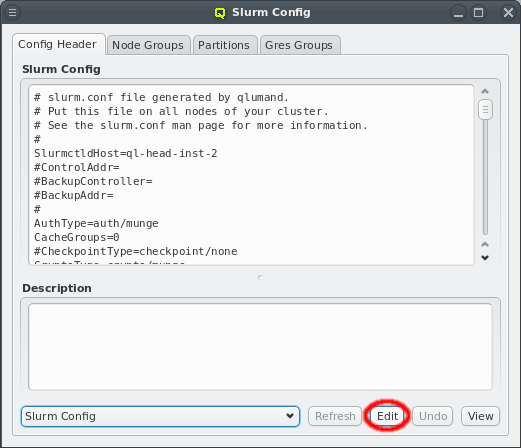
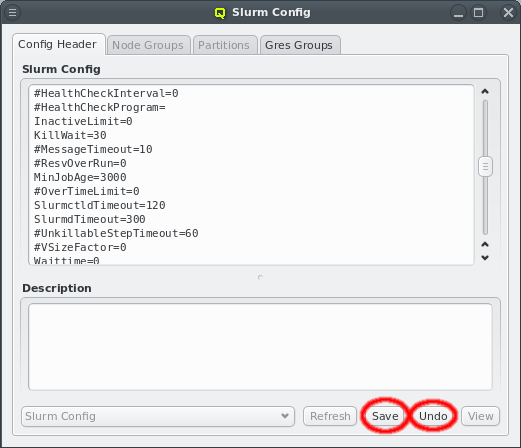
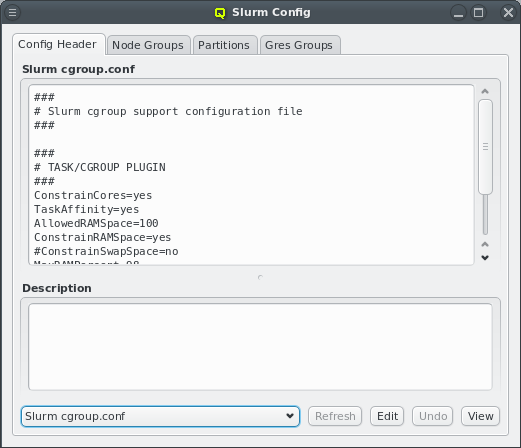
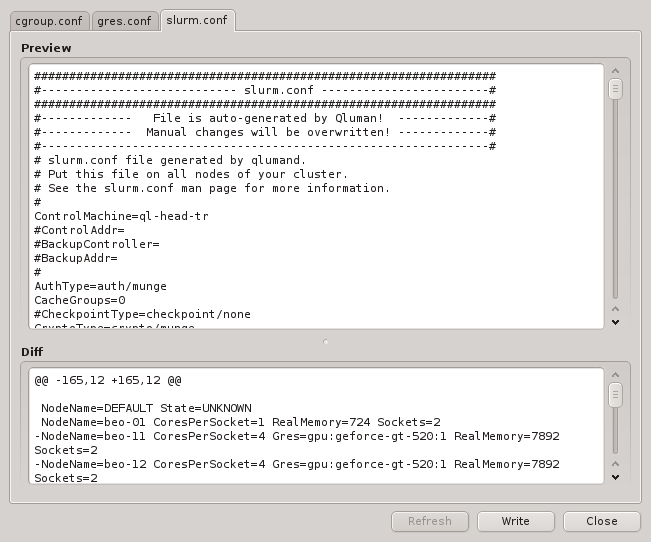
The overall slurm configuration is split into two templates, the slurm config and
cgroups.conf. On write, QluMan adds the NodeName and PartitionName lines at the end of the
slurm config template to generate the slurm.conf file, while the cgroup.conf file gets
written as is. For the syntax of both templates, please refer to the slurm documentation
(e.g. man slurm.conf). To edit one of the templates, select it, click the Edit button
and start making changes. Click Save to save the changes or Undo to discard
them. Use the Preview button to check changes before writing them.
Slurm Node Groups
Slurm node properties are configured from two sources:
a) The slurm node groups. Every host can belong to at most one such group. The membership is assigned (see Assigning Hosts to Slurm Node Groups, Partitions and Gres Groups) by adding the desired node group to the Config Set that is assigned to the node via its Host Template or via the alternative ways to assign config classes.
+
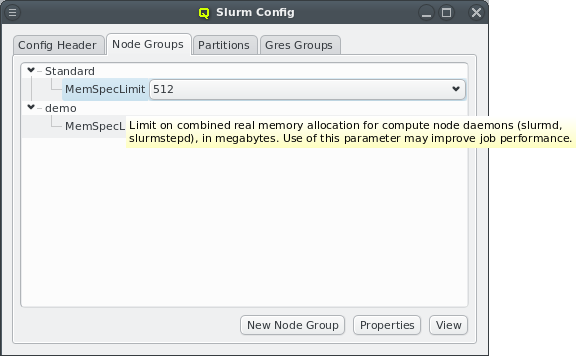
Each Node Group is a collection of slurm node properties, that will be set for the members of
the group. Per default, only the MemSpecLimit property is defined, but other properties like
Feature or Weight can be added by using the Slurm Property
Editor.
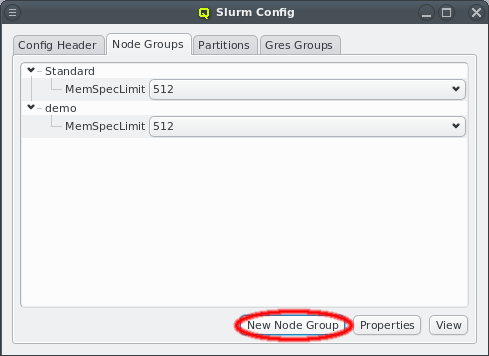
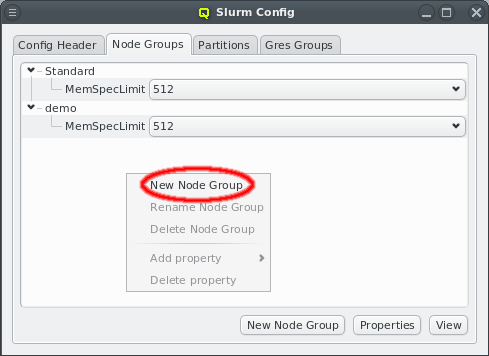

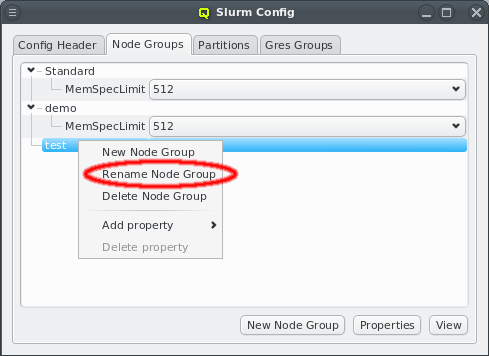
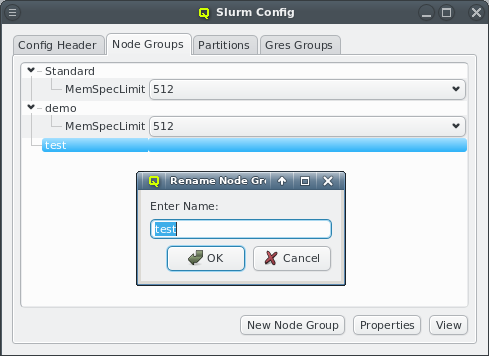
A new node group can be created by clicking the New Node Group button or selecting New Node Group from the context menu. This opens a dialog asking for the name of the new group. An existing node group can be renamed or deleted from the context menu.
The context menu also allows to add properties to a group. Note, that some properties are unique, i.e. only one value can be selected for the property. Adding a second value of the same property will automatically replace the old value in that case. Other properties are not unique. Adding multiple values to such properties results in a comma separated list of values in the
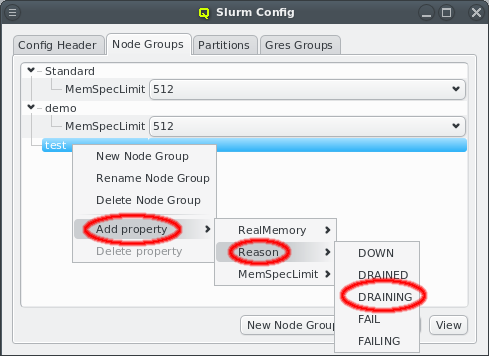
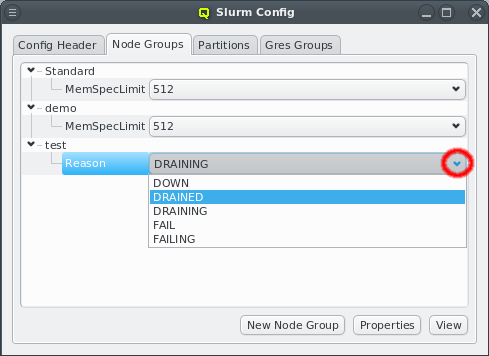
b) The slurm.conf file. An example for this is the Feature property. Properties can also be
changed directly using the pull-down menu. If a change will cause a duplicate value, the
previous (duplicate) value is automatically removed.
Slurm Partitions
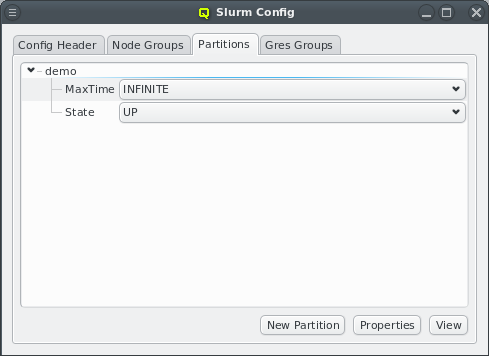
The management of Slurm partitions works exactly the same way as that of slurm node groups. Please see Slurm Node Groups for how to create, rename and change partitions.
Slurm Property Editor
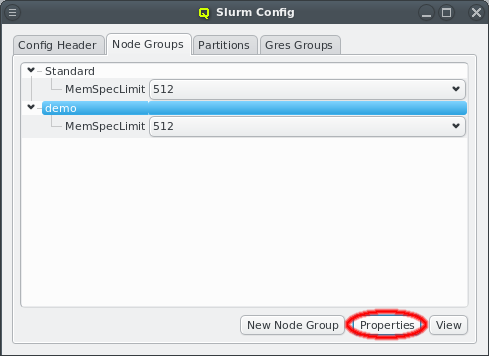
The Slurm property editor for node or partition properties can be opened by clicking the
Properties button at the bottom of the Slurm main dialog. If the Node Groups
tab is selected, the editor for node properties will be opened. If the Partitions tab is
selected, the editor for partition properties will be opened.
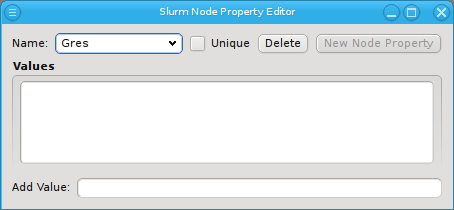
To add a new property, enter the name of the property in the name field. If the name does not already exist, the New Property button will be
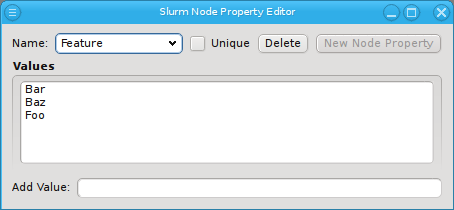
enabled. Click on it to create the property. QluMan has a white-list of known valid
properties, e.g. Weight and allows adding such a property without further questions. In this
case, QluMan will also set the unique flag and add all known property values automatically.
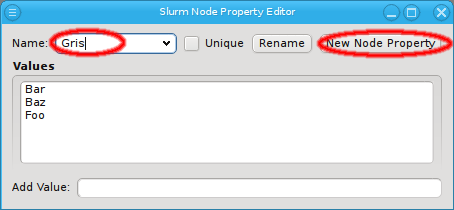
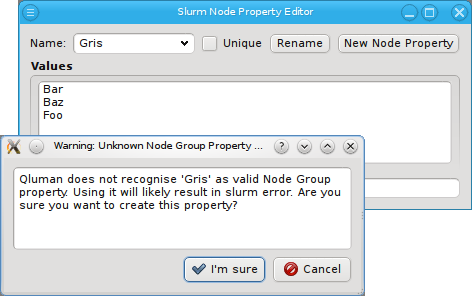
When a property is created that is not part of the white-list (Gres in the screenshot) a
dialog opens up, asking for confirmation. Note that adding an unknown property can lead to a
failure when trying to restart slurm. Therefore make sure to only add properties you are
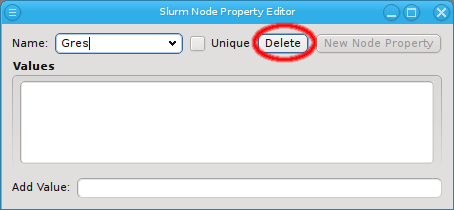
certain slurm will know about. A property without values can be deleted by clicking the
Delete button.
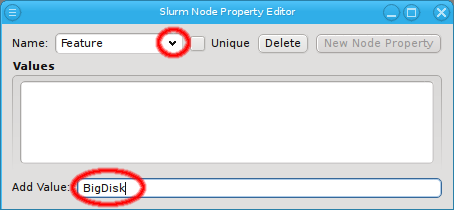
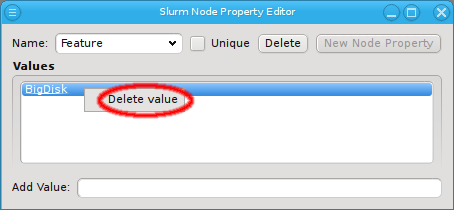
To add values to a property, first select the desired property using the pull-down menu from the name. Then enter the new property using Add Value at the bottom and finally press Enter to add it. To delete a value, select Delete value from the context menu.
Slurm Gres Groups
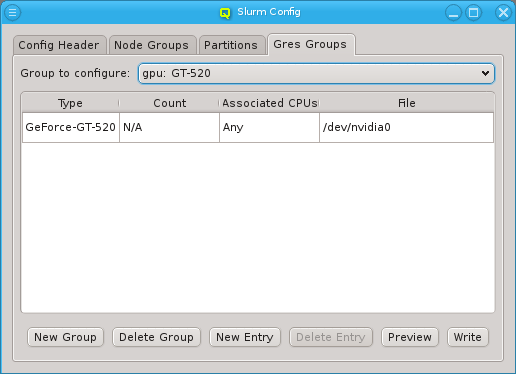
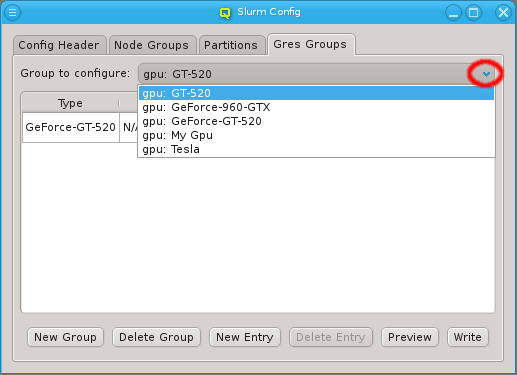
Currently, Slurm Gres Groups are used in Qluman mainly to handle the setup of GPUs for slurm. The GPU Wizard is the most convenient and accurate way to create such resource groups. Supplementing the wizard, the Gres Groups tab allows creating and managing any type of resource group, as well as binding GPUs to specific CPU sets, which is not possible via the wizard. To view or modify a Gres Group, select the group from the drop down menu. Use the Preview button to check the resulting config file changes before writing them.
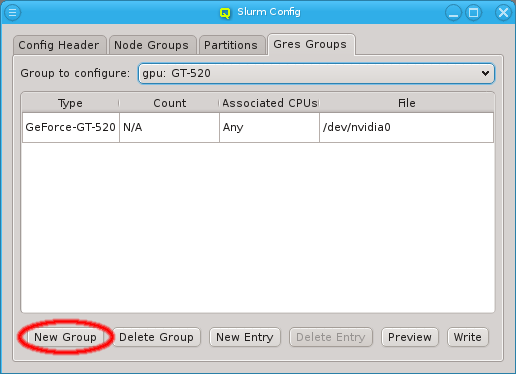
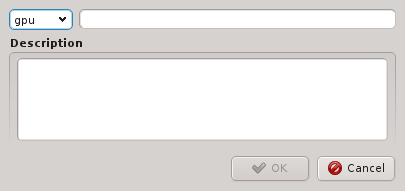
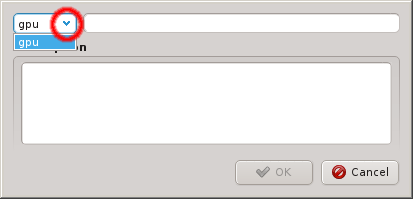
A new Gres Group can be created by clicking the New Gres Group button. This opens a dialog asking for the type, name and description of the new group. An existing type can be selected from the drop down menu or a new type can be
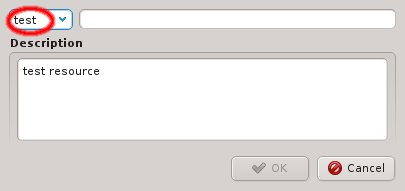
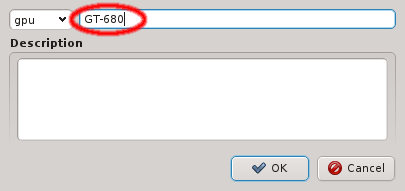
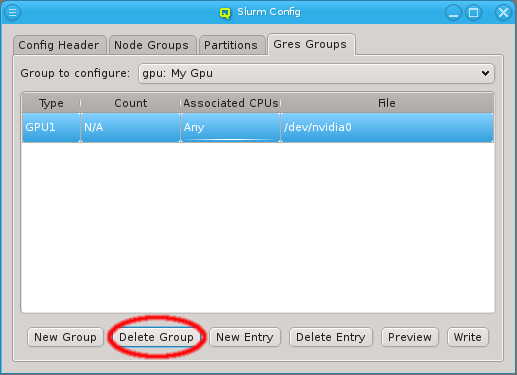
entered directly. After entering a new unique group name the OK button becomes selectable. A group that is not in use can be deleted by clicking Delete Group.
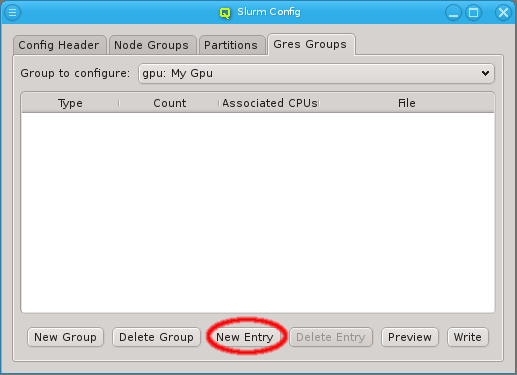
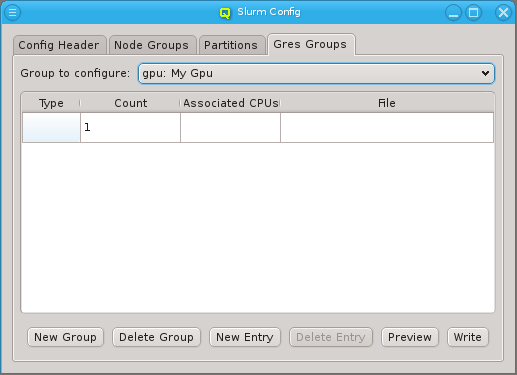
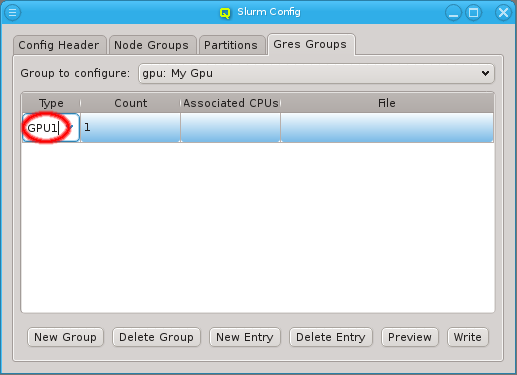
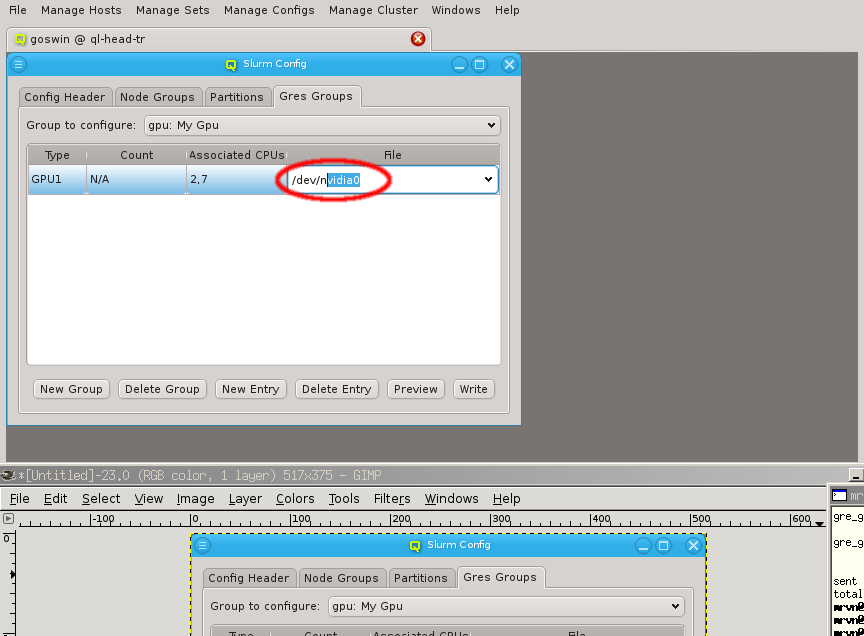
A Gres Group can have multiple entries. A new entry may be added to a group by clicking on
New Entry. Initially, the entry is blank and at least the type column must be
filled in. For resources that can be allocated in multiple pieces, a count can be set,
indicating the number of resource
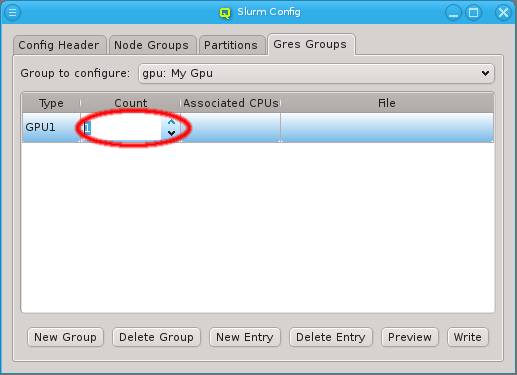
pieces available. For resources that have a device file associated with it, its path can be set
in the file column.
|
For resources that have an associated file, the count is not applicable, since there is always only exactly one file. |
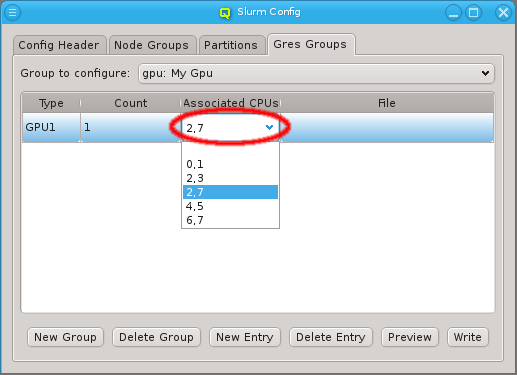
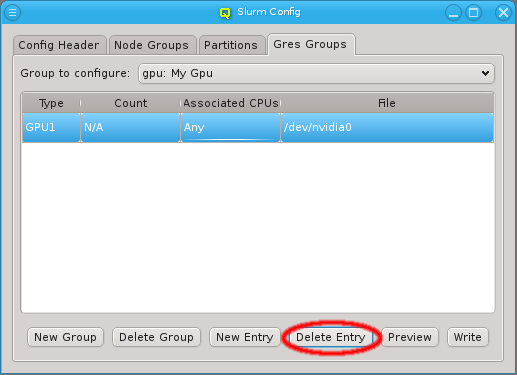
Optionally, an entry can also be associated with a set of CPUs. The CPUs to be used can be entered as a comma-separated list or, for recurring sets, selected from the drop-down menu. An entry can be deleted from the group by selecting Delete Entry. A group that is no longer in use can be deleted by selecting Delete Group.
Assigning Hosts to Slurm Node Groups, Partitions and Gres Groups
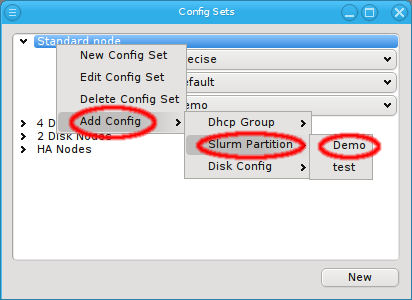
Hosts are assigned to Slurm Node/Gres Groups and Partitions by use of the global or a
Host Template (through its corresponding Config Set)
or by direct assignment, i.e. the standard
four levels of configuration. A Config Set may contain at
most one Node Group but any number of Gres Groups or Partitions,
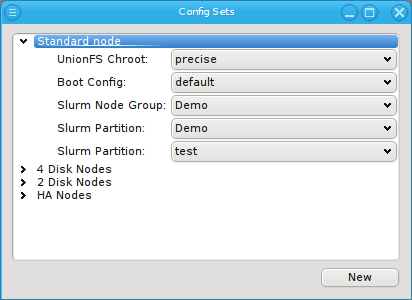
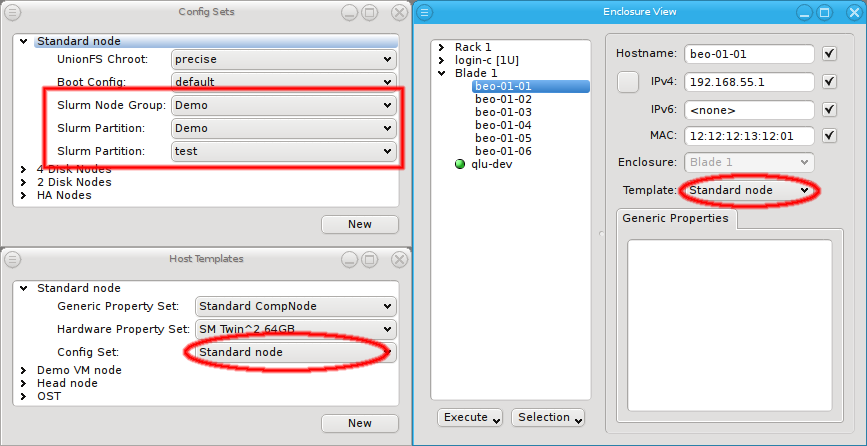
since a host can be member of an arbitrary number of Slurm partitions. They can all be assigned
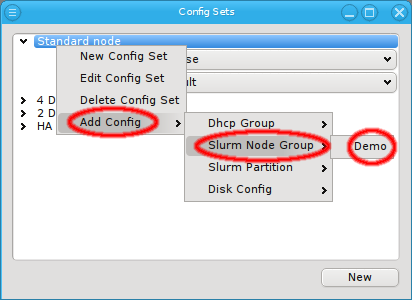
by selecting them via Add Config in the context menu of a Config Set or via the
Enclosure View context menu of the host(s).
|
The four levels of configuration allow overriding a setting in
one particular level with a different value in a higher level. They do not allow removing a
setting though. For this purpose, there exists a |
GPU Wizard
Purpose
When setting up Slurm, the basic node config is derived from the hosts Hardware Properties. However, configuring GPUs is more complex: This is done through the
Slurm Gres Groups as part of the slurm config class. Gres Groups
are used to specify the type and number of GPUs of a host. When submitting jobs that require
GPUs, this information is then used to determine the nodes that satisfy the job
requirements. All the necessary settings for the desired configuration of the nodes may also be
done manually and can be changed later through the slurm config dialog from the main window.
As a convenient alternative, the GPU Wizard guides you through the necessary configuration
steps. It uses the auto-detected GPUs of hosts to suggest their optimal configuration
options. Furthermore, it attempts to establish a balance between the available configuration
strategies: Using templates or individually assigned config sets and/or config classes.
|
For Nvidia GPUs to be detected on a host, it must have booted a Qlustar image that includes the nvidia module. Otherwise GPUs will be missed. Only nodes on which GPUs have been detected, can be configured through the GPU Wizard. |
Selecting Hosts
The first step in the wizard is to select the hosts that should be configured. Initially, the lists of hosts is empty. One or more of the four buttons at the bottom have to be pressed to pre-select hosts that should be considered.
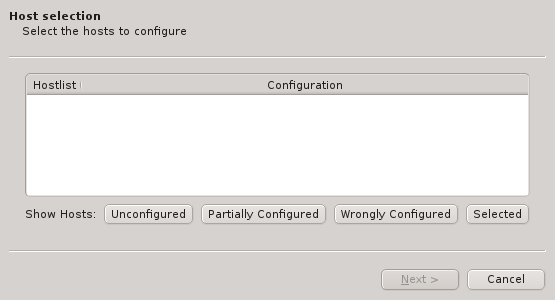
The Unconfigured button adds all hosts that do not have any GPU configured at all. The Partially Configured button adds hosts that already have some GPUs configured correctly, but not all of them. The Wrongly Configured button adds hosts, where the configured GPUs do not match the GPUs detected at boot, e.g. when the GPU cards have been swapped for a newer model on the hosts. Finally, the Selected button adds hosts, that have been selected in the enclosure view, including hosts that are already configured correctly.
|
Only hosts with auto-detected GPUs will be shown, even if others are selected. |
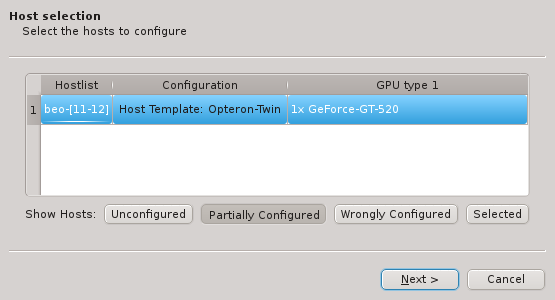
Once one or more of the buttons are pressed, the affected hosts will show up in the table. To keep things compact, hosts with identically detected GPUs are grouped together and shown in hostlist syntax. Select one of the shown groups by clicking on the corresponding row and then press Next to start the configuration.
Choosing the assignment option
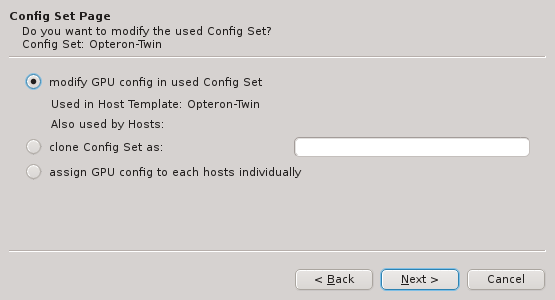
There are three different ways, how the GPU configuration can be achieved: On the wizard’s
Config Set Page you have the option to a) add (modify) the GPU config to the Config Set of
the currently assigned Host Template, b) clone the Config Set currently active or c) assign
Gres Groups directly to the group of selected hosts. Select the
desired method and press Next to continue to the next step.
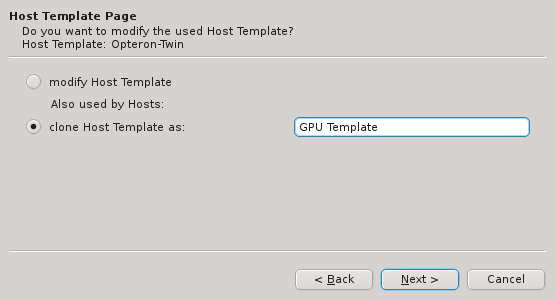
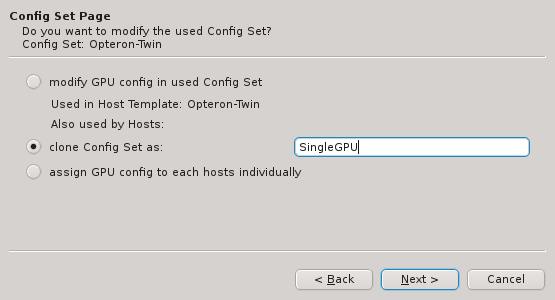
In case the clone Config Set option is selected, the Host Template Page will appear and
offer the choice to either modify the currently used Host Template or to
create a clone of it for further modification.
|
For the options that would modify an existing entity (Config set or Host template), the wizard dialogs always show other non-selected hosts, that would also be affected by the modifications. |
Creating/assigning Gres groups
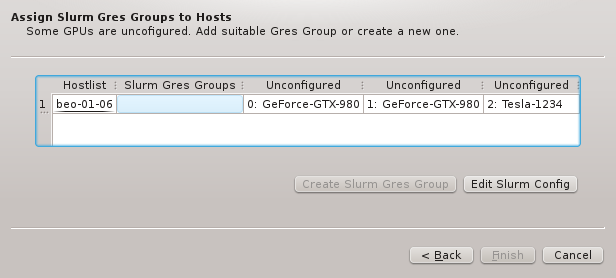
The next step is to possibly create and finally assign Gres Groups
to the list of selected hosts. The corresponding wizard page shows the unconfigured GPUs, each
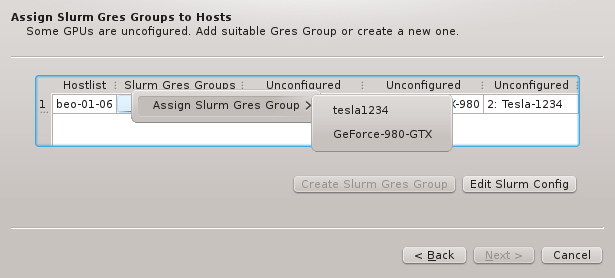
in a separate column. If an existing Gres Group exists that includes all or a subset of the
unconfigured GPUs, the context menu allows to select it. This would conclude the assignment
process.
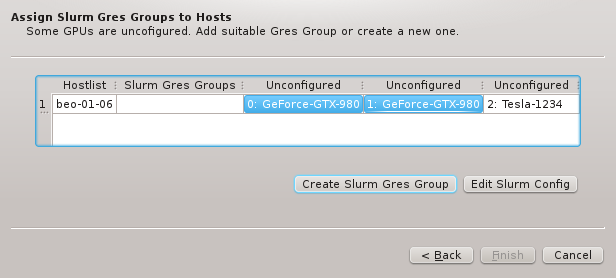

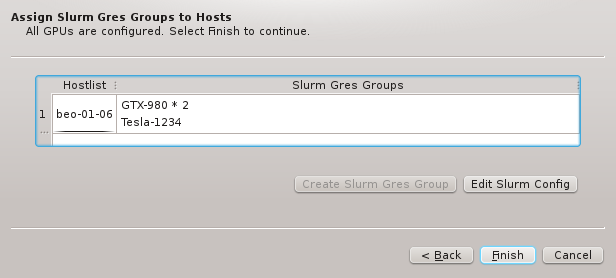
Alternatively, when one or more GPUs are selected, a new Gres Group can be created that the
GPUs will be a member of. The new group will have to be given a name and optionally a
description. Once all GPUs are assigned to a Gres Group, you can finish the process by pressing
Finish.

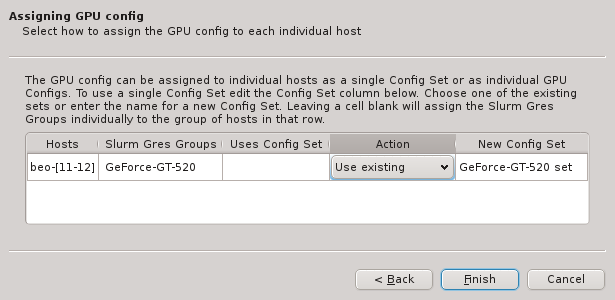
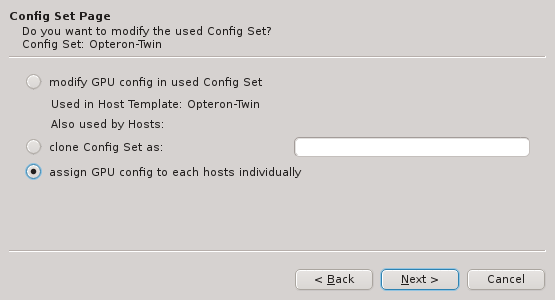
In case direct assignment has been selected, one more wizard page allows to fine-tune the
assignment. An additional Action column appears that allows to a) either use and assign an
existing Config Set, b) create and assign a new one
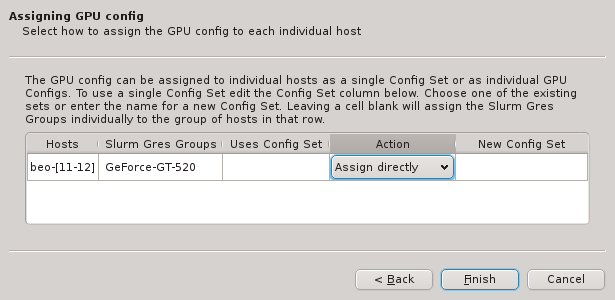
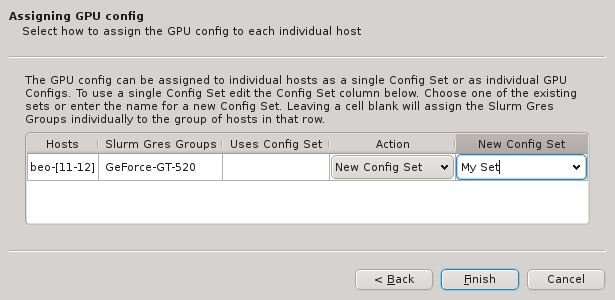
or c) directly assign the Gres Groups to the selected hosts. When choosing option b), the
blank field of the New Config Set column becomes editable by double-clicking.
Like with other properties, the optimal way for configuring (via template or different direct assignment variations) is often a matter of taste and a trade-off between simplicity, clarity and precision concerning your individual configuration policy.
Slurm Management
The QluMan Slurm Component provides extensive functionality to manage and operate most aspects and features of the Slurm workload manager. All QluMan Slurm functionality is accessible underneath the top-level menu entry.
The following management and operation sub-components are available:
Slurm Overview
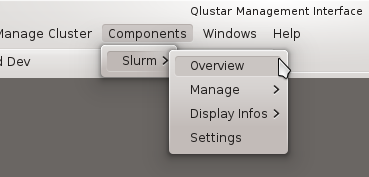
The Slurm Overview window provides a summary of the utilization of the cluster. It is split
into 2 parts: The Cluster Usage Overview tab and the Job Overview tab.
Cluster Usage Overview
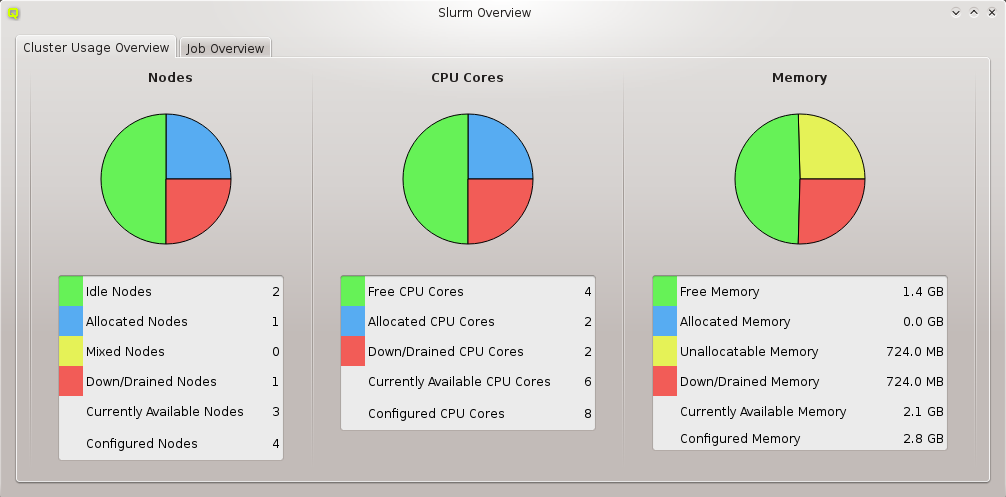
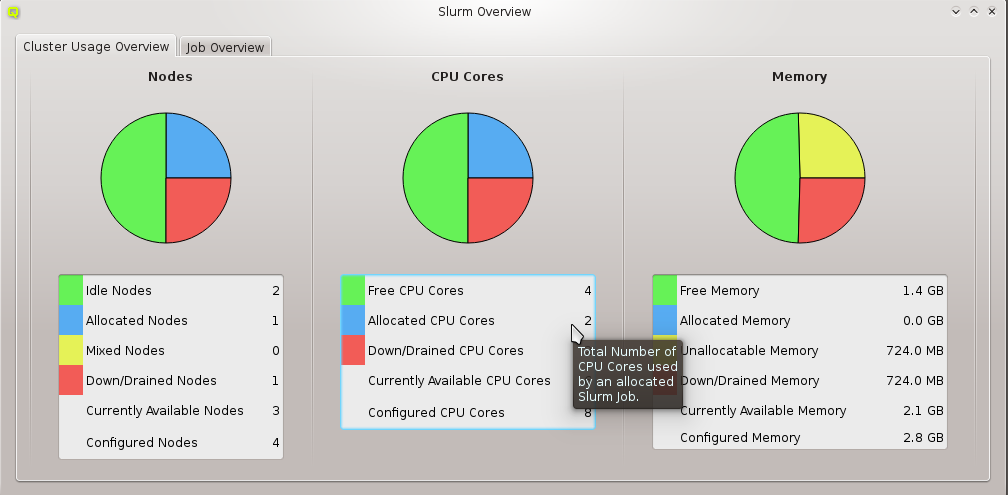
The Cluster Usage Overview provides continuously updated information and charts about Node,
CPU Core and Memory utilization by Slurm jobs. Every information field in the tables has a
tool-tip that supplies more detailed information about it.
|
The colors used in the |
Job Overview
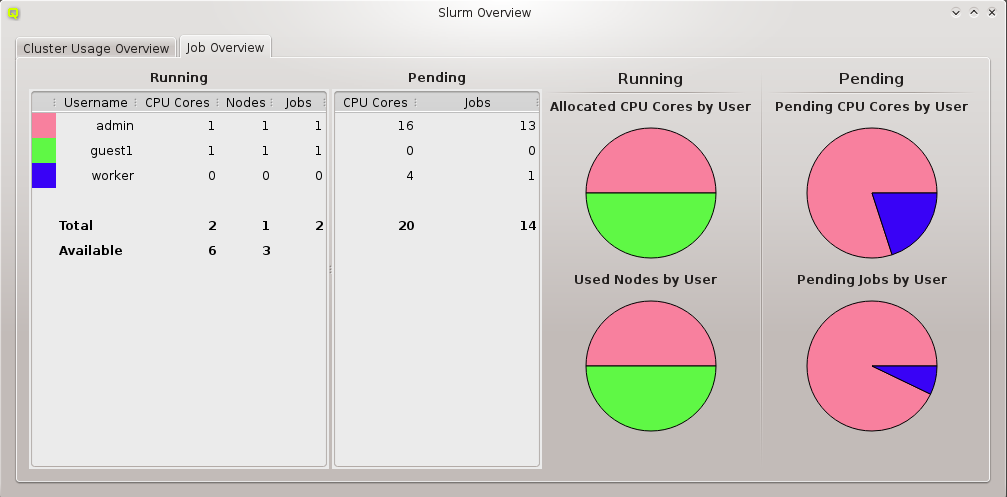
The Job Overview display consists of two tables and four charts being continuously
updated. The Running table provides summary information about running jobs of users. It shows
the color representing the user (if his share is displayed in one of the charts), his username,
the count of utilized CPU cores, the number of used nodes and the number of running jobs. The
Pending table provides the total number of requested CPU cores and the number of pending jobs
for the same user.
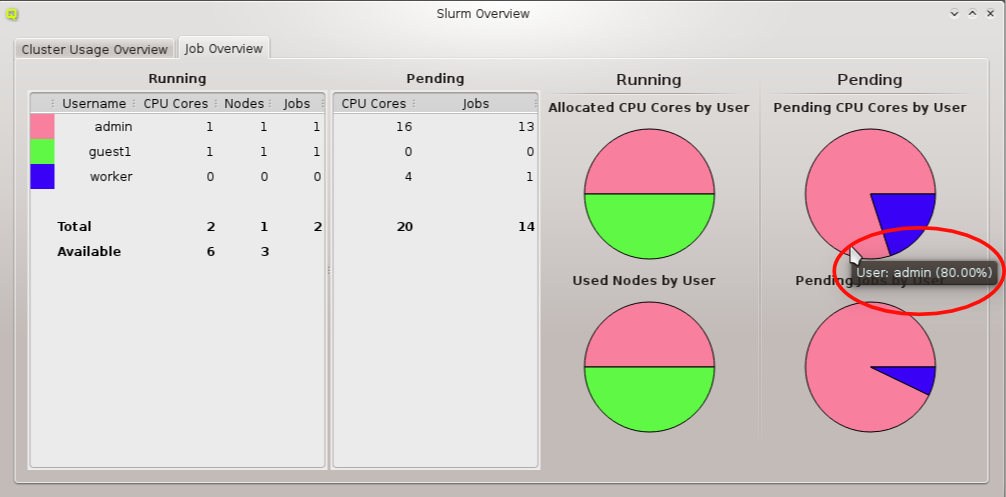
The job statistics is graphically displayed in the four pie-charts Allocated CPU Cores by
User, Used Nodes by User, Pending CPU Cores by User and Pending Jobs by User. Every
slice of the pie-chart has a tool-tip showing the name of the user it corresponds to together
with his share in percentage of the corresponding resource. The used colors change randomly
with every new invocation of the window.
|
Only the users with the highest percentage of jobs are shown in the pie-charts (a maximum of 10 users being displayed). |
Job
Management
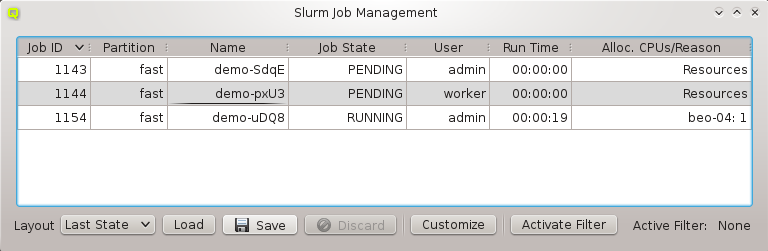
The Job Management window shows a continuously updated table with all current jobs of the
cluster. Since a single job has about 100 properties, every QluMan user is able to customize
the job properties he wants to be displayed and which ones should be hidden in the table (see
Customize Columns for more detailed information).
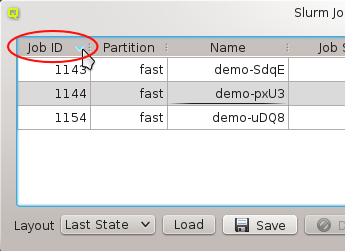
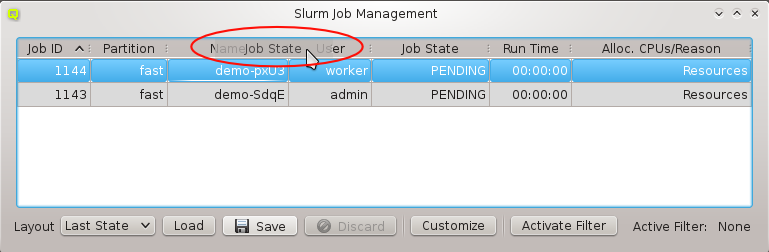
To sort the job table entries, one just has to click on the title of the property one wants to sort for (for example Job Id). Clicking the title again changes the sort order. You can also move a column with drag and drop and change its width.
These settings can be stored in layouts. Just modify the Job Management the way you want it and hit the Save Button. You can restore a layout by selecting it in the Layout combo box and press Load. When the Job Management gets opened it always uses the last state as layout. This is the layout that was set when you closed the Job Management the last time.
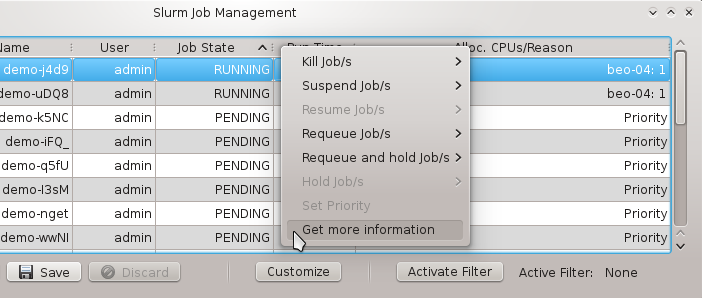
If you want to change the state of a job you just have to open its context-menu and select one of the following actions:
- Kill Job
-
This kills a job and sets its state to CANCELED.
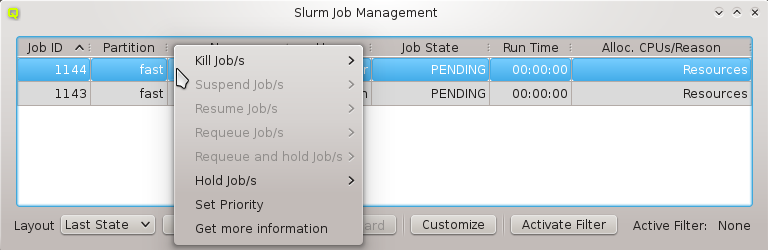
- Suspend Job
-
This suspends a job and sets its state to SUSPENDED.
- Resume Job
-
This resumes a suspended job and sets its state to RUNNING.
- Requeue Job
-
This kills a job and puts it back into the queue with state PENDING.
- Requeue and Hold Job
-
This kills a job, puts it back in the queue with state PENDING and places a hold on it.
- Hold Job
-
This prevents a pending job from getting started.
- Release Job
-
This releases a job that was in the HOLD state.
- Set Priority
-
This allows to manually set the priority of a job.
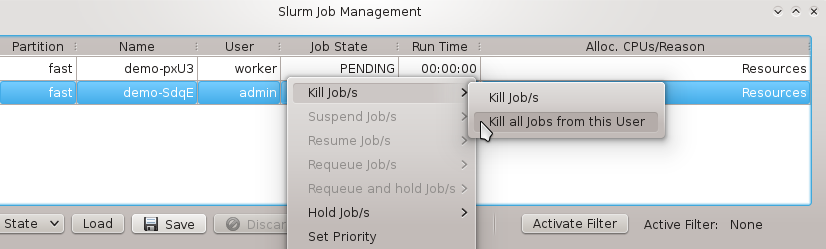
Depending on the state of a selected job some actions might be disabled (e.g. a job cannot be released if it wasn’t on hold before). As long as there is no conflict concerning their job states, it is possible to collectively manipulate either a list of jobs selected with the mouse or all jobs of the user of the currently selected job. If you want to get more information about a job, open the context-menu and select More Information (see More Job Information for details).
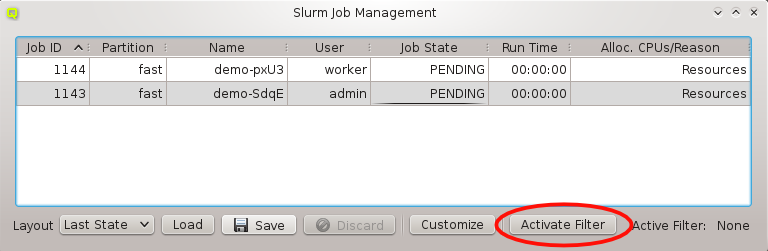
Clicking on Activate Filter at the bottom of the window, allows to activate one
or more custom filters (created using the Job Filter
Editor) by checking the corresponding entry. This can be useful to restrict the list of
displayed jobs according to some criteria (e.g. a certain user). All currently active filters
are shown in the bottom left corner of the Job Management window. They can be deactivated
again by unchecking their entry in the Activate Filter sub-window.
|
The column height of the job table is customizable in the Preferences Dialog. |
Customize Columns
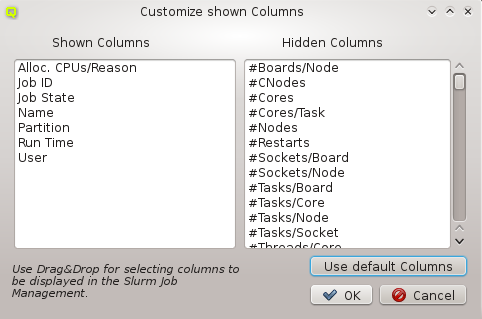
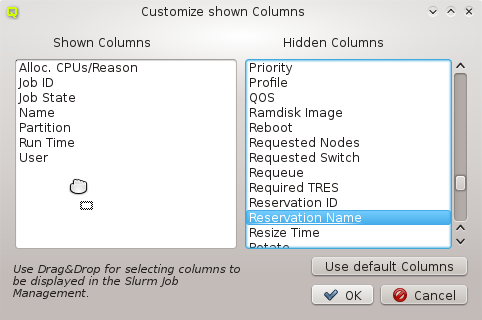
The Customize Columns dialog displays all known columns (properties of a job) in two
lists. The columns in the left list will be shown in the jobs table, the ones in the right list
won’t. To show or hide columns just select them and drag them either into the left or right
list. Confirm your changes with OK.
|
The order of the columns in the left list is not important, because it is not the order how
they will be shown in the |
More Information
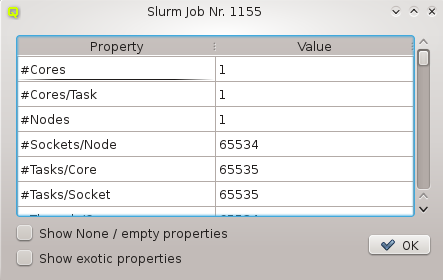
This dialog opens after you select Get more information in the context-menu of a job. It
shows the properties and their corresponding values of the selected job in a table. There are
two filters that may be applied: One is for hiding all properties with a value of 0, None,
False or empty, the other one for hiding exotic properties which one is rarely
interested in. Per default, both filters are enabled. To disable them, you have to check the
corresponding entry at the bottom of the dialog.
|
The column height of the table is editable in the Preferences Dialog. |
Activate Filter
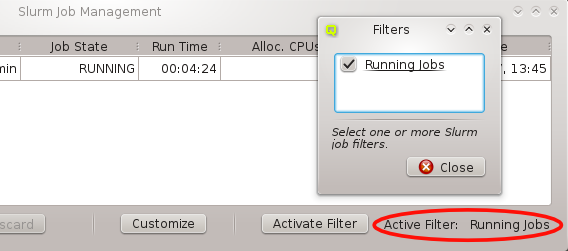
If you created some custom filters, they will be listed here (For information about creating
custom filters see Job Filter Editor). Select one or
more filters to be applied to the current job table. All active filters are shown as a
comma-separated list in the bottom-left corner of the Job Management window.
Job Filter Editor
As mentioned before, in the Job Filter Editor dialog it is possible to create custom filters
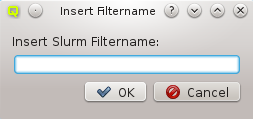
for the Job Management table. After it has been opened, a new filter may be created by
clicking New Filter and then insert a name for the filter. After confirming with OK the
filter is created and a new window comes up, where properties can be assigned to it. To add
properties, right-click for the context-menu and select the property you want to filter with.
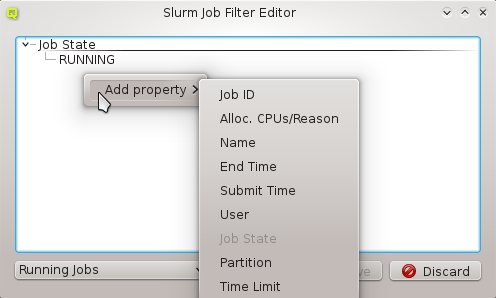
In the current example, we chose to filter by Job Id. A new dialog pops up. Now one can select a range of job ids to be displayed. Since a job id is always an integer, one has the option to select among the filter types between x and y, bigger than x and less than x.
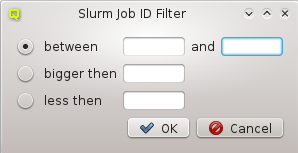
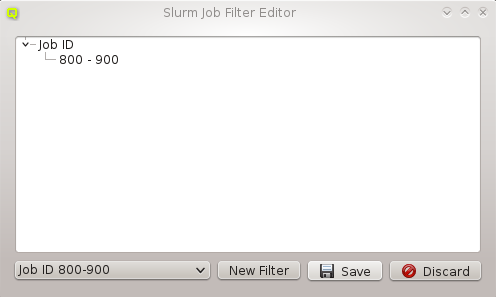
Choose the filter type you want, set the values and confirm with OK. Consequently, the property
is now part of the new filter. One can combine multiple properties in one custom filter. Each
additional property narrows down the possible jobs to be displayed. After adding all desired
properties, hit the Save button. Now the new filter can be applied in the Job
Management window.
Node State Management
The Node State Management dialog lists all hosts that are registered with Slurm. There are
three different kind of views showing the existing hosts. The color of the LED in front of the
hostname indicates the Slurm state a node is in. When hovering over a particular node, a
tool-tip describing the state appears.
- Partition View
-
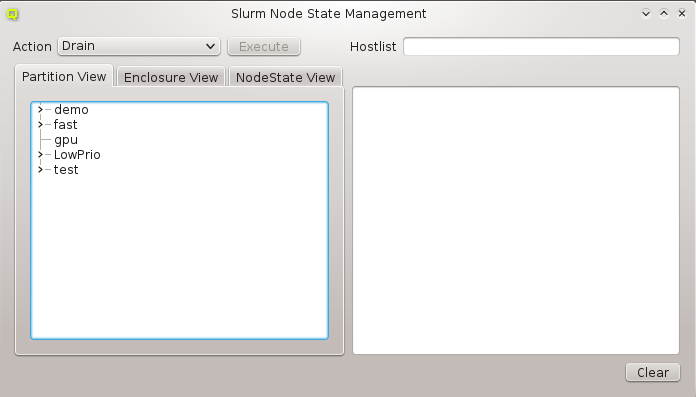 This tree shows all Slurm partitions and their assigned compute nodes when uncollapsed. This
can be used to act on all nodes found in one or more partitions.
This tree shows all Slurm partitions and their assigned compute nodes when uncollapsed. This
can be used to act on all nodes found in one or more partitions. - Enclosure View
-
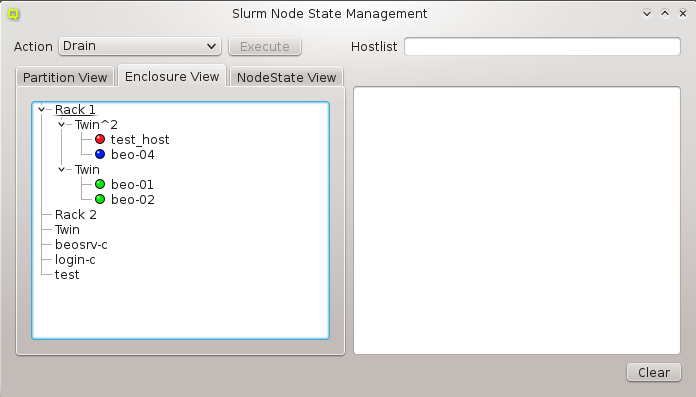 This tree has the same structure as the
 Enclosure Viewdialog. It is useful when acting on a group of nodes located in specific enclosures (e.g. to drain all nodes in a certain rack, because of a planned maintenance for that rack). - NodeState View
-
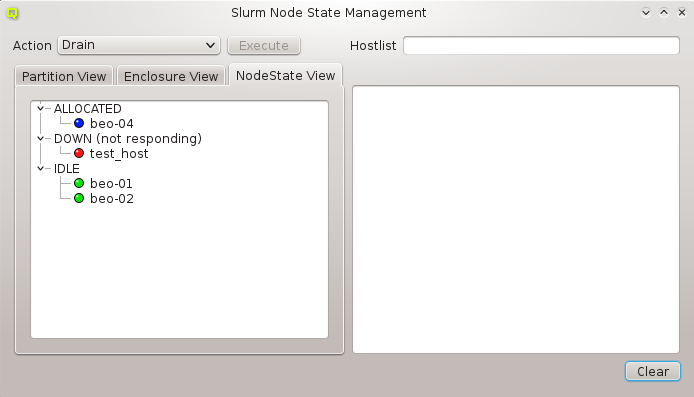 This tree shows all current node states in the cluster and their corresponding nodes when
uncollapsed. It can be used to conveniently act on all nodes in a specific state (e.g. to
undrain all previously drained nodes).
This tree shows all current node states in the cluster and their corresponding nodes when
uncollapsed. It can be used to conveniently act on all nodes in a specific state (e.g. to
undrain all previously drained nodes).
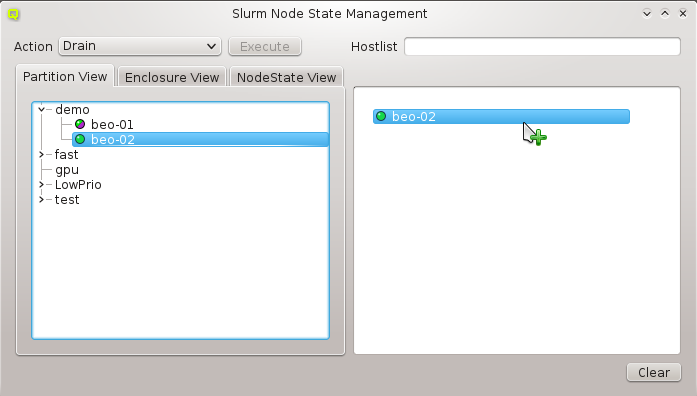
To manage one or more nodes, they have to be selected first. Use the preferred view and move the node(s) to the right list via drag&drop. One can also move a whole group of nodes, for example all nodes from a rack by dragging the name of the rack to the right tree. All nodes in this list are available for later actions. You
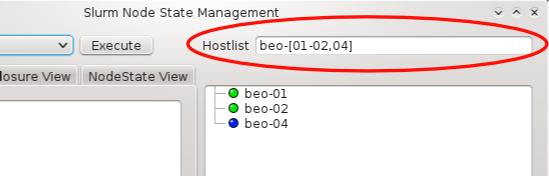
can also select multiple nodes for drag&drop or enter a hostlist in the Hostlist field
(e.g. beo-[01-04]). The nodes will appear in the right list, if the hostlist is valid.
There are seven possible actions that may be applied to the selected nodes:
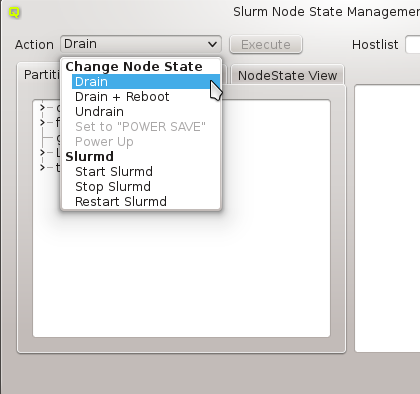
- Drain
-
The node is currently executing a job, but will not be allocated additional jobs. The node state will be changed to state DRAINED when the last job on it completes.
- Undrain
-
This will undrain all selected nodes.
- Set to POWER SAVE
-
The nodes will be put into power save mode. Power management mode needs to be configured in the slurm config for this to work.
- Start Slurmd
-
This starts the Slurmd on the selected nodes.
- Stop Slurmd
-
This stops the Slurmd on the selected nodes.
- Restart Slurmd
-
This restarts the Slurmd on the selected nodes.
Once the desired nodes are selected, an action can be chosen and then executed by clicking the Execute button. In case the action was operating on the nodes slurmd, an RXengine window comes up, in which one can track the success of the remote slurmd operation. To clear the complete list of selected nodes, one can click the Clear button. To remove only a subset of nodes, one can select them in the right list and remove them via the context-menu.
Slurm Reservations
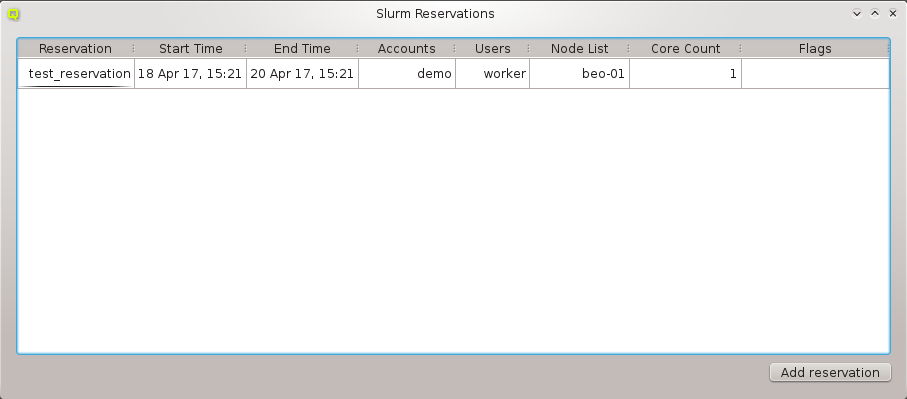
The Slurm Reservations window shows a table of all active reservations and their most
important properties. Furthermore, it allows to manipulate the reservations and create new
ones.
Creating a new Reservation
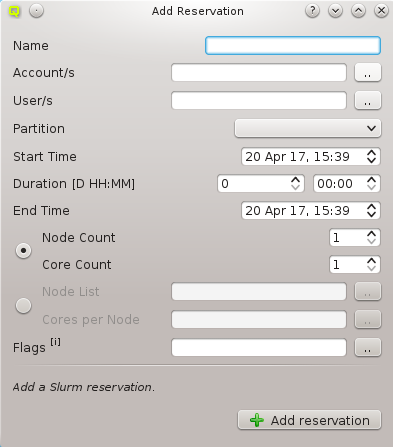
To create a new reservation, click the Add reservation button. A new dialog pops up. The following parameters can be specified:
- Name
-
Here a custom name can be specified for the reservation. If no custom name is given Slurm automatically creates one based on the first user or account name chosen for the reservation and a numeric suffix.
- Account(s)
-
To create a reservation, one has to either select one or more accounts and/or one or more users who will be allowed to use it. Select one or more accounts by checking their entries in the pop-up. All users of the selected accounts may utilize the reservation.
- User(s)
-
To create a reservation, one has to either select one or more accounts and/or one or more users who will be allowed to use it. Select one or more users by checking their entries in the pop-up. In case accounts are also set, the Select User dialog shows only the users belonging to the selected accounts.
- Partition
-
The partition the reservation applies to.
- Start Time
-
The start time of the reservation. The default value is now. By changing the Start Time, Duration or End Time all timing values will be recalculated.
- Duration
-
The duration of the reservation. Set a count of days and/or hours and minutes. By changing the Start Time, Duration or End Time, all timing values will be recalculated.
- End Time
-
The End Time of the reservation. By changing the Start Time, Duration or End Time, all timing values will be recalculated.
- Nodes and Cores
-
One may either choose to set a Node Count and Core Count or a fixed Node List and Cores per Node. In the former case, Slurm will randomly select the nodes and cores for your reservation. By choosing the second variation one can explicitly select the nodes for the reservation and the number of cores from every node.
- Node Count / Core Count
-
Number of nodes and cores to be reserved.
- Node List / Cores per Node
-
Identify the node(s) to be reserved. For every node you can set the number of cores.
- Flags
-
Flags associated with the reservation. The following flags can be set: +
-
ANY_NODES: Use any compute nodes
-
DAILY: Set DAILY flag
-
FIRST_CORES: Use only first cores on each node
-
IGNORE_JOBS: Ignore running jobs
-
MAINT: Set MAINT flag
-
OVERLAP: Permit to overlap others
-
PART_NODES: Use partition nodes only
-
STATIC_ALLOC: Static node allocation
-
TIME_FLOAT: Time offset is relative
-
WEEKLY: Set WEEKLY flag
-
Confirm by clicking the Add reservation button.
Updating a Reservation
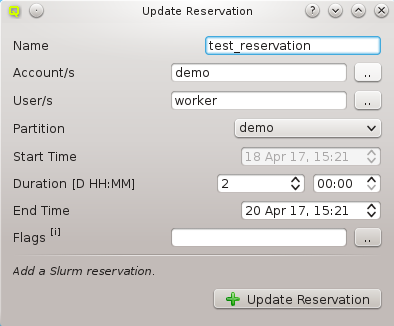
To update a reservation one just has to select it and open its context-menu. Choose Update Reservation. A window pops up with all the properties set to the values of the existing reservation. To modify the reservation just make the desired changes and click the Update Reservation button.
|
Not all properties are changeable. To edit the |
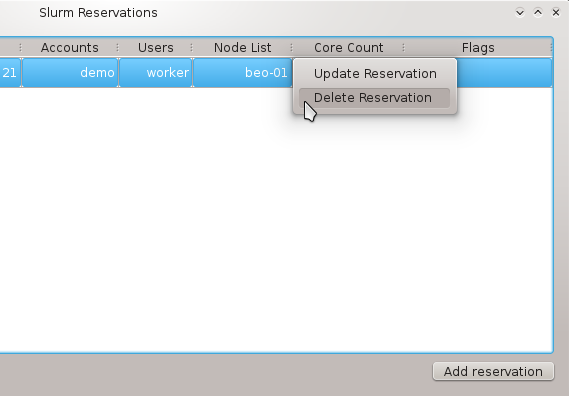
Deleting a Reservation
To delete a reservation one just has to choose Delete Reservation from its context-menu .
Slurm Accounting
Manage Slurm Accounts
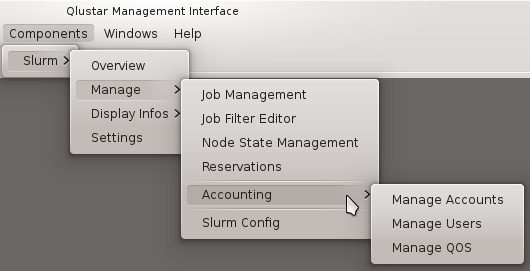
To open the Manage Slurm Accounts dialog select
. There
will be a tab for every cluster known to the Slurm accounting database. Each tab contains a
tree with the accounts and users that are registered in the corresponding
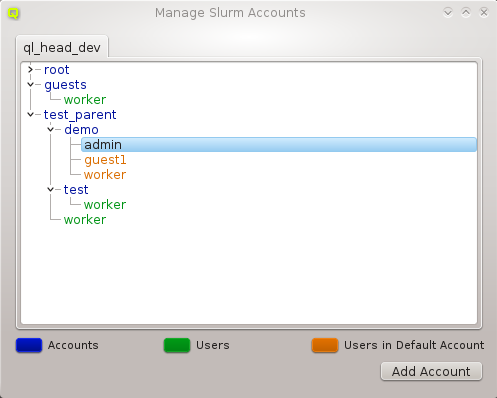
Slurm instance. To better distinguish between accounts and users, they are identified by pre-defined color codes (See Preferences Dialog for changing the corresponding colors). At the bottom of the dialog you can see a legend for the color codes.
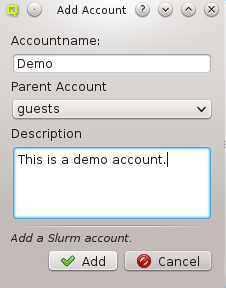
Adding an Account
Clicking the Add Account button will open a new dialog. Here you have to specify
a name for the new account. Optionally, you can also specify a parent account and a
description. If an account had been selected before, the Add Account button was clicked, this
account will be pre-filled as the parent account. When you are finished, confirm with the OK
button.
|
Account names have to be unique! |
Deleting an Account
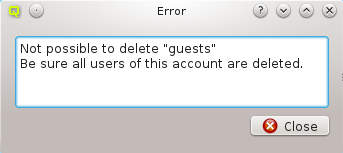
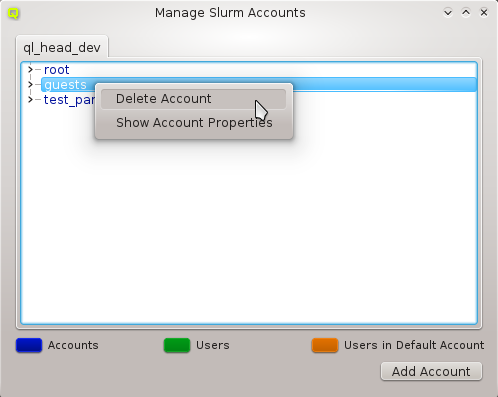
Before being able to delete an account, it has to be assured, that the account contains no more users (See below to learn how to remove users from an account). Optionally, one can remove users from an account in the Manage Slurm Users dialog.
After all users are removed from the account, one can delete it via its context-menu by selecting Delete Account.
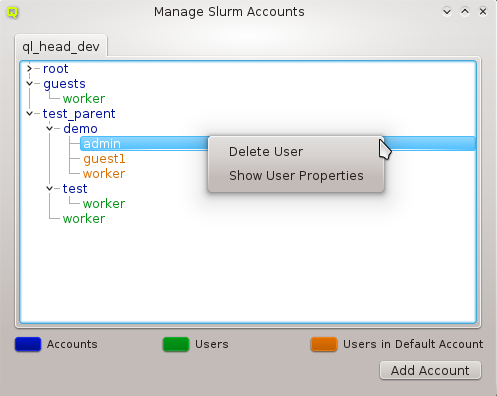
Deleting a user from an Account
To delete a user from an account use its context-menu and select Delete User.
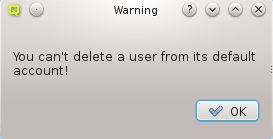
|
You can’t remove a user from his default account. First change the default account of the user and then delete the old one. |
Show Account/User Properties
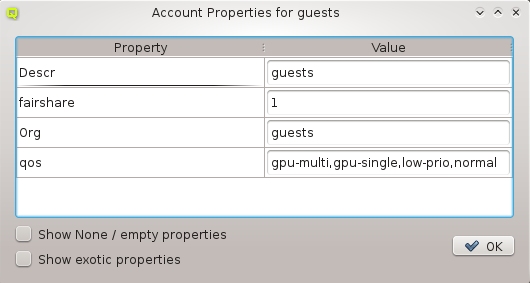
To show the properties of an account or user bring up its context-menu and select
Show Account Properties or Show User Properties depending on what
was selected. Two filters are available in this dialog: One for hiding all properties with a
value of 0 or empty and one for hiding exotic properties which are not of interest in most
cases. By default, both filters are enabled. To disable them, their corresponding entry has to
be checked at the bottom of the dialog.
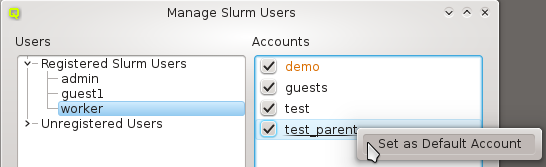
Manage Slurm Users
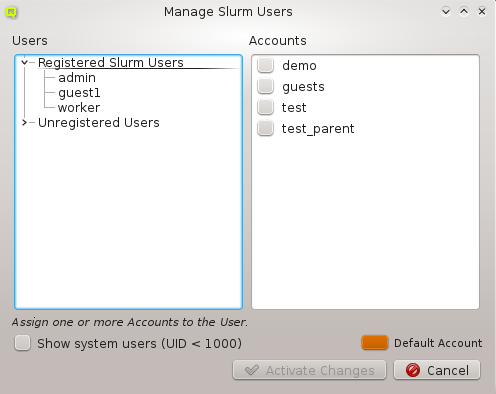
The Manage Users dialog allows to assign accounts to a user, set and change a user’s default
account, register new users and delete users. When a user is selected, the accounts he is a
member of are checked in the Accounts list displayed at the right. His default
account is highlighted with the specific color set for default accounts in the
Preferences Dialog. By default, system users are hidden. To show
them, just check the Show system users (UID < 1000) checkbox.
Registering a User with Slurm
To register a user with Slurm, uncollapse the Unregistered Users and select the desired user. Every user needs a default account, so this has to be defined first. To do so, select Set as Default Account in the context-menu of the account you want to be the default. By doing this, the user will be registered with this default account. If you just select some accounts for an unregistered user by checking them and then pressing the
Create button, the user will be registered with a default account set randomly among the chosen ones.
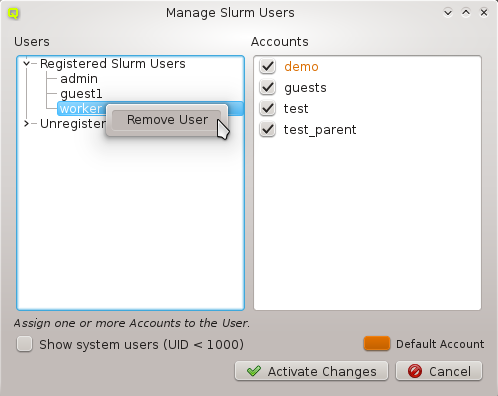
Deleting a User
To delete a user, bring up his context-menu and select Remove User.
|
Be sure that the user has no active jobs. |
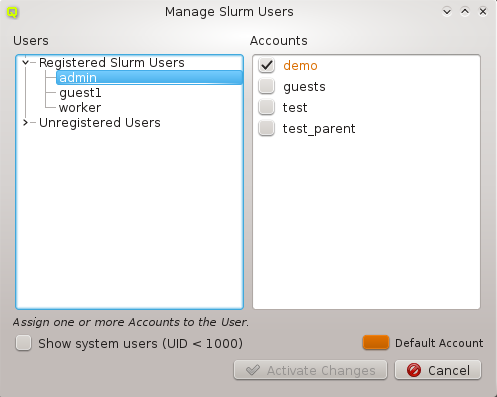
Assigning a User to Accounts
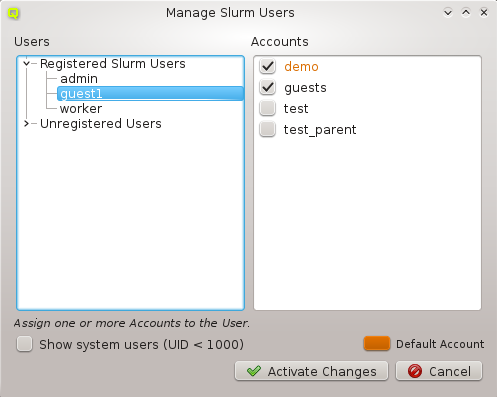
Selecting a registered Slurm user displays the accounts he is member of in the Accounts list to the right. To add/remove him to/from an account (un)check it and hit the Activate Changes button.
Changing the Default Account of a User
To change the default account of a user, select him in the Registered Slurm Users tree and bring up the context-menu of the account you want to set as the new default. Then select Set as Default Account.
Cluster Usage
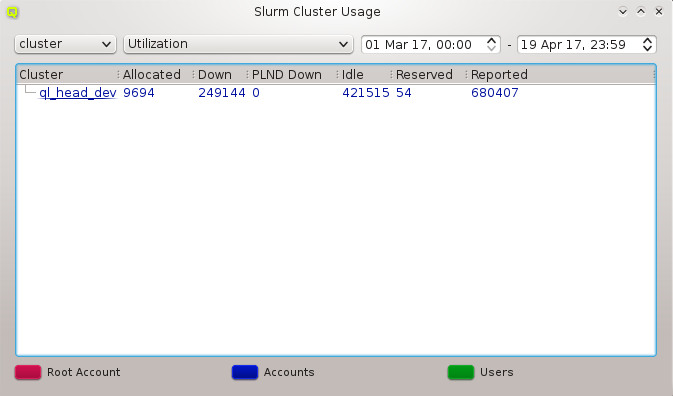
The Cluster Usage display uses the Slurm utility sreport to generate reports of job usage and cluster utilization. For detailed information about the type of reports and options read the sreport manpage. Select your report type (for example _cluster_) in the left combo box and then the report options from the combobox right to it. Per
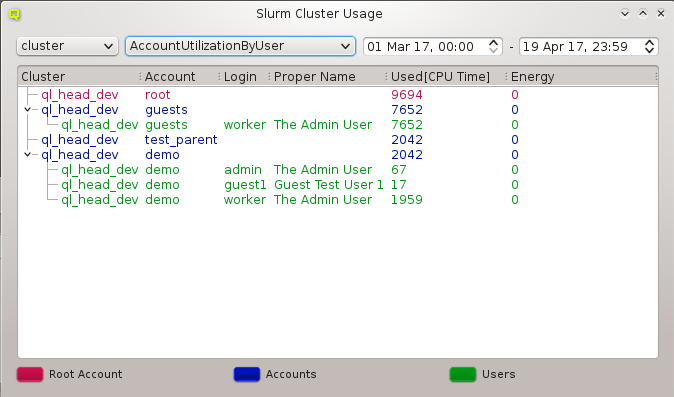
default the time period used for the report is the past day. You can change this by modifying the start and the end time. The colors used in the window are customizable in the Preferences Dialog.
|
sreport will only be able to show utilization data if Slurm Accounting is activated. This is the default on Qlustar clusters. |
Fair Share
The Fair Share view uses the Slurm utility sshare to display Slurm fair-share
information. We provide two versions of views, a basic and a long one. The long version shows
additional information that is needed less often. By default we show the basic view, but you
can easily switch by checking the long checkbox at the bottom right of the
window.
Account View

The Account View shows the Slurm fair-share information for all registered Slurm accounts. The used colors are customizable in the Preferences Dialog.
Detailed Account View
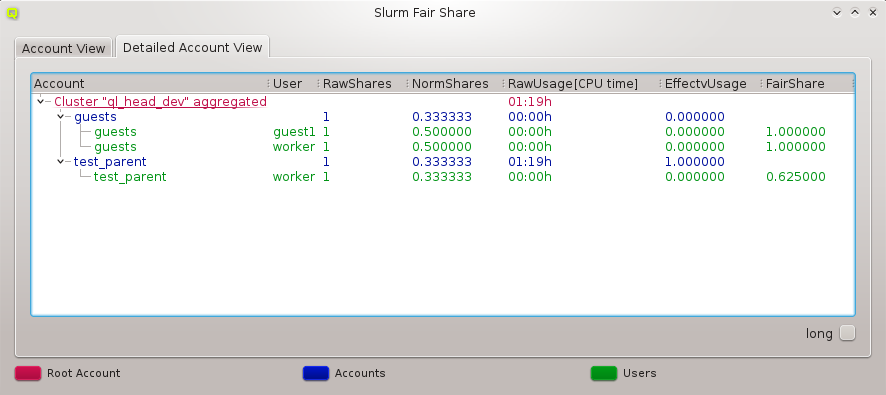
The Detailed Account View shows the Slurm fair-share information for all registered Slurm accounts including the information for individual users that are member of the accounts. The used colors are customizable in the Preferences Dialog.
For more information about sshare and the meaning of the displayed quantities, read the sshare manpage.
|
sshare will only be able to show fair-share data if the fair-share option is activated in the Slurm config. This is the default on Qlustar clusters. |
Job Priorities
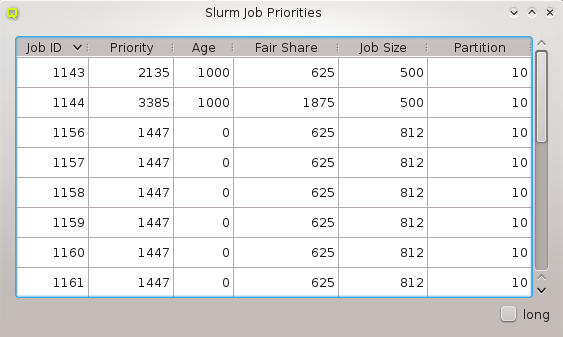
The Job Priorities dialog uses the Slurm utility sprio to display the values of the individual factors that are used to calculate a job’s scheduling priority when the multi-factor priority plugin is installed. This is information needed, when analyzing why certain pending jobs run earlier than others.
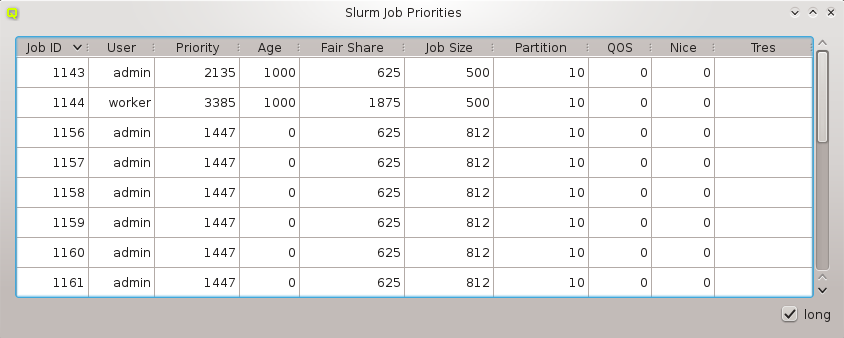
We provide two versions of the view, a basic and a long one. The long version shows additional information that is needed less often. By default we show the basic view, but you can easily switch by checking the long checkbox at the bottom right of the window. For more information about sprio read the sprio manpage.
QluMan Slurm Settings
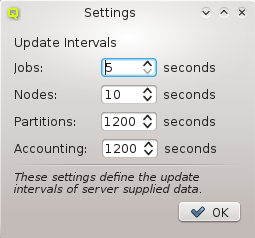
The QluMan Slurm Settings dialog allows to customize the update intervals for information about jobs, nodes, partitions and Slurm accounting. This information flow is provided by the QluMan Slurm daemon running on the cluster and the QluMan GUI automatically subscribes to it. Shorter update intervals mean more server load and more network traffic. In most cases, the default values should be adequate.
|
Whenever you modify some property/value in the QluMan GUI for example for a job the GUI will always get an immediate update for that. The update intervals only affect changes that are not the consequence of an explicit action by a QluMan user. |