Installation Guide
1. Installation Requirements
To install the Qlustar OS you need:
-
A DVD or a USB flash-drive (minimum size 1GB) loaded with the Qlustar installer
-
A 64bit x86 server/PC (or virtual machine) with:
-
At least two network adapters.
-
At least one disk with a minimum size of 160GB.
-
Optionally a second (or more) disk(s) with a minimum size of 160GB.
-
A CPU supporting virtualization (only for virtual front-end and demo nodes).
-
A minimum of 1GB of RAM, but 2GB if you choose a virtual front-end node and an additional 1GB for each demo node you want to run simultaneously.
-
Internet connection.
-
|
The only virtual machine (VM) we test the installation process on is KVM. Hence, this is the only VM officially supported by Qlustar. Furthermore, while nesting of VMs is supported, it will be rather slow to start a virtual front-end node or a virtual demo-cluster directly from within a head-node that is itself running as a VM. |
|
The Qlustar kernel is configured for cluster server hardware. Hence, it’s possible, that drivers for some network or storage adapters on Laptops or other non-server PCs are missing. If you run into such problems, please post it in the Qlustar Mailing List. At this stage, Qlustar also has no support for secure boot, but fully supports UEFI otherwise. So make sure that secure boot is disabled in your BIOS settings. |
2. Loading the installer to a USB flash-drive
The Qlustar installer is provided as an ISO image, that can be burned onto a DVD or be loaded onto a USB flash-drive. This section explains the USB method. If you already have an up-to-date Qlustar USB drive you can skip this step. But make sure that you have the latest installer to be found at the Qlustar website.
|
After downloading the installer image, verify its integrity, by executing the following command: 0 user@workstation ~ $ sha256sum qlustar-installer.iso Now compare the such-generated checksum with the value that is published at the above download page. If the checksums are not identical, do not proceed with the installation, since that means the installer is corrupt (either due to hardware errors or a malicious attack). In this case, you should download the image once more. If the problem persists, also after downloading from a different computer, please post the incidence in the Qlustar Mailing List. |
With the downloaded disk image you can easily create a bootable drive under Linux as follows
(note that the USB drive should have a minimum size of 1GB): Given that the downloaded
installer image file is named qlustar-installer.iso and that the device name of the drive is
/dev/sdb, the following command (executed as root) will load the image to the flash-drive:
0 root@workstation ~ #
dd if=qlustar-installer.iso of=/dev/sdb
Depending on the speed of your flash-drive, this can take up to 20 minutes.
|
The above command will destroy all data on the USB drive or to be more precise, it will destroy
the data of the device named |
This can be achieved e.g. by executing the command
0 root@workstation ~ #
tail -f /var/log/kern.log
at the shell prompt before you insert the drive. Just after you have inserted it, a message like
[sdb] Attached SCSI removable disk
should appear. In this case your USB drive would have the device name /dev/sdb. If the above
dd command finished successfully, you can use the drive to install the Qlustar OS on the
target machine. This is described in the next paragraph.
3. Installation process
Step by step instructions
-
Booting from the USB Drive
Insert the drive into the server that you want to install the Qlustar OS on and boot. Make sure to select the USB drive as the boot device, either by entering the BIOS and changing the boot order, or by entering a boot menu and then selecting the drive. On some BIOSes, the latter is achieved by pressing the key F7 or F12.
-
Starting the installation process
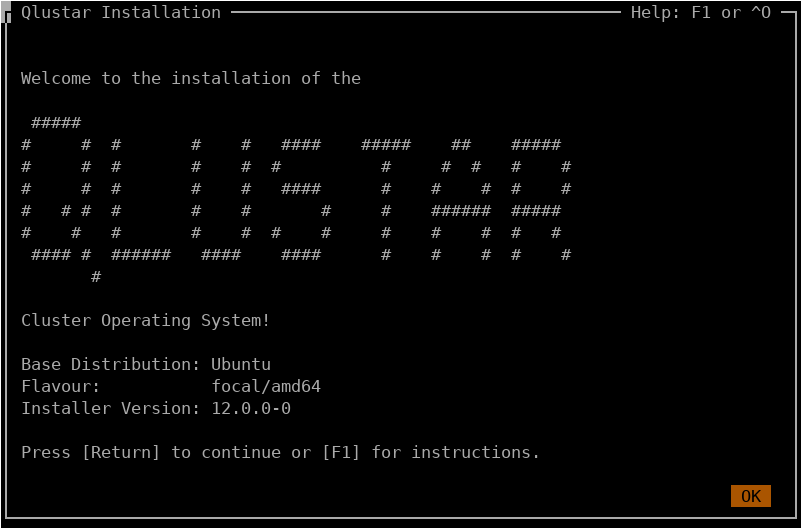
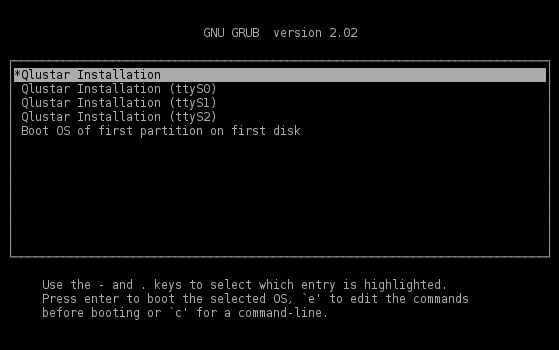
When the server boots from your drive, it will present a menu with various alternative boot options of which the first is highlighted (see picture). If you install via a serial console (e.g. IPMI serial-over-LAN), select the correct entry (ttyS0/1/2) depending on your hardware setup. Press Enter to start the installation. After the kernel was loaded, you will see the kernel messages on the screen followed by some messages of the installation system. Finally, the installer will present its welcome screen at which you can start the setup process by pressing Enter.
The installer is running in a screen session with the screen command character being remapped to Ctrl-t. Hence, if you need to start a shell during the installation process, you can do so at any time after the welcome screen has popped up by typing Ctrl-t c (this opens a new screen window) and then executing bash. An arbitrary number of additional screen windows can be opened this way. To switch back to the main installer window type Ctrl-t 0. To cycle between possible other additional screen windows type Ctrl-t n.
-
Localization settings
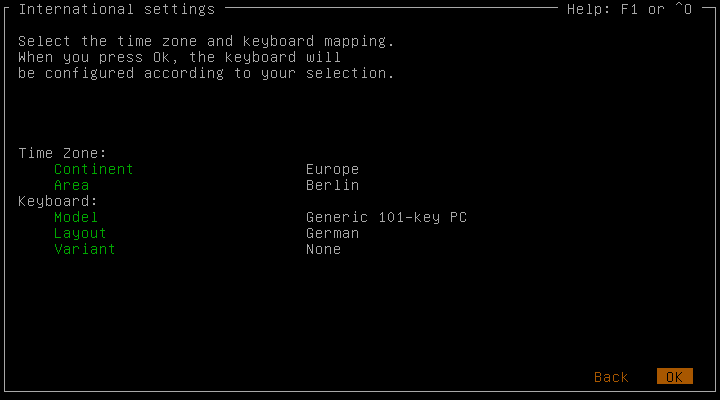
In the first screen you can select the timezone and keyboard mapping. After you have made your choices, selected OK and pressed Enter, the keyboard mapping will be configured according to your choice. If you have selected a wrong mapping, the keyboard will not function properly. If this is still the case after changing the mapping to the correct value, you will have to reboot the server and start the installation from scratch.
-
Disk Configuration
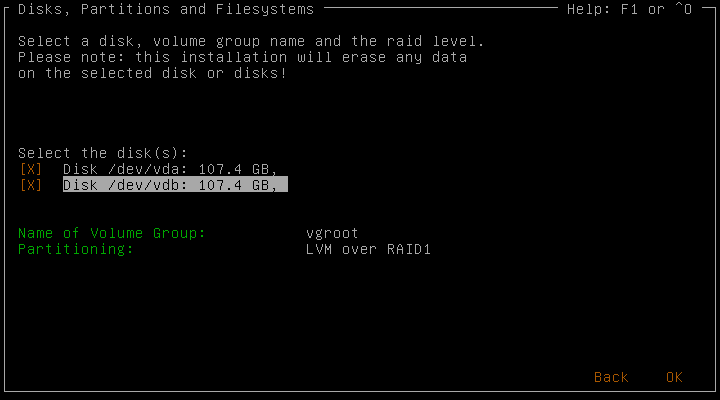
In this screen you can select the disk(s) to install Qlustar on. If there is more than one disk in the system, you can select multiple disks and create a RAID array (different RAID levels can be chosen depending on the number of the disks available). The chosen disk (or created RAID device) will then be used as a LVM physical volume to create a LVM volume group (the name of which can be specified). Four ext4 file-systems (
root,var,tmp,apps) will automatically be created on equally named LVM logical volumes within this volume group. -
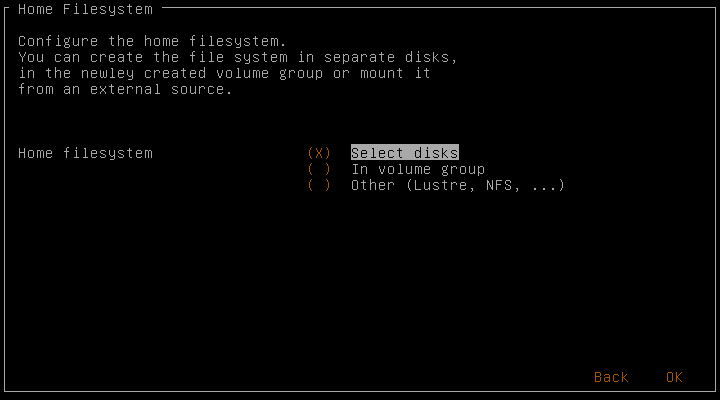
Home File-System
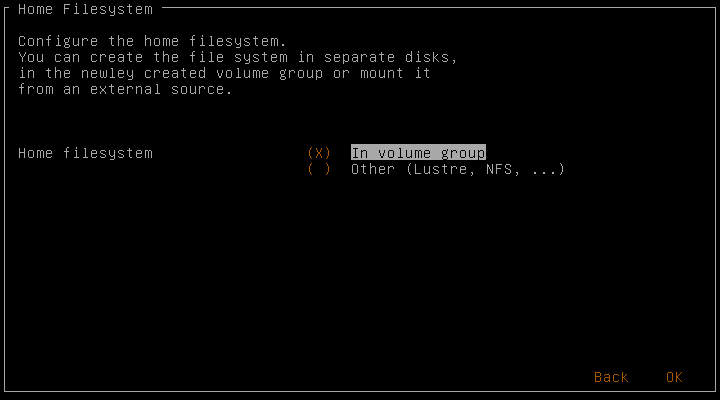
A separate file-system is used for the home directories. If there are additional unused disks in the system you are offered the choice to use them in the next screen. If not, you can use the previously configured volume group for this additional file-system. If you choose Other, then no configuration for a home file-system will be done. In this case, you won’t be able to add any cluster users without further manual steps to setup a home file-system.
-
Home File-System on separate Disks
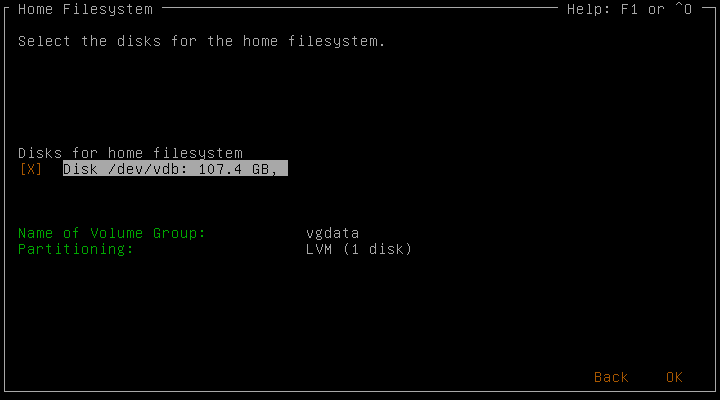
This screen only appears if you have selected Select disks in the previous step. You can choose the disks and possibly the raid level to use for the home file-system similar to the previous dialog.
-
Network Settings (1)
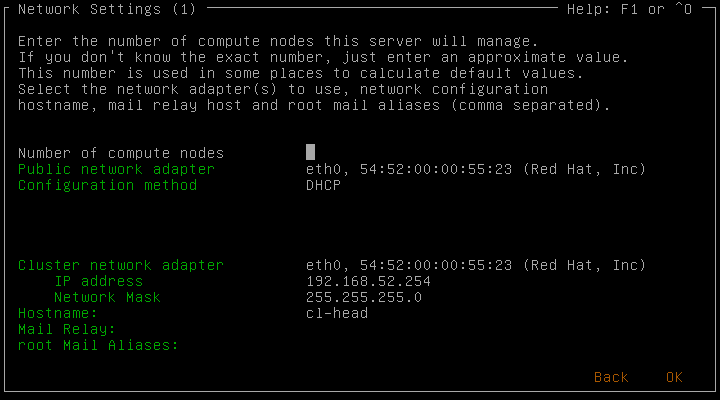
In this screen, you configure the IP addresses for the cluster and public network. The installer has some logic to check for valid network configuration parameters as well as suggesting reasonable values. The chosen number of compute nodes NK in the cluster determines the suggested cluster network address and other parameters. It doesn’t have to be accurate, just an approximate number will do.
Note that Qlustar requires cluster-internal IP networks to be in a non-public range. If you’re unhappy with the range suggested, you can change NK to another number (e.g. NK=1000 suggests 10.x.x.x, NK=200 172.16.x.x and NK=16 192.168.x.x).
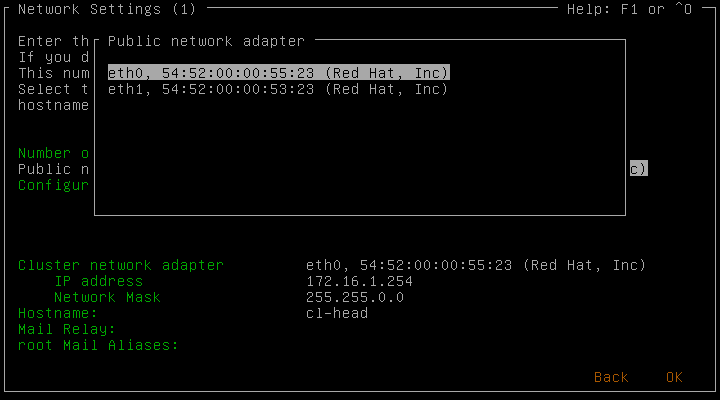
You can also set the hostname (associated with the public IP) for the new head-node. The name of the head-node’s cluster-internal interface is beosrv-c. Note that two network adapters are necessary for proper operation of your cluster.
It’s important that you correctly identify external (public/access to the Internet) and internal (cluster) network adapters. If you select DHCP as the configuration method for the public interface, make sure to add its IP address later to the corresponding Network Config in the graphical QluMan GUI. If you don’t have any special reason for changing the suggested address/netmask of the internal adapter, we recommend to leave them unchanged.
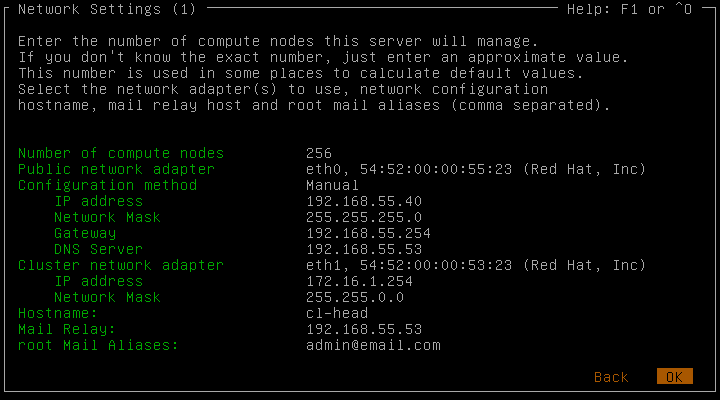
Postfix is running on the head-node as the central mail transfer agent. You need to specify a mail relay host (either by name if resolvable via DNS or by IP) in your LAN, where mail of the cluster will be accepted and redistributed. Root mails generated on the cluster, will be redirected to a list of e-mail addresses, that you can enter next (multiple addresses should be separated by a comma). Having a correctly functioning mail setup is required to receive monitoring messages.
-
Network Settings (2)
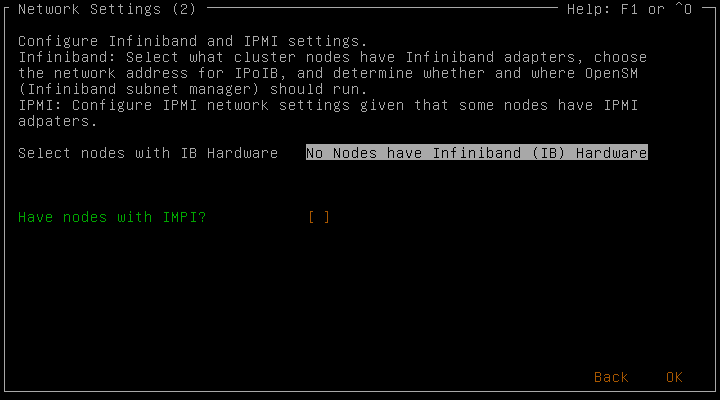
Here you have the possibility to configure optional Infiniband (IB) and/or IPMI network parameters, if you have the corresponding hardware in your cluster.
If there are nodes with IB, you first need to set the option whether the head-node itself also has IB hardware or not. If it doesn’t, you only need to choose the IB TCP/IP network address parameters (defaults are again recommended).
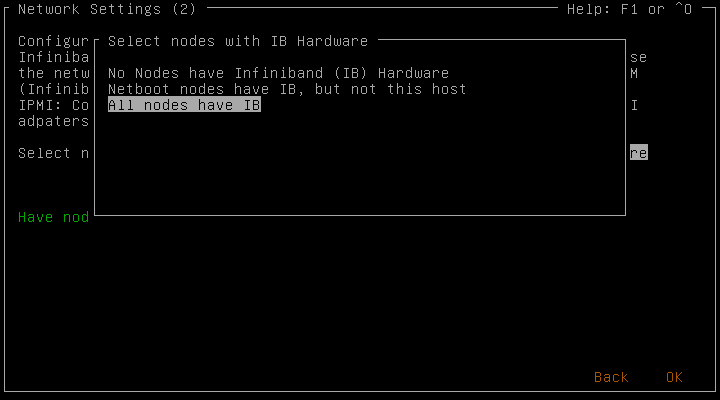
Otherwise, you have the additional choice to run OpenSM (IB subnet manager) on the head-node. Note, that at least one node (or switch) in an IB fabric has to run a subnet manager. Given the value of the IB network address, the host part of the IB adapter’s IP address will be set from the host part of the Ethernet address of the node in the cluster network. Example: IP cluster network 192.168.52.100 - IP IB network 192.168.53.100 (see also the corresponding section of the QluMan Guide).
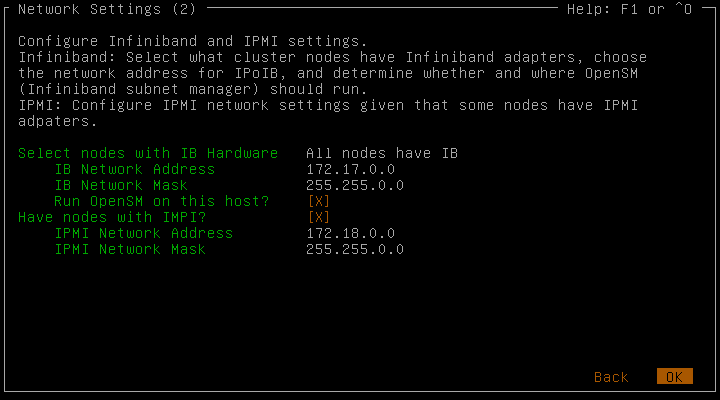
As with IB, if some of the nodes of your cluster have an IPMI adapter that is connected to a switch, you can enter the network address parameters that will be used to configure its IP address. Again, the host part of the IPMI adapter’s IP will be derived from its cluster network IP (see above). Additional host-specific IPMI configuration options can be set in QluMan.
The configuration of IPMI adapters is hardware dependent. The method used within Qlustar works on most systems, but there is no guarantee, that it will work on yours.
-
Additional Settings
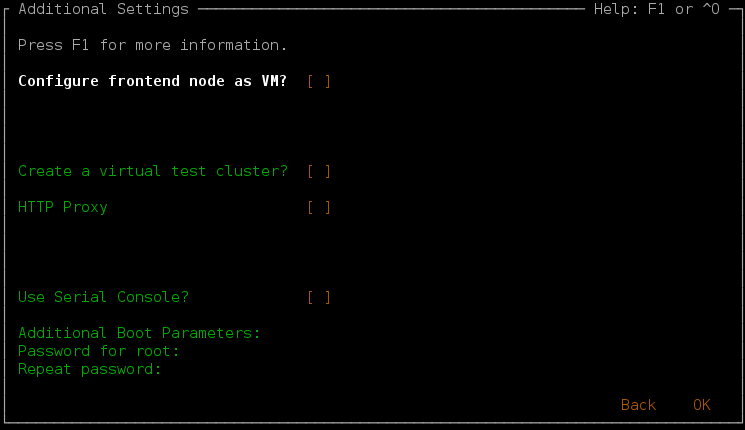
For the sake of system stability and performance, it is usually a good idea to separate user from system activities as much as possible. To achieve this, we suggest to run only system-related tasks directly on the cluster’s head-node(s) and have physical or virtual front-end (FE) nodes for user access/activity.
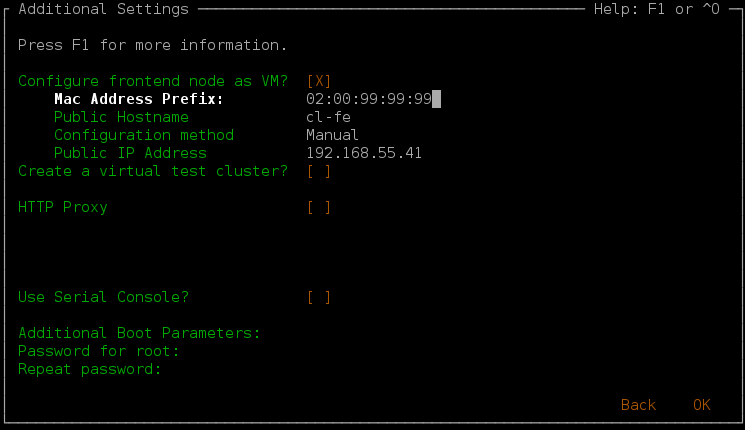
In this dialog you can choose to setup a virtual FE node as a virtual machine running on the head-node. If you decide not to do so, we advise to assign a physical machine as a FE node at a later stage. The suggestions for the network parameters of the FE VM are derived from the head-node’s values. Again, if you select DHCP as the configuration method for the public interface, make sure to add its IP address later to the corresponding Network Config in the QluMan GUI. The cluster node name of this FE node will be login-c.
You also have the option to create a virtual demo-cluster on the head-node, provided the latter has enough RAM. When choosing the number of demo-nodes, keep in mind, that each one of them will be configured with 1.5GB of main memory. Even if configured, the VMs will not be started automatically though, so the head-node will be able to boot, even if a huge number of demo VMs are chosen.
If you choose neither the option for the virtual FE node, nor the virtual demo-cluster, the necessary network pre-configurations (bridge setup, etc.) for starting VMs will not be done. This means, that you’ll have to do a number of non-trivial manual steps after installation, in case you find out that you need support for VMs later on.
If you intend to follow all the instructions in the First Steps Guide, a virtual demo-cluster is a requirement.
Simply configuring a virtual demo-cluster doesn’t consume any resources of the head-node apart from a little bit of disk space (in form of LVM logical volumes), so it doesn’t harm to do so. If you later want to get rid of it, just delete the LVM volumes and the nodes in QluMan.
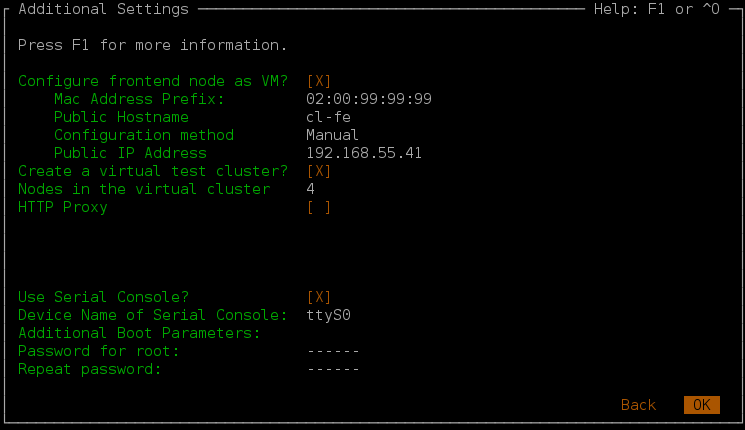
If you need a proxy to access the internet, you can enter the relevant proxy parameters here. To use a serial device for console access, select the next option and enter the device name. Additional kernel parameters for the head-node can be specified next (typically, none are needed). Finally, type in the password for the root user twice.
-
Edge Platform & Package Bundle Selection
-
Edge Platform Selection
Qlustar supports multiple so-called Edge Platforms. In 12.0, the available ones are Ubuntu/Focal, CentOS 7 and CentOS 8. Please select your favorite platform(s). Multiple choices are possible. At least one must be selected. In essence, this option corresponds to the choice of what Linux distribution you (or your users, if you’re an administrator) like to work with/develop for.
You can always add support for a previously unselected edge platform later on by creating corresponding chroots and Qlustar images using QluMan.
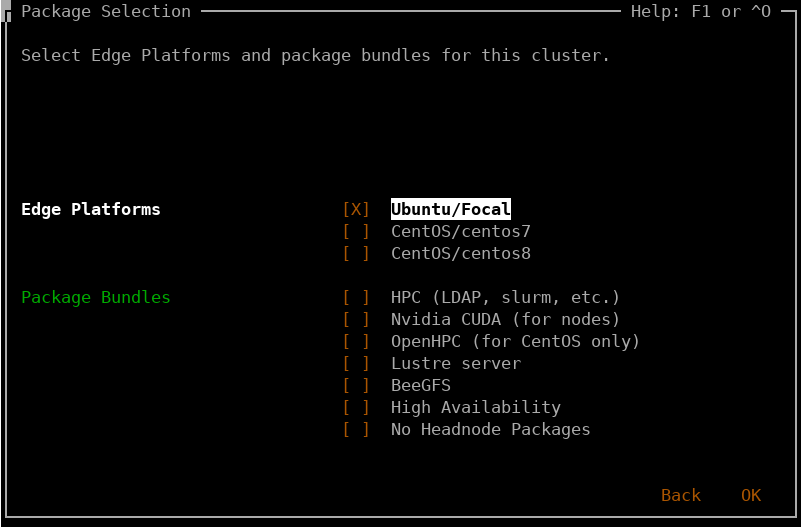
Technically, choosing a specific edge platform (e.g. Ubuntu/Focal) will cause Qlustar images based on Ubuntu/Focal to be created along with an associated chroot during the installation process. This chroot will hold a complete Ubuntu/Focal installation in which you can add packages later on. By assigning this Qlustar image later to some nodes in QluMan, you will have a full-featured Ubuntu/Focal installation available on them, once they will have booted over the network.
It is fully supported and easily achieved to have one subset of nodes running Ubuntu/Focal and another one running CentOS 7 simultaneously in the same cluster.
-
Package Bundle Selection
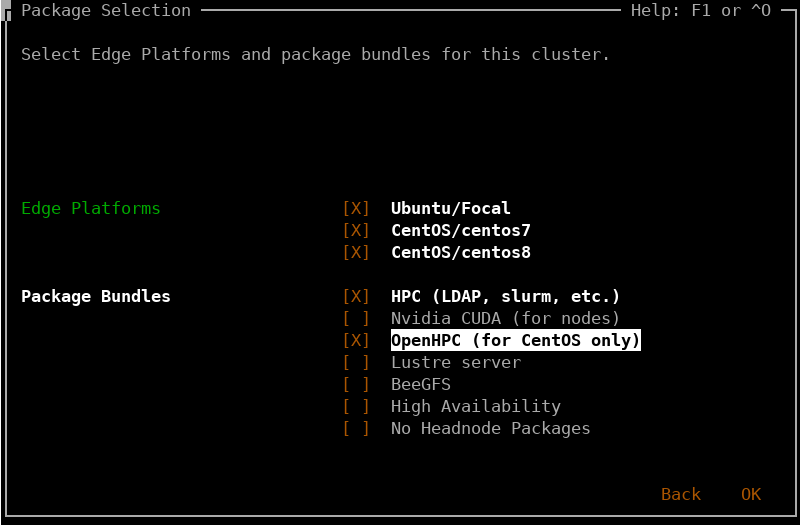
The default installation will only install a minimal set of basic packages on the head-node of your cluster. Here you can select additional package bundles to install. If you intend to use your cluster for HPC purposes, and/or if you want to follow all the instructions in the First Steps Guide you will have to select HPC as a minimum.
This is also the place to add basic OpenHPC packages (MPI, most recent GNU compilers) to a CentOS installation. The screenshot shows an example. Other OpenHPC packages are readily available for installation from the Qlustar mirror of the OpenHPC repository.
Beware, that you should choose Lustre as an option here only, if the head-node itself is supposed to run Lustre services (MGS/MDTs/OSTs). If you merely intend to try out Lustre, it is recommended to configure an image with Lustre support in QluMan, and assign it to some nodes of the virtual demo-cluster.
Apart from Nvidia CUDA software, the packages selected here will only be installed on the head-node. Selecting and generating boot-image modules as well as the process of general package installation for compute/storage nodes booting from the network must be done elsewhere. This is discussed in the First Steps and the QluMan Guide.
-
-
-
Reviewing Installation Settings
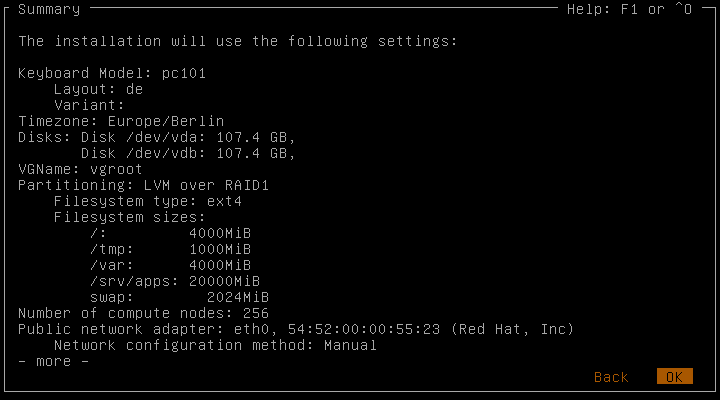
Before the actual installation will begin, the final screen shows a summary of the settings that have been selected/will be used (you will have to move back with the left arrow key in order to scroll down in the summary screen). If there are any parameters, you want to change, just go back and make the required modifications.
-
Actual Installation
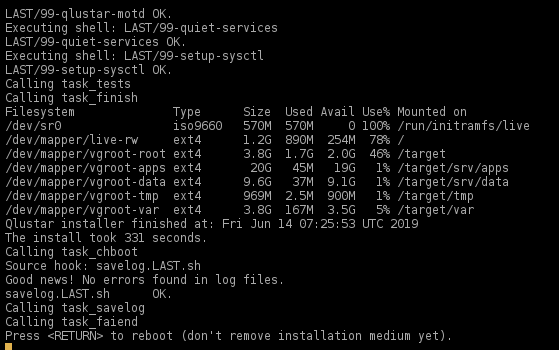
The actual installation process will take a few minutes to complete. Press Enter when requested at the end of the process. Remove the USB drive and press Enter again to reboot. Please note that the head-node has a text-only console. An X server (graphical interface) is not installed in order to keep resource consumption low and eliminate package overhead.