RXengine / Remote Execution Engine
RXengine Overview
QluMan provides a powerful remote command execution engine, that allows to run shell commands
on any number of hosts in parallel and analyze their output/status in real-time. Commands
fall into three categories: Pre-defined commands, custom commands and "Power Management"
commands. The RXengine has the following capabilities:
-
The command can be a single command or a series of commands in bash shell syntax.
-
The hosts are specified in
Hostlist formator through a Host Filter, so that even large groups can be represented by a short string. -
The commands run in parallel on all hosts, but Power Management commands have a limit to protect against overloading fuses when simultaneously turning on too many hosts sharing a fuse.
-
The network connection used for remote execution is both encrypted and authenticated. It employs the same high-speed/high-security elliptic-curve cryptography that is used for the connection between the QluMan server and the QluMan GUI.
-
Multiple commands can be run in tabs from the same
RXenginewindow and multipleRXenginewindows can be opened simultaneously. -
The output is analyzed and updated in short intervals during the execution phase.
-
Hosts with equal output are grouped together to display a compact view of command’s messages.
-
The output can further be filtered by the return code of the command and by (de)selecting
stdoutand/orstderr. -
A history of executed commands is kept a) in the database on the cluster head-node (hence accessible to all QluMan users of that cluster) and b) locally in the user’s home directory. The user database logs commands executed on any cluster managed with QluMan by that user. Commands can be re-executed or saved to the execution menu from the
Command
History
viewer.
Executing a pre-defined command
Pre-Defined commands can be created using the Command Editor (see Command Editor for details). They can be defined as cluster commands stored in the DB of
the cluster currently connected to and usable by different users on that cluster or as user
commands stored in the user’s home directory and usable only by that user but on all clusters
the user has access to.
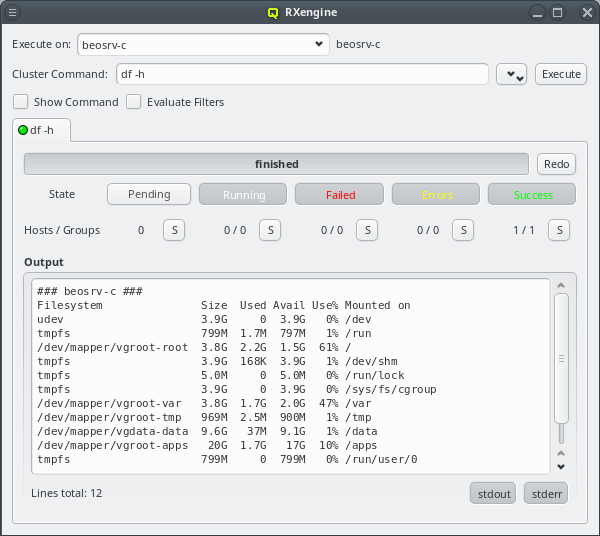
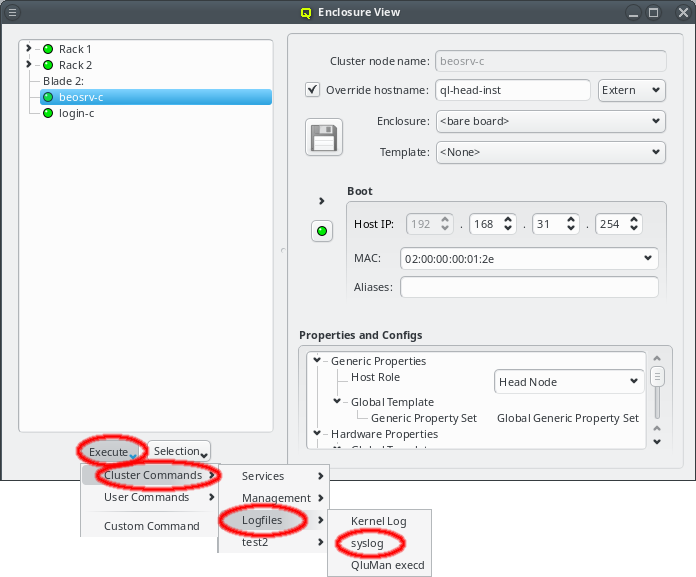
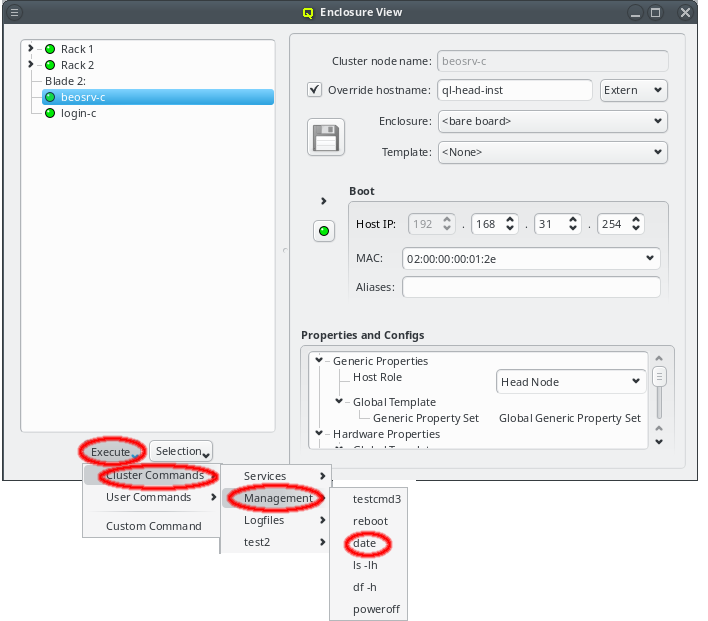
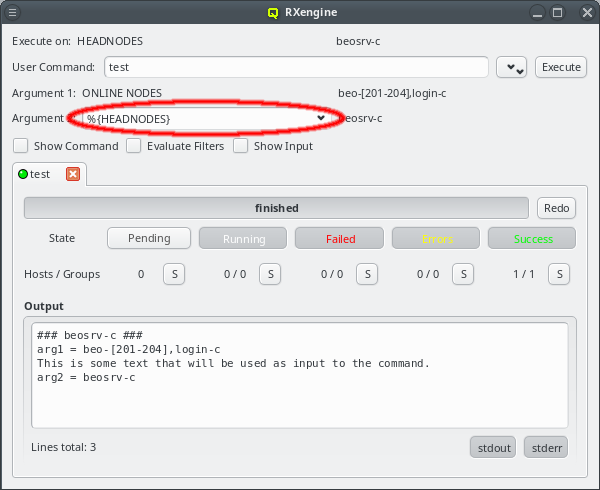
To execute a pre-defined command, open the pull-down menu of the Execute button
at the bottom of the Enclosure View and select a command from either the Cluster Commands or User Commands sub-menu. This opens a new RXengine window with the
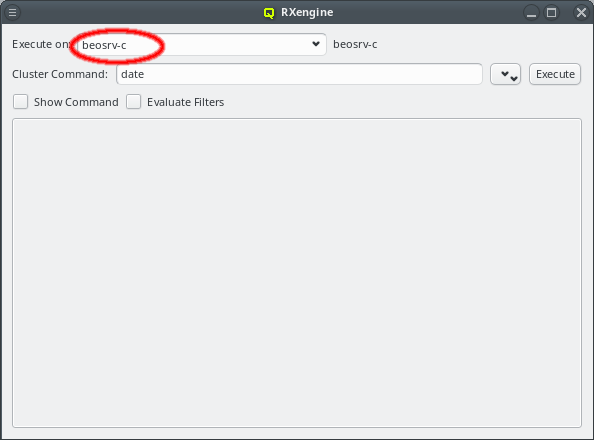
chosen command already selected. At the very top of the window, the Execute on
field shows the hosts on which the command will be executed. Below that, the selected
pre-defined command is shown. It can be changed at any time by choosing a different entry via
the Pull-down button. If defined, additional arguments of the command are
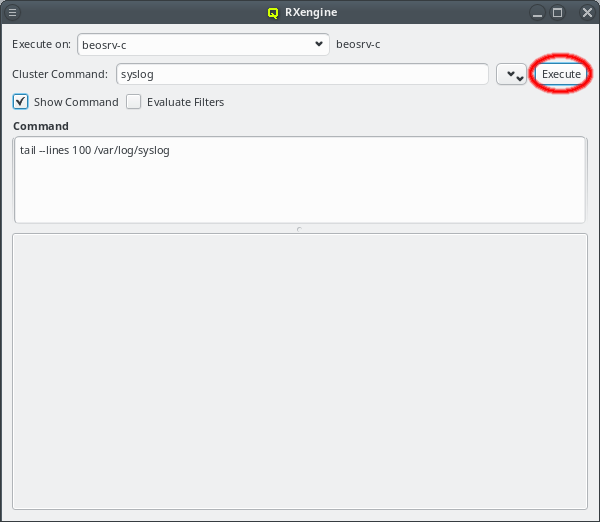
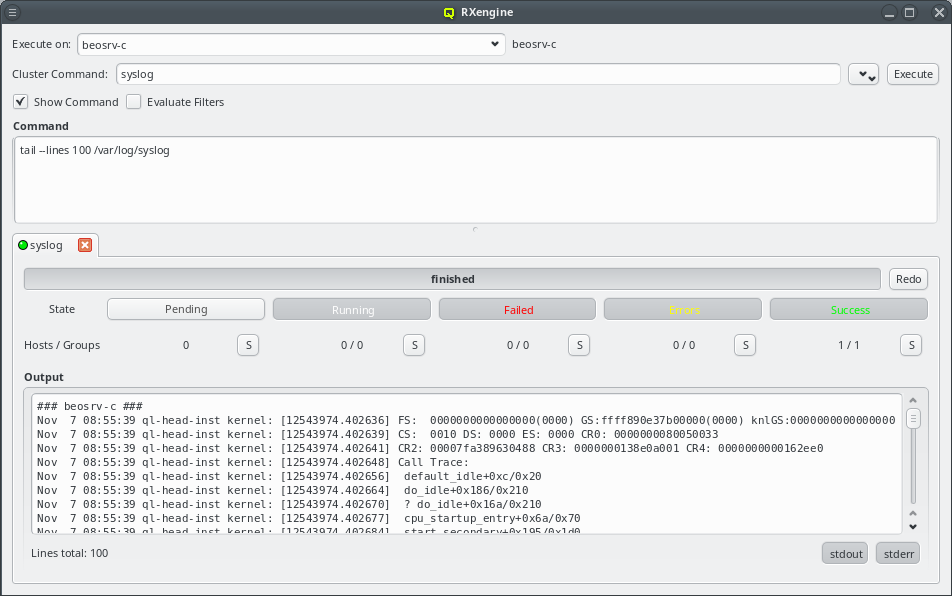
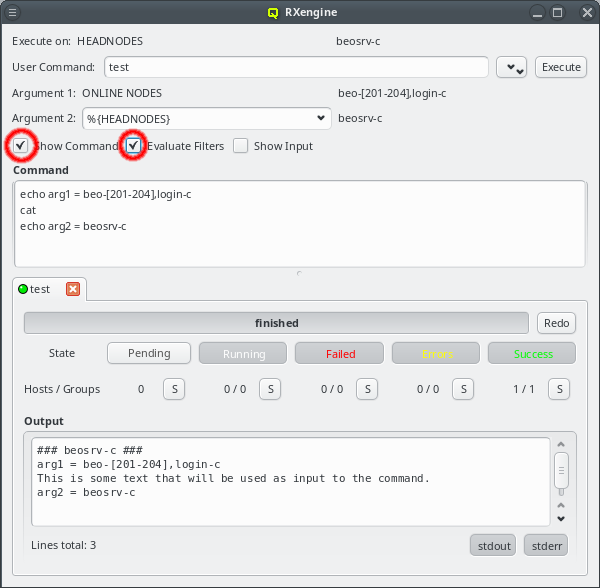
displayed underneath. If Show Command is checked, the actual command code is
shown further below. If Evaluate Filters is checked, the final command will be
shown with all its arguments inserted at the right places and filters evaluated to their
respective hostlists. Upon clicking the Execute button, execution of the command
on all selected hosts starts.
Arguments to a pre-defined command can be set fixed to a Host Filter,
in which case the filter and its resulting hostlist are shown as plain text and can not be
edited. Optionally, specification of arguments in Hostlist format may also be left up to the
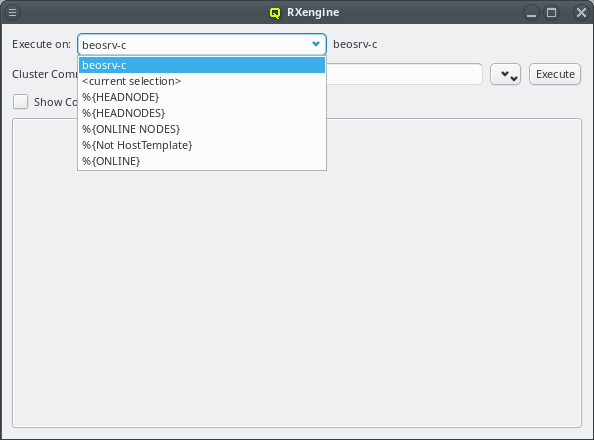
user. In that case, a combo-box is shown, followed by the evaluation of the specified input
shown as plain text. When hosts were selected in the Enclosure View, the combo-box will
contain the hostlist corresponding to the selection as default. The text can be edited directly
or a filter can be chosen from the dropdown menu. Any argument starting with "%" is assumed to
be a filter. If this is not intended, the "%" must be escaped by another "%", but only at the
start of an argument. For more details about specifying arguments in pre-defined commands see
Command Editor.
|
Commands can only be executed on nodes that are online, the resulting hostlist shown for
|
|
In general, execution of commands on head-nodes is not allowed. The only exception is for pre-defined commands that use HEADNODE or HEADNODES in the Execute On field. This is a safety feature to prevent running harmful commands accidentally on these crucial nodes. |
Executing a custom command
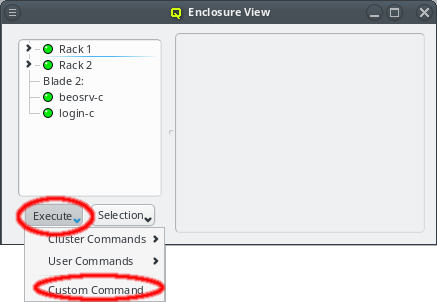
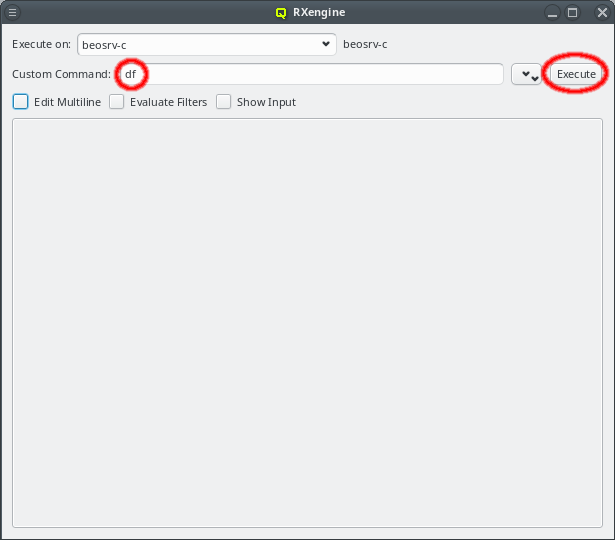
To execute a custom command, open the pull-down menu of the Execute button at the
bottom of the Enclosure View and select custom command from the menu. This opens a new blank
Command Execution window.
|
The initial hostlist is empty in the screenshot examples, since no hosts where selected in the
|
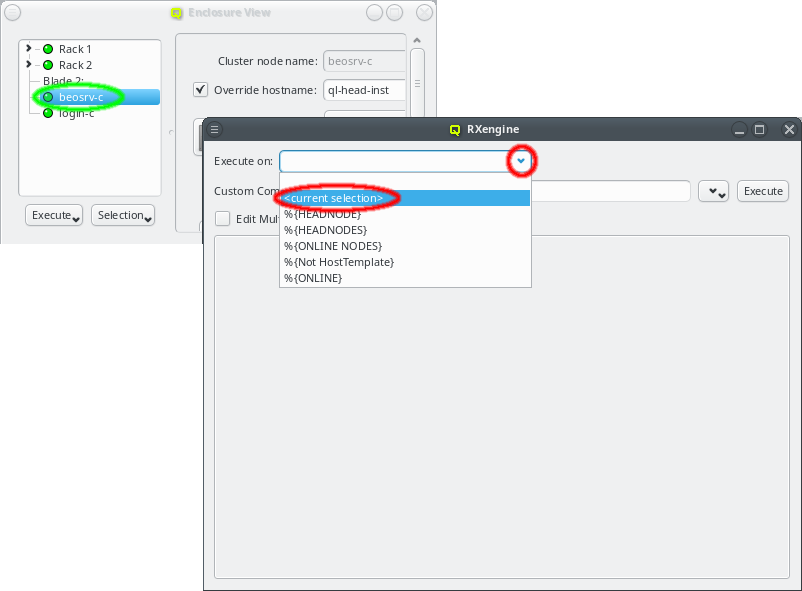
In case hosts were selected in the Enclosure View before clicking the Execute
button, a hostlist representing these hosts will be present in the RXengine window. This
allows easy selection of hosts to run a command on by selecting them
in the Enclosure View.
The hostlist can also be updated at a later time with the currently selected hosts in the
Enclosure View by selecting menu:<current selection> from the drop-down menu for
filters. This makes it easy, to run the same command on different sets of hosts. When a command
is executed, it is added to both the cluster and user Command History.
The Command History viewer can be opened from . It allows
viewing previous commands as well as re-executing or saving them in the Command Editor (see
Command Editor).
|
The main purpose of the history is as a log of commands (possibly for auditing) rather than a repository of useful commands. The preferred way to manage frequently used commands is by pre-defining them. |
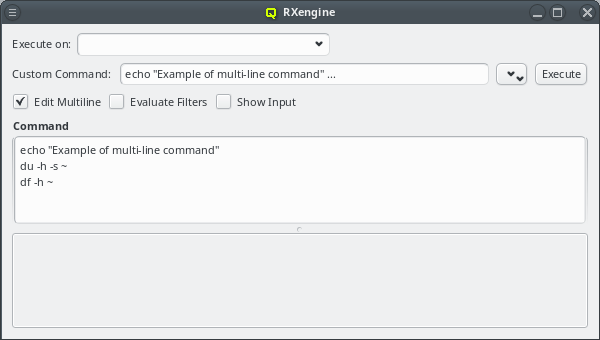
Passing input to a command
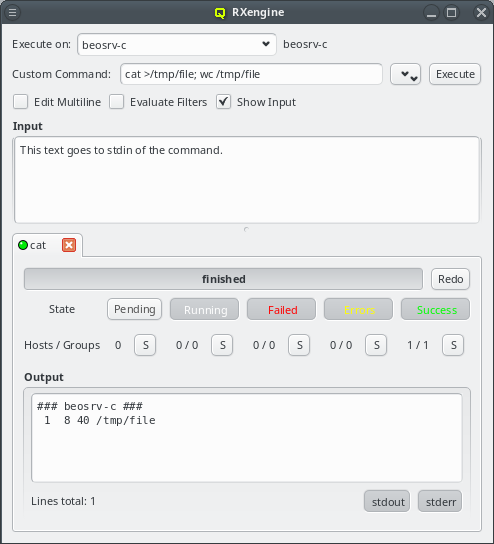
Sometimes it is necessary to pass some input to a command. This can be done by checking the
Show Input checkbox. Another text box will then be added to the window where text
can be entered that will be passed as stdin to the command on each host.
Command Syntax
Commands will be interpreted/executed by the BASH shell on every host matching the
hostlist. The full bash syntax is supported. Redirection of output to files, as in the last
example, and working with variables works as expected. Please refer to the bash documentation
(e.g. man bash) for more details.
Power Management commands
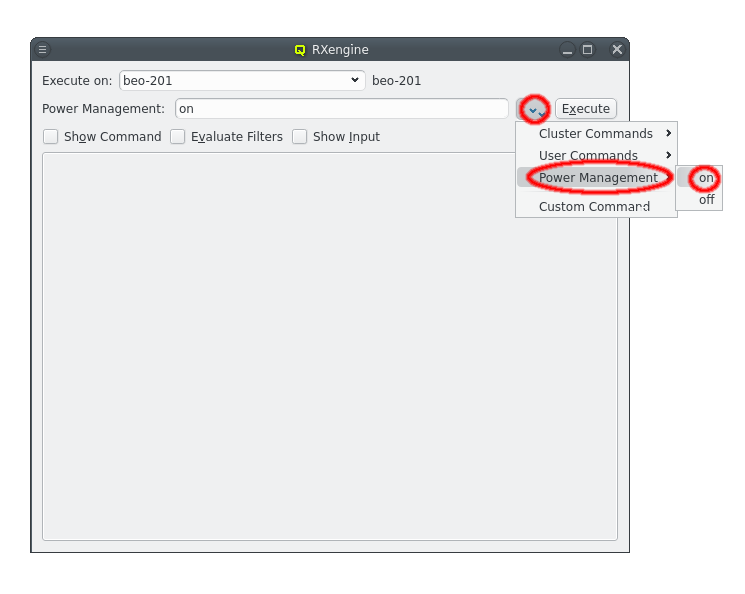
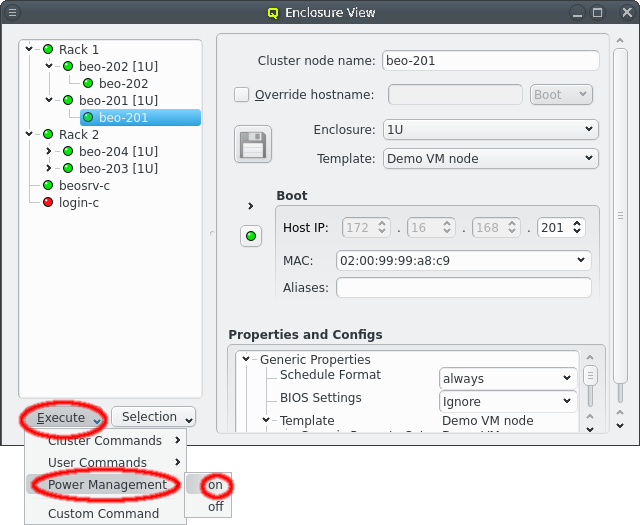
Power Management commands use IPMI or Redfish to control the power state of a host. To execute a
Power Management command, open the pull-down menu of the Execute button at the
bottom of the Enclosure View and select the desired command from the menu. This opens a new
blank Command Execution window. Power Management commands can also be selected from the Command
Execution window using the pull-down menu.
The Power Management commands are executed on the head-node. They are therefore not limited to hosts that are online. But they require hosts to have an assigned Remote Management config and a NIC of type IPMI in their network config. The former configures the type of access as well as credentials (user/password), while the latter provides connectivity to the BMC of the host.

Power Management commands are started by clicking the Execute button in the Command
Execution window after which a new execution tab will appear showing the progress. They are
executed with a delay between hosts that share a fuse to avoid overloading the fuse with the
electrical current spike occurring at power-on.
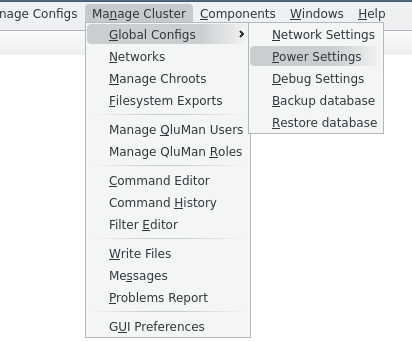
The Power Settings dialog can be opened via [Power Settings]. The settings control two aspects of the power management commands: The grouping of hosts and the delay between executing power management commands for different hosts in the same group.
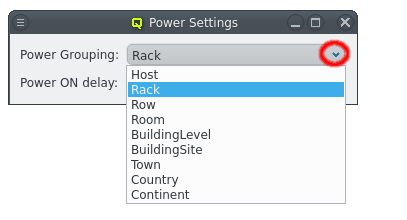
In almost all cases, a fuse will be shared between hosts in the same rack but not between racks. This is the default grouping and unlikely to ever need changing. For a cluster built using blade enclosures, each blade enclosure could potentially have its on fuse and then selecting a grouping by host enclosure would make sense.
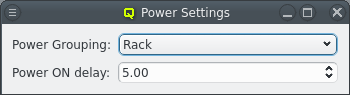
The power-on delay is the time between starting power management commands for hosts that are in the same group. Hosts in different groups will be started in parallel though. If the Power Grouping is set to Rack then hosts that are in the same rack will execute Power Management commands sequentially with the configured delay.
|
All hosts that are not in an enclosure at the selected grouping level are considered to be in a common group as well. Without having hosts sorted into larger enclosures, it is impossible to determine their physical relation and likely shared power. So it’s assumed they all share the same fuse. Hence, organizing hosts into racks can greatly speed up power management commands on large sets of hosts. |
Analysis of Command Status/Output
Once the hostlist is added, a command can simply be run by entering it in the command box and hitting the Execute button. It will then start in parallel on all listed hosts and the command output will be collected. Periodically, in short but increasing intervals, the output will be sorted and displayed. Hence, for short running programs you will see it immediately. Due to the increasing display intervals, long running and noisy commands won’t cause constant flickering of the output, allowing you to more easily follow it.
Command Status
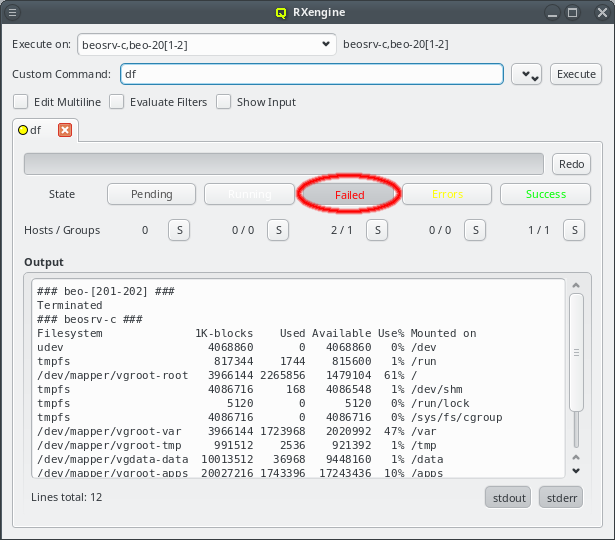
After the Execute button has been pressed, all hosts will start in the Pending
state. Once a host confirms that it has started its command, it will change to the Running
state. When the command concludes, the state becomes one of Failed, Errors or
Success. If the command exited with a return code other than 0, the host will enter the
Failed state. If the command exited with a return code of 0, but produced output on stderr,
it will enter the Errors state. Otherwise, it enters the Success state.
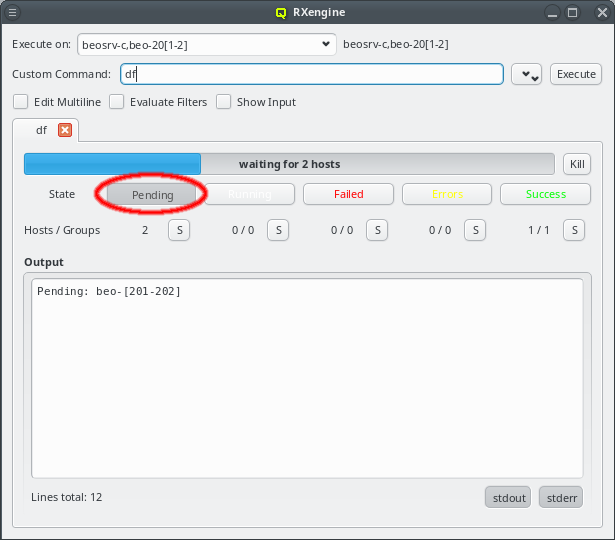
In the screenshot example, the hosts beo-201 and beo-202 were down, so they remained in the
Pending
state
. By clicking the Pending button, a hostlist of the pending hosts
is displayed. The QluMan server will start the command on those hosts, when they become online
again. If you do not want that to happen, or if the command does not terminate on its own, then
the Kill button allows you to stop the command. A killed command counts as
failed, so beo-201 and beo-202 now enter that state. The command output also reflects, that
the command was killed.
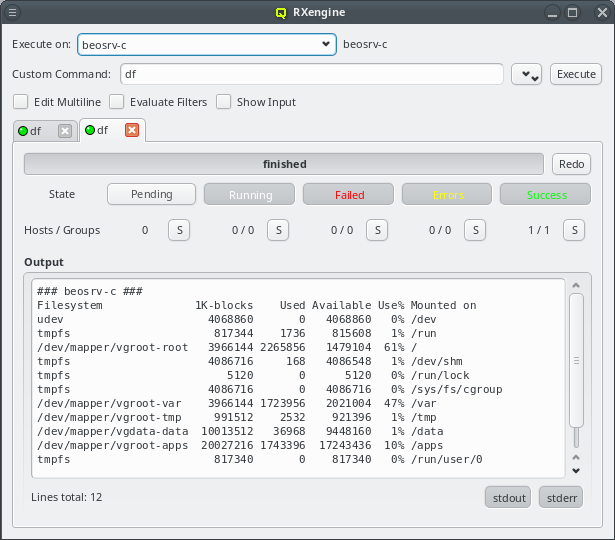
Host Grouping by Status and Output

Hosts executing a command are not only grouped by their execution state, the command output produced by the different hosts is also analyzed and compared to each other. Hosts with identical output are put into a group. Their output is only displayed once, prefixed with the hostlist representing the hosts in each group. For a quick overview, the number of hosts and groups is also displayed below each state button.
In the screenshot example, two hosts (beo-201 and beo-202) have failed, because they where
offline and the command was killed before starting. The output of both was identical, so they
form one group. Similar, one host (beosrv-c) completed the command successfully and builds
its own group.
The S buttons next to the numbers add or remove the hosts in each state to form a new hostlist for the next command. Press the button to include the corresponding hosts and press it once more to exclude them again. This is convenient, e.g. to quickly select only the hosts for which a command failed: Analyze the errors and later relaunch with an adjusted command. Another example: Select only the successful hosts to run a follow-up command etc.
Filtering by stdout and stderr
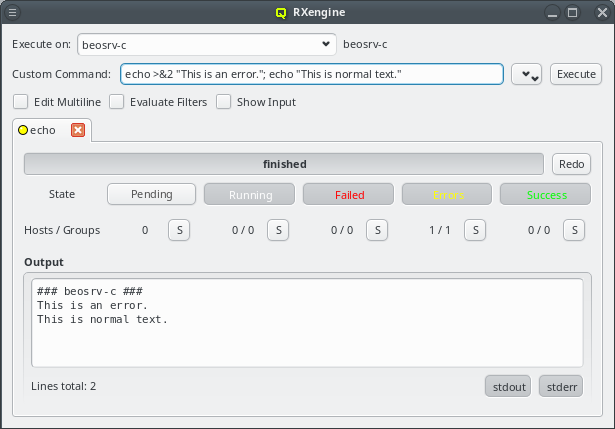
Commands usually output regular text to stdout and warnings as well as errors to stderr. In
the latter case, the command ends up in the Errors state, because this is usually something
that needs further inspection. The screenshot example prints two lines, one to stderr and one
to stdout. Unfortunately Unix does not enforce any order between output to stdout and
stderr. Therefore, as in this example, it can happen, that a small delay between the command
output and reading from the file descriptors causes the order to slightly change.

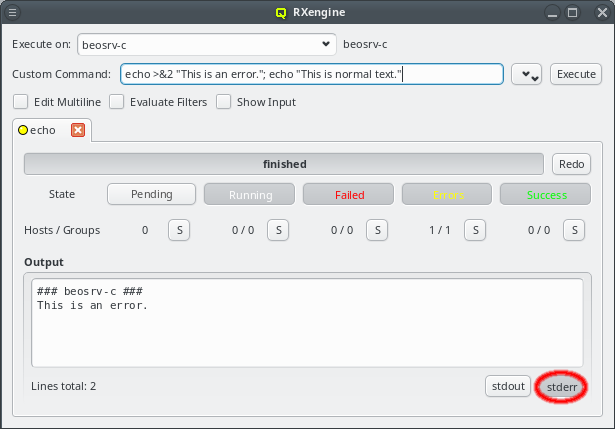
Some commands produce a lot of output. Error messages are then easily overseen in between the
lines. Similarly a command might report a lot of harmless errors, that hide the interesting
output going to stdout. To simplify an analysis of the command output for such cases, the two
buttons stdout and stderr at the bottom of the window allow
toggling the visibility of stdout and stderr output selectively on and off.
Searching in the Command Output
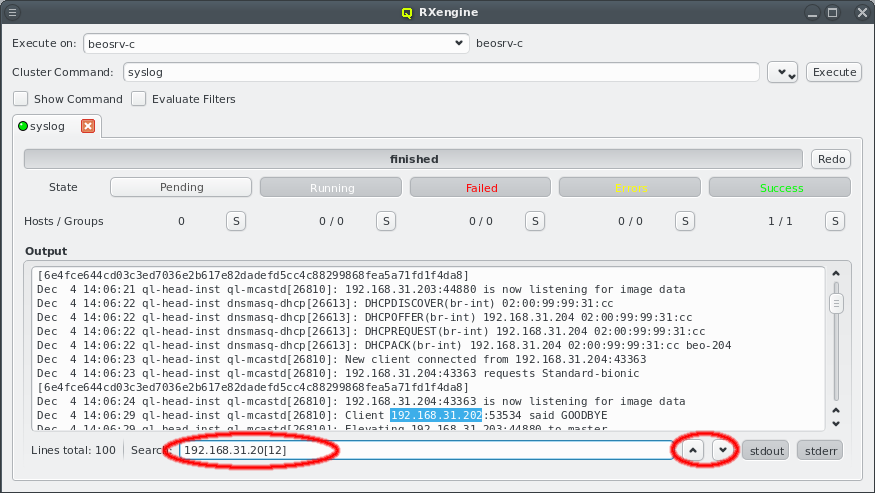
Searching in the command output is possible by entering text in the search field at the bottom of the execution window. The text is interpreted as a regular expression and a match is searched in the text starting at the current position in the output. If a match is found, the matching text is highlighted. The up/down buttons next to the search field allow skipping to the previous/next match respectively. If no match is found, the Search label will turn red.
Command Editor
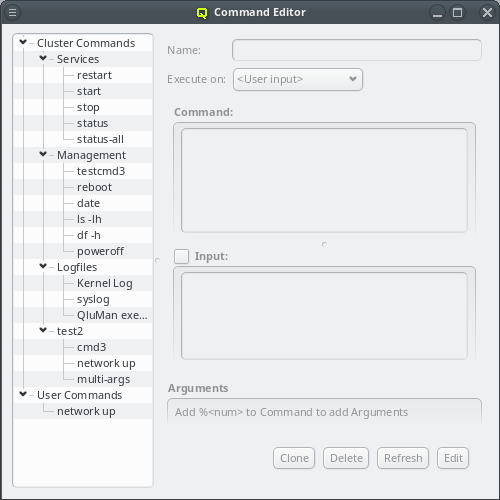
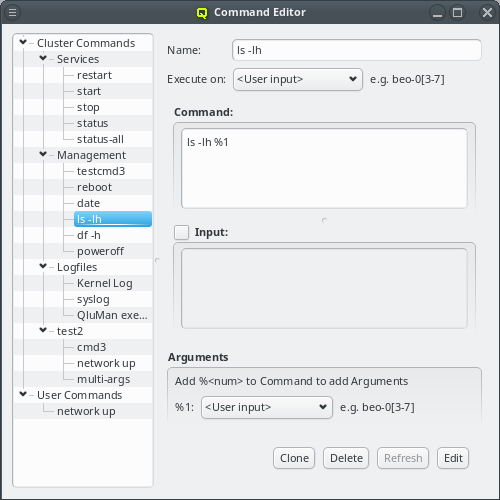
The Command Editor shows all the pre-defined commands in a tree view on the left. The tree
consists of two top level items, Cluster Commands on top and User Commands
underneath. Cluster commands are stored in the cluster’s QluMan DB and user commands in the
user’s home directory. Selecting a command shows its definition on the right, where it can also
be edited. Every command has a name/alias under which it appears in the tree view on the left
as well as in the Execute menu in the Enclosure View and in the drop-down menu
of an RXengine window.
There are three Admin Rights concerning pre-defined commands: "Can create, modify and delete
predefined commands" refers to the right to create Cluster Commands while "Can execute
predefined commands on nodes" refers to their execution. User commands on the other hand can
always be created, modified or deleted by the user. But to execute them, the right "Can execute
custom commands on nodes" is required just like when executing custom commands directly.
Sorting commands
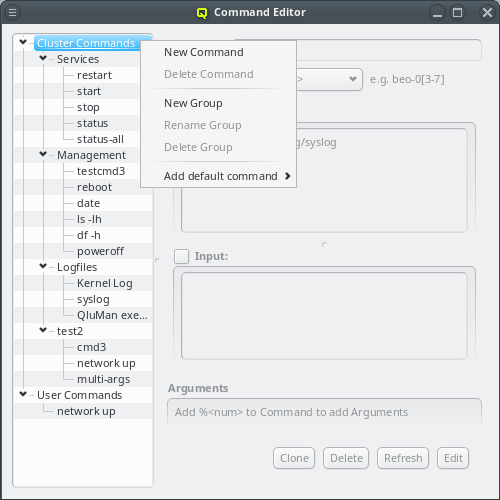
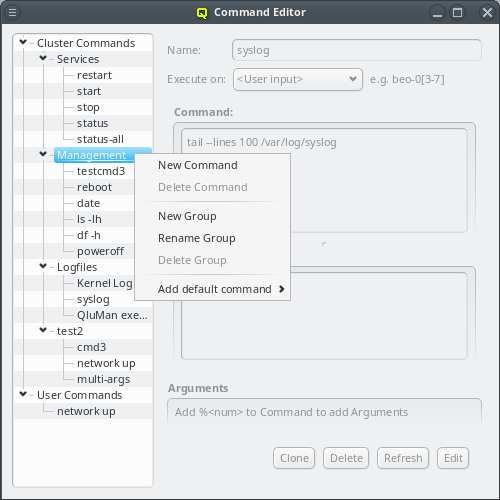
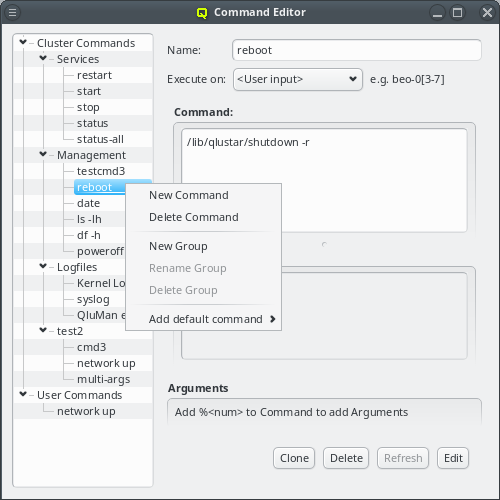
Commands are kept in a tree structure, grouping similar commands together. They can be sorted freely using drag&drop. You may select one ore more commands or groups and drag them where they should appear. Items are moved if they remain inside the same top level item (cluster or user) otherwise they are copied, since the two are stored in different places. Groups can be created, renamed, moved and deleted to achieve any desired hierarchy of commands.
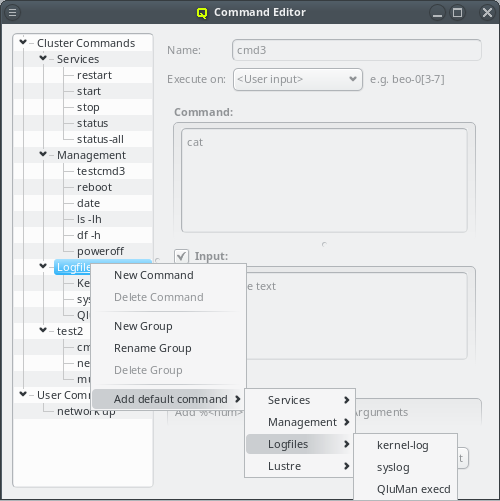
When a cluster is first installed, a number of pre-defined commands are added to the cluster automatically. A few more default commands can be added from the context menu by selecting Add default command and following the tree structure there. This also includes all the commands added at installation time. So in case one of these was deleted, it can always be restored again.
Defining or editing a command
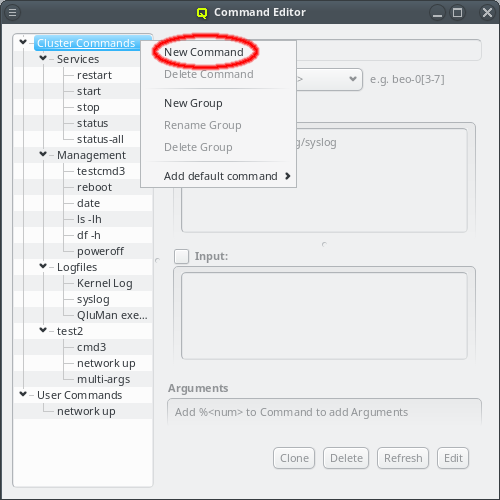
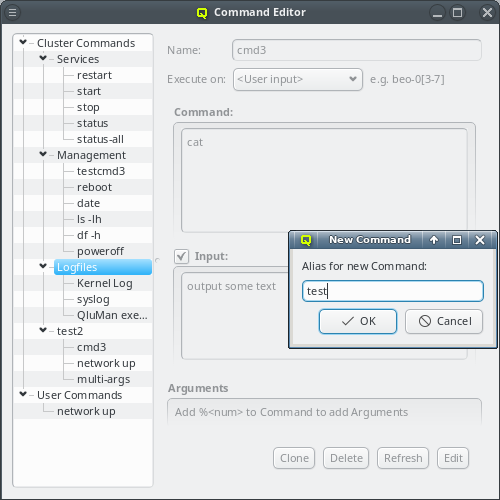
To define a new command, select New Command from the context menu and set its name. The new command will be created in the group, where the context menu was opened or in the root, if the mouse is outside of any group. Initially, the command will have no definitions.
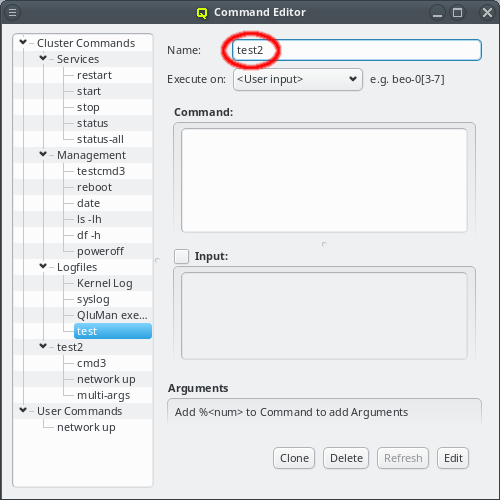
To edit a command, it needs to be selected first. Then its definitions will be shown on the right. The name/alias of a command can be edited by clicking in the text box at the top and entering the new name. Press return, to save the new name and the check-box will become fully checked again. To undo editing, simply re select the command in the tree view.
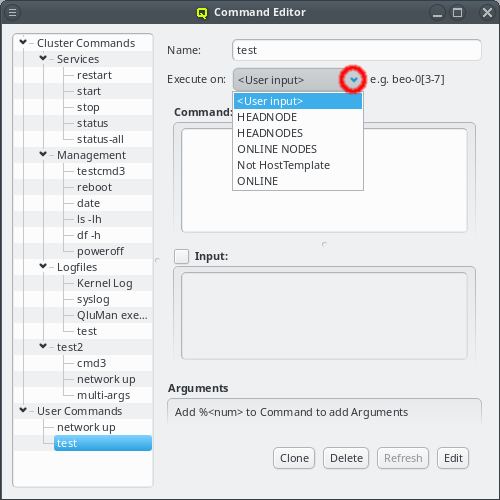
A command can be executed on any host or set of hosts in the cluster. The Execute on
field governs how that host or set of hosts is constructed. The default is User
input. This means, the user will have to choose the hostlist, where the command will run, at
the time, when it will be executed. Alternatively, the hostlist of the command can be preset by
selecting one of the filters from the dropdown menu. If a filter is selected, the hostlist, it
currently evaluates to, is displayed below it.

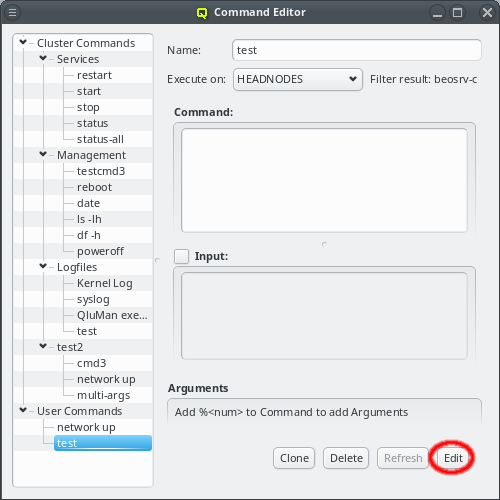
Editing the command itself may take a while. To avoid conflicts from concurrent editing
attempts by different QluMan users, only one person can edit a command at a time. To start the
editing process, click the Edit button at the bottom. After that, changes to the
command can be entered. Commands will be interpreted/executed by the BASH shell on every host
matching the hostlist. The full bash syntax is supported. Redirection of output to files and
working with variables works as expected. Please refer to the bash documentation (e.g. man
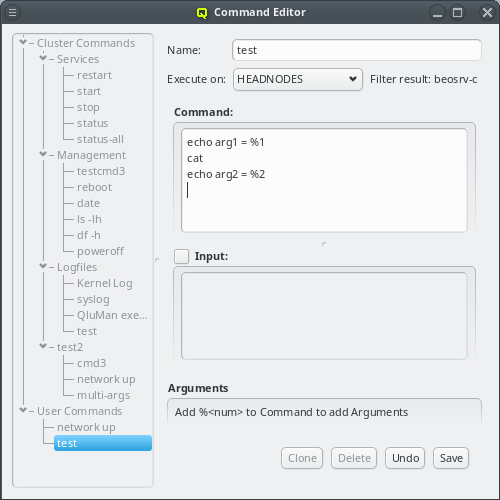
bash) for more details. There is one exception to this: A "%" character followed by a number
specifies additional arguments for the command, as explained in more detail below.
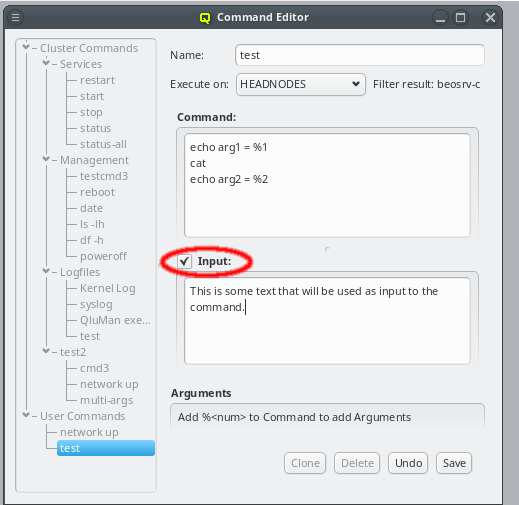
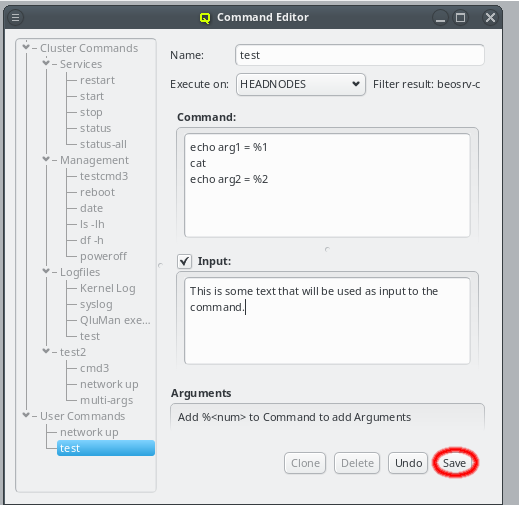
Sometimes it is necessary, to pass some input to a pre-defined command. This can be done by clicking the Input check-box. It will bring up an input text-box, where the desired input text can be entered.
To finish editing the command, click the Save button at the bottom. This actually
saves the command text and input, if any, in the database and releases the lock on the
command. This also scans the command text for argument placeholders and updates the entries in
the Arguments box.

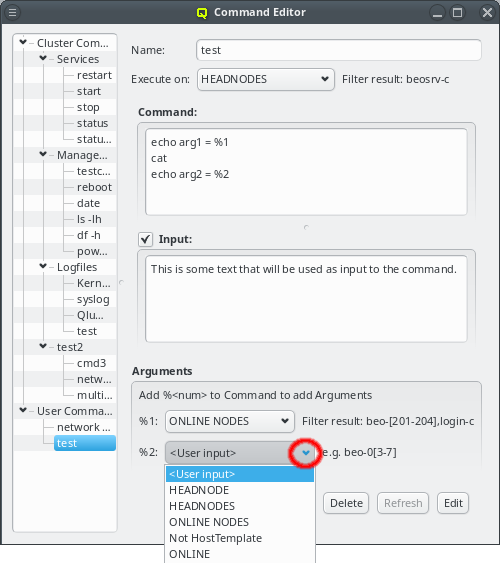
The definition of command arguments use the same mechanism as detailed for the Execute on
definition. They can either be left up to the user, to be filled in when the command is
executed or be specified by a filter selectable from the drop-down menu. When executed, the
<num> placeholders in the command text are replaced by the user specified arguments or the
resulting hostlist of the filter. There are always as many arguments as there are placeholders
in the command. To add an argument, edit the command text and add a placeholder there. To
remove an argument, edit the command text and remove the placeholder.
In the screenshot example, the test command is defined to execute on all head-nodes (beosrv-c
is the only head node in the cluster). It has some input and two extra arguments. The first one
is fixed to the ONLINE NODES filter that evaluates to any host reported as online. The second
one is left for the user to be specified, hence, when executing the command, only the second
argument is editable. In the screenshot, the HEADNODES filter was chosen for this argument,
but any other text would have been possible too. For easy verification, the command text, with
all the arguments substituted, is shown together with the command input (if defined).
|
In the example, the specified input is simply output by the |
Command History
Every time a command is executed using the RXengine the command is logged in the command
history. There are two separate history logs: One for the QluMan user and one for the
cluster. The user history is stored locally in a sqlite database located in the user’s home
directory and contains a list of all the commands executed by the user on any cluster she/he
has access to. This history is only accessible to and managed by the user himself. The cluster
history is stored in the QluMan database on the cluster head-node and holds all the commands
executed on that particular cluster. It is accessible to all QluMan users but entries can be
removed only by users with the specific Admin Right that exists for this.
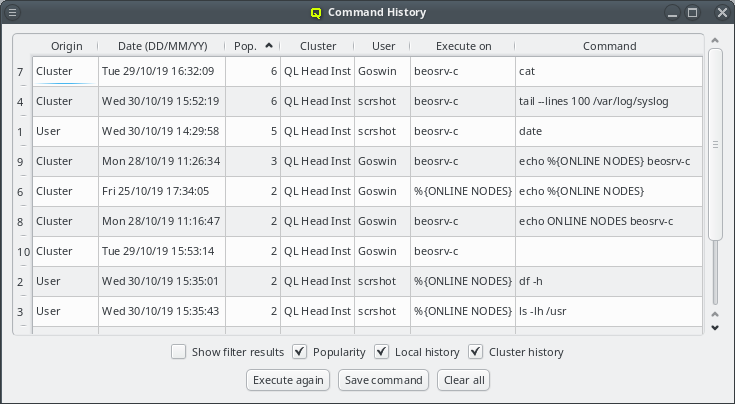
When first opened, the Command History viewer will show a merge of the user history with the
cluster history of the cluster currently connected to. Commands will be sorted with the most
popular command at the top. Popularity is defined by the number of times a command has been
executed. If the popularity is equal, the newer command will be at the top. The view in the
Command History viewer can be altered in several ways:
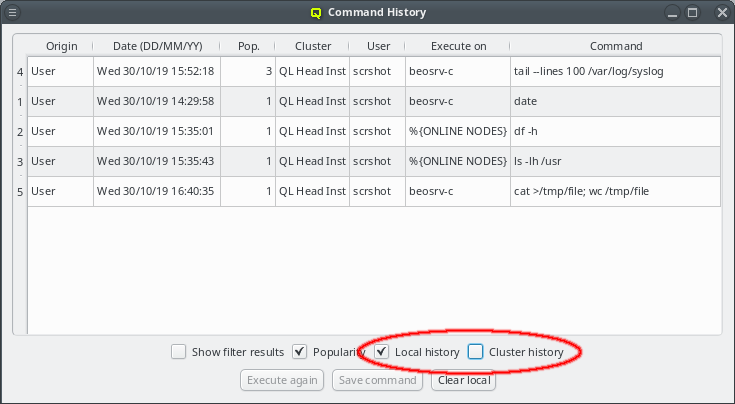
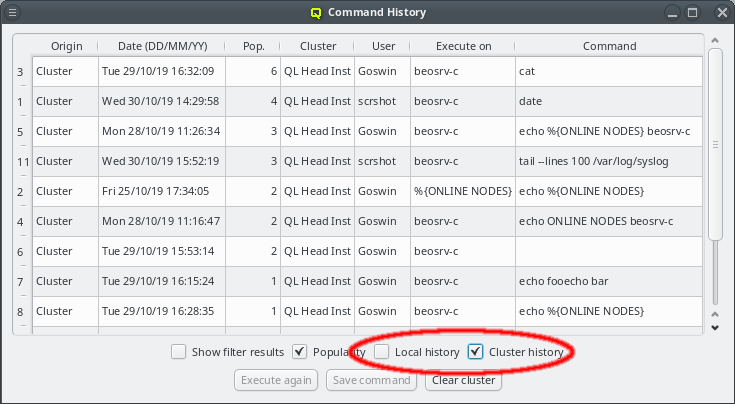
The display of the user and cluster history can be toggled on and off using the two check boxes User history and Cluster history. If a box is unchecked, the corresponding history will not be shown.
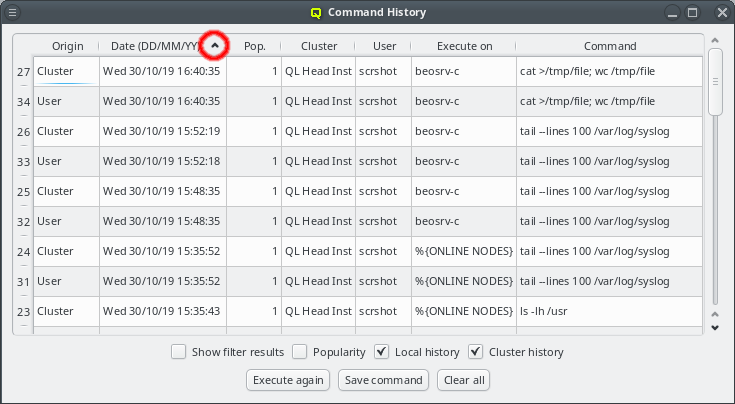
The history can also be sorted with respect to any displayed column of the table by clicking at the column header. Repeated clicks will reverse the direction of the sort as shown by an up or down arrow at the right side of the column header used to sort.
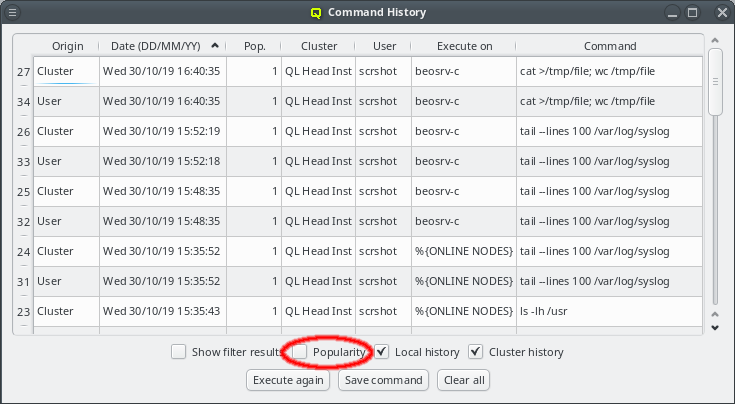
When first opened, the Command History viewer will group identical commands together and show
the number of times each command was executed in the popularity count column Pop.. Removing
the checkmark from the Popularity checkbox will list each command separately,
allowing for a full audit of the history.
|
The state of the |
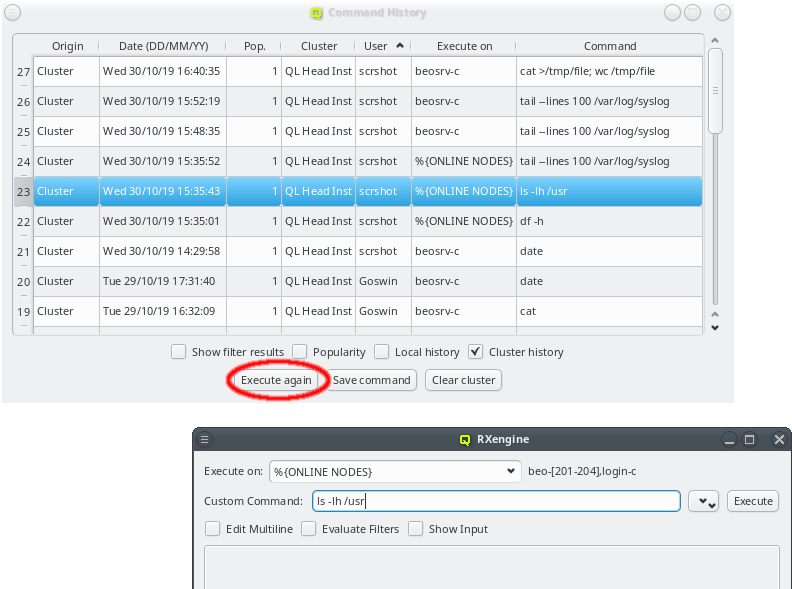
Besides being a log for executed commands the Command History viewer has two more useful
functions: A command can be re-executed by first selecting the command from the list and then
clicking the Execute again. This will open the RXengine window with the
selected command already filled in. The command may then still be edited or the Execute on
hostlist be altered before clicking Execute to actually initiate the execution.
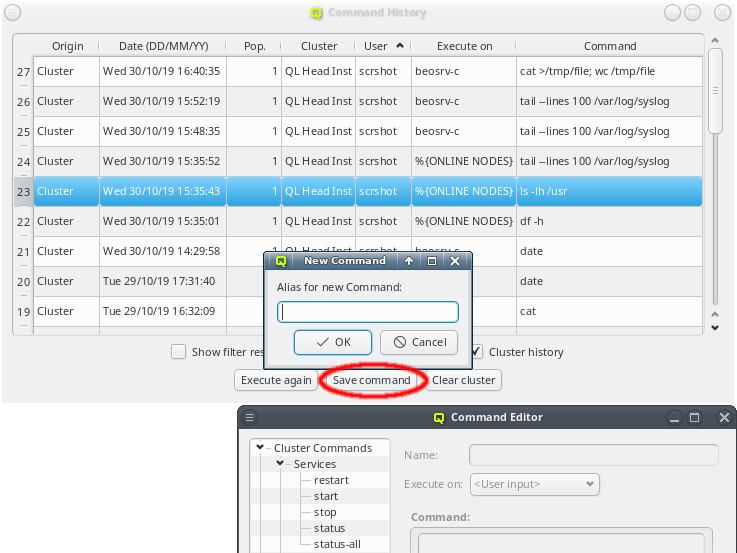
Additionally a command in the history may be used as a template for a pre-defined
command. Clicking the Save command button will ask for an alias of the command
and will then open the Command Editor window to start the creation of a new entry. The
command will be created as a user pre-defined command. Later it may be edited and moved around
in the pre-defined command trees like any other entry.
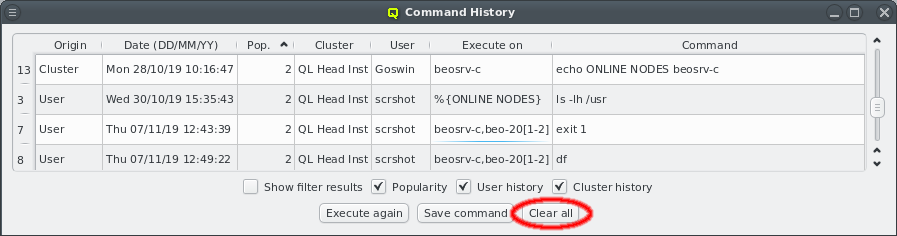
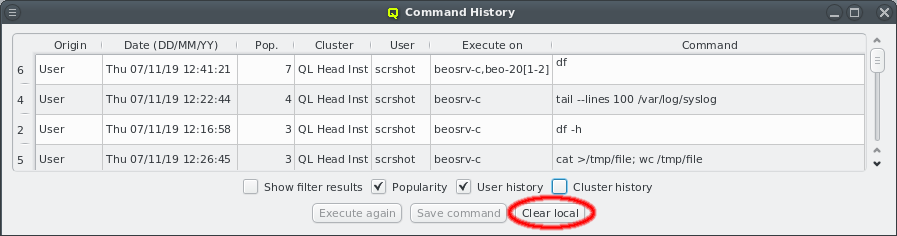
As time passes, the command history continues to grow and at some point you might want to clean up old or unimportant entries. There are various ways to truncate the list: If both histories are displayed and no lines are explicitly selected, the full history can be removed by clicking the Clear all button. If only the user or cluster history is selected to be shown, this button changes accordingly to clear only the history currently displayed.
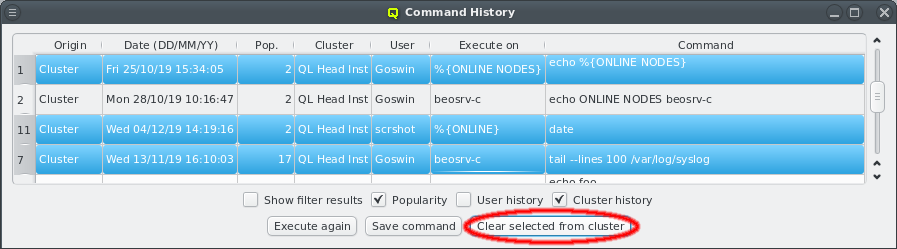
To delete individual history elements, select the corresponding entries in the history. Ranges of entries can be selected using the Shift key, individual ones using Ctrl. The button then changes to Clear selected and will remove all selected entries from the history.
|
When |