LDAP Management
Qlustar comes with a fully configured LDAP directory based on OpenLDAP/slapd to manage cluster users and groups. It is created at installation time and includes TLS support as well an automatically configured sssd setup. This section describes the corresponding GUI components.
LDAP User Management
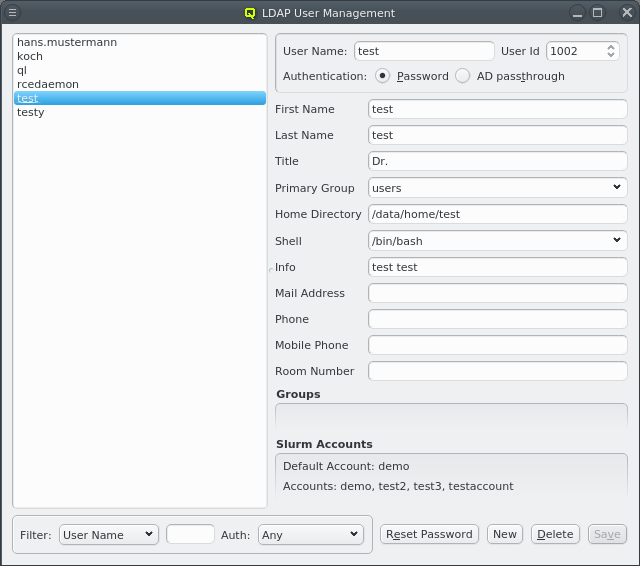
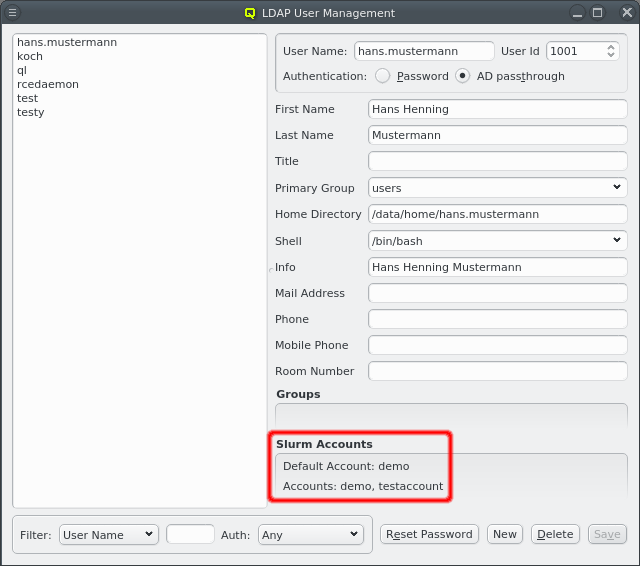
The LDAP User Management can be opened from the main menu . It shows a list of all LDAP Users on the left side and information about the currently selected user on the right.
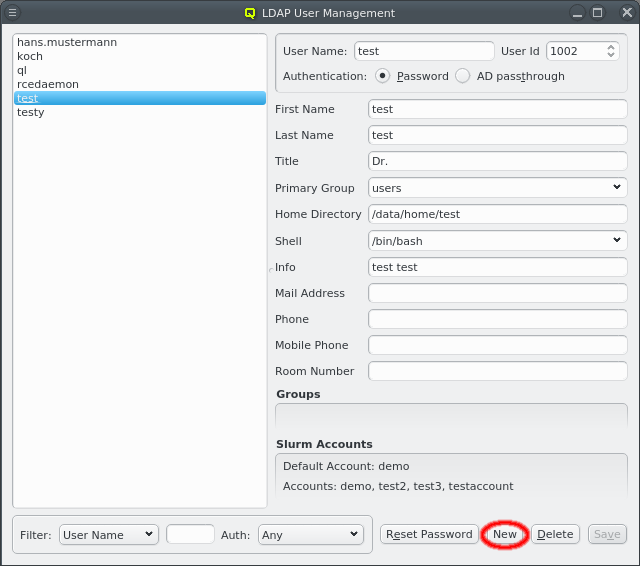
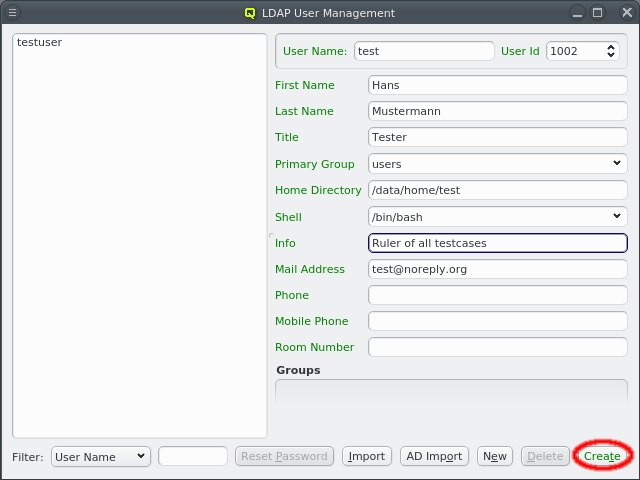
Click the New button to create a new user. The right side of the window then allows to input the necessary data for creation. Some fields are pre-set with default values. The label before each field indicates if the input is valid: It will be green if the current value is acceptable, yellow if it’s possible to complete it to an acceptable value and red for invalid input. The first field to be filled is the User Name. Changing it will also change the Home Directory field. The latter is pre-set using the Homedir Prefix with the username appended. Once all fields are green, the Create button will also turn green, indicating that it can be clicked to create the new user.
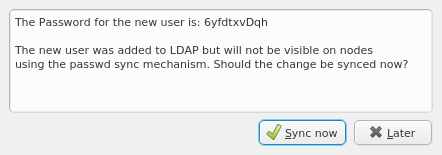
Once a new user has been created, its random initial password is shown in a popup window. The
user will then appear in LDAP immediately and be usable on any node with the standard Qlustar
Nameservice config. However, this is not the default setting for a node to avoid overloading
the LDAP server with simultaneous requests from many compute nodes on large clusters. The
default setup is to create a passwd and group file from the LDAP data which are sent to nodes
during the early boot process. This way user/group data are accessible via local lookups
leaving the server mostly idle. Click the Sync now button in the popup to update the
passwd and group file on any node using the default synchronization method.
The user information has 2 optional parts.
-
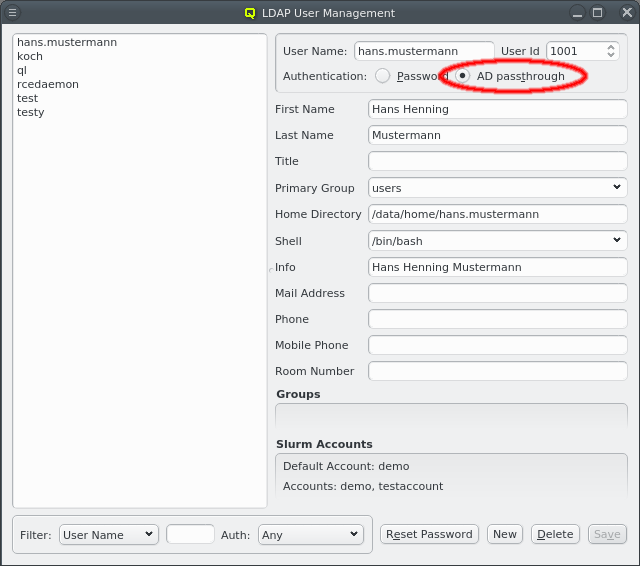
If the head-node is configured for LDAP AD (Active Directory) passthrough authentication, then the authentication method for the user can be selected either to use a cluster-local LDAP password (Qlustar standard) or to use AD Passthrough.
In case of AD passthrough, the password for the user can only be set/changed on the AD. New users will not get a random password and password reset via QluMan will not work for the user.
-
If the QluMan slurm component is installed on the head-node, then the user’s slurm accounts will be listed at the bottom. When a new LDAP user is created and the Primary Group is associated with a Slurm Account, a corresponding user will automatically be created in slurm and added to the associated slurm account. See Manage Slurm Accounts for associating LDAP Groups with Slurm Accounts.
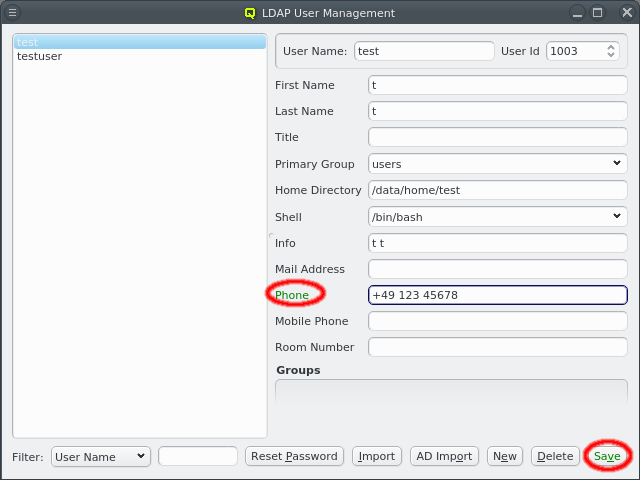
The information for an existing user can be edited by first selecting the user on the left side and then modifying the relevant field. The label is color-coded again to show the validity of the input. The Save button must be clicked to save the changes. To undo them without saving, just select a different user or close the window.
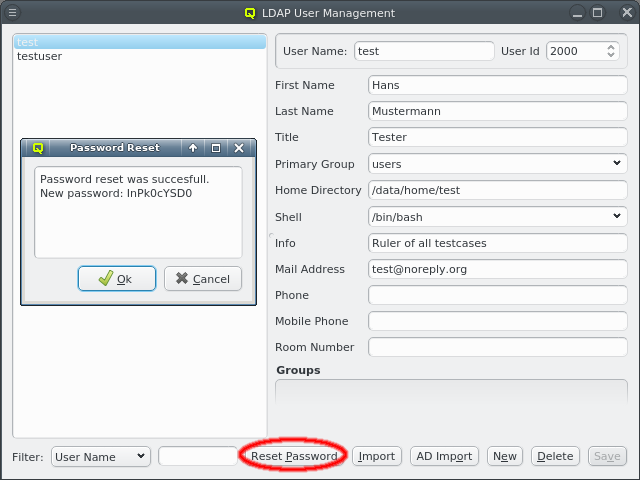
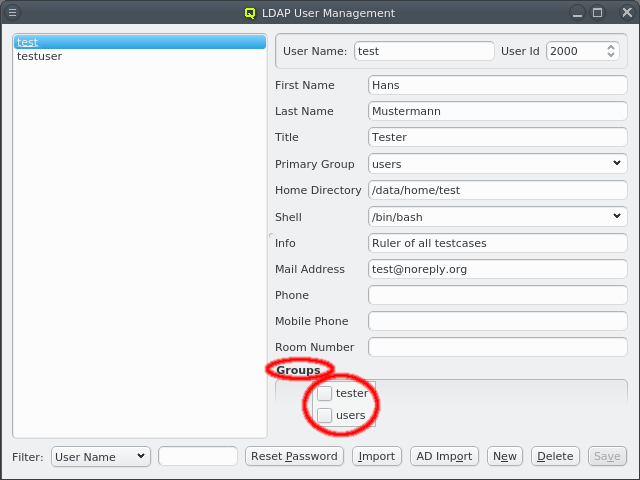
A user can be added to or removed from a group by opening the context-menu in the Groups box. Selecting an entry will add or remove the user from the corresponding group. A user’s password can be reset by selecting the user on the left side and clicking the Reset Password button. A window with the new password will then come up.
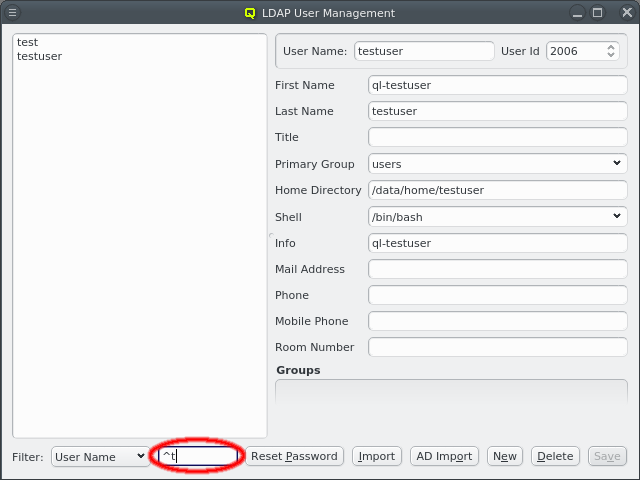
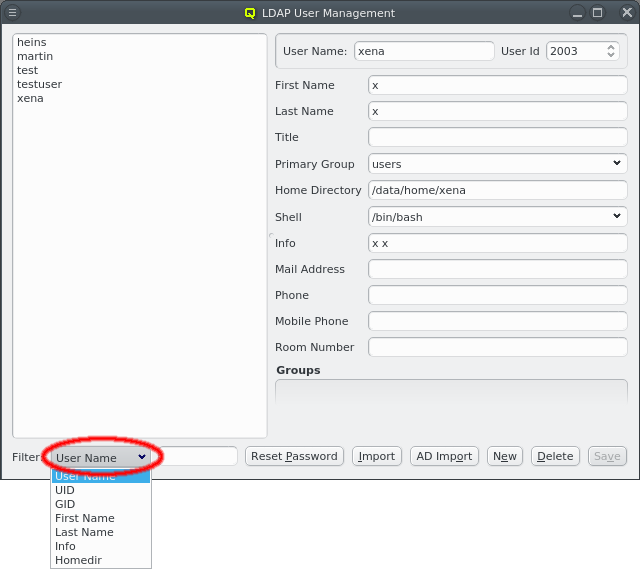
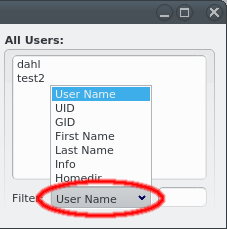
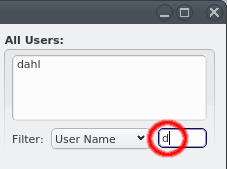
Once the cluster has many users, it can become hard to find a particular one in the user list. To simplify this, the list can be filtered as follows: Select one of the available filters from the Filter drop-down menu and enter a regular expression in the text field next to it. The user list then updates as you type, showing only users that match the regular expression for the selected filter.
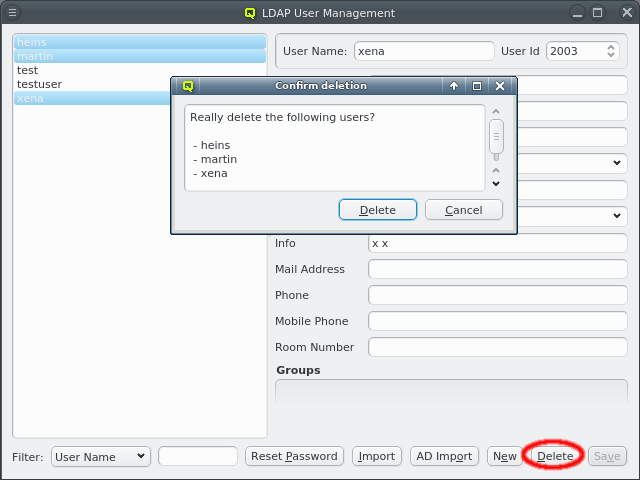
To delete users, select them on the left and click the Delete button.
|
The home directory of a user is not removed when deleting it. This will have to be done manually. |
LDAP Group Management
The LDAP Group Management dialog can be opened from the main menu .
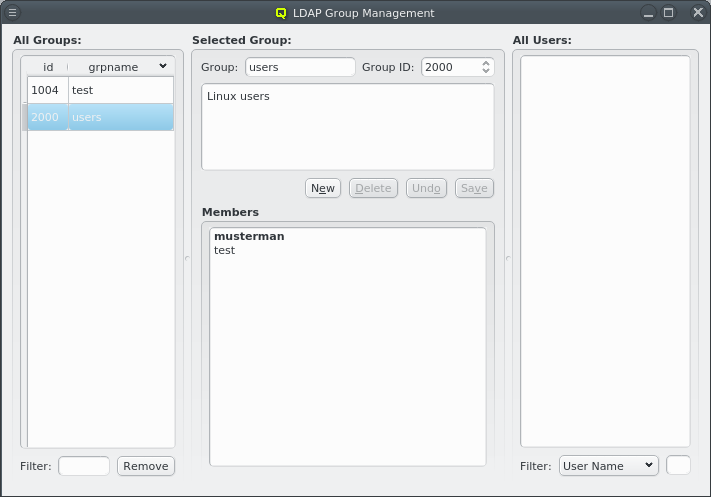
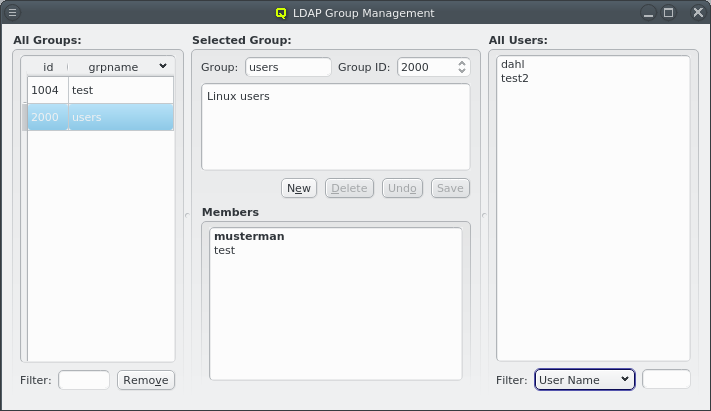
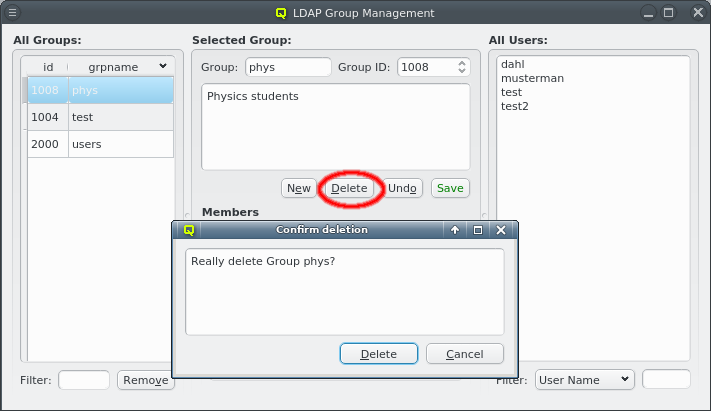
It allows creation and removal of groups as well as the management of group membership. The corresponding window is split into three parts: The left part shows a list of all LDAP groups, the middle displays details for the selected group, including a list of its members and the right has a list of users.
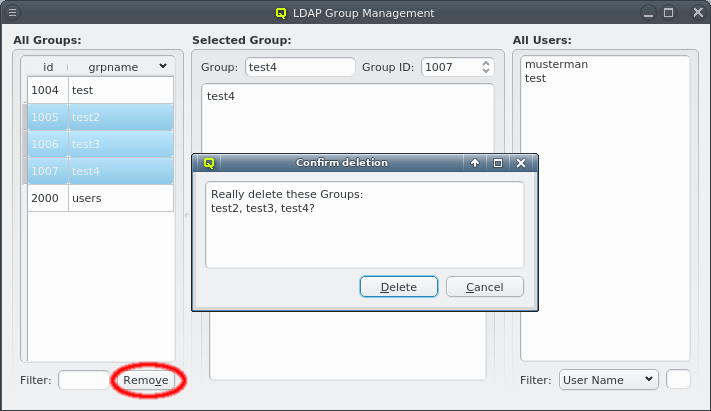
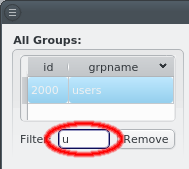

The list of groups can be sorted by either the group ID or the group name in ascending or descending order by clicking on the column name. It can also be filtered by specifying a regular expression for the group name in the Filter text field at the bottom. Groups can be removed in batches by selecting them in the list and clicking the Remove button.
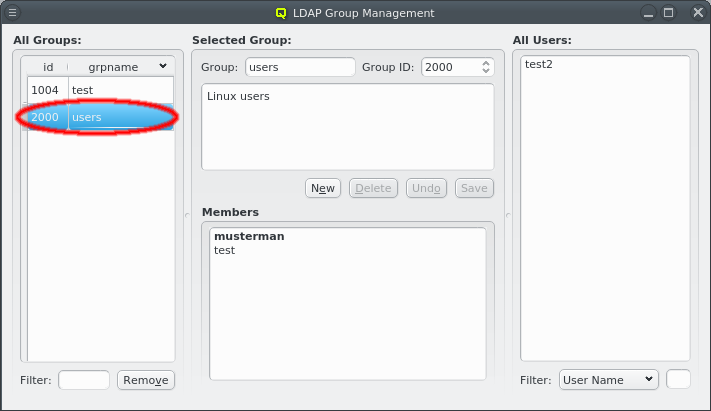
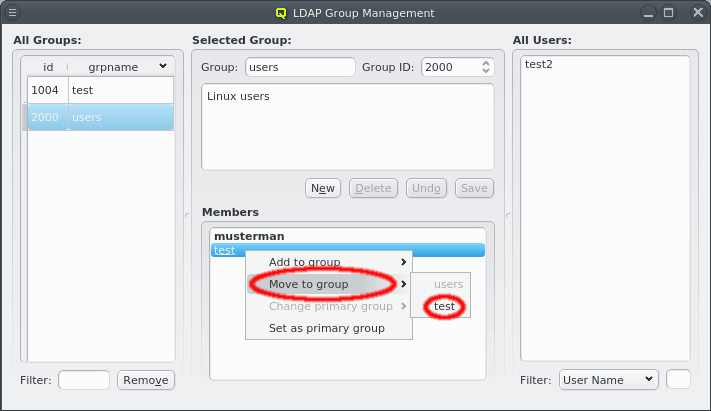
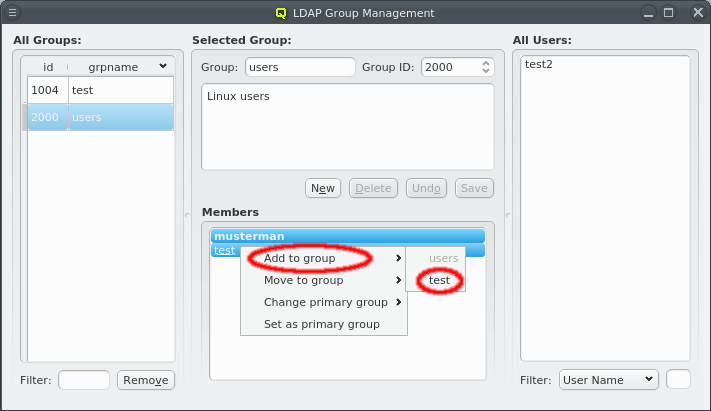
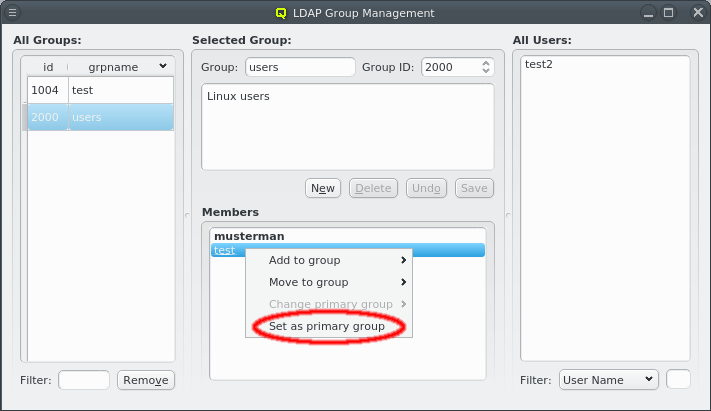
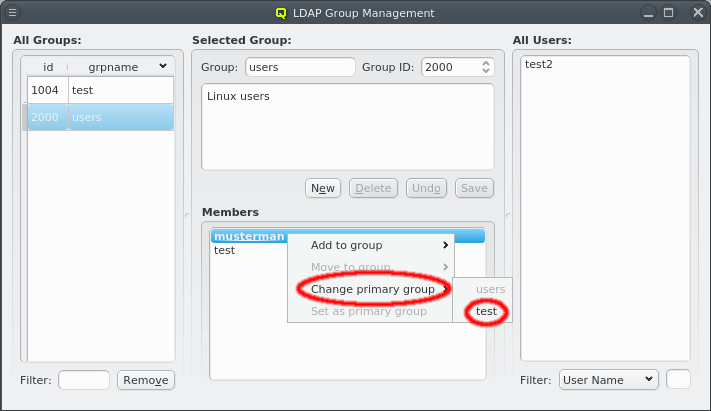
Selecting a group on the left will display its details in the middle: At the top the group name and group ID and the description of the group underneath. At the bottom is the list of users that are members of the group. Users that have this group as their primary group are shown in bold. The context menu for the Members box allows modifying the membership of the selected users in four ways:
-
The selected users can be added as members of another group.
-
The selected users can be moved from this group to another group. This only works for users that don’t have the group as primary group.
-
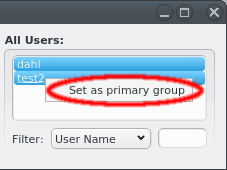
The primary group of the selected users can be changed to another group. This only works for users that have the group as primary group.
-
The primary group of the selected users can be changed to this group. This only works for users that don’t have the group as primary group already.
If a group is selected with its details shown in the middle, the right side lists users that are not members of the group. This list supports filtering to simplify finding users, just like in the LDAP User Management.
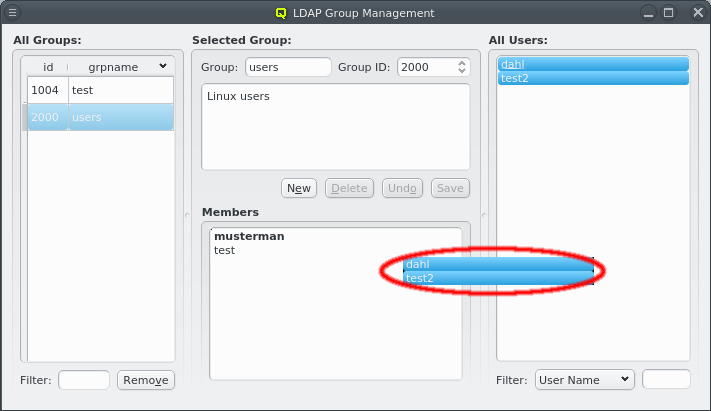
Selected users in this list can be added to the group shown in the middle by dragging them into the Members box. This also works in the other direction: Selecting users in the Members box and dragging them into the All Users box will remove them from the group, but only if this group is not their primary group.
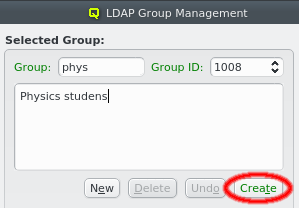

A new LDAP group can be created by clicking the New button. A group name must then be entered. The group ID can be changed from the suggested one and a description for the group can be added in the box below the name. The labels are color-coded to show valid inputs: Green for valid inputs, yellow for partial ones and red when the group ID is already in use. If all inputs are valid, the Create button will turn green and clicking it will create the new group.
|
The Group ID must be within the range set by Min and Max Group ID in the LDAP Config. |
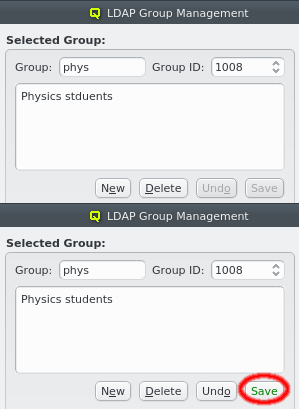
The description of the group can be edited by clicking in its box. When it is changed, the Undo and Save buttons become active. Click the Save button to save it.
The currently displayed group can be deleted by clicking the Remove button. Multiple groups can be selected and removed in batches.
LDAP User Import
Two methods for importing users are supported: a) Import of users, passwords and groups from flat files in the standard UNIX formats. b) QluMan may be configured to allow for a single sign-on setup where users can be imported from and authenticated against an Active Directory (AD) server. In such a setup, the Qlustar LDAP server uses SASL pass-through authentification against AD passwords instead of storing password hashes.
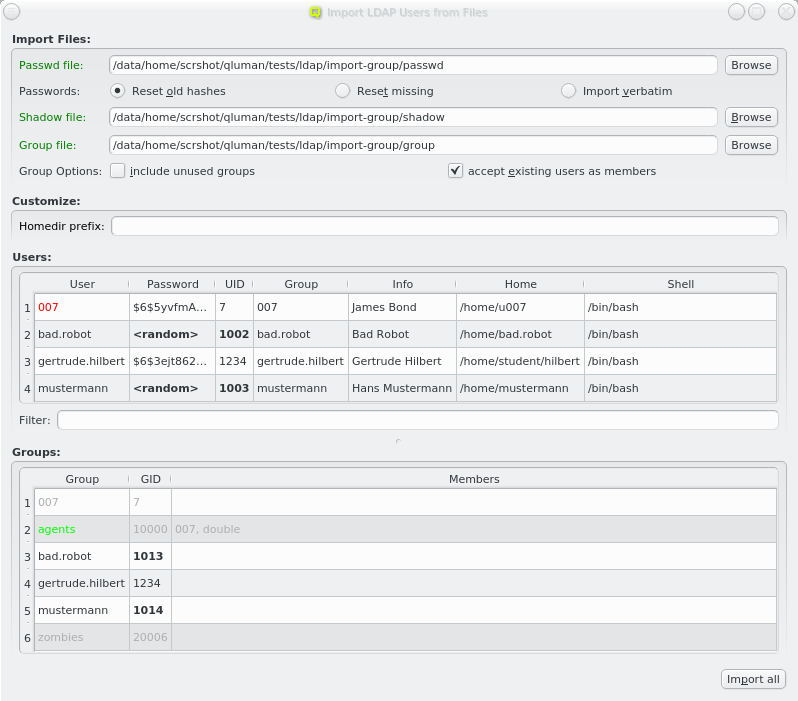
Importing from Files
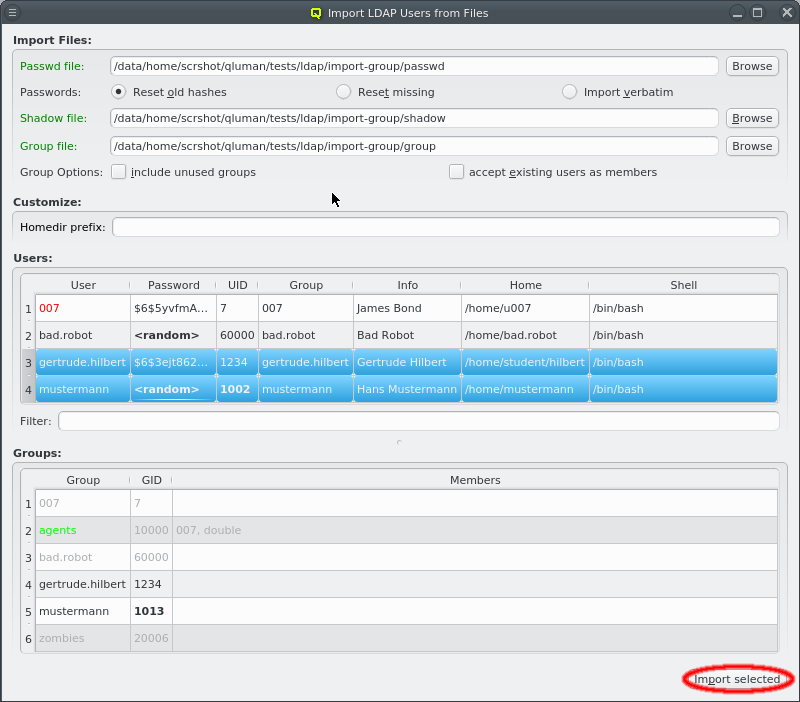
To import users, passwords and groups from flat files, select from the main menu.
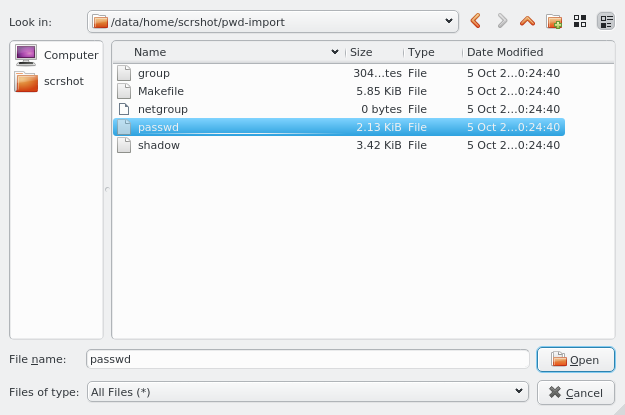

First enter the path to a passwd file or click the Browse button to select one in the
file dialog. The passwd file will then be loaded and the user data shown in the Users box
at the bottom.
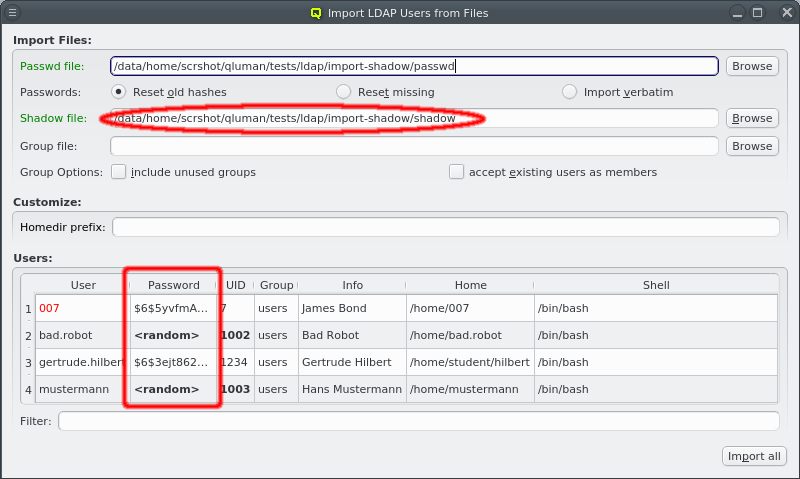
If a file named shadow exists in the same directory as the passwd file, it will be
automatically parsed as well to extract the passwords for the users to be
imported. Furthermore, if a file named group exists in the same directory, it will be used to
supply groups and group membership data for import. For both it is also possible to enter a
different filename. If passwords and/or groups are not wanted, the corresponding paths can be
left empty.
Importing passwords
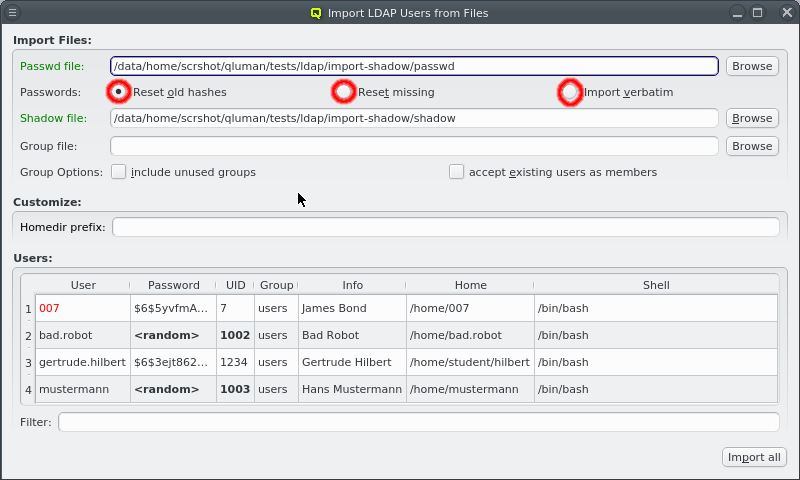
Without a shadow file, all users are created with a random password. If one is supplied, three import modes for the passwords may be selected:
-
Reset old hashes
Only passwords using secure encryption methods are imported from the shadow file. Passwords in older formats such as cram-md5 or even crypt syntax are ignored and new random passwords will be generated when creating the users.
-
Reset missing
All passwords in the shadow file are used regardless of how secure they are. But users without or with disabled passwords will have a new random password generated when creating the users.
-
Import verbatim
All entries in the shadow file are used verbatim, no matter whether they are secure, insecure, empty or disabled.
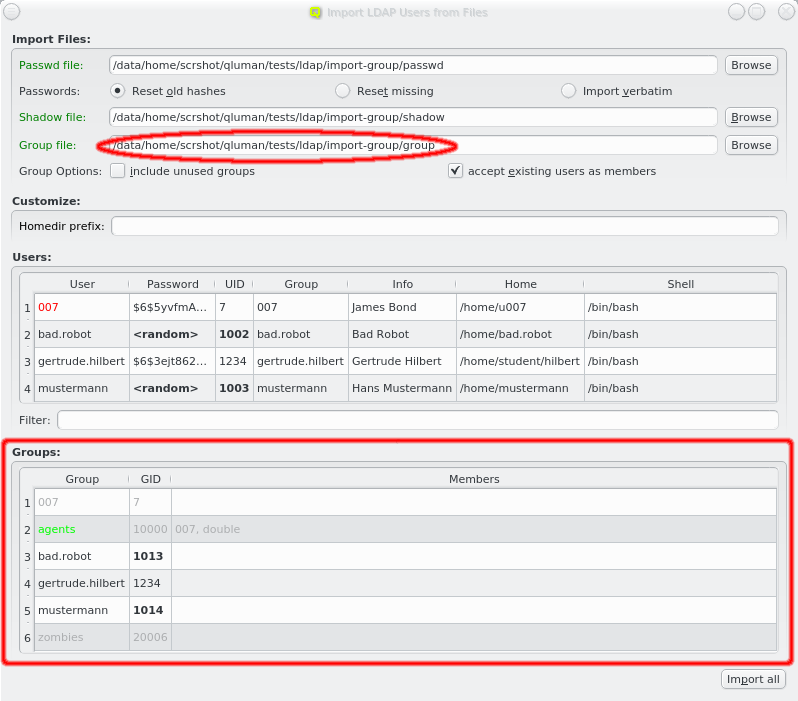
Importing Groups
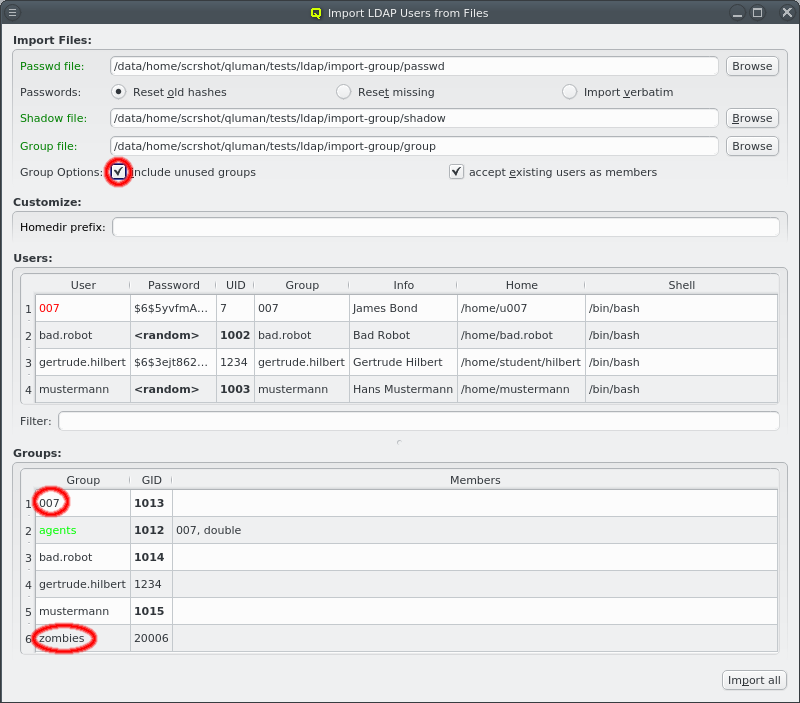
If no group file is specified then the primary group of all users is changed to the default group from the LDAP Config. If one is specified, the primary group of users is preserved, provided it exists in the group file. Membership of users in other groups is also imported.
When importing groups the Groups box appears at the bottom of the window showing all the groups from the file.
|

User selection
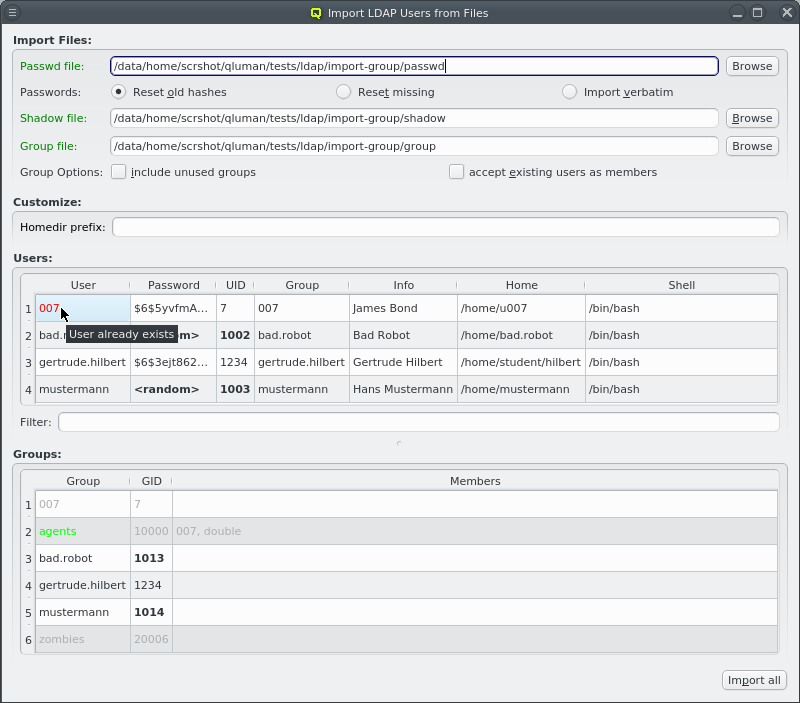
qluman-qt tries to preserve as much as possible from the selected passwd file, but some entries might be problematic. For example the UID for the user might already be in use or outside the allowed range as defined in LDAP Config. In such a case, a new UID is generated.
|
Users can now be individually selected for import using the standard multi-select method. Clicking the Import selected button at the bottom will then start the import (including groups if a group file is included). Per default, no users are selected, in which case all users will be imported. The button at the bottom then reads Import all.
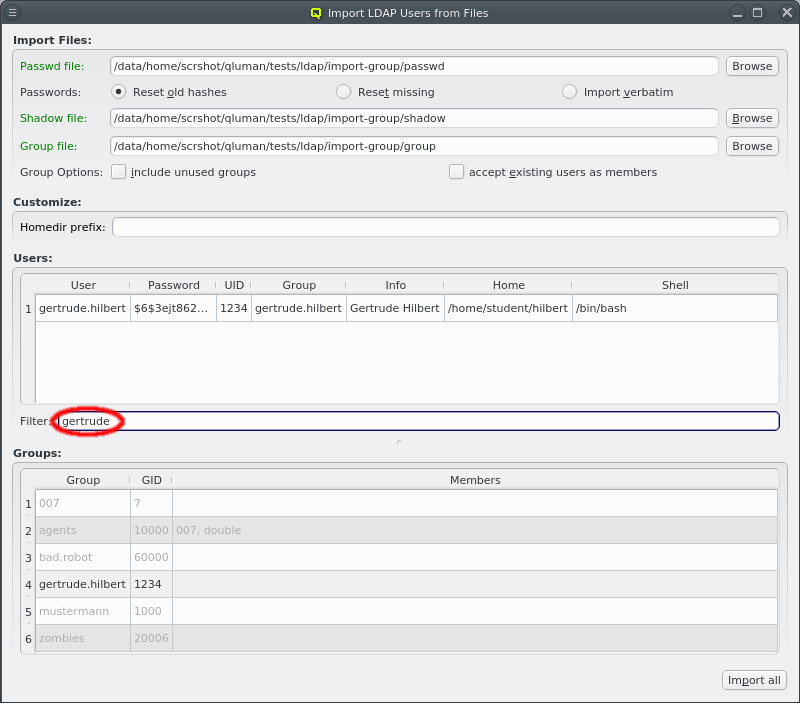
To make selecting users from a long list simpler, the user list can be filtered. Any text entered into the filter field is matched against the users login and info field and only matching entries are displayed.
|
During the process of selecting users, the proposed UID number for a user can change because new UIDs are only computed for selected users. This prevents gaps in the UID list. The same thing can happen for the GID of groups. |
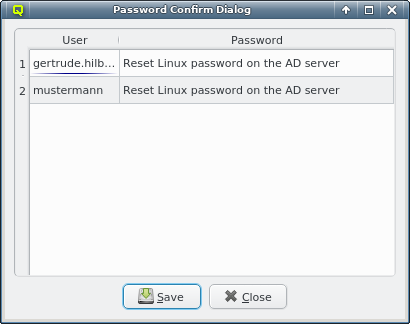
After importing the users, the ones with a password listed as <random> will get a new one with a
random value. A table listing the new password for each user will be shown after the import is
complete.
|
Creating users and resetting passwords is done one at a time and might take a while when many users are imported. Watch how they become ghosted in the Users box as they are created. |
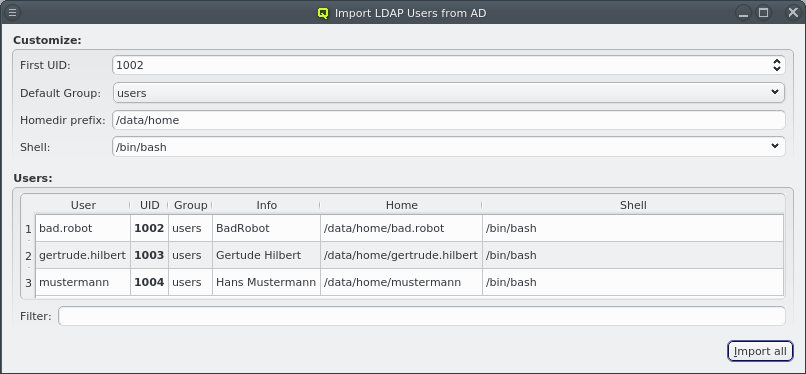
Importing from AD
To import users from an AD, select from the main menu. When the window opens, the list of users is requested from the AD server. This may cause a slight delay before the list is shown.
Only two user data fields are imported from the AD: The users login name (Windows sAMAccountName) and the info field. The UID, Group, Home and Shell are filled in by QluMan. No password hash is stored in Qlustar LDAP, since the password check is passed through to the AD server when authenticating such users.
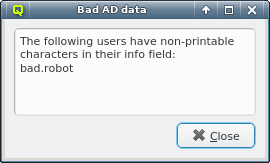
|
It is possible that the AD returns data that is incompatible with LDAP, for example a user can have non-printable characters in the info field. Since this would make it impossible to import the user into LDAP, a warning is shown and the problematic characters are removed. |
Customizing AD import
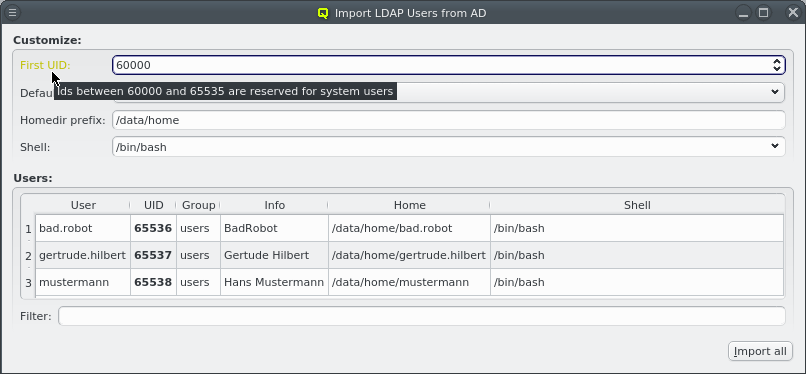
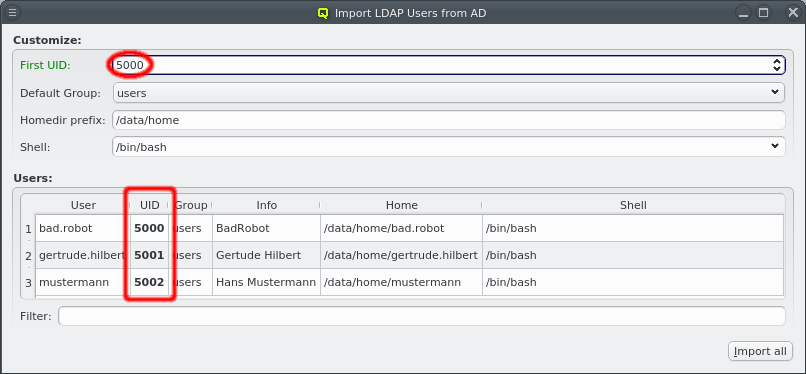
Per default, new UIDs will be generated for all users to be imported starting where the next available UID is taken from the LDAP Config. A valid custom choice for the first UID will turn the label green. An invalid choice will turn the label yellow and generate a tool-tip explaining why the choice is invalid.
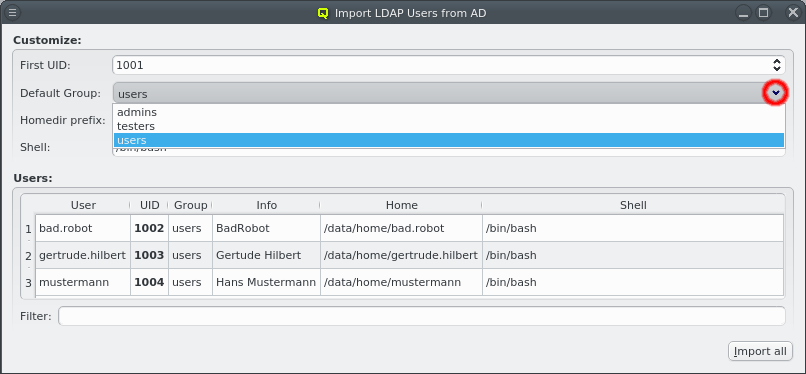
No group membership is imported from the AD, so per default, all imported users will be assigned to the Default Group defined in the LDAP Config. This can be changed by selecting a different group from the pull-down menu.
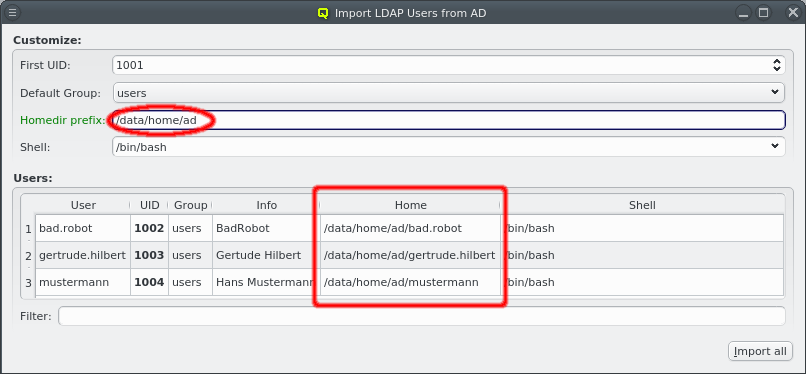
Similarly, the homedir prefix is taken from LDAP Config to generate the home directory path for the users. When changing the homedir prefix, make sure it is an existing path. The GUI only checks whether it is plausible, not whether it actually exists or whether the nodes configured to create homedirs have permissions to do so in that location.
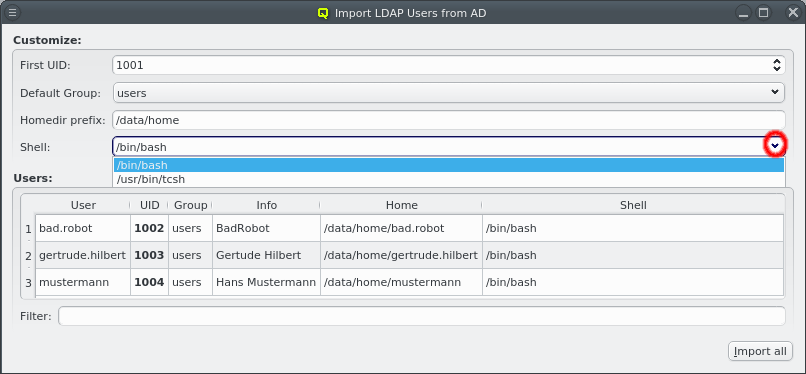
Finally, the shell for the users can be selected via the drop-down menu from the list of common shells and ones already in use by other users. The shell can also be entered directly for the rare cases where a custom one is desired.
|
When entering it directly the GUI does not check whether it actually exists or is a valid login shell. |
Select users for import from AD
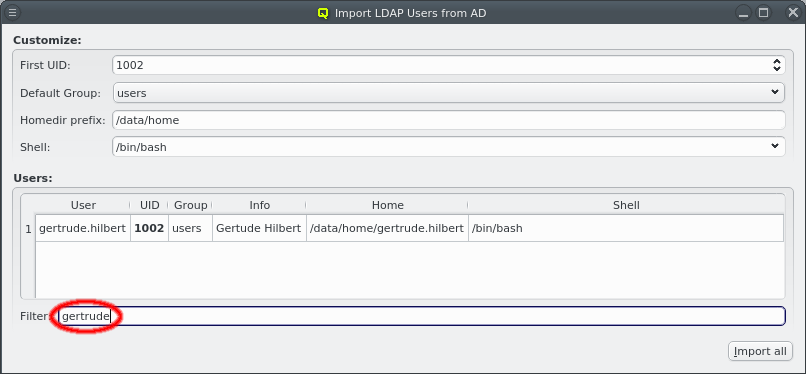
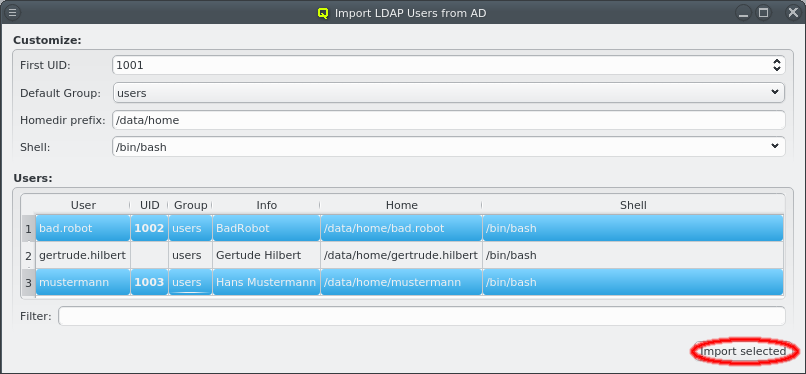

Users can now be selected for import using the standard multi-select method. Clicking the Import selected button at the bottom will then start the import. Per default, no users are selected, in which case all users will be imported. The button at the bottom then reads Import all. To make selecting users from a long list simpler, the user list can be filtered. Any text entered into the filter field is matched against the users login and info field and only matching entries are displayed.
LDAP Configuration
The LDAP Configuration dialog can be opened from the main menu . It handles a few settings relevant to the user and group management in qluman-qt.
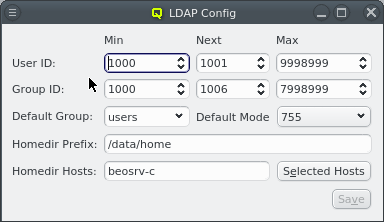
In QluMan, the user ID for LDAP users is limited to a customizable range of IDs. By convention, user IDs below 1000 (200 for CentOS) are reserved for system accounts and daemons. Per default, QluMan uses 2000 as the minimum value for UIDs. On the other hand, there is no well-defined convention for the maximum.
In some situations, it is convenient to assign certain ranges of IDs to certain user groups. Changing the Min and Max values before user creation then helps by making qluman-qt suggest UIDs only within that range for new users.
The Next value for User ID is the UID qluman-qt will suggest the next time a user is created. Once created, the Next value is incremented to the next unused UID. When it hits the Max User ID, it will be reset to Min User ID and start all over. The reason to explicitly keep track of this instead of always using the smallest free UID is to avoid reusing UIDs of deleted users. If a UID is reused, there is always a risk of loosing data protection: Left-over files on the system belonging to the old user would be accessible by the new user. The same mechanism is implemented for the Min, Next and Max settings of Group ID.
| User IDs and Group IDs in the range 60000 - 65535 are always reserved and will be skipped automatically if they fall in the Min/Max interval. |
The Default Group, Default Mode and Homedir Prefix can also be set here. They are used to fill the corresponding fields with default values when creating a new user. The homedir is constructed from the Homedir Prefix and the username of the new user.
Finally, a list of cluster nodes can be entered to set Homedir Hosts. The default setting is just beosrv-c, the head-node. A change is only needed if the home directories cannot be created on the head-node. This can be the case if home directories are on an external NFS server or a Lustre filesystem for example. If a list of hosts is entered here, they will be checked for accessibility one by one and the home directory created on the first one accessible.
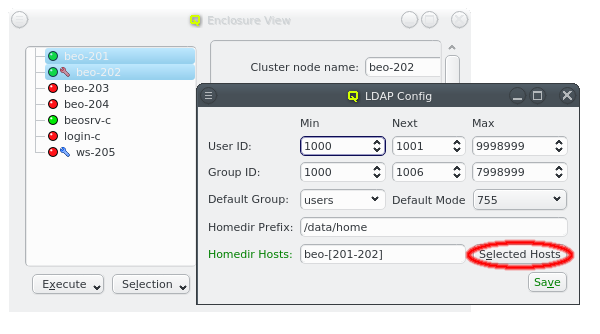
A hostlist can either be entered directly or hosts can be selected in the Enclosure View and the Selected Hosts button be clicked to enter a hostlist of the selected hosts.