Zpools and ZFS
|
This section borrows heavily from the excellent ZFS tutorial series by Aaron Toponce. |
Zpool Administration
VDEVs
Virtual Device Introduction
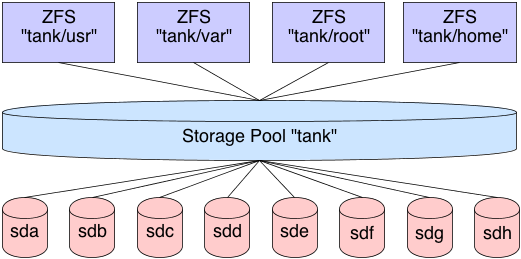
To start, we need to understand the concept of virtual devices, or VDEVs, as ZFS uses them
internally extensively. If you are already familiar with RAID, then this concept is not new to
you, although you may not have referred to it as VDEVs. Basically, we have a meta-device that
represents one or more physical devices. In Linux software RAID, you might have a /dev/md0
device that represents a RAID-5 array of 4 disks. In this case, /dev/md0 would be your VDEV.
There are seven types of VDEVs in ZFS:
-
disk (default): The physical hard drives in your system.
-
file: The absolute path of pre-allocated files/images.
-
mirror: Standard software RAID-1 mirror.
-
raidz1/2/3: Non-standard distributed parity-based software RAID levels.
-
spare: Hard drives marked as a hot spare for ZFS software RAID.
-
cache: Device used for a level 2 adaptive read cache (L2ARC).
-
log: A separate log (SLOG) called the ZFS Intent Log (ZIL).
|
It’s important to note that VDEVs are always dynamically striped. The stripe size is calculated by the number of disks and the size of the disks in the array. If more disks are added, the stripe size can be adjusted as needed for the additional disk. Thus, the dynamic nature of the stripe. |
Some zpool caveats
-
Once a device is added to a VDEV, it cannot be removed.
-
You cannot shrink a zpool, only grow it.
-
RAID-0 is faster than RAID-1, which is faster than RAIDZ-1, which is faster than RAIDZ-2, which is faster than RAIDZ-3.
-
Hot spares are not dynamically added unless you enable the setting, which is off by default.
-
A zpool will not dynamically resize when larger disks fill the pool unless you enable the setting before your first disk replacement, which is off by default.
-
A zpool will know about advanced format 4K sector drives if and only if the drive reports such.
-
Deduplication is extremely expensive, will cause performance degradation if not enough RAM is installed, and is pool-wide, not local to filesystems.
-
On the other hand, compression is extremely cheap on the CPU, yet it is disabled by default.
-
ZFS suffers a great deal from fragmentation, and full zpools will feel the performance degradation.
-
ZFS supports encryption natively, but it is not Free Software. It is proprietary copyrighted by Oracle.
The following examples, assume we have four disk drives: /dev/sd[c-f]. If you follow the
commands on your machine, make sure you execute the following cleanup step, that destroys the
created zpool, at the end of each example:
0 root@cl-head ~ #
zpool destroy data
Creating a simple pool
Let’s start by creating a simple zpool named data with 4 drives:
0 root@cl-head ~ #
zpool create data /dev/sd[c-f]
In this case, I’m using four disk VDEVs. Because VDEVs are always dynamically striped, effectively we now have a RAID-0 between four drives (no redundancy). We should also check the status of the zpool:
0 root@cl-head ~ #
zpool status data
  pool: data
 state: ONLINE
  scan: none requested
config:

    NAME        STATE     READ WRITE CKSUM
    data        ONLINE       0     0     0
      sdc       ONLINE       0     0     0
      sdd       ONLINE       0     0     0
      sde       ONLINE       0     0     0
      sdf       ONLINE       0     0     0

errors: No known data errors
A simple mirrored zpool
In this example, the four drives will be mirrored. So, rather than using the disk VDEV, we’ll be using mirror:
0 root@cl-head ~ #
zpool create data mirror /dev/sd[c-f]
0 root@cl-head ~ #
zpool status data
  pool: data
 state: ONLINE
  scan: none requested
config:

    NAME        STATE     READ WRITE CKSUM
    data        ONLINE       0     0     0
      mirror-0  ONLINE       0     0     0
        sdc     ONLINE       0     0     0
        sdd     ONLINE       0     0     0
        sde     ONLINE       0     0     0
        sdf     ONLINE       0     0     0

errors: No known data errors
Notice that now mirror-0 is the VDEV, with each physical device managed by it. As mentioned
earlier, this would be analogous to a Linux software RAID /dev/md0 device representing the
four physical devices. Destroy the pool again before starting the next example.
Nested VDEVs
VDEVs can be nested. A perfect example is a standard RAID-1+0 (commonly referred to as
RAID-10). This is a stripe of mirrors. In order to specify the nested VDEVs, just put them on
the command line in order:
0 root@cl-head ~ #
zpool create data mirror /dev/sd[cd] mirror /dev/sd[ef]
0 root@cl-head ~ #
zpool status data
  pool: data
 state: ONLINE
  scan: none requested
config:

    NAME        STATE     READ WRITE CKSUM
    data        ONLINE       0     0     0
      mirror-0  ONLINE       0     0     0
        sdc     ONLINE       0     0     0
        sdd     ONLINE       0     0     0
      mirror-1  ONLINE       0     0     0
        sde     ONLINE       0     0     0
        sdf     ONLINE       0     0     0

errors: No known data errors
The first VDEV is mirror-0 which is managing /dev/sd[cd], the second VDEV is mirror-1
managing /dev/sd[ef]. Since VDEVs are always dynamically striped, mirror-0 and mirror-1
are also striped, thus creating the RAID-10 setup. Don’t forget to cleanup before continuing.
File VDEVs
As mentioned, pre-allocated files can also be used for setting up zpools on top of your existing filesystem.
|
This is meant entirely for testing purposes, and not for storing production data. Using files is a great way to have a sandbox, where you can test compression ratio, the size of the deduplication table, or other things without actually committing production data to it. The image files must be pre-allocated, and not sparse files or thin provisioned. |
Let’s see how this works:
0 root@cl-head ~ #
for i in {1..4}; do dd if=/dev/zero of=/tmp/file$i bs=1M count=64 \
  &> /dev/null; done
0 root@cl-head ~ #
zpool create data /tmp/file[1-4]
0 root@cl-head ~ #
zpool status data
  pool: data
 state: ONLINE
  scan: none requested
config:

    NAME          STATE     READ WRITE CKSUM
    data          ONLINE       0     0     0
      /tmp/file1  ONLINE       0     0     0
      /tmp/file2  ONLINE       0     0     0
      /tmp/file3  ONLINE       0     0     0
      /tmp/file4  ONLINE       0     0     0

errors: No known data errors
In this case, we created a RAID-0. We used pre-allocated files using /dev/zero that are each
64MB (the minimum for a VDEV) in size. Thus, the size of our zpool is 256 MB in usable
space. Each file, as with our first example using disks, is a VDEV. Of course, you can treat
the files as disks, and put them into a mirror configuration, RAID-10, RAIDZ-1, etc.
Hybrid pools
Using our four file/disk VDEVs, we now create a hybrid pool with cache and log drives.
0 root@cl-head ~ #
zpool create data mirror /tmp/file[12] mirror /tmp/file[34] \
log mirror /dev/sd[cd] cache /dev/sd[ef]
0 root@cl-head ~ #
zpool status data
  pool: data
 state: ONLINE
  scan: none requested
config:

    NAME            STATE     READ WRITE CKSUM
    data            ONLINE       0     0     0
      mirror-0      ONLINE       0     0     0
        /tmp/file1  ONLINE       0     0     0
        /tmp/file2  ONLINE       0     0     0
      mirror-1      ONLINE       0     0     0
        /tmp/file3  ONLINE       0     0     0
        /tmp/file4  ONLINE       0     0     0
    logs
      mirror-2      ONLINE       0     0     0
        sdc         ONLINE       0     0     0
        sdd         ONLINE       0     0     0
    cache
      sde           ONLINE       0     0     0
      sdf           ONLINE       0     0     0

errors: No known data errors
First, we created a RAID-10 using our four pre-allocated image files. Notice the VDEVs
mirror-0/1, and what they are managing. Second, we created a third VDEV called mirror-2
that actually is not used for storing data in the pool, but is used as a ZFS intent log
(ZIL). Finally we created two standard disk VDEVs for caching data (sde/f) that are also
managed by the cache VDEV. Hence, in this example, we’ve used 6 of the 7 VDEV types listed
above, the only one missing is spare. Since neither the logs nor the cache are long-term
storage for the pool, we’ve created a hybrid pool.
|
In production, the files would be physical disks, and the ZIL and cache would be fast SSDs. |
|
Also do notice the simplicity in the implementation. Consider doing something similar with LVM, RAID and ext4. You would need to do the following: 0 root@cl-head ~ # mdadm -C /dev/md0 -l 0 -n 4 /dev/sd[c-f] 0 root@cl-head ~ # pvcreate /dev/md0 0 root@cl-head ~ # vgcreate /dev/md0 data 0 root@cl-head ~ # lvcreate -l 100%FREE -n home data 0 root@cl-head ~ # mkfs.ext4 /dev/data/home 0 root@cl-head ~ # mkdir -p /data/home 0 root@cl-head ~ # mount -t ext4 /dev/data/home /data/home With ZFS, this was done with one command (apart from the analogous of creating the logical volume, which will get to later), rather than seven. |
RAIDZ
Self-healing RAID
ZFS can detect silent errors, and fix them on the fly. Suppose that there is bad data on a disk in the array. When the application requests the data, ZFS constructs the stripe as we just learned, and compares each block against a SHA-256 checksum in the meta-data. If the read stripe does not match the checksum, ZFS finds the corrupted block, it then reads the parity, and fixes it through combinatorial reconstruction and returns valid data to the application.
This is all accomplished in ZFS itself, without the help of special hardware. Another aspect of the RAIDZ levels is the fact, that if the stripe is longer than the disks in the array and there is a disk failure, not enough data with the parity can reconstruct the data. Thus, ZFS will mirror some of the data in the stripe to prevent this from happening.
|
If your RAID and filesystem are separate products, they are not aware of each other, therefore detecting and fixing silent data errors is not possible in this case. |
Let’s build some RAIDZ pools now. We’ll be using 5 disk drives /dev/sd[c-g] (each 10TB) in
the following examples.
RAIDZ-1
RAIDZ-1 is similar to RAID-5 in that there is a single parity bit distributed across all the
disks in the array. The stripe width is variable, and could cover the exact width of disks in
the array, fewer disks, or more disks. This still allows for one disk failure to maintain
data. Two disk failures results in data loss. A minimum of 3 disks must be used in a
RAIDZ-1. The capacity of your storage will be the number of disks in your array times the
storage of the smallest disk, minus one disk for parity storage. So in the following example, I
should have roughly 20 TB of usable disk space.
To setup a zpool with RAIDZ-1, we use the raidz1 VDEV, in this case using only 3 disk drives:
0 root@cl-head ~ #
zpool create data raidz1 /dev/sd[c-e]

0 root@cl-head ~ #
zpool status data
  pool: data
 state: ONLINE
  scan: none requested
config:

    NAME        STATE     READ WRITE CKSUM
    data        ONLINE       0     0     0
      raidz1-0  ONLINE       0     0     0
        sdc     ONLINE       0     0     0
        sdd     ONLINE       0     0     0
        sde     ONLINE       0     0     0

errors: No known data errors
Cleanup before moving on.
RAIDZ-2
RAIDZ-2 is similar to RAID-6 in that there is a dual parity bit distributed across all the disks in the array. The stripe width is variable, and could cover the exact width of disks in the array, fewer disks, or more disks. This still allows for two disk failures to maintain data. Three disk failures results in data loss. A minimum of 4 disks must be used in a RAIDZ-2. The capacity of your storage will be the number of disks in your array times the storage of the smallest disk, minus two disks for parity storage. So in the following example, we should again have roughly 20TB of usable disk space.
To setup a zpool with RAIDZ-2, we use the raidz2 VDEV:
0 root@cl-head ~ #
zpool create data raidz2 /dev/sd[c-f]
0 root@cl-head ~ #
zpool status data
  pool: data
 state: ONLINE
  scan: none requested
config:

    NAME        STATE     READ WRITE CKSUM
    data        ONLINE       0     0     0
      raidz2-0  ONLINE       0     0     0
        sdc     ONLINE       0     0     0
        sdd     ONLINE       0     0     0
        sde     ONLINE       0     0     0
        sdf     ONLINE       0     0     0

errors: No known data errors
Cleanup again before moving on.
RAIDZ-3
RAIDZ-3 does not have a standardized RAID level to compare it to. However, it is the logical continuation of RAIDZ-1 and RAIDZ-2 in that there is a triple parity bit distributed across all the disks in the array. The stripe width is variable, and could cover the exact width of disks in the array, fewer disks, or more disks. This still allows for three disk failures to maintain data. Four disk failures results in data loss. A minimum of 5 disks must be used with RAIDZ-3. The capacity of your storage will be the number of disks in your array times the storage of the smallest disk, minus three disks for parity storage. So in our example, we again have roughly 20TB of usable disk space.
To setup a zpool with RAIDZ-3, we use the raidz3 VDEV:
0 root@cl-head ~ #
zpool create data raidz3 /dev/sd[c-g]
0 root@cl-head ~ #
zpool status data
  pool: data
 state: ONLINE
  scan: none requested
config:

    NAME        STATE     READ WRITE CKSUM
    data        ONLINE       0     0     0
      raidz3-0  ONLINE       0     0     0
        sdc     ONLINE       0     0     0
        sdd     ONLINE       0     0     0
        sde     ONLINE       0     0     0
        sdf     ONLINE       0     0     0
        sdg     ONLINE       0     0     0

errors: No known data errors
Cleanup again before moving on.
Performance Considerations
Lastly, in terms of performance, mirrors will always outperform RAIDZ levels. On both reads and writes. Further, RAIDZ-1 will outperform RAIDZ-2, which it turn will outperform RAIDZ-3. The more parity bits you have to calculate, the longer it’s going to take to both read and write the data. Of course, you can always add striping to your VDEVs to maximize on some of this performance. Nested RAID levels, such as RAID-10 are the performance optimum due to the flexibility in which you can lose disks without parity, and the throughput you get from the stripe. So, in a nutshell, from fastest to slowest, your non-nested RAID levels will perform as:
-
RAID-0 (fastest)
-
RAID-1
-
RAIDZ-1
-
RAIDZ-2
-
RAIDZ-3 (slowest)
Exporting and Importing Storage Pools
Motivation
As a GNU/Linux storage administrator, you may come across the need to move your storage from one server to another. This could be accomplished by physically moving the disks from one storage box to another, or by copying the data from the old live running system to the new. we will cover both cases in this series. The latter deals with sending and receiving ZFS snapshots, a topic that will take us some time getting to. This post will deal with the former; that is, physically moving the drives.
One slick feature of ZFS is the ability to export your storage pool, so you can disassemble the drives, unplug their cables, and move the drives to another system. Once on the new system, ZFS gives you the ability to import the storage pool, regardless of the order of the drives. A good demonstration of this is to grab some USB sticks, plug them in, and create a ZFS storage pool. Then export the pool, unplug the sticks, drop them into a hat, and mix them up. Then, plug them back in at any random order, and re-import the pool on a new box. In fact, ZFS is smart enough to detect endianness. In other words, you can export the storage pool from a big endian system, and import the pool on a little endian system, without hiccup.
Exporting Storage Pools
When the migration is ready to take place, before unplugging the power, you need to export the storage pool. This will cause the kernel to flush all pending data to disk, writes data to the disk acknowledging that the export was done, and removes all knowledge that the storage pool existed in the system. At this point, it’s safe to shut down the computer, and remove the drives.
If you do not export the storage pool before removing the drives, you will not be able to import the drives on the new system, and you might not have gotten all unwritten data flushed to disk. Even though the data will remain consistent due to the nature of the filesystem, when importing, it will appear to the old system as a faulted pool. Further, the destination system will refuse to import a pool that has not been explicitly exported. This is to prevent race conditions with network attached storage that may be already using the pool.
To export a storage pool, use the following command:
0 root@cl-head ~ #
zpool export data
This command will attempt to unmount all ZFS datasets as well as the pool. By default, when
creating ZFS storage pools and filesystems, they are automatically mounted to the system. There
is no need to explicitly unmount the filesystems as you with with ext3 or ext4. The export will
handle that. Further, some pools may refuse to be exported, for whatever reason. You can pass
the -f switch if needed to force the export.
Importing Storage Pools
Once the drives have been physically installed into the new server, you can import the pool. Further, the new system may have multiple pools installed, to which you will want to determine which pool to import, or to import them all. If the storage pool “data” does not already exist on the new server, and this is the pool you wish to import, then you can run the following command:
0 root@cl-head ~ #
zpool import data

0 root@cl-head ~ #
zpool status data

state: ONLINE
scan: none requested
config:

NAME        STATE     READ WRITE CKSUM
data        ONLINE       0     0     0
mirror-0  ONLINE       0     0     0
sde     ONLINE       0     0     0
sdf     ONLINE       0     0     0
mirror-1  ONLINE       0     0     0
sdg     ONLINE       0     0     0
sdh     ONLINE       0     0     0
mirror-2  ONLINE       0     0     0
sdi     ONLINE       0     0     0
sdj     ONLINE       0     0     0

errors: No known data errors
Your storage pool state may not be ONLINE, meaning that everything is healthy. If the system does not recognize a disk in your pool, you may get a DEGRADED state. If one or more of the drives appear as faulty to the system, then you may get a FAULTED state in your pool. You will need to troubleshoot what drives are causing the problem, and fix accordingly.
You can import multiple pools simultaneously by either specifying each pool as an argument, or
by passing the -a switch for importing all discovered pools. For importing the two pools
“data1″ and “data2″, type:
0 root@cl-head ~ #
zpool import data1 data2
For importing all known pools, type:
0 root@cl-head ~ #
zpool import -a
Recovering A Destroyed Pool
If a ZFS storage pool was previously destroyed, the pool can still be imported to the
system. Destroying a pool doesn’t wipe the data on the disks, so the meta-data is still in
tact, and the pool can still be discovered. Let’s take a clean pool called “data”, destroy it,
move the disks to a new system, then try to import the pool. You will need to pass the -D
switch to tell ZFS to import a destroyed pool. Do not provide the pool name as an argument, as
you would normally do:
(server A)
0 root@cl-head ~ #
zpool destroy data

(server B)
0 root@cl-head ~ #
zpool import -D

pool: data
id: 17105118590326096187
state: ONLINE (DESTROYED)
action: The pool can be imported using its name or numeric identifier.
config:

data        ONLINE
mirror-0  ONLINE
sde     ONLINE
sdf     ONLINE
mirror-1  ONLINE
sdg     ONLINE
sdh     ONLINE
mirror-2  ONLINE
sdi     ONLINE
sdj     ONLINE


pool: data
id: 2911384395464928396
state: UNAVAIL (DESTROYED)
status: One or more devices are missing from the system.
action: The pool cannot be imported. Attach the missing
devices and try again.
see: http://zfsonlinux.org/msg/ZFS-8000-6X
config:

data          UNAVAIL  missing device
sdk         ONLINE
sdr         ONLINE

Additional devices are known to be part of this pool, though their
exact configuration cannot be determined.
Notice that the state of the pool is ONLINE (DESTROYED). Even though the pool is ONLINE, it is
only partially online. Basically, it’s only been discovered, but it’s not available for use. If
you run the df command, you will find that the storage pool is not mounted. This means the
ZFS filesystem datasets are not available, and you currently cannot store data into the
pool. However, ZFS has found the pool, and you can bring it fully ONLINE for standard usage by
running the import command one more time, this time specifying the pool name as an argument to
import:
(server B)
0 root@cl-head ~ #
zpool import -D data

cannot import 'data': more than one matching pool
import by numeric ID instead

(server B)
0 root@cl-head ~ #
zpool import -D 17105118590326096187

(server B)
0 root@cl-head ~ #
zpool status data

pool: data
state: ONLINE
scan: none requested
config:

NAME        STATE     READ WRITE CKSUM
data        ONLINE       0     0     0
mirror-0  ONLINE       0     0     0
sde     ONLINE       0     0     0
sdf     ONLINE       0     0     0
mirror-1  ONLINE       0     0     0
sdg     ONLINE       0     0     0
sdh     ONLINE       0     0     0
mirror-2  ONLINE       0     0     0
sdi     ONLINE       0     0     0
sdj     ONLINE       0     0     0

errors: No known data errors
Notice that ZFS was warning me that it found more than on storage pool matching the name “data”, and to import the pool, I must use its unique identifier. So, I pass that as an argument from my previous import. This is because in my previous output, we can see there are two known pools with the pool name “data”. However, after specifying its ID, I was able to successfully bring the storage pool to full ONLINE status. You can identify this by checking its status:
0 root@cl-head ~ #
zpool status data

pool: data
state: ONLINE
status: The pool is formatted using an older on-disk format.  The pool can
still be used, but some features are unavailable.
action: Upgrade the pool using 'zpool upgrade'.  Once this is done, the
pool will no longer be accessible on older software versions.
scrub: none requested
config:

NAME        STATE     READ WRITE CKSUM
data        ONLINE       0     0     0
mirror-0  ONLINE       0     0     0
sde     ONLINE       0     0     0
sdf     ONLINE       0     0     0
mirror-1  ONLINE       0     0     0
sdg     ONLINE       0     0     0
sdh     ONLINE       0     0     0
mirror-2  ONLINE       0     0     0
sdi     ONLINE       0     0     0
sdj     ONLINE       0     0     0
Upgrading Storage Pools
One thing that may crop up when migrating disk, is that there may be different pool and filesystem versions of the software. For example, you may have exported the pool on a system running pool version 20, while importing into a system with pool version 28 support. As such, you can upgrade your pool version to use the latest software for that release. As is evident with the previous example, it seems that the new server has an update version of the software. We are going to upgrade.
|
Once you upgrade your pool to a newer version of ZFS, older versions will not be able to use the storage pool. So, make sure that when you upgrade the pool, you know that there will be no need for going back to the old system. Further, there is no way to revert the upgrade and revert to the old version. |
First, we can see a brief description of features that will be available to the pool:
0 root@cl-head ~ #
zpool upgrade -v

This system is currently running ZFS pool version 28.
The following versions are supported:

VER   DESCRIPTION
---   ---------------------------------------------------
1    Initial ZFS version
2    Ditto blocks (replicated meta-data)
3    Hot spares and double parity RAID-Z
4    zpool history
5    Compression using the gzip algorithm
6    bootfs pool property
7    Separate intent log devices
8    Delegated administration
9    refquota and refreservation properties
10   Cache devices
11   Improved scrub performance
12   Snapshot properties
13   snapused property
14   passthrough-x aclinherit
15   user/group space accounting
16   stmf property support
17   Triple-parity RAID-Z
18   Snapshot user holds
19   Log device removal
20   Compression using zle (zero-length encoding)
21   Deduplication
22   Received properties
23   Slim ZIL
24   System attributes
25   Improved scrub stats
26   Improved snapshot deletion performance
27   Improved snapshot creation performance
28   Multiple vdev replacements

For more information on a particular version, including supported releases,
see the ZFS Administration Guide.
So, let’s perform the upgrade to get to version 28 of the pool:
0 root@cl-head ~ #
zpool upgrade -a
Conclusion
There are plenty of situations where you may need to move disk from one storage server to
another. Thankfully, ZFS makes this easy with exporting and importing pools. Further, the
zpool command has enough sub-commands and switches to handle the most common scenarios when a
pool will not export or import. Towards the very end of the series, we’ll discuss the zdb
command, and how it may be useful here. But at this point, steer clear of zdb, and just focus
on keeping your pools in order, and properly exporting and importing them as needed.
Scrub and Resilver
Standard Validation
In GNU/Linux, we have a number of filesystem checking utilities for verifying data integrity on
the disk. This is done through the “fsck” utility. However, it has a couple major
drawbacks. First, you must fsck the disk offline if you are intending on fixing data
errors. This means downtime. So, you must use the umount command to unmount your disks,
before the fsck. For root partitions, this further means booting from another medium, like a
CDROM or USB stick. Depending on the size of the disks, this downtime could take hours. Second,
the filesystem, such as ext3 or ext4, knows nothing of the underlying data structures, such as
LVM or RAID. You may only have a bad block on one disk, but a good block on another
disk. Unfortunately, Linux software RAID has no idea which is good or bad, and from the
perspective of ext3 or ext4, it will get good data if read from the disk containing the good
block, and corrupted data from the disk containing the bad block, without any control over
which disk to pull the data from, and fixing the corruption. These errors are known as silent
data errors, and there is really nothing you can do about it with the standard GNU/Linux
filesystem stack.
ZFS Scrubbing
With ZFS on Linux, detecting and correcting silent data errors is done through scrubbing the disks. This is similar in technique to ECC RAM, where if an error resides in the ECC DIMM, you can find another register that contains the good data, and use it to fix the bad register. This is an old technique that has been around for a while, so it’s surprising that it’s not available in the standard suite of journaled filesystems. Further, just like you can scrub ECC RAM on a live running system, without downtime, you should be able to scrub your disks without downtime as well. With ZFS, you can.
While ZFS is performing a scrub on your pool, it is checking every block in the storage pool against its known SHA-256 checksum. Every block from top-to-bottom is checksummed using SHA-256 by default. This can be changed to using the Fletcher algorithm, although it’s not recommended. Because of SHA-256, you have a 1 in 2^256 or 1 in 10^77 chance that a corrupted block hashes to the same SHA-256 checksum. This is a 0.00000000000000000000000000000000000000000000000000000000000000000000000000001% chance. For reference, uncorrected ECC memory errors will happen on about 50 orders of magnitude more frequently, with the most reliable hardware on the market. So, when scrubbing your data, the probability is that either the checksum will match, and you have a good data block, or it won’t match, and you have a corrupted data block.
Scrubbing ZFS storage pools is not something that happens automatically. You need to do it manually, and it’s highly recommended that you do it on a regularly scheduled interval. The recommended frequency at which you should scrub the data depends on the quality of the underlying disks. If you have SAS or FC disks, then once per month should be sufficient. If you have consumer grade SATA or SCSI, you should do once per week. You can schedule a scrub easily with the following command:
0 root@cl-head ~ #
zpool scrub data

0 root@cl-head ~ #
zpool status data

pool: data
state: ONLINE
scan: scrub in progress since Sat Dec  8 08:06:36 2012
32.0M scanned out of 48.5M at 16.0M/s, 0h0m to go
0 repaired, 65.99% done
config:

NAME        STATE     READ WRITE CKSUM
data        ONLINE       0     0     0
mirror-0  ONLINE       0     0     0
sde     ONLINE       0     0     0
sdf     ONLINE       0     0     0
mirror-1  ONLINE       0     0     0
sdg     ONLINE       0     0     0
sdh     ONLINE       0     0     0
mirror-2  ONLINE       0     0     0
sdi     ONLINE       0     0     0
sdj     ONLINE       0     0     0

errors: No known data errors
As you can see, you can get a status of the scrub while it is in progress. Doing a scrub can
severely impact performance of the disks and the applications needing them. So, if for any
reason you need to stop the scrub, you can pass the -s switch to the scrub
sub-command. However, you should let the scrub continue to completion.
0 root@cl-head ~ #
zpool scrub -s data
You should put something similar to the following in your root’s crontab, which will execute a scrub every Sunday at 02:00 in the morning:
0 2 * * 0 /sbin/zpool scrub data
Self Healing Data

If your storage pool is using some sort of redundancy, then ZFS will not only detect the silent data errors on a scrub, but it will also correct them if good data exists on a different disk. This is known as “self healing”, and can be demonstrated in the following image. In our RAIDZ post, we discussed how the data is self-healed with RAIDZ, using the parity and a reconstruction algorithm. We are going to simplify it a bit, and use just a two way mirror. Suppose that an application needs some data blocks, and in those blocks, on of them is corrupted. How does ZFS know the data is corrupted? By checking the SHA-256 checksum of the block, as already mentioned. If a checksum does not match on a block, it will look at our other disk in the mirror to see if a good block can be found. If so, the good block is passed to the application, then ZFS will fix the bad block in the mirror, so that it also passes the SHA-256 checksum. As a result, the application will always get good data, and your pool will always be in a good, clean, consistent state.
Resilvering Data
Resilvering data is the same concept as rebuilding or resyncing data onto the new disk into the array. However, with Linux software RAID, hardware RAID controllers, and other RAID implementations, there is no distinction between which blocks are actually live, and which aren’t. So, the rebuild starts at the beginning of the disk, and does not stop until it reaches the end of the disk. Because ZFS knows about the the RAID structure and the filesystem meta-data, we can be smart about rebuilding the data. Rather than wasting our time on free disk, where live blocks are not stored, we can concern ourselves with ONLY those live blocks. This can provide significant time savings, if your storage pool is only partially filled. If the pool is only 10% filled, then that means only working on 10% of the drives. Win. Thus, with ZFS we need a new term than “rebuilding”, “resyncing” or “reconstructing”. In this case, we refer to the process of rebuilding data as “resilvering”.
Unfortunately, disks will die, and need to be replaced. Provided you have redundancy in your storage pool, and can afford some failures, you can still send data to and receive data from applications, even though the pool will be in “DEGRADED” mode. If you have the luxury of hot swapping disks while the system is live, you can replace the disk without downtime (lucky you). If not, you will still need to identify the dead disk, and replace it. This can be a chore if you have many disks in your pool, say 24. However, most GNU/Linux operating system vendors, such as Debian or Ubuntu, provide a utility called “hdparm” that allows you to discover the serial number of all the disks in your pool. This is, of course, that the disk controllers are presenting that information to the Linux kernel, which they typically do. So, you could run something like:
0 root@cl-head ~ #
for i in a b c d e f g; do echo -n "/dev/sd$i: "; hdparm -I
/dev/sd$i | awk '/Serial Number/ {print $3}'; done

/dev/sda: OCZ-9724MG8BII8G3255
/dev/sdb: OCZ-69ZO5475MT43KNTU
/dev/sdc: WD-WCAPD3307153
/dev/sdd: JP2940HD0K9RJC
/dev/sde: /dev/sde: No such file or directory
/dev/sdf: JP2940HD0SB8RC
/dev/sdg: S1D1C3WR
It appears that /dev/sde is my dead disk. I have the serial numbers for all the other disks
in the system, but not this one. So, by process of elimination, I can go to the storage array,
and find which serial number was not printed. This is my dead disk. In this case, I find serial
number “JP2940HD01VLMC”. I pull the disk, replace it with a new one, and see if /dev/sde is
repopulated, and the others are still online. If so, I’ve found my disk, and can add it to the
pool. This has actually happened to me twice already, on both of my personal hyper-visors. It
was a snap to replace, and I was online in under 10 minutes.
To replace an dead disk in the pool with a new one, you use the replace sub-command. Suppose
the new disk also identified itself as /dev/sde, then I would issue the following command:
0 root@cl-head ~ #
zpool replace data sde sde

0 root@cl-head ~ #
zpool status data

pool: data
state: ONLINE
status: One or more devices is currently being resilvered.  The pool will
continue to function, possibly in a degraded state.
action: Wait for the resilver to complete.
scrub: resilver in progress for 0h2m, 16.43% done, 0h13m to go
config:

NAME          STATE       READ WRITE CKSUM
data          DEGRADED       0     0     0
mirror-0    DEGRADED       0     0     0
replacing DEGRADED       0     0     0
sde       ONLINE         0     0     0
sdf       ONLINE         0     0     0
mirror-1    ONLINE         0     0     0
sdg       ONLINE         0     0     0
sdh       ONLINE         0     0     0
mirror-2    ONLINE         0     0     0
sdi       ONLINE         0     0     0
sdj       ONLINE         0     0     0
The resilver is analogous to a rebuild with Linux software RAID. It is rebuilding the data blocks on the new disk until the mirror, in this case, is in a completely healthy state. Viewing the status of the resilver will help you get an idea of when it will complete.
Identifying Pool Problems
Determining quickly if everything is functioning as it should be, without the full output of
the zpool status command can be done by passing the -x switch. This is useful for scripts
to parse without fancy logic, which could alert you in the event of a failure:
0 root@cl-head ~ #
zpool status -x

all pools are healthy
The rows in the zpool status command give you vital information about the pool, most of which
are self-explanatory. They are defined as follows:
- pool
-
The name of the pool
- state
-
The current health of the pool. This information refers only to the ability of the pool to provide the necessary replication level.
- status
-
A description of what is wrong with the pool. This field is omitted if no problems are found.
- action
-
A recommended action for repairing the errors. This field is an abbreviated form directing the user to one of the following sections. This field is omitted if no problems are found.
- see
-
A reference to a knowledge article containing detailed repair information. Online articles are updated more often than this guide can be updated, and should always be referenced for the most up-to-date repair procedures. This field is omitted if no problems are found.
- scrub
-
Identifies the current status of a scrub operation, which might include the date and time that the last scrub was completed, a scrub in progress, or if no scrubbing was requested.
- errors
-
Identifies known data errors or the absence of known data errors.
- config
-
Describes the configuration layout of the devices comprising the pool, as well as their state and any errors generated from the devices. The state can be one of the following: ONLINE, FAULTED, DEGRADED, UNAVAILABLE, or OFFLINE. If the state is anything but ONLINE, the fault tolerance of the pool has been compromised.
The columns in the status output, “READ”, “WRITE” and “CKSUM” are defined as follows:
- NAME
-
The name of each VDEV in the pool, presented in a nested order.
- STATE
-
The state of each VDEV in the pool. The state can be any of the states found in “config” above.
- READ
-
I/O errors occurred while issuing a read request.
- WRITE
-
I/O errors occurred while issuing a write request.
- CHKSUM
-
Checksum errors. The device returned corrupted data as the result of a read request.
Conclusion
Scrubbing your data on regular intervals will ensure that the blocks in the storage pool remain consistent. Even though the scrub can put strain on applications wishing to read or write data, it can save hours of headache in the future. Further, because you could have a “damaged device” at any time (see about damaged devices with ZFS), properly knowing how to fix the device, and what to expect when replacing one, is critical to storage administration. Of course, there is plenty more I could discuss about this topic, but this should at least introduce you to the concepts of scrubbing and resilvering data.
Getting and Setting Properties
Motivation
With ext4, and many filesystems in GNU/Linux, we have a way for tuning various flags in the filesystem. Things like setting labels, default mount options, and other tunables. With ZFS, it’s no different, and in fact, is far more verbose. These properties allow us to modify all sorts of variables, both for the pool, and for the datasets it contains. Thus, we can “tune” the filesystem to our liking or needs. However, not every property is tunable. Some are read-only. But, we’ll define what each of the properties are and how they affect the pool. Note, we are only looking at zpool properties, and we will get to ZFS dataset properties when we reach the dataset subtopic.
Zpool Properties
- allocated
-
The amount of data that has been committed into the pool by all of the ZFS datasets. This setting is read-only.
- altroot
-
Identifies an alternate root directory. If set, this directory is prepended to any mount points within the pool. This property can be used when examining an unknown pool, if the mount points cannot be trusted, or in an alternate boot environment, where the typical paths are not valid.Setting altroot defaults to using cachefile=none, though this may be overridden using an explicit setting.
- ashift
-
Can only be set at pool creation time. Pool sector size exponent, to the power of 2. I/O operations will be aligned to the specified size boundaries. Default value is “9″, as 2^9 = 512, the standard sector size operating system utilities use for reading and writing data. For advanced format drives with 4 KiB boundaries, the value should be set to ashift=12, as 2^12 = 4096.
- autoexpand
-
Must be set before replacing the first drive in your pool. Controls automatic pool expansion when the underlying LUN is grown. Default is “off”. After all drives in the pool have been replaced with larger drives, the pool will automatically grow to the new size. This setting is a boolean, with values either “on” or “off”.
- autoreplace
-
Controls automatic device replacement of a spare VDEV in your pool. Default is set to “off”. As such, device replacement must be initiated manually by using the
zpool replacecommand. This setting is a boolean, with values either“on” or “off”. - bootfs
-
Read-only setting that defines the bootable ZFS dataset in the pool. This is typically set by an installation program.
- cachefile
-
Controls the location of where the pool configuration is cached. When importing a zpool on a system, ZFS can detect the drive geometry using the meta-data on the disks. However, in some clustering environments, the cache file may need to be stored in a different location for pools that would not automatically be imported. Can be set to any string, but for most ZFS installations, the default location of
/etc/zfs/zpool.cacheshould be sufficient. - capacity
-
Read-only value that identifies the percentage of pool space used.
- comment
-
A text string consisting of no more than 32 printable ASCII characters that will be stored such that it is available even if the pool becomes faulted. An administrator can provide additional information about a pool using this setting.
- dedupditto
-
Sets a block deduplication threshold, and if the reference count for a deduplicated block goes above the threshold, a duplicate copy of the block is stored automatically. The default value is 0. Can be any positive number.
- dedupratio
-
Read-only deduplication ratio specified for a pool, expressed as a multiplier
- delegation
-
Controls whether a non-privileged user can be granted access permissions that are defined for the dataset. The setting is a boolean, defaults to “on” and can be “on” or “off”.
- expandsize
-
Amount of uninitialized space within the pool or device that can be used to increase the total capacity of the pool. Uninitialized space consists of any space on an EFI labeled VDEV which has not been brought online (i.e.
zpool online -e). This space occurs when a LUN is dynamically expanded. - failmode
-
Controls the system behavior in the event of catastrophic pool failure. This condition is typically a result of a loss of connectivity to the underlying storage device(s) or a failure of all devices within the pool. The behavior of such an event is determined as follows:
- wait
-
Blocks all I/O access until the device connectivity is recovered and the errors are cleared. This is the default behavior.
- continue
-
Returns EIO to any new write I/O requests but allows reads to any of the remaining healthy devices. Any write requests that have yet to be committed
- panic
-
Prints out a message to the console and generates a system crash dump.
- free
-
Read-only value that identifies the number of blocks within the pool that are not allocated.
- guid
-
Read-only property that identifies the unique identifier for the pool. Similar to the UUID string for ext4 filesystems.
- health
-
Read-only property that identifies the current health of the pool, as either ONLINE, DEGRADED, FAULTED, OFFLINE, REMOVED, or UNAVAIL.
- listsnapshots
-
Controls whether snapshot information that is associated with this pool is displayed with the
zfs listcommand. If this property is disabled, snapshot information can be displayed with thezfs list -t snapshotcommand. The default value is “off”. Boolean value that can be either “off” or “on”. - readonly
-
Boolean value that can be either “off” or “on”. Default value is “off”. Controls setting the pool into read-only mode to prevent writes and/or data corruption.
- size
-
Read-only property that identifies the total size of the storage pool.
- version
-
Writable setting that identifies the current on-disk version of the pool. Can be any value from 1 to the output of the
zpool upgrade -vcommand. This property can be used when a specific version is needed for backwards compatibility.
Getting and Setting Properties
There are a few ways you can get to the properties of your pool- you can get all properties at once, only one property, or more than one, comma-separated. For example, suppose I wanted to get just the health of the pool. I could issue the following command:
0 root@cl-head ~ #
zpool get health data

NAME  PROPERTY  VALUE   SOURCE
data  health    ONLINE  -
If I wanted to get multiple settings, say the health of the system, how much is free, and how much is allocated, I could issue this command instead:
0 root@cl-head ~ #
zpool get health,free,allocated data

NAME  PROPERTY   VALUE   SOURCE
data  health     ONLINE  -
data  free       176G    -
data  allocated  32.2G   -
And of course, if I wanted to get all the settings available, I could run:
0 root@cl-head ~ #
zpool get all data

NAME  PROPERTY       VALUE       SOURCE
data  size           208G        -
data  capacity       15%         -
data  altroot        -           default
data  health         ONLINE      -
data  guid           1695112377970346970  default
data  version        28          default
data  bootfs         -           default
data  delegation     on          default
data  autoreplace    off         default
data  cachefile      -           default
data  failmode       wait        default
data  listsnapshots  off         default
data  autoexpand     off         default
data  dedupditto     0           default
data  dedupratio     1.00x       -
data  free           176G        -
data  allocated      32.2G       -
data  readonly       off         -
data  ashift         0           default
data  comment        -           default
data  expandsize     0           -
Setting a property is just as easy. However, there is a catch. For properties that require a string argument, there is no way to get it back to default. At least not that I am aware of. With the rest of the properties, if you try to set a property to an invalid argument, an error will print to the screen letting you know what is available, but it will not notify you as to what is default. However, you can look at the ‘SOURCE’ column. If the value in that column is “default”, then it’s default. If it’s “local”, then it was user-defined.
Suppose we wanted to change the comment property, this is how I would do it:
0 root@cl-head ~ #
zpool set comment="Contact admins@example.com" data

0 root@cl-head ~ #
zpool get comment data

NAME  PROPERTY  VALUE                       SOURCE
data  comment   Contact admins@example.com  local
As you can see, the SOURCE is “local” for the comment property. Thus, it was user-defined. As
mentioned, I don’t know of a way to get string properties back to default after
being set. Further, any modifiable property can be set at pool creation time by using the -o
switch, as follows:
0 root@cl-head ~ #
zpool create -o ashift=12 data raid1 sda sdb
Final Thoughts
The zpool properties apply to the entire pool, which means ZFS datasets will inherit that property from the pool. Some properties that you set on your ZFS dataset, which will be discussed towards the end of this series, apply to the whole pool. For example, if you enable block deduplication for a ZFS dataset, it dedupes blocks found in the entire pool, not just in your dataset. However, only blocks in that dataset will be actively deduped, while other ZFS datasets may not. Also, setting a property is not retroactive. In the case of your autoexpand zpool property to automatically expand the zpool size when all the drives have been replaced, if you replaced a drive before enabling the property, that drive will be considered a smaller drive, even if it physically isn’t. Setting properties only applies to operations on the data moving forward, and never backward.
Despite a few of these caveats, having the ability to change some parameters of your pool to
fit your needs as a GNU/Linux storage administrator gives you great control that other
filesystems don’t. And, as we’ve discovered thus far, everything can be handled with a single
command zpool, and easy-to-recall sub-commands. We’ll have one more post discussing a
thorough examination of caveats that you will want to consider before creating your pools, then
we will leave the zpool category, and work our way towards ZFS datasets, the bread and butter
of ZFS as a whole. If there is anything additional about zpools you would like me to post on,
let me know now, and I can squeeze it in.
Best Practices and Caveats
Best Practices
As with all recommendations, some of these guidelines carry a great amount of weight, while others might not. You may not even be able to follow them as rigidly as you would like. Regardless, you should be aware of them. I’ll try to provide a reason why for each. They’re listed in no specific order. The idea of “best practices” is to optimize space efficiency, performance and ensure maximum data integrity.
-
Only run ZFS on 64-bit kernels. It has 64-bit specific code that 32-bit kernels cannot do anything with.
-
Install ZFS only on a system with lots of RAM. 1 GB is a bare minimum, 2 GB is better, 4 GB would be preferred to start. Remember, that per default ZFS will use 1/2 of the available RAM for the ARC.
-
Use ECC RAM when possible for scrubbing data in registers and maintaining data consistency. The ARC is an actual read-only data cache of valuable data in RAM.
-
Use whole disks rather than partitions. ZFS can make better use of the on-disk cache as a result. If you must use partitions, backup the partition table, and take care when reinstalling data into the other partitions, so you don’t corrupt the data in your pool.
-
Keep each VDEV in a storage pool the same size. If VDEVs vary in size, ZFS will favor the larger VDEV, which could lead to performance bottlenecks.
-
Use redundancy when possible, as ZFS can and will want to correct data errors that exist in the pool. You cannot fix these errors if you do not have a redundant good copy elsewhere in the pool. Mirrors and RAID-Z levels accomplish this.
-
For the number of disks in the storage pool, use the “power of two plus parity” recommendation. This is for storage space efficiency and hitting the “sweet spot” in performance. So, for a RAIDZ-1 VDEV, use three (2+1), five (4+1), or nine (8+1) disks. For a RAIDZ-2 VDEV, use four (2+2), six (4+2), ten (8+2), or eighteen (16+2) disks. For a RAIDZ-3 VDEV, use five (2+3), seven (4+3), eleven (8+3), or nineteen (16+3) disks. For pools larger than this, consider striping across mirrored VDEVs.
-
Consider using RAIDZ-2 or RAIDZ-3 over RAIDZ-1. You’ve heard the phrase “when it rains, it pours”. This is true for disk failures. If a disk fails in a RAIDZ-1, and the hot spare is getting resilvered, until the data is fully copied, you cannot afford another disk failure during the resilver, or you will suffer data loss. With RAIDZ-2, you can suffer two disk failures, instead of one, increasing the probability you have fully resilvered the necessary data before the second, and even third disk fails.
-
Perform regular (at least weekly) backups of the full storage pool. It’s not a backup, unless you have multiple copies. Just because you have redundant disk, does not ensure live running data in the event of a power failure, hardware failure or disconnected cables.
-
Use hot spares to quickly recover from a damaged device. Set the “autoreplace” property to on for the pool.
-
Consider using a hybrid storage pool with fast SSDs or NVRAM drives. Using a fast SLOG and L2ARC can greatly improve performance.
-
If using a hybrid storage pool with multiple devices, mirror the SLOG and stripe the L2ARC.
-
If using a hybrid storage pool, and partitioning the fast SSD or NVRAM drive, unless you know you will need it, 1 GB is likely sufficient for your SLOG. Use the rest of the SSD or NVRAM drive for the L2ARC. The more storage for the L2ARC, the better.
-
Keep pool capacity under 80% for best performance. Due to the copy-on-write nature of ZFS, the filesystem gets heavily fragmented. Email reports of capacity at least monthly.
-
Scrub consumer-grade SATA and SCSI disks weekly and enterprise-grade SAS and FC disks monthly.
-
Email reports of the storage pool health weekly for redundant arrays, and bi-weekly for non-redundant arrays.
-
When using advanced format disks that read and write data in 4 KB sectors, set the “ashift” value to 12 on pool creation for maximum performance. Default is 9 for 512-byte sectors.
-
Set “autoexpand” to on, so you can expand the storage pool automatically after all disks in the pool have been replaced with larger ones. Default is off.
-
Always export your storage pool when moving the disks from one physical system to another.
-
When considering performance, know that for sequential writes, mirrors will always outperform RAID-Z levels. For sequential reads, RAID-Z levels will perform more slowly than mirrors on smaller data blocks and faster on larger data blocks. For random reads and writes, mirrors and RAID-Z seem to perform in similar manners. Striped mirrors will outperform mirrors and RAID-Z in both sequential, and random reads and writes.
-
Compression is disabled by default. This doesn’t make much sense with today’s hardware. ZFS compression is extremely cheap, extremely fast, and barely adds any latency to the reads and writes. In fact, in some scenarios, your disks will respond faster with compression enabled than disabled. A further benefit is the massive space benefits.
Caveats
The point of the caveat list is by no means to discourage you from using ZFS. Instead, as a storage administrator planning out your ZFS storage server, these are things that you should be aware of, so as not to catch you with your pants down, and without your data. If you don’t head these warnings, you could end up with corrupted data. The line may be blurred with the “best practices” list above. I’ve tried making this list all about data corruption if not headed. Read and head the caveats, and you should be good.
-
Your VDEVs determine the IOPS of the storage, and the slowest disk in that VDEV will determine the IOPS for the entire VDEV.
-
ZFS uses 1/64 of the available raw storage for meta-data. So, if you purchased a 1 TB drive, the actual raw size is 976 GiB. After ZFS uses it, you will have 961 GiB of available space. The “zfs list” command will show an accurate representation of your available storage. Plan your storage keeping this in mind.
-
ZFS wants to control the whole block stack. It checksums, resilvers live data instead of full disks, self-heals corrupted blocks, and a number of other unique features. If using a RAID card, make sure to configure it as a true JBOD (or “pass-through mode”), so ZFS can control the disks. If you can’t do this with your RAID card, don’t use it. Best to use a real HBA.
-
Do not use other volume management software beneath ZFS. ZFS will perform better, and ensure greater data integrity, if it has control of the whole block device stack. As such, avoid using dm-crypt, mdadm or LVM beneath ZFS.
-
Do not share a SLOG or L2ARC DEVICE across pools. Each pool should have its own physical DEVICE, not logical drive, as is the case with some PCI-Express SSD cards. Use the full card for one pool, and a different physical card for another pool. If you share a physical device, you will create race conditions, and could end up with corrupted data.
-
Do not share a single storage pool across different servers. ZFS is not a clustered filesystem. Use GlusterFS, Ceph, Lustre or some other clustered filesystem on top of the pool if you wish to have a shared storage backend.
-
Other than a spare, SLOG and L2ARC in your hybrid pool, do not mix VDEVs in a single pool. If one VDEV is a mirror, all VDEVs should be mirrors. If one VDEV is a RAIDZ-1, all VDEVs should be RAIDZ-1. Unless of course, you know what you are doing, and are willing to accept the consequences. ZFS attempts to balance the data across VDEVs. Having a VDEV of a different redundancy can lead to performance issues and space efficiency concerns, and make it very difficult to recover in the event of a failure.
-
Do not mix disk sizes or speeds in a single VDEV. Do mix fabrication dates, however, to prevent mass drive failure.
-
In fact, do not mix disk sizes or speeds in your storage pool at all.
-
Do not mix disk counts across VDEVs. If one VDEV uses 4 drives, all VDEVs should use 4 drives.
-
Do not put all the drives from a single controller in one VDEV. Plan your storage, such that if a controller fails, it affects only the number of disks necessary to keep the data online.
-
When using advanced format disks, you must set the ashift value to 12 at pool creation. It cannot be changed after the fact. Use “zpool create -o ashift=12 data mirror sda sdb” as an example.
-
Hot spare disks will not be added to the VDEV to replace a failed drive by default. You MUST enable this feature. Set the autoreplace feature to on. Use “zpool set autoreplace=on data” as an example.
-
The storage pool will not auto resize itself when all smaller drives in the pool have been replaced by larger ones. You MUST enable this feature, and you MUST enable it before replacing the first disk. Use “zpool set autoexpand=on data” as an example.
-
ZFS does not restripe data in a VDEV nor across multiple VDEVs. Typically, when adding a new device to a RAID array, the RAID controller will rebuild the data, by creating a new stripe width. This will free up some space on the drives in the pool, as it copies data to the new disk. ZFS has no such mechanism. Eventually, over time, the disks will balance out due to the writes, but even a scrub will not rebuild the stripe width.
-
You cannot shrink a zpool, only grow it. This means you cannot remove VDEVs from a storage pool.
-
You can only remove drives from mirrored VDEV using the “zpool detach” command. You can replace drives with another drive in RAIDZ and mirror VDEVs however.
-
Do not create a storage pool of files or ZVOLs from an existing zpool. Race conditions will be present, and you will end up with corrupted data. Always keep multiple pools separate.
-
The Linux kernel may not assign a drive the same drive letter at every boot. Thus, you should use the /dev/disk/by-id/ convention for your SLOG and L2ARC. If you don’t, your zpool devices could end up as a SLOG device, which would in turn clobber your ZFS data.
-
Don’t create massive storage pools “just because you can”. Even though ZFS can create 78-bit storage pool sizes, that doesn’t mean you need to create one.
-
Don’t put production directly into the zpool. Use ZFS datasets instead.
-
Don’t commit production data to file VDEVs. Only use file VDEVs for testing scripts or learning the ins and outs of ZFS.
ZFS Filesystem Administration
Creating Filesystems
Background
First, we need to understand how traditional filesystems and volume management work in GNU/Linux before we can get a thorough understanding of ZFS datasets. To treat this fairly, we need to assemble Linux software RAID, LVM, and ext4 or another Linux kernel supported filesystem together.
This is done by creating a redundant array of disks, and exporting a block device to represent that array. Then, we format that exported block device using LVM. If we have multiple RAID arrays, we format each of those as well. We then add all these exported block devices to a “volume group” which represents my pooled storage. If I had five exported RAID arrays, of 1 TB each, then I would have 5 TB of pooled storage in this volume group. Now, I need to decide how to divide up the volume, to create logical volumes of a specific size. If this was for an Ubuntu or Debian installation, maybe I would give 100 GB to one logical volume for the root filesystem. That 100 GB is now marked as occupied by the volume group. I then give 500 GB to my home directory, and so forth. Each operation exports a block device, representing my logical volume. It’s these block devices that I format with ex4 or a filesystem of my choosing.

In this scenario, each logical volume is a fixed size in the volume group. It cannot address the full pool. So, when formatting the logical volume block device, the filesystem is a fixed size. When that device fills, you must resize the logical volume and the filesystem together. This typically requires a myriad of commands, and it’s tricky to get just right without losing data.
ZFS handles filesystems a bit differently. First, there is no need to create this stacked approach to storage. We’ve already covered how to pool the storage, now we well cover how to use it. This is done by creating a dataset in the filesystem. By default, this dataset will have full access to the entire storage pool. If our storage pool is 5 TB in size, as previously mentioned, then our first dataset will have access to all 5 TB in the pool. If I create a second dataset, it too will have full access to all 5 TB in the pool. And so on and so forth.
Now, as files are placed in the dataset, the pool marks that storage as unavailable to all datasets. This means that each dataset is aware of what is available in the pool and what is not by all other datasets in the pool. There is no need to create logical volumes of limited size. Each dataset will continue to place files in the pool, until the pool is filled. As the cards fall, they fall. You can, of course, put quotas on datasets, limiting their size, or export ZVOLs, topics we’ll cover later.
So, let’s create some datasets.
Basic Creation
In these examples, we will assume our ZFS shared storage is named “data”. Further, we will assume that the pool is created with 4 pre-allocated files of 1 GB in size each, in a RAIDZ-1 array. Let’s create some datasets.
0 root@cl-head ~ #
zfs create data/test

0 root@cl-head ~ #
zfs list

NAME         USED  AVAIL  REFER  MOUNTPOINT
data         175K  2.92G  43.4K  /data
data/test   41.9K  2.92G  41.9K  /data/test
Notice that the dataset “data/test” is mounted to “/data/test” by default, and that it has full access to the entire pool. Also notice that it is occupying only 41.9 KB of the pool. Let’s create 4 more datasets, then look at the output:
0 root@cl-head ~ #
zfs create data/test2

0 root@cl-head ~ #
zfs create data/test3

0 root@cl-head ~ #
zfs create data/test4

0 root@cl-head ~ #
zfs create data/test5

0 root@cl-head ~ #
zfs list

NAME         USED  AVAIL  REFER  MOUNTPOINT
data         392K  2.92G  47.9K  /data
data/test   41.9K  2.92G  41.9K  /data/test
data/test2  41.9K  2.92G  41.9K  /data/test2
data/test3  41.9K  2.92G  41.9K  /data/test3
data/test4  41.9K  2.92G  41.9K  /data/test4
data/test5  41.9K  2.92G  41.9K  /data/test5
Each dataset is automatically mounted to its respective mount point, and each dataset has full unfettered access to the storage pool. Let’s fill up some data in one of the datasets, and see how that affects the underlying storage:
0 root@cl-head ~ #
cd /data/test3

0 root@cl-head ~ #
for i in {1..10}; do dd if=/dev/urandom of=file$i.img bs=1024 count=$RANDOM
&> /dev/null; done

0 root@cl-head ~ #
zfs list

NAME         USED  AVAIL  REFER  MOUNTPOINT
data         159M  2.77G  49.4K  /data
data/test   41.9K  2.77G  41.9K  /data/test
data/test2  41.9K  2.77G  41.9K  /data/test2
data/test3   158M  2.77G   158M  /data/test3
data/test4  41.9K  2.77G  41.9K  /data/test4
data/test5  41.9K  2.77G  41.9K  /data/test5
Notice that in my case, “data/test3″ is occupying 158 MB of disk, so according to the rest of the datasets, there is only 2.77 GB available in the pool, where previously there was 2.92 GB. So as you can see, the big advantage here is that I do not need to worry about pre-allocated block devices, as I would with LVM. Instead, ZFS manages the entire stack, so it understands how much data has been occupied, and how much is available.
Mounting Datasets
It’s important to understand that when creating datasets, you aren’t creating exportable block devices by default. This means you don’t have something directly to mount. In conclusion, there is nothing to add to your /etc/fstab file for persistence across reboots.
So, if there is nothing to add do the /etc/fstab file, how do the filesystems get mounted? This is done by importing the pool, if necessary, then running the “zfs mount” command. Similarly, we have a “zfs unmount” command to unmount datasets, or we can use the standard “umount” utility:
0 root@cl-head ~ #
umount /data/test5

0 root@cl-head ~ #
mount | grep data

data/test on /data/test type zfs (rw,relatime,xattr)
data/test2 on /data/test2 type zfs (rw,relatime,xattr)
data/test3 on /data/test3 type zfs (rw,relatime,xattr)
data/test4 on /data/test4 type zfs (rw,relatime,xattr)
0 root@cl-head ~ #
zfs mount data/test5

0 root@cl-head ~ #
mount | grep data

data/test on /data/test type zfs (rw,relatime,xattr)
data/test2 on /data/test2 type zfs (rw,relatime,xattr)
data/test3 on /data/test3 type zfs (rw,relatime,xattr)
data/test4 on /data/test4 type zfs (rw,relatime,xattr)
data/test5 on /data/test5 type zfs (rw,relatime,xattr)
By default, the mount point for the dataset is “/<pool-name>/<dataset-name>”. This can be changed, by changing the dataset property. Just as storage pools have properties that can be tuned, so do datasets. We’ll dedicate a full post to dataset properties later. We only need to change the “mountpoint” property, as follows:
0 root@cl-head ~ #
zfs set mountpoint=/mnt/test data/test

0 root@cl-head ~ #
mount | grep data

data on /data type zfs (rw,relatime,xattr)
data/test2 on /data/test2 type zfs (rw,relatime,xattr)
data/test3 on /data/test3 type zfs (rw,relatime,xattr)
data/test4 on /data/test4 type zfs (rw,relatime,xattr)
data/test5 on /data/test5 type zfs (rw,relatime,xattr)
data/test on /mnt/test type zfs (rw,relatime,xattr)
Nested Datasets
Datasets don’t need to be isolated. You can create nested datasets within each other. This allows you to create namespaces, while tuning a nested directory structure, without affecting the other. For example, maybe you want compression on /var/log, but not on the parent /var. there are other benefits as well, with some caveats that we will look at later.
To create a nested dataset, create it like you would any other, by providing the parent storage pool and dataset. In this case we will create a nested log dataset in the test dataset:
0 root@cl-head ~ #
zfs create data/test/log

0 root@cl-head ~ #
zfs list

NAME            USED  AVAIL  REFER  MOUNTPOINT
data            159M  2.77G  47.9K  /data
data/test      85.3K  2.77G  43.4K  /mnt/test
data/test/log  41.9K  2.77G  41.9K  /mnt/test/log
data/test2     41.9K  2.77G  41.9K  /data/test2
data/test3      158M  2.77G   158M  /data/test3
data/test4     41.9K  2.77G  41.9K  /data/test4
data/test5     41.9K  2.77G  41.9K  /data/test5
Additional Dataset Administration
Along with creating datasets, when you no longer need them, you can destroy them. This frees up the blocks for use by other datasets, and cannot be reverted without a previous snapshot, which we’ll cover later. To destroy a dataset:
0 root@cl-head ~ #
zfs destroy data/test5

0 root@cl-head ~ #
zfs list

NAME            USED  AVAIL  REFER  MOUNTPOINT
data            159M  2.77G  49.4K  /data
data/test      41.9K  2.77G  41.9K  /mnt/test
data/test/log  41.9K  2.77G  41.9K  /mnt/test/log
data/test2     41.9K  2.77G  41.9K  /data/test2
data/test3      158M  2.77G   158M  /data/test3
data/test4     41.9K  2.77G  41.9K  /data/test4
We can also rename a dataset if needed. This is handy when the purpose of the dataset changes, and you want the name to reflect that purpose. The arguments take a dataset source as the first argument and the new name as the last argument. To rename the data/test3 dataset to music:
0 root@cl-head ~ #
zfs rename data/test3 data/music

0 root@cl-head ~ #
zfs list

NAME            USED  AVAIL  REFER  MOUNTPOINT
data            159M  2.77G  49.4K  /data
data/music      158M  2.77G   158M  /data/music
data/test      41.9K  2.77G  41.9K  /mnt/test
data/test/log  41.9K  2.77G  41.9K  /mnt/test/log
data/test2     41.9K  2.77G  41.9K  /data/test2
data/test4     41.9K  2.77G  41.9K  /data/test4
Subsection Compression
Compression is transparent with ZFS if you enable it. This means that every file you store in your pool can be compressed. From your point of view as an application, the file does not appear to be compressed, but appears to be stored uncompressed. In other words, if you run the “file” command on your plain text configuration file, it will report it as such. Instead, underneath the file layer, ZFS is compressing and decompressing the data on disk on the fly. And because compression is so cheap on the CPU, and exceptionally fast with some algorithms, it should not be noticeable.
Compression is enabled and disabled per dataset. Further, the supported compression algorithms are LZJB, ZLE, and Gzip. With Gzip, the standards levels of 1 through 9 are supported, where 1 is as fast as possible, with the least compression, and 9 is as compressed as possible, taking as much time as necessary. The default is 6, as is standard in GNU/Linux and other Unix operating systems. LZJB, on the other hand, was invented by Jeff Bonwick, who is also the author of ZFS. LZJB was designed to be fast with tight compression ratios, which is standard with most Lempel-Ziv algorithms. LZJB is the default. ZLE is a speed demon, with very light compression ratios. LZJB seems to provide the best all around results it terms of performance and compression.
Obviously, compression can vary on the disk space saved. If the dataset is storing mostly uncompressed data, such as plain text log files, or configuration files, the compression ratios can be massive. If the dataset is storing mostly compressed images and video, then you won’t see much if anything in the way of disk savings. With that said, compression is disabled by default, and enabling LZJB doesn’t seem to yield any performance impact. So even if you’re storing largely compressed data, for the data files that are not compressed, you can get those compression savings, without impacting the performance of the storage server. So, IMO, I would recommend enabling compression for all of your datasets.
|
Enabling compression on a dataset is not retroactive! It will only apply to newly committed or modified data. Any previous data in the dataset will remain uncompressed. So, if you want to use compression, you should enable it before you begin committing data. |
To enable compression on a dataset, we just need to modify the “compression” property. The valid values for that property are: “on”, “off”, “lzjb”, “gzip”, “gzip[1-9]“, "lz4" and “zle”.
0 root@cl-head ~ #
zfs create data/log

0 root@cl-head ~ #
zfs set compression=lzjb data/log
Now that we’ve enabled compression on this dataset, let’s copy over some uncompressed data, and see what sort of savings we would see. A great source of uncompressed data would be the /etc/ and /var/log/ directories. Let’s create a tarball of these directories, see it’s raw size and see what sort of space savings we achieved:
0 root@cl-head ~ #
tar -cf /data/test/text.tar /var/log/ /etc/

0 root@cl-head ~ #
ls -lh /data/test/text.tar

-rw-rw-r-- 1 root root 24M Dec 17 21:24 /data/test/text.tar

0 root@cl-head ~ #
zfs list data/test

NAME        USED  AVAIL  REFER  MOUNTPOINT
data/test  11.1M  2.91G  11.1M  /data/test

0 root@cl-head ~ #
zfs get compressratio data/test

NAME       PROPERTY       VALUE  SOURCE
data/test  compressratio  2.14x  -
So, in my case, I created a 24 MB uncompressed tarball. After copying it to the dataset that had compression enabled, it only occupied 11.1 MB. This is less than half the size (text compresses very well)! We can read the “compressratio” property on the dataset to see what sort of space savings we are achieving. In my case, the output is telling me that the compressed data would occupy 2.14 times the amount of disk space, if uncompressed. Very nice.
Snapshots and Clones
Snapshots with ZFS are similar to snapshots with Linux LVM. A snapshot is a first class read-only filesystem. It is a mirrored copy of the state of the filesystem at the time you took the snapshot. Think of it like a digital photograph of the outside world. Even though the world is changing, you have an image of what the world was like at the exact moment you took that photograph. Snapshots behave in a similar manner, except when data changes that was part of the dataset, you keep the original copy in the snapshot itself. This way, you can maintain persistence of that filesystem.
You can keep up to 2^64 snapshots in your pool, ZFS snapshots are persistent across reboots, and they don’t require any additional backing store; they use the same storage pool as the rest of your data. If you remember our post about the nature of copy-on-write filesystems, you will remember our discussion about Merkle trees. A ZFS snapshot is a copy of the Merkle tree in that state, except we make sure that the snapshot of that Merkle tree is never modified.
Creating snapshots is near instantaneous, and they are cheap. However, once the data begins to change, the snapshot will begin storing data. If you have multiple snapshots, then multiple deltas will be tracked across all the snapshots. However, depending on your needs, snapshots can still be exceptionally cheap.
Creating Snapshots
You can create two types of snapshots: pool snapshots and dataset snapshots. Which type of snapshot you want to take is up to you. You must give the snapshot a name, however. The syntax for the snapshot name is:
- pool/dataset@snapshot-name
- pool@snapshot-name
To create a snapshot, we use the “zfs snapshot” command. For example, to take a snapshot of the “data/test” dataset, we would issue:
0 root@cl-head ~ #
zfs snapshot data/test@tuesday
Even though a snapshot is a first class filesystem, it does not contain modifiable properties like standard ZFS datasets or pools. In fact, everything about a snapshot is read-only. For example, if you wished to enable compression on a snapshot, here is what would happen:
0 root@cl-head ~ #
zfs set compression=lzjb data/test@friday

cannot set property for 'data/test@friday': this property can not be modified for
snapshots
Listing Snapshots
Snapshots can be displayed two ways: by accessing a hidden “.zfs” directory in the root of the dataset, or by using the “zfs list” command. First, let’s discuss the hidden directory. Check out this madness:
0 root@cl-head ~ #
ls -a /data/test

./  ../  boot.tar  text.tar  text.tar.2

0 root@cl-head ~ #
cd /data/test/.zfs/

0 root@cl-head ~ #
ls -a

./  ../  shares/  snapshot/
Even though the “.zfs” directory was not visible, even with “ls -a”, we could still change directory to it. If you wish to have the “.zfs” directory visible, you can change the “snapdir” property on the dataset. The valid values are “hidden” and “visible”. By default, it’s hidden. Let’s change it:
0 root@cl-head ~ #
zfs set snapdir=visible data/test

0 root@cl-head ~ #
ls -a /data/test

./  ../  boot.tar  text.tar  text.tar.2  .zfs/
The other way to display snapshots is by using the zfs list command, and passing the -t
snapshot argument, as follows:
0 root@cl-head ~ #
zfs list -t snapshot

NAME                              USED  AVAIL  REFER  MOUNTPOINT
pool/cache@2012:12:18:51:2:19:00     0      -   525M  -
pool/cache@2012:12:18:51:2:19:15     0      -   525M  -
pool/home@2012:12:18:51:2:19:00  18.8M      -  28.6G  -
pool/home@2012:12:18:51:2:19:15  18.3M      -  28.6G  -
pool/log@2012:12:18:51:2:19:00    184K      -  10.4M  -
pool/log@2012:12:18:51:2:19:15    184K      -  10.4M  -
pool/swap@2012:12:18:51:2:19:00      0      -    76K  -
pool/swap@2012:12:18:51:2:19:15      0      -    76K  -
pool/vmsa@2012:12:18:51:2:19:00      0      -  1.12M  -
pool/vmsa@2012:12:18:51:2:19:15      0      -  1.12M  -
pool/vmsb@2012:12:18:51:2:19:00      0      -  1.31M  -
pool/vmsb@2012:12:18:51:2:19:15      0      -  1.31M  -
data@2012:12:18:51:2:19:00           0      -  43.4K  -
data@2012:12:18:51:2:19:15           0      -  43.4K  -
data/test@2012:12:18:51:2:19:00      0      -  37.1M  -
data/test@2012:12:18:51:2:19:15      0      -  37.1M  -
Notice that by default, it will show all snapshots for all pools.
If you want to be more specific with the output, you can see all snapshots of a given parent, whether it be a dataset, or a storage pool. You only need to pass the “-r” switch for recursion, then provide the parent. In this case, I’ll see only the snapshots of the storage pool “data”, and ignore those in “pool”:
0 root@cl-head ~ #
zfs list -r -t snapshot data

NAME                              USED  AVAIL  REFER  MOUNTPOINT
data@2012:12:18:51:2:19:00           0      -  43.4K  -
data@2012:12:18:51:2:19:15           0      -  43.4K  -
data/test@2012:12:18:51:2:19:00      0      -  37.1M  -
data/test@2012:12:18:51:2:19:15      0      -  37.1M  -
Destroying Snapshots
Just as you would destroy a storage pool, or a ZFS dataset, you use a similar method for destroying snapshots. To destroy a snapshot, use the “zfs destroy” command, and supply the snapshot as an argument that you want to destroy:
0 root@cl-head ~ #
zfs destroy data/test@2012:12:18:51:2:19:15
An important thing to know, is if a snapshot exists, it’s considered a child filesystem to the dataset. As such, you cannot remove a dataset until all snapshots, and nested datasets have been destroyed.
0 root@cl-head ~ #
zfs destroy data/test

cannot destroy 'data/test': filesystem has children
use '-r' to destroy the following datasets:
data/test@2012:12:18:51:2:19:15
data/test@2012:12:18:51:2:19:00
Destroying snapshots can free up additional space that other snapshots may be holding onto, because they are unique to those snapshots.
Renaming Snapshots
You can rename snapshots, however, they must be renamed in the storage pool and ZFS dataset from which they were created. Other than that, renaming snapshots is pretty straight forward:
0 root@cl-head ~ #
zfs rename data/test@2012:12:18:51:2:19:15 data/test@tuesday-19:15
Rolling Back to a Snapshot
A discussion about snapshots would not be complete without a discussion about rolling back your filesystem to a previous snapshot.
Rolling back to a previous snapshot will discard any data changes between that snapshot and the current time. Further, by default, you can only rollback to the most recent snapshot. In order to rollback to an earlier snapshot, you must destroy all snapshots between the current time and that snapshot you wish to rollback to. If that’s not enough, the filesystem must be unmounted before the rollback can begin. This means downtime.
To rollback the “data/test” dataset to the “tuesday” snapshot, we would issue:
0 root@cl-head ~ #
zfs rollback data/test@tuesday

cannot rollback to 'data/test@tuesday': more recent snapshots exist
use '-r' to force deletion of the following snapshots:
data/test@wednesday
data/test@thursday
As expected, we must remove the “@wednesday” and “@thursday” snapshots before we can rollback to the “@tuesday” snapshot.
ZFS Clones
A ZFS clone is a writeable filesystem that was “upgraded” from a snapshot. Clones can only be created from snapshots, and a dependency on the snapshot will remain as long as the clone exists. This means that you cannot destroy a snapshot, if you cloned it. The clone relies on the data that the snapshot gives it, to exist. You must destroy the clone before you can destroy the snapshot.
Creating clones is nearly instantaneous, just like snapshots, and initially does not take up any additional space. Instead, it occupies all the initial space of the snapshot. As data is modified in the clone, it begins to take up space separate from the snapshot.
Creating ZFS Clones
Creating a clone is done with the zfs clone command, the snapshot to clone, and the name of
the new filesystem. The clone does not need to reside in the same dataset as the clone, but it
does need to reside in the same storage pool. For example, if I wanted to clone the
“data/test@tuesday” snapshot, and give it the name of “data/tuesday”, I would run the following
command:
0 root@cl-head ~ #
zfs clone data/test@tuesday data/tuesday

0 root@cl-head ~ #
dd if=/dev/zero of=/data/tuesday/random.img bs=1M count=100

0 root@cl-head ~ #
zfs list -r data

NAME           USED  AVAIL  REFER  MOUNTPOINT
data           161M  2.78G  44.9K  /data
data/test     37.1M  2.78G  37.1M  /data/test
data/tuesday   124M  2.78G   161M  /data/tuesday
Destroying Clones
As with destroying datasets or snapshots, we use the zfs destroy command. Again, you cannot
destroy a snapshot until you destroy the clones. So, if we wanted to destroy the “data/tuesday”
clone:
0 root@cl-head ~ #
zfs destroy data/tuesday
Just like you would with any other ZFS dataset.
Some Final Thoughts
Because both snapshots and clones are cheap, it’s recommended that you take advantage of them. Clones can be useful to test deploying virtual machines, or development environments that are cloned from production environments. When finished, they can easily be destroyed, without affecting the parent dataset from which the snapshot was created.
Sending and Receiving Filesystems
ZFS Send
Sending a ZFS filesystem means taking a snapshot of a dataset, and sending the snapshot. This ensures that while sending the data, it will always remain consistent, which is crux for all things ZFS. By default, we send the data to a file. We then can move that single file to an off-site backup, another storage server, or whatever. The advantage a ZFS send has over “dd”, is the fact that you do not need to take the filesystem offline to get at the data.
To send a filesystem to a file, you first must make a snapshot of the dataset. After the snapshot has been made, you send the snapshot. This produces an output stream, that must be redirected. As such, you would issue something like the following:
0 root@cl-head ~ #
zfs snapshot data/test@tuesday

0 root@cl-head ~ #
zfs send data/test@tuesday > /backup/test-tuesday.img
Now, your brain should be thinking. You have at your disposal a whole suite of Unix utilities to manipulate data. So, rather than storing the raw data, how about we compress it with the “xz” utility?
0 root@cl-head ~ #
zfs send data/test@tuesday | xz > /backup/test-tuesday.img.xz
Want to encrypt the backup? You could use OpenSSL or GnuPG:
0 root@cl-head ~ #
zfs send data/test@tuesday | xz | openssl enc -aes-256-cbc -a
-salt > /backup/test-tuesday.img.xz.asc
ZFS Receive
Receiving ZFS filesystems is the other side of the coin. Where you have a data stream, you can import that data into a full writable filesystem. It wouldn’t make much sense to send the filesystem to an image file, if you can’t really do anything with the data in the file.
Just as zfs send operates on streams, zfs receive does the same. So, suppose we want to
receive the /backup/test-tuesday.img filesystem. We can receive it into any storage pool, and
it will create the necessary dataset.
0 root@cl-head ~ #
zfs receive data/test2 < /backup/test-tuesday.img
Of course, in our sending example, I compressed and encrypted a sent filesystem. So, to reverse that process, I do the commands in the reverse order:
0 root@cl-head ~ #
openssl enc -d -aes-256-cbc -a -in /storage/temp/testzone.gz.ssl
| unxz | zfs receive data/test2
The zfs recv command can be used as a shortcut.
Combining Send and Receive
Both zfs send and zfs receive operate on streams of input and output. So, it would make
sense that we can send a filesystem into another. Of course we can do this locally:
0 root@cl-head ~ #
zfs send data/test@tuesday | zfs receive pool/test
This is perfectly acceptable, but it doesn’t make a lot of sense to keep multiple copies of the filesystem on the same storage server. Instead, it would make better sense to send the filesystem to a remote box. You can do this trivially with OpenSSH:
0 root@cl-head ~ #
zfs send data/test@tuesday | ssh user@server.example.com "zfs receive pool/test"
Check out the simplicity of that command. You’re taking live, running and consistent data from a snapshot, and sending that data to another box. This is epic for off-site storage backups. On your ZFS storage servers, you would run frequent snapshots of the datasets. Then, as a nightly cron job, you would “zfs send” the latest snapshot to an off-site storage server using “zfs receive”. And because you are running a secure, tight ship, you encrypt the data with OpenSSL and XZ. Win.
ZVOLS
What is a ZVOL?
A ZVOL is a “ZFS volume” that has been exported to the system as a block device. So far, when dealing with the ZFS filesystem, other than creating our pool, we haven’t dealt with block devices at all, even when mounting the datasets. It’s almost like ZFS is behaving like a userspace application more than a filesystem. I mean, on GNU/Linux, when working with filesystems, you’re constantly working with block devices, whether they be full disks, partitions, RAID arrays or logical volumes. Yet somehow, we’ve managed to escape all that with ZFS. Well, not any longer. Now we get our hands dirty with ZVOLs.
A ZVOL is a ZFS block device that resides in your storage pool. This means that the single block device gets to take advantage of your underlying RAID array, such as mirrors or RAID-Z. It gets to take advantage of the copy-on-write benefits, such as snapshots. It gets to take advantage of online scrubbing, compression and data deduplication. It gets to take advantage of the ZIL and ARC. Because it’s a legitimate block device, you can do some very interesting things with your ZVOL. We’ll look at three of them here- swap, ext4, and VM storage. First, we need to learn how to create a ZVOL.
Creating a ZVOL
To create a ZVOL, we use the “-V” switch with our "zfs create” command, and give it a size. For example, if we wanted to create a 1 GB ZVOL, we could issue the following command. Notice further that there are a couple new symlinks that exist in /dev/zvol/data/ and /dev/data/ which points to a new block device in /dev/:
0 root@cl-head ~ #
zfs create -V 1G data/disk1

0 root@cl-head ~ #
ls -l /dev/zvol/data/disk1

lrwxrwxrwx 1 root root 11 Dec 20 22:10 /dev/zvol/data/disk1 -> ../../zd144

0 root@cl-head ~ #
ls -l /dev/data/disk1

lrwxrwxrwx 1 root root 8 Dec 20 22:10 /dev/data/disk1 -> ../zd144
Because this is a full fledged, 100% bona fide block device that is 1 GB in size, we can do anything with it that we would do with any other block device, and we get all the benefits of ZFS underneath. Plus, creating a ZVOL is near instantaneous, regardless of size. Now, I could create a block device with GNU/Linux from a file on the filesystem. For example, if running ext4, I can create a 1 GB file, then make a block device out of it as follows:
0 root@cl-head ~ #
fallocate -l 1G /tmp/file.img

0 root@cl-head ~ #
losetup /dev/loop0 /tmp/file.img
I now have the block device /dev/loop0 that represents my 1 GB file. Just as with any other block device, I can format it, add it to swap, etc. But it’s not as elegant, and it has severe limitations. First off, by default you only have 8 loopback devices for your exported block devices. You can change this number, however. With ZFS, you can create 2^64 ZVOLs by default. Also, it requires a pre-allocated image, on top of your filesystem. So, you are managing three layers of data: the block device, the file, and the blocks on the filesystem. With ZVOLs, the block device is exported right off the storage pool, just like any other dataset.
Let’s look at some things we can do with this ZVOL.
Swap on a ZVOL
It can act as part of a healthy system, keeping RAM dedicated to what the kernel actively needs. But, when active RAM starts spilling over to swap, then you have “the swap of death”, as your disks thrash, trying to keep up with the demands of the kernel. So, depending on your system and needs, you may or may not need swap.
First, let’s create 1 GB block device for our swap. We’ll call the dataset “data/swap” to make it easy to identify its intention. Before we begin, let’s check out how much swap we currently have on our system with the “free” command:
0 root@cl-head ~ #
free

total       used       free     shared    buffers     cached
Mem:      12327288    8637124    3690164          0     175264    1276812
-/+ buffers/cache:    7185048    5142240
Swap:            0          0          0
In this case, we do not have any swap enabled. So, let’s create 1 GB of swap on a ZVOL, and add it to the kernel:
0 root@cl-head ~ #
zfs create -V 1G data/swap

0 root@cl-head ~ #
mkswap /dev/zvol/data/swap

0 root@cl-head ~ #
swapon /dev/zvol/data/swap

0 root@cl-head ~ #
free

total       used       free     shared    buffers     cached
Mem:      12327288    8667492    3659796          0     175268    1276804
-/+ buffers/cache:    7215420    5111868
Swap:      1048572          0    1048572
It worked! We have a legitimate Linux kernel swap device on top of ZFS.
|
If you’re running memory intensive applications on your machine, it is not recommended to have swap on a ZVOL. It can lead to a hanging system once memory pressure sets in. |
ZVOL storage for VMs
Probably the most attracive use-case for ZVOLs is to use them as the backend storage for VMs. It’s not uncommon to create logical volume block devices as the backend for VM storage. After having the block device available for Qemu, you attach it to the virtual machine, and from its perspective, you have a “/dev/vda” or “/dev/sda” depending on the setup.
If using libvirt, you would have a /etc/libvirt/qemu/vm.xml file. In that file, you could have the following, where “/dev/zd0″ is the ZVOL block device:
<disk type='block' device='disk'>
<driver name='qemu' type='raw' cache='none'/'>
<source dev='/dev/zd0'/'>
<target dev='vda' bus='virtio'/'>
<alias name='virtio-disk0'/'>
<address type='pci' domain='0x0000' bus='0x00' slot='0x05' function='0x0'/'>
</disk'>
At this point, your VM gets all the ZFS benefits underneath, such as snapshots, compression, deduplication, data integrity, drive redundancy, etc.
Conclusion
ZVOLs are a great way to get to block devices quickly while taking advantage of all of the underlying ZFS features. Using the ZVOLs as the VM backing storage is especially attractive. However, I should note that when using ZVOLs, you cannot replicate them across a cluster. ZFS is not a clustered filesystem. If you want data replication across a cluster, then you should not use ZVOLs, and use file images for your VM backing storage instead. Other than that, you get all of the amazing benefits of ZFS that we have been blogging about up to this point, and beyond, for whatever data resides on your ZVOL.