Cluster Network Setup
An arbitrary number of networks of different types and with different properties can be configured for a cluster. There is a network config class that allows networks to be grouped in any number of network configs. The idea is, that any such network config reflects the network adapter configuration of a single or a group of nodes. Finally such a network config can be assigned to Config Sets or directly to cluster nodes. According to the chosen network config for a node, individual node network properties like IP or MAC addresses can then be assigned to the node in the Enclosure View.
Network Definitions
During the installation of Qlustar, the basic configuration parameters for the cluster network had to be entered. Often, additional networks need to be defined later. This can be accomplished within the networks dialog selectable via from the main windows menu.
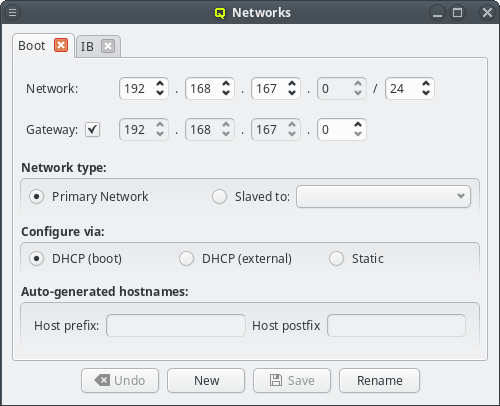
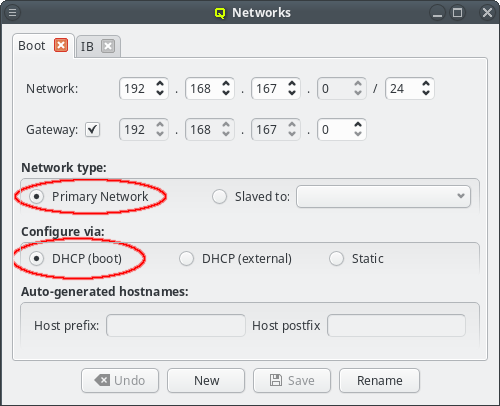
The Networks window displays all defined networks each in a separate tab. Each tab shows all the configurable parameter that define the corresponding network. The base settings of a network are its IP address and netmask as well as an optional gateway address. QluMan distinguishes two types of networks: Primary Networks and Slave Networks.
A primary network is one that determines the IP address of a host using one of the options listed in the Configure via section of the dialog. The available options are:
- DHCP (boot)
-
Configuration via the DHCP server running on the head-node. This allows the host to boot over the network using PXE. Every cluster must have one such network and it is created automatically during the Qlustar installation process according to the data provided from the installer.
- DHCP (external)
-
Configuration by an external DHCP server not under the control of QluMan. This option only makes sense for nodes that have an adapter connected to a cluster-external network, like e.g. a cluster FrontEnd node.
- Static
-
Static configuration for each host individually. Select Static for this method. The last two options are usually used for the external networks of the head-node and login nodes.
A slave network on the other hand, is tied to a primary network. The idea is, that the IP of a host in the slave network is determined by mapping the host part of the IP in the primary network into the network range of the slave network. In most cases, this means that the host IP of the primary and slave networks end in the same number. This is a convenient feature, mostly used for Infiniband and IPMI networks. It saves you from registering/managing additional MAC/IP addresses and makes IPs easily recognizable as belonging to the same host.
|
This mechanism requires the netmask of the slave network to be at least as large as the primary network it is slaved to. Hence, the GUI prevents smaller values to be selected. |
Usually, the head-node(s) have a NIC in all QluMan-defined networks. But this is not always the case. Qluman also supports nodes that have networks not connected to the head-node(s). They can also boot the Qlustar node OS from that network, provided they have a gateway that can reach the head-node(s).
For this case the network should be configured as Static in the Configure via section and the Routed via in the Network type section must be set to the network via which the gateway will connect to the head-node(s).
|
A correct Routed via setting is critical for the ql-mcastd server. With a wrong value it will not listen for requests on that network. |
Configuring the Boot network
Qlustar uses network-booting via PXE to start nearly all hosts in the cluster. The only
system(s) that can not be network-booted is the head-node(s) itself. Every cluster should
therefore have a network that is a Primary Network and configured via
DHCP (boot). Such a network is created by the Qlustar installer and called
Boot. Changes to this network are rarely necessary but if changes were made, all nodes must
be rebooted to get the updated configuration.
|
Changing the network address or mask may also require additional manual changes in the config of hosts booting from disk, specifically the head-node itself. |
Individual IP addresses and MACs of a host can be configured in the Enclosure View, once the host has been assigned to a network config. As with other settings/configs, this assignment can also be done in the Enclosure View by assigning a network config in one of the usual ways (direct assignment, host or global template).
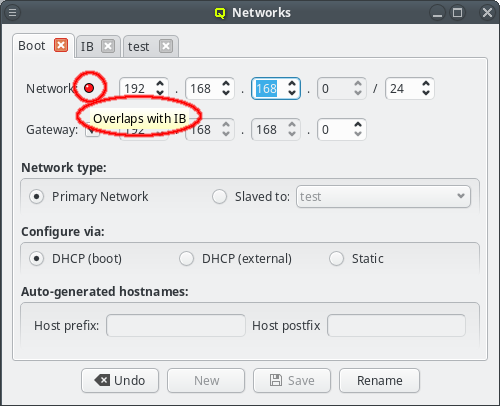
The GUI has some safeguards to prevent invalid network configurations. For example different networks must not overlap. Attempting to change the network address so that it overlaps another network won’t be accepted: The Save button at the bottom of the window will be disabled and a red LED icon will appear with a tool-tip explaining why the selected configuration is not allowed.
When changing the network IP address or netmask, the IP addresses of all hosts configured to be in that network will be remapped to reflect the changed values. This requires that a new netmask is large enough, so that the resulting network range can include all existing hosts in the cluster. Therefore, the GUI won’t let you pick anything too small. If there are unused address ranges in the existing network and you need a smaller netmask than currently selectable, you will first have to change some host addresses so that all of them combined occupy a small enough subset of the current network.
Changing the network address IP will automatically remap the cluster internal Head IP address
as well, while changing the netmask will not. Note, that the Qlustar convention, to use the
second last IP of the cluster network as the Head IP, is obviously not a requirement. Hence,
this is not done automatically when changing the netmask. Furthermore, changing the Head IP
involves some additional steps without which the nodes in the cluster won’t function or even
boot. The reason is that the Head IP also appears in the Global DHCP Template and may have
been added to other templates too. These templates are simple, freely editable text blobs. A
change of the network definitions will not change them, so you need to check and adjust each of
them manually.
Changes to the networks definition have wide-ranging effects. To prevent accidental changes or booting hosts while in between configurations any changes to the network are not saved instantly. Instead the Save button at the bottom of the window needs to be clicked to confirm the changes. Alternatively, the Undo button can be used to revert any changes to the last saved values. Any changes to a network must be saved or reverted before switching tabs or closing the window.
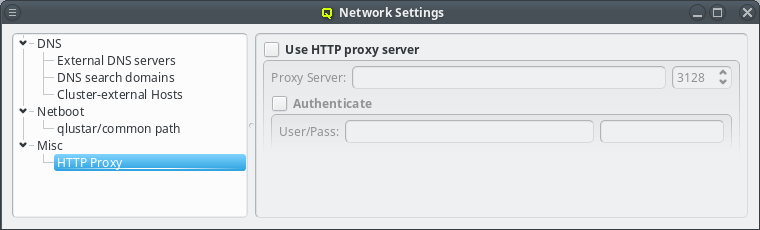
If the head-node does not have direct access to the Internet, a HTTP proxy must be configured. QluMan uses this proxy to download packages from the Qlustar repository, when creating a new chroot. The proxy can be configured under (Other Network Settings).
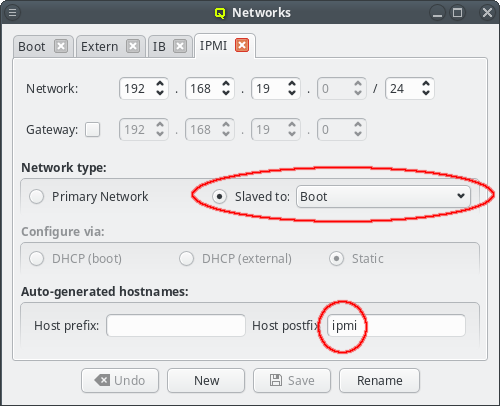
Configuring slave networks
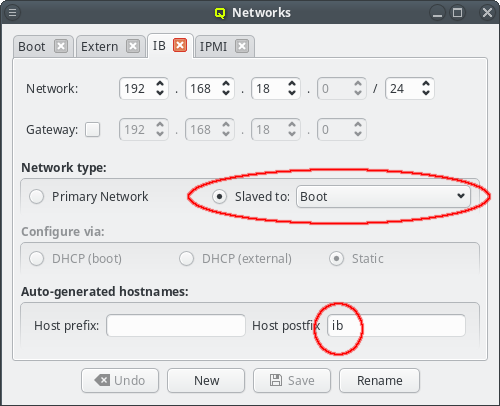
For convenience, in a cluster with Infiniband and/or IPMI, the corresponding networks are usually setup to mirror the Boot network: If the Boot IP of a host ends in .10 then the Infiniband and IPMI IPs will usually also end in .10. Within QluMan, this relationship can be set up by configuring these special networks as a slave to the Boot network: In the tab of the network under consideration, simply select the network to be slaved to from the drop-down menu.
In a slave network, the IP of a host is always derived from its IP in the network it is slaved to. During the initial part of a node’s boot process, the qluman-execd writes the resulting static slave network information into the relevant configuration file, so that the adapter will later be configured via standard OS methods. Hence, the IPs in the slave network don’t need to be set for each host individually.
The hostnames corresponding to the IPs in the slave network are also under control of this
mechanism. The name of a host in a slave network will be auto generated using the QluMan node
name of the host as the stem and adding a prefix and/or postfix separated by a dash to it. The
default Infiniband network setup for example has a postfix of ib, meaning a host named
beo-01 will be reachable on the Infiniband network as beo-01-ib. Such pre-/post-fixes may be
set/changed in the configuration dialog of the network.
|
Hostnames generated by QluMan are added to the DHCP (boot network only), NIS and ssh configs allowing them to be used within the cluster where necessary. |
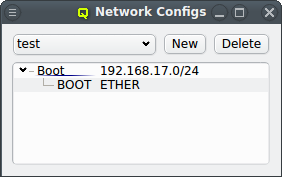
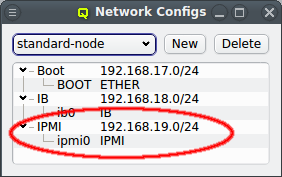
Network Configs
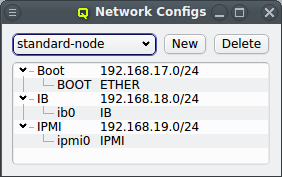
As part of the above mentioned reimplementation of QluMan network configuration management, a
new config class Network Config has been added. It allows combining multiple network
definitions (as described above) and link each of them to a
physical adapter. Like any other config class, such a Network Config may then be assigned to
the Global Template, Host Templates, Config Sets or individually to hosts. Every host must have
exactly one assigned Network Config which must match its hardware (adapter names).
|
Hosts with different types of network adapters may need different Network Configs even if they are connected to the same networks, because the hardware specific network adapter name of each NIC can differ between these hosts. |
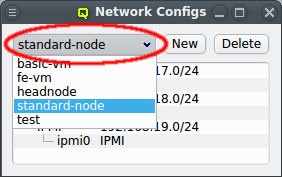
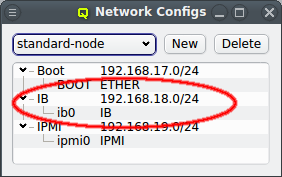
There can be any number of Network Configs, but only one is shown at a time in the corresponding dialog. To view or edit a different Network Config, select the desired entry from the drop-down menu.
The configuration of the selected Network Config is shown as a tree. The top-level items of the tree list the defined network definitions: Both the name and the network/mask of the corresponding network are shown for each entry. Below each network definition, the NIC information (device name and network type) for that network is displayed. QluMan currently supports three types of NICs: ETHER for Ethernet, IB for Infiniband/OmniPath and IPMI.
Managing Network Configs
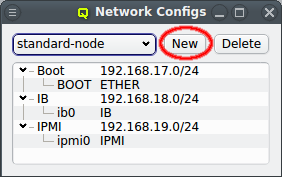
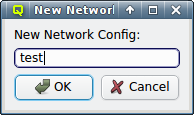
A new Network Config can be created by clicking the New button. This opens a dialog asking for the name of the new Config. Entering an unused name and pressing the Ok button will create it and select the new entry in the Networks Configs dialog. Initially this will be empty.
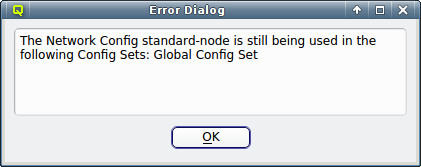
A Network Config may be deleted by clicking the Delete button. It can only be deleted, if it is no longer directly assigned to a host or included in a Config Set. Otherwise an error dialog will pop up describing the locations where it is still in use.
Adding a Network
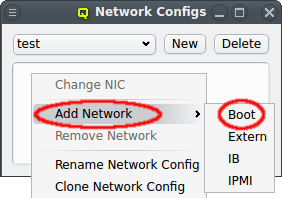
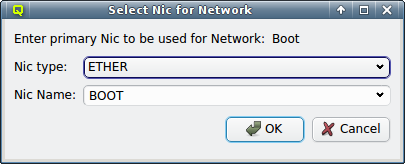
A network can be added to the Network Config by selecting a network definition from the entries below Add Network in the context menu. This opens a dialog where the type and name of the NIC for this network may be selected.
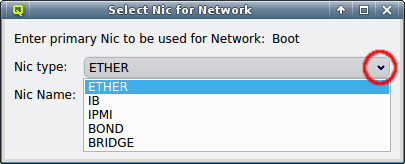
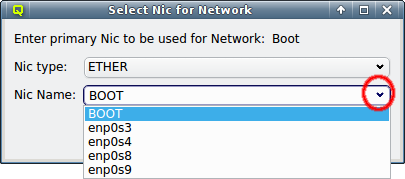
The NIC type should be selected first using the corresponding drop-down menu. A selection of valid types is available to choose from. The drop-down menu for the NIC name lists all the previously used names of the same type for easy selection. A new name can also be entered directly, in case the NIC has a name not previously encountered.
|
The name for Ethernet adapters is generated by systemd according to the way the Ethernet chip is wired into or where the network card is inserted on the mainboard (in case of add-on cards). This mechanism generates names that are predictable even when another NIC fails or a new one is added later on. It guarantees that the same name is used for a NIC on every boot. |
|
The special name |
The default name for Infiniband adapters is the kernel name of the IP-over-IB device, which
usually has the form ib<N> starting with ib0. Even simpler, the name for IPMI adapters is
ipmi0.
After selecting the NIC type and name, click OK and the new entry will appear in the Network Config dialog. If more networks are needed, simply repeat the procedure above for each of them.
Lustre LNet Alias
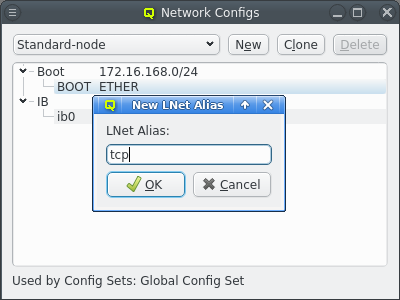
Starting with QluMan 13.2.0, the Lustre configuration options were extended to include settings for bringing up LNet on any Lustre node including servers. This works as follows:
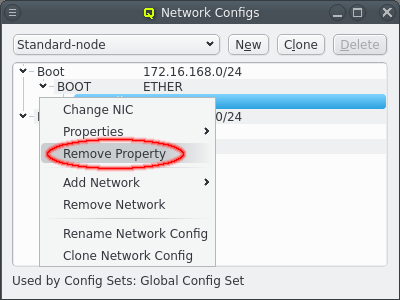
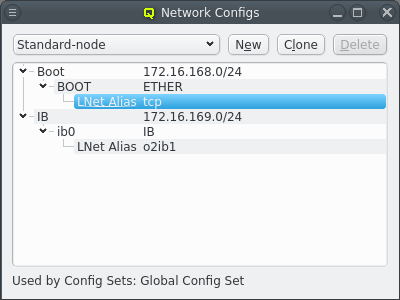
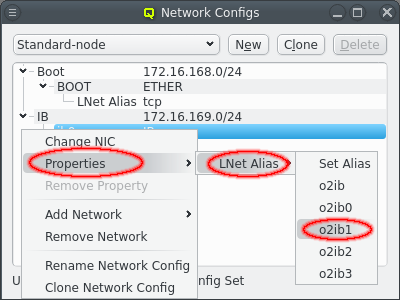
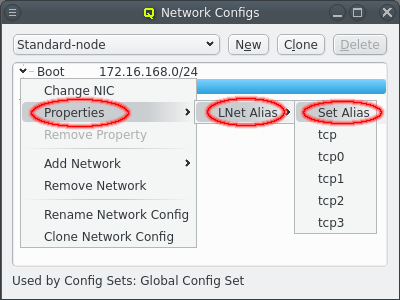
In a Network Config, an LNet alias can be added for each NIC via the context-menu . This opens up a dialog asking for the name of the alias to add. An LNet alias for Ethernet NICs must start with tcp while for Infiniband adapters it must start with o2ib. In both cases it may optionally be followed by a number. For convenience, the context-menu also includes preset aliases sufficient for most configurations. An LNet alias can be removed again by choosing Remove Property from the context-menu.

A new boolean Generic Property LNet Discover was introduced and can be added to a Generic Property Set or assigned directly to a host. This property controls whether LNet on a host should auto-discover other Lustre NIDs in the network and is only relevant for multi-rail configurations. For some non multi-rail physical network topologies this has to be explicitly disabled to guarantee stable operation.
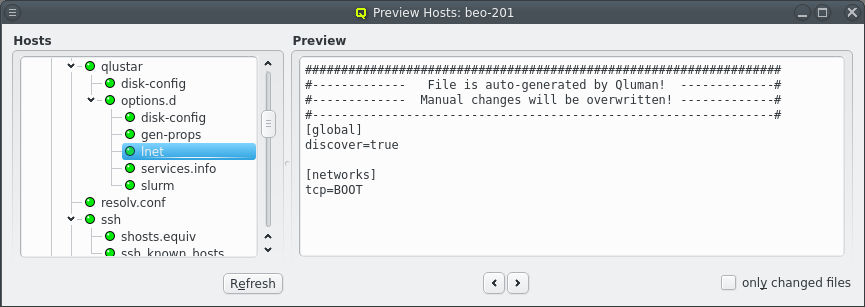
If a Network Config with LNet aliases is assigned to a host, a config file is generated for
that host upon boot at /etc/qlustar/options.d/lnet and Lustre LNet is configured accordingly.
|
For Lustre clients, setting an LNet alias remains optional and LNet aliases tcp and o2ib0 are still generated automatically via a modprobe file for the NIC used to mount the Lustre Filesystem. This method is less flexible, to be deprecated and may fail when Lustre filesystems are mounted from different NICs on the same node. |
Host specific Network Settings
When all the networks have been defined and required Network Configs were created and assigned to a host through a template or directly, the final step of the network configuration involves the host’s individual settings.
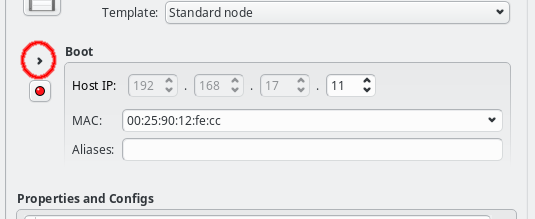

They are displayed by selecting the host in the Enclosure View. For each network the host belongs to, the Host IP, MAC address (where applicable) and optional host aliases are shown and can be set or changed.
If the host already got a Network Config assigned at its creation time, either from the Global Template, by setting a Host Template or by copying the config from an existing host, then the boot network will already have a Host IP and MAC address filled in. Both of these are required for the host to be able to boot from the network and to receive the correct configuration at boot.
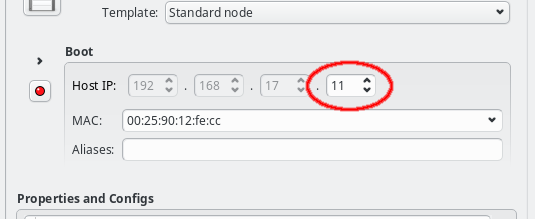
The Host IP can be entered directly or changed using the up or down arrows. Only the host part of the IP can be changed in this way, its network part is fixed and grayed out: The GUI ensures that only IPs being part of the corresponding network can be entered. If no Host IP has been manually set for the host yet, then the lowest IP in the network will be suggested and the Host IP will be color coded to indicate unsaved changes. More info about color coding and how to save changes can be found in this section.
|
The Host IP for slave networks is auto-generated by mapping the host’s IP in the master network into the slave, such that the last digits of the IP are identical in both networks. It can therefore not be edited. |
For networks that use DHCP(boot) to configure the network adapter, the correct MAC address
must be given. It must be entered as six hexadecimal bytes separated by ":". For example:
00:25:90:12:fe:cc. Again, color coding of the MAC label will show whether the
entered MAC address is valid, although most invalid input is rejected by the GUI outright. For
networks defined as DHCP(external), the MAC field is purely informational and not used by
QluMan.
The last part of a host’s network settings are optional host aliases. These are simply alternative names under which the host can be reached and which will be added to the NIS database. Aliases are entered as a space-separated list of hostnames and must be unique. For performance reasons, the uniqueness is not fully checked by the GUI, so care must be taken to avoid collisions.
Names of a Host
A host can have multiple names. Typically there is at least one name for each network it is
connected to. The primary name of a host in QluMan is its Cluster node name, which is its
name shown in the Enclosure View tree. By convention and default, the head-node is named
beosrv-c and the FrontEnd node login-c. Note, that these are their names in the
cluster-internal boot network and not their real hostname (displayed by the hostname
command). Per default, compute nodes are named beo-<N> with <N> being a two-digit running
number and their Cluster node name will also be used as their real hostname.
|
We strongly advise to keep the head-node |
A host’s Cluster node name will always resolve to its IP in the boot network. It is also used
as the stem, when the name of the host in networks slaved to the boot network is generated with
the configured pre-/suffix of the slave. E.g. per default, the name in the IPMI network has a
suffix of ipmi, which means that a host with Cluster node name beo-01 will become
beo-01-ipmi in the IPMI network.
Sometimes the generated names are inconvenient to remember, or the network does not have generated names at all, when it is neither the boot nor a slave network (e.g. the external network of the FrontEnd node). In such cases, a host can be given additional names by defining host aliases for it.
Even stronger than an alias is the hostname override. The hostname override does not just add
an additional name for the host, but also makes it the real hostname that is displayed by the
hostname command) and will appear on the shell prompt, in logfiles or outgoing mails from
that host. This is commonly used for FrontEnd nodes, so that the visible name matches the
external name of the host that is used to connect to it.
Infiniband Network
For most practical purposes, Infiniband (IB) adapters need to be configured with an IP address (IPoIB) just like Ethernet adapters. If you have chosen to configure an IB network during installation, this section is mostly about how to review or change the initial settings. If not, a network definition for IB has to be created in the Networks dialog. There, a network IP address and a netmask can be chosen for the IBoIB Network.
The Infiniband network must not collide with any other network. This is prevented automatically in the settings dialog. It is convenient to define the IB network as a slave to the boot network. Then the IB IP of each host is computed by mapping the host part of its Boot IP to the IB network and no further configuration is necessary. Example: If a host’s boot network IP address is 192.168.17.100, the corresponding slaved IB IP address will become 192.168.18.100.
|
This mechanism requires the IB netmask to be at least as large as the Boot Network netmask. Hence, smaller values won’t be selectable. |
In order to have the IB adapter of a node configured correctly during the boot process, the network definition must also be added to the Network Config used by the host. It is not uncommon, that a cluster consists of hosts with IB and hosts without. In such cases, multiple Network Configs must be created (at least one with IB and one without IB) and assigned to the different hosts in one of the standard ways (via templates or directly). If the Network Config for a host includes a NIC of type IB, during its boot process, the necessary Infiniband kernel modules will be loaded and IP-over-IB will be set up with the IP mapping configured in the network definition.
Activating/configuring OpenSM
In an IB fabric, at least one node (or switch) has to run a subnet manager process that manages the IB routing tables. Qlustar provides OpenSM for this task. If the head-node is also part of the IB network, it’s usually best to configure it to run OpenSM. This might have been chosen during installation, in which case there is nothing more to be done. If not, you have the option to run OpenSM on ordinary nodes too.
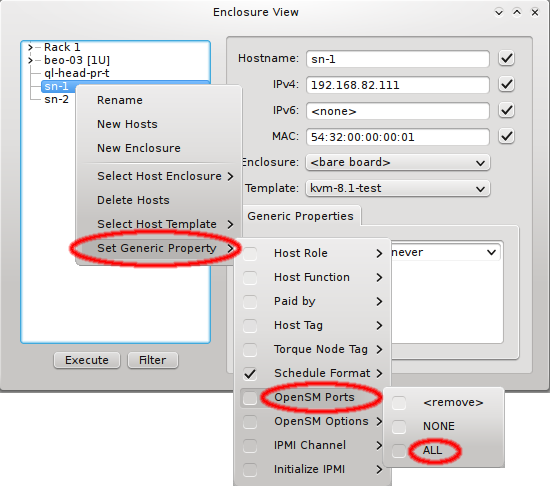
In this case, it is advisable to run OpenSM on two or three nodes (not more) for redundancy reasons. It is therefore best, to configure this directly for the chosen hosts, rather than using a Host Template or generic property set. After selecting the host(s) where OpenSM should run in the Enclosure View, open the context menu and select . The next time the host(s) boots, the OpenSM daemon will be started on all its Infiniband ports.
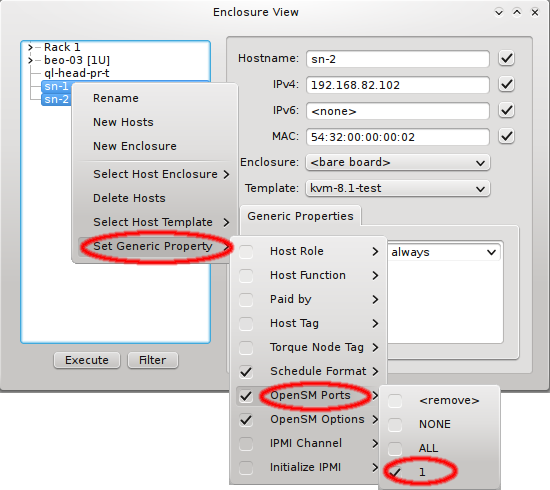

If a host has more than one IB port, OpenSM can also be configured to run only on a specific
one rather than on all of them. The port can be specified by its number or by its unique ID. As
this is an uncommon configuration and the unique ID is unknown beforehand, there is no preset
value for this. To create a new value, first select an existing value, e.g. ALL, for the
generic property OpenSM Ports. You can then edit the value in the Generic Properties box of
a host. Editing the line and pressing Enter will create the new value. Beware
that this will only affect one shown host. To assign the new value to other hosts, select them
and then change the OpenSM Ports property through the context menu.
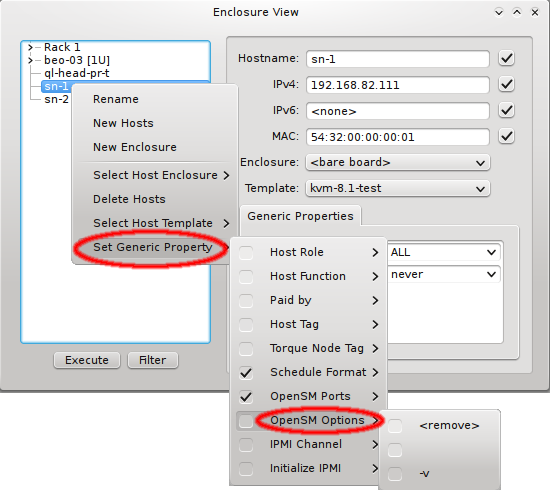
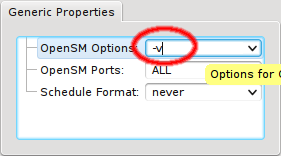
In some circumstances, it might be necessary to run OpenSM with extra options. This can also be
configured via Generic Properties. The only preset value is the empty
string, so you need to create a new value for the options you require. First add the empty
value of the generic property OpenSM Options to one host. Then edit the value to your
requirements and press Enter to create it. Finally add/change the OpenSM Options
generic property for all relevant hosts.
IPMI settings
Configuring IPMI is similar to Infiniband and also involves multiple steps, because there are a number of options to set. If you have chosen to configure an IPMI network during installation, a larger part of this section is about how to review or change the initial settings. If not, a network definition for IPMI has to be created in the Networks dialog.
There, an IPMI network address and netmask can be chosen. The IPMI network must not collide with any other network. This is prevented automatically in the settings dialog. By making the network a slave to the boot network, the IPMI IP of each host is computed by mapping the host part of its Boot IP to the IPMI Network. Example: If a host’s boot network IP address is 192.168.17.100, the corresponding slaved IPMI IP address will become 192.168.19.100.
Just as in the case of an IB adapter, the network definition for IPMI must be added to the Network Config used by the host. It is not uncommon, that a cluster consists of hosts with IPMI and hosts without. In such cases, multiple Network Configs must be created (at least one with IPMI and one without IPMI) and assigned to the different hosts in one of the standard ways (via templates or directly). If the Network Config for a host includes a NIC of type IPMI, the node is ready for monitoring its temperature and fan speeds.
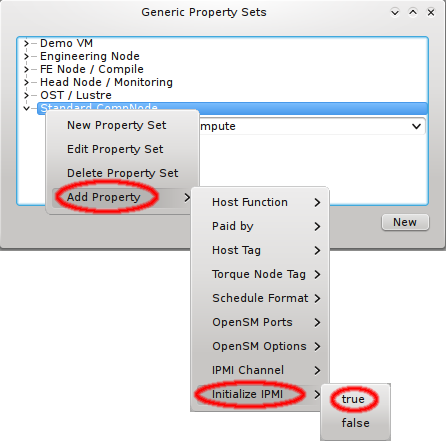
Enabling IPMI nodes for remote control involves one more setting: The generic property
Initialize IPMI. Per default, the settings of the IPMI cards are not touched by Qlustar as
they retain their configuration across boot. However, if the Initialize IPMI generic property
is assigned and set to true, the IPMI card network settings of the corresponding host will be
set every time it boots. Changing the value of this property to true and after booting back
to false, allows a one-time setup of the card’s network properties.
Global Network Settings
Some network settings can not be assigned to a group of nodes but relate to the cluster as a whole and how it connects to the outside world. This includes the configuration of the DNS and an optional HTTP Proxy. To configure these global network settings, select .
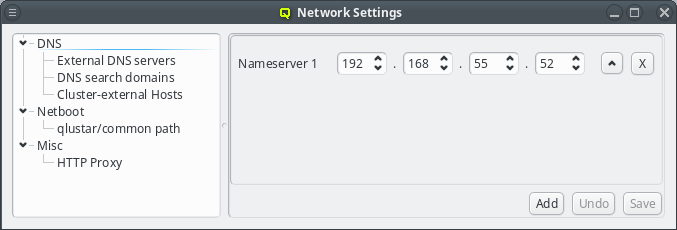
DNS (Domain Name System)
DNS has a hierarchical design. Each correctly configured computer knows about a DNS server that will handle local requests. Should the request fall outside the scope of the local server, it will ask the next higher server in the hierarchy. Starting with Qlustar 11, local DNS requests are handled by dnsmasq which will answer requests concerning any QluMan configured node automatically. The handling of requests about external hosts are affected by three QluMan settings: The external DNS servers, the DNS search domains and Cluster-external Hosts.
External DNS servers
External DNS servers will be needed to resolve any DNS request about hosts outside of the cluster. Since this is used to resolve hostnames into IP addresses a nameserver can not be identified by its hostname, but must be specified by its IP address. This are usually servers maintained by the local IT department or by your internet service provider (ISP). There are also public DNS servers anyone can use as a fallback, for example Googles public DNS server (IP 8.8.8.8).
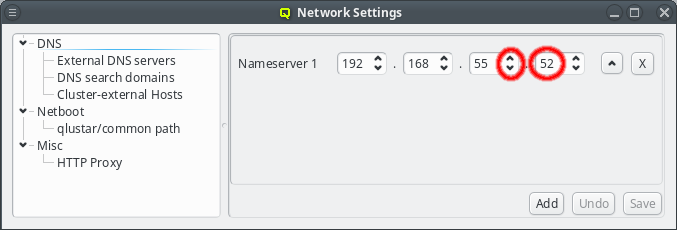
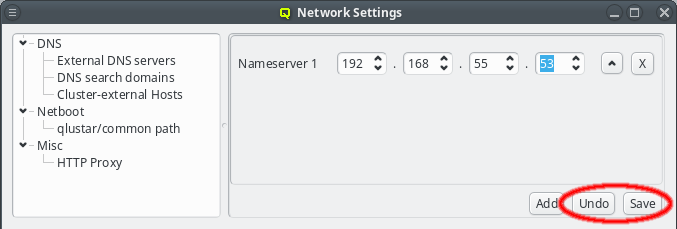
The nameserver specified during the installation process should already be set unless you upgraded from Qlustar 10.1. If the IP of the nameserver changes, it can be edited by either pressing the up/down arrows next to each part of the IP or by clicking at the number and entering it directly. Once the correct IP address has been entered it needs to be saved by either pressing Enter, or by clicking the Save button. The Undo button reverts the nameserver entry to the last saved IP.
|
Saving changes in this dialog doesn’t activate the new config immediately but only saves them
in the QluMan database. To finally activate them, the |

For redundancy purposes more than one nameserver can be set. To add an additional nameserver click the Add button. This will add a new nameserver entry to the GUI defaulting to Googles public DNS server. The entry may then be edited as described above. Use this also when upgrading from a previous version of Qlustar to add the first nameserver.
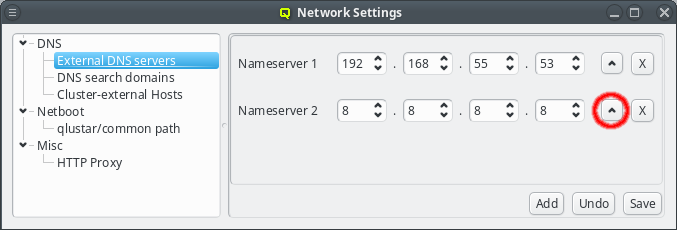
When a DNS request cannot be answered locally, the external name-servers will be asked one by one in the order shown in the GUI. This order can be changed by pressing the Up button next to the nameserver. This will move the respective nameserver up one position in the list.
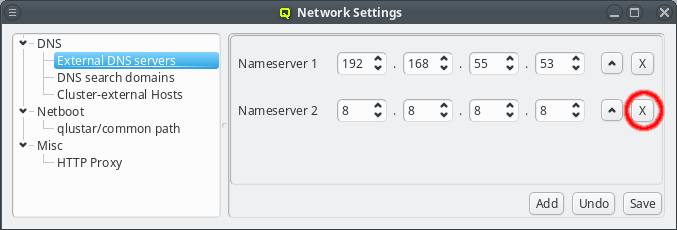
When a server is no longer valid or wanted, it can be removed by pressing the X button next to the nameserver.
DNS search domains
A DNS search domain is what the DNS service will use to resolve hostnames that are not fully qualified. A fully qualified domain name is one that can be resolved by working down from the root domain (which is just an empty string) and eventually ending up with an IP address. In less technical terms, it’s one that ends in a top-level-domain such as .de, .net, .org, .com, etc..
In practice, whenever a device tries to resolve a hostname that can not be resolved as is, the resolver code appends search domains to the hostname and tries the resulting names one by one to see if it resolves then. The list of search domains usually contains at least the main domain of the organization the cluster is located at, but often also sub-domains of it. Example: The search domain list contains my-department.my-firm.com and my-firm.com. A look-up for the host mailserv will then first try mailserv as is. If that fails, mailserv.my-department.my-firm.com is tried and if that also fails, finally mailserv.my-firm.com. This mechanism allows using the shorter hostname to refer to some hosts that are outside the cluster.
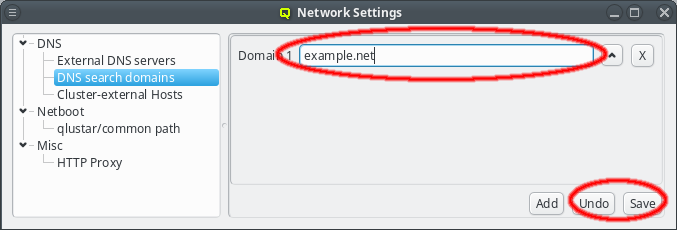
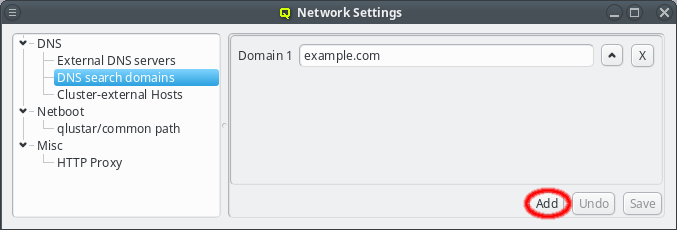
A search domain may be edited by clicking the text-field for the domain. As soon as changes are made, the Undo and Save buttons will become enabled. Changes are saved by either pressing Enter, or by clicking the Save button. An additional search domain can be included by clicking the Add button.
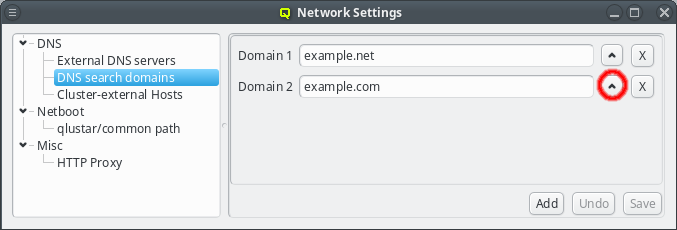
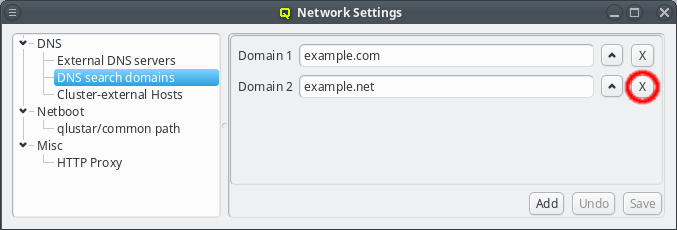
The search domains will be tried in the order shown in the GUI. Just like with the nameserver entries, the order can be changed by clicking the up button. This will move the selected domain one slot upwards. Search domains can also be removed by clicking the X button.
|
The DNS search domains are set via DHCP on each host as it boots and are not updated at run-time. So any changes made, will only affect hosts booted after the change was saved. Already running hosts need to be rebooted to catch the change. |
Cluster-external Hosts
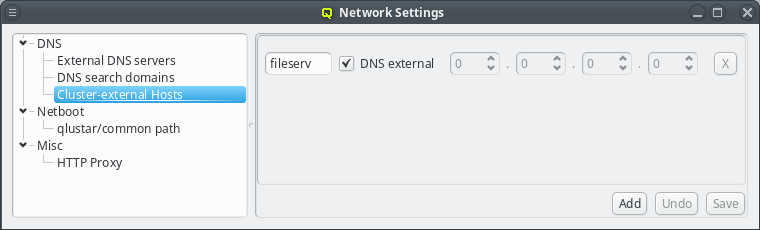
While QluMan automatically manages the DNS entries for the nodes in the cluster (any node that is shown in the Enclosure view), sometimes there are also hosts outside of the cluster networks that QluMan should know about, e.g. external file-servers that are used in Filesystem Exports.
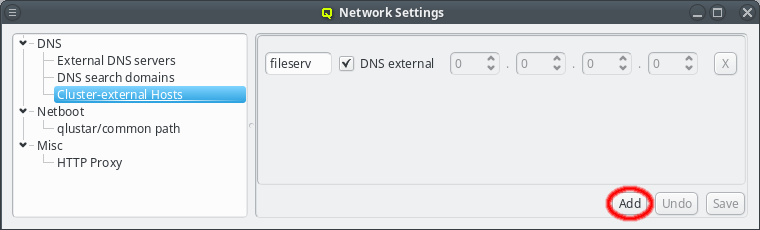
To add an entry for such an external host, simply click the Add button and enter its name. QluMan also allows to add the host to the DNS config for the cluster, but by default, for new entries that is not the case, and the DNS external checkbox is checked.
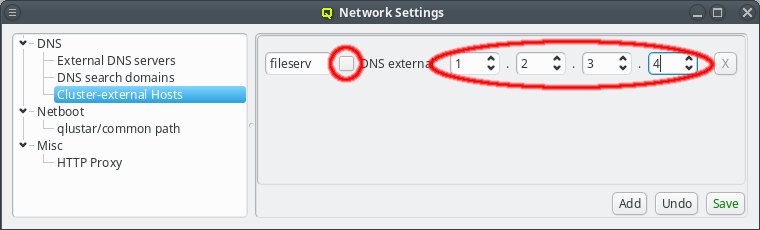
To add a DNS entry for a cluster-external host, uncheck the DNS external checkbox. This activates the IP widget and you can enter the correct IP. To finalize the input and save the IP, press Enter or click the Save button.
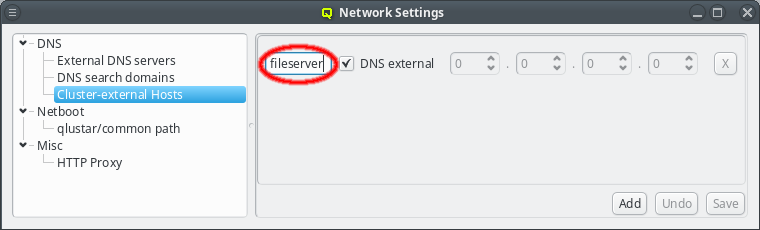
The name or IP of a cluster-external host may be edited at any time by selecting it, or by clicking the Up / Down arrows on the IP. Don’t forget to press Enter or click the Save button to confirm the changes.
|
To finally activate the changes to cluster-external hosts the |
Netboot
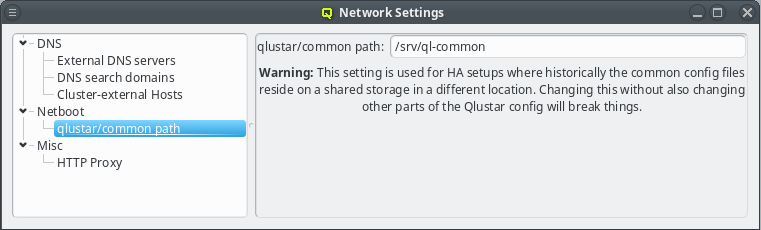
The qlustar/common path specifies the location of the cluster-wide configuration directory on the head-node that is used for its NFS export. This path value should not be changed unless there is a good reason for it. A custom value is usually required only for a head-node setup in high-availability mode.
Other Network Settings
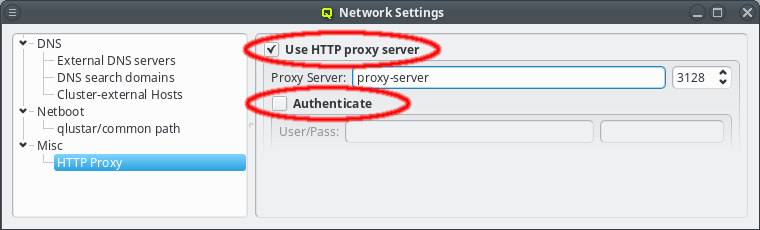
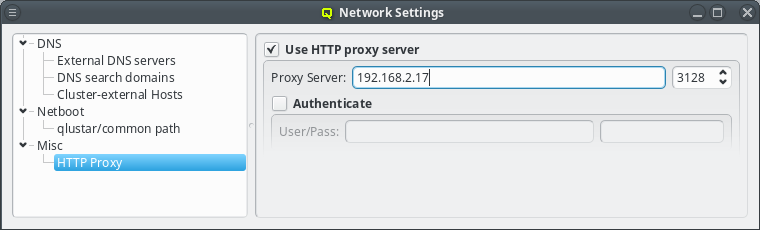
Sometimes the cluster head-node does not have direct access to the internet and requires a proxy server for a connection to the Qlustar repository servers. To enable support for such scenarios, click the check-mark before Http Proxy and enter the hostname of the proxy server together with the proxy port.
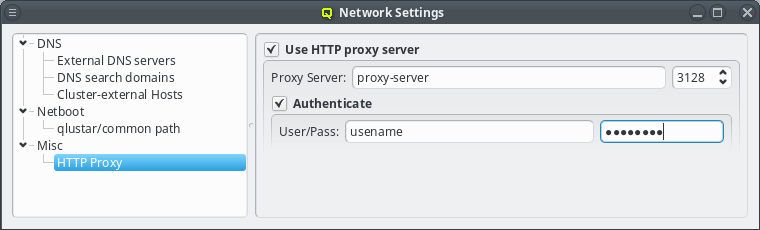
If the proxy requires authentication, click the check-mark before Authenticate and enter a username and password. The Http Proxy and User/Pass label will turn green when entries are edited with acceptable input but have not been saved yet. The labels will turn red when the current input is invalid and turn back to black once the input has been saved. The input can be saved by pressing Enter, or will be saved automatically when the input field looses focus. Leaving the user name field empty will disable authentication just the same as clearing the Authenticate check-mark.
Nameservice Providers
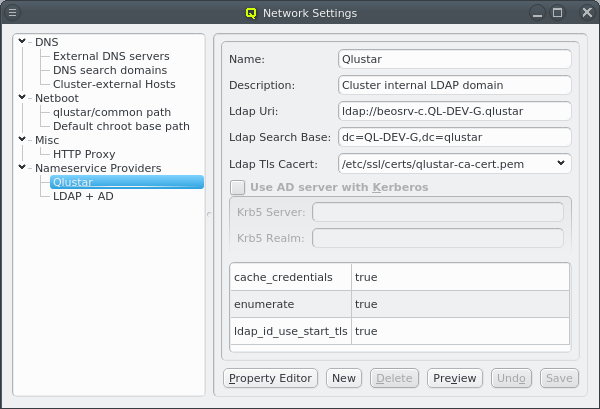
Nameservice providers running LDAP or Active Directory (AD) services can be used to provide user/group information and authentication to the cluster. The provider for the cluster-internal LDAP service is defined by default and named Qlustar. Other provider definitions are only needed if external LDAP or AD services are to be used. If so, they need to be configured as described below.

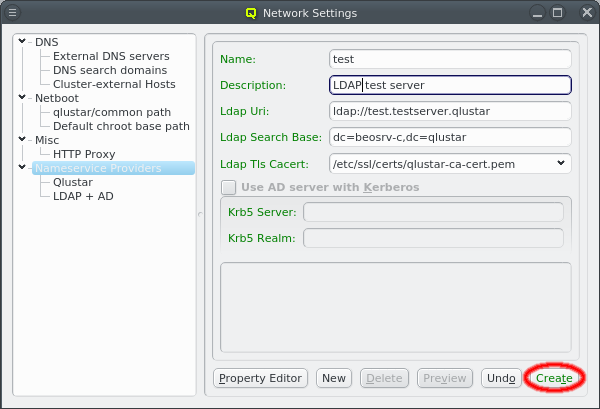
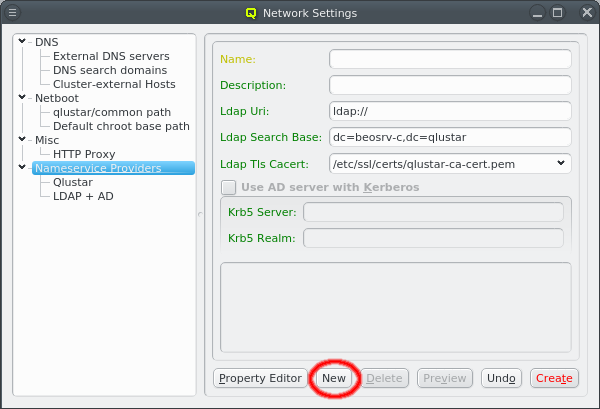
A new Nameservice Provider can be created by clicking the New button and filling out the form. The fields are color coded to show required and valid inputs. Once all fields are filled in correctly, the Create button turns green and clicking it creates the new Nameservice Provider definition. To create an AD provider definition, check the Use AD server with Kerberos check-mark and enter the Kerberos 5 server and Realm information.
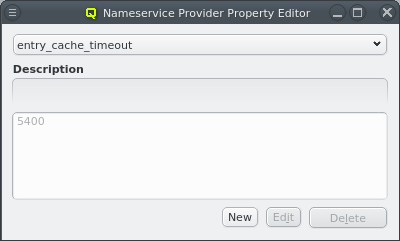
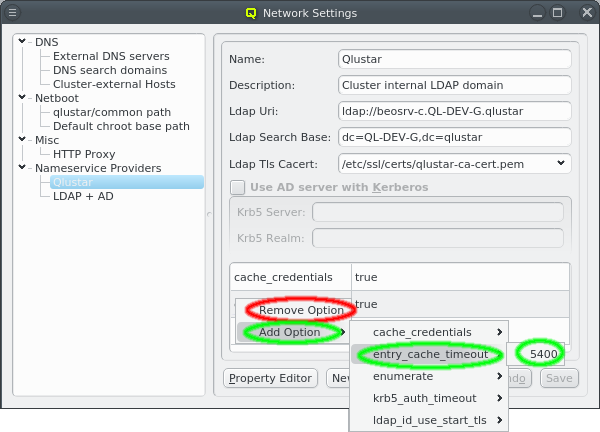
Once a Nameservice Provider has been created with its essential configuration, additional
options can be added or removed at the bottom through the context menu. Only a few options are
pre-defined, those needed for the Qlustar config. Additional ones can be added through the
property editor. For details about allowed options and their meaning please refer to the
sssd.conf manpage.
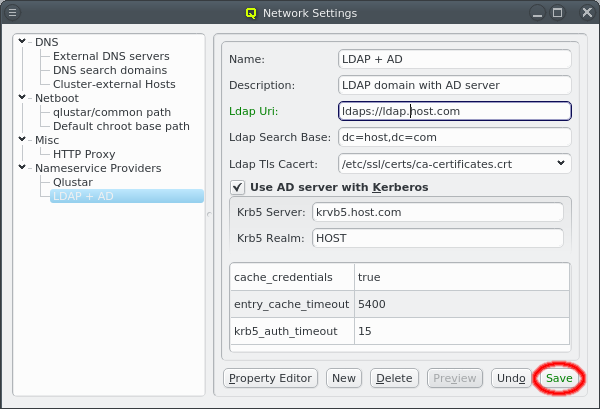
Besides adding or removing options, the essential configuration can also be edited by clicking the respective field. Any changes must be saved by clicking the Save button at the bottom. Clicking the Undo button or selecting a different entry in the tree on the left will undo any changes.
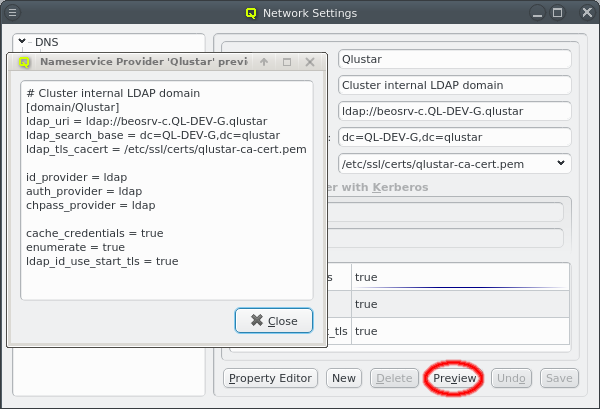
Once the configuration is complete, the Preview button allows double checking the
configuration that will be generated when the selected Nameservice Provider is used later to
generate the sssd.conf of a node. The shown snippet will be a part of the overall sssd
configuration of the host.
Qlustar Multicast Daemon
The boot process for Qlustar has two stages. First the kernel and a minimal initramfs is loaded
using PXE support of the node’s BIOS. The initramfs then downloads a squashfs image using
multicast provided by the Qlustar Multicast Daemon (ql-mcastd).
The generated configuration of ql-mcastd can be previewed and written as part of the DNSMasq
file class. It includes any configured network that has bootable nodes as well as IP and port
parameters defined in the MCastd section of /etc/qlustar/qluman/qlumand.cf:
[MCastd]
multicast_ip = 232.1.0.0
multicast_control_port = 5000
multicast_port_min = 5001
multicast_port_max = 5999
In the unlikely event of a conflict with other services in the same network, the multicast IP,
control port and port range used for transfers can be changed. After editing the file, the
qluman-server service must be restarted so the new settings will be included in the
ql-mcastd.conf. If the control port has been changed, then, after writing ql-mcastd.conf,
all Qlustar images must be rebuild as well using:
0 root@beosrv-c ~ #
qlustar-image-reconfigure all