Enclosures
Enclosure View
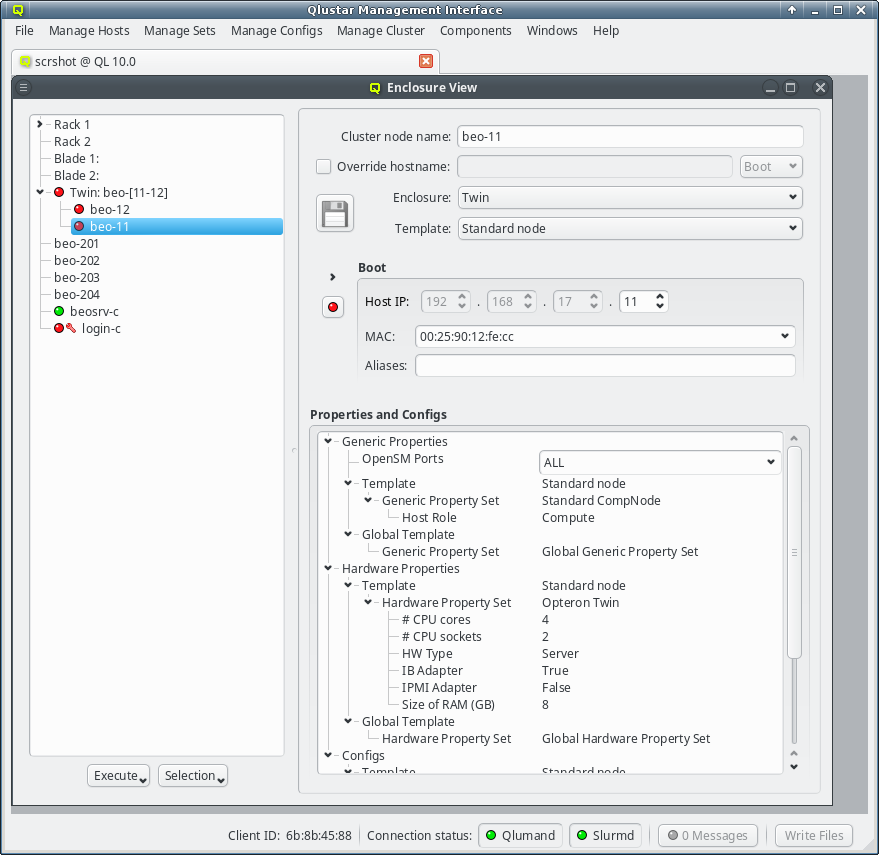
The Enclosure View shows an overview of the cluster in a tree structure. The tree is designed
to reflect the physical structure of the cluster. At the lowest level are the hosts. A host can
be a head, storage or compute node but also a switch e.g. In general, anything in the cluster
that has a name, IP and MAC address is a host.
A host is represented by its bare board and should be placed into a host enclosure. 1U, 2U,
3U or 4U enclosures contain exactly one board, while others like a Twin or Blade chassis can
have multiple boards. Once defined, host enclosures can be placed into racks, racks grouped
into rows, rows into rooms and so on. The tree has a simple drag&drop interface. E.g. you can
select a number of nodes (by holding the Ctrl key and clicking or holding the
Shift key and dragging the mouse) and drag&drop them into a Blade enclosure.
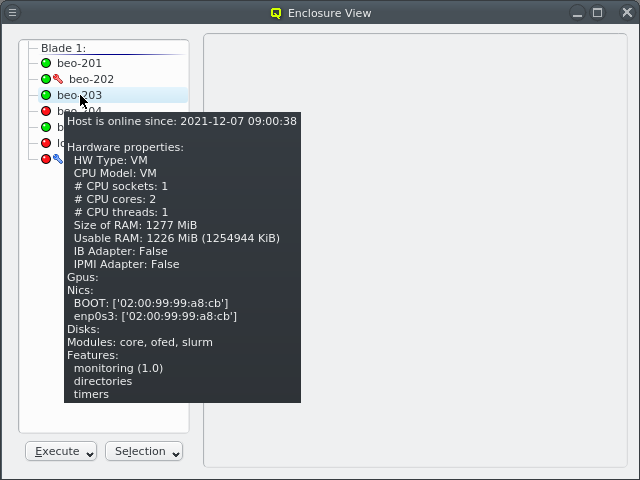
Selecting a node in the tree displays its configuration info on the right hand side. Hovering over a host entry in the tree view brings up a tool-tip with additional info about the host.
Editing a host’s individual network information
The cluster node name can be edited at the top. Normally, the node name will also be used as
the real hostname (displayed by the hostname command). If a different hostname is desired, it
can be entered by clicking the Override hostname check-mark and entering the name
in the text field next to it.
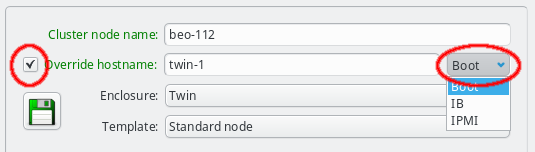
To complete the change of the hostname, the network that the chosen new hostname should be part of, must be selected from the list offered in the drop-down menu at the right of the text-field. This choice determines the IP address of the host, which will be used for the hostname in the NIS config, and which applications will see when they resolve the hostname.
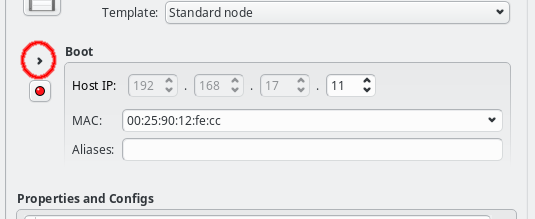
In the center of the window, the host’s individual network config is shown. Initially, only the boot network is visible, as shown in the screenshot. Clicking the > button will display the complete list of networks assigned to the host through its Network Config. For each network, the Host IP, MAC address and optional aliases are shown (more details in section Host Networks Settings).
While editing a field, the label corresponding to it, will change color indicating the validity and state of the information entered so far. A green label means that the current input is a valid choice, but has not been saved yet. A yellow label means that the input is incomplete, but can still be completed to become valid (this only applies to the MAC address field, in case a partial address is entered). A red label indicates that the current input is invalid and can not be used.
The tool-tip, displayed when the mouse moves on top of the label, states the reason, why the entered value is invalid. The most likely reason is, that the input is already used by another host. The node name, hostname override, the host IPs, MAC addresses and aliases must all be unique.
Along with the color coding of the label, the Save button will also become enabled and change color, whenever a field is edited and not yet saved. It will turn red if any of the changes are invalid, even if some of them are. Again, the tool-tip will point to the reason why values are invalid. Changes can be saved by pressing return in the text field or by clicking the Save button. Once all changes have been saved in the database, the corresponding labels will turn black again and the Save button will become disabled.
|
As long as changes have not been saved, trying to work on a different host by clicking on it in the tree view, or closing the Enclosure View all together, will pop up a reminder dialog asking to save/undo the changes or cancel the action. |
Other host specific settings
For nodes that are not part of a multi-host enclosure (like a Blade or Twin chassis) the
enclosure type can be changed to one of the single-slot host enclosures (1U, 2U, etc.). A new
enclosure of the chosen type will then be created if the node is not already part of one. If a
node is included in a multi-host enclosure, this field will be ghosted.
The template field allows to select a so-called Host Template for the node. Usually, large groups of nodes have an identical hardware and software configuration and will use the same template. Deviations from the properties coming from the template can be set for individual hosts by direct assignment of either a property/config set or individual properties/configs directly to the host through its context menu. In case of unique properties, direct assignments override settings from the template (or property set), for non-unique properties this is additive.
|
Any changes made in the configuration only affect the active node (as indicated by the hostname in the info part of the enclosure view), and not all selected nodes. Configurations for all selected nodes can be made by using the context menu (right click) in the tree view. |
Managing Enclosures
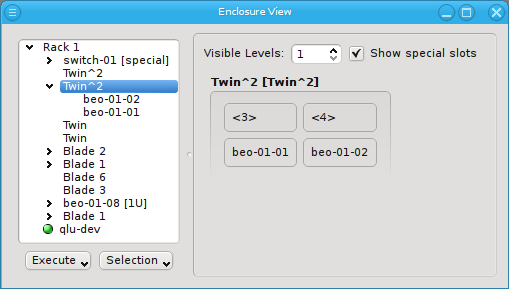
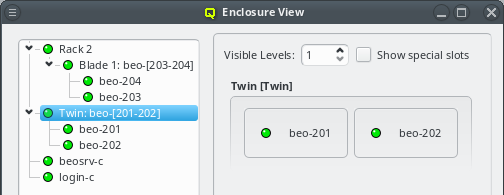
Similar to host nodes, selecting an enclosure entry displays the physical layout of the corresponding enclosure on the right. Controls to select the visibility level and special slots are available at the top of the display. See below for more details about these. The name of the enclosure and its type (in brackets) is shown in the title. In the above case, both name and type are "Twin². Below the title you have a representation of the physical layout of the enclosure. For this example, you see the 2x2 slots that are characteristic of a
Twin² enclosure. Two slots are filled with beo-01 and beo-02 and two slots remain empty,
showing only the number of each slot in brackets.
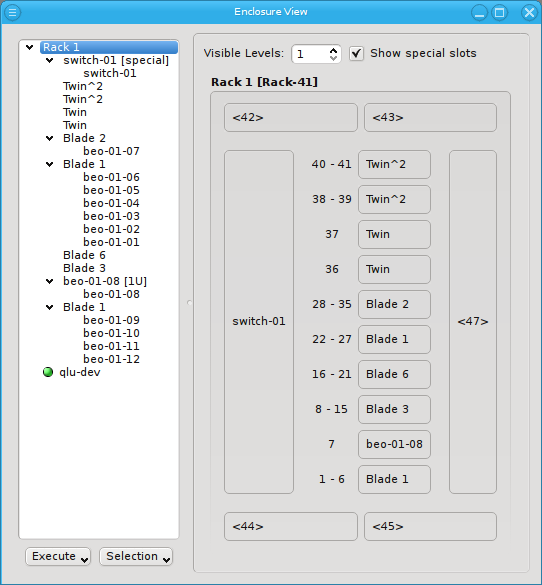
Selecting a rack shows a more complex picture. The current example rack holds ten enclosures in
its central 19 inch slots: A FatTwin, a Twin, a Twin², a Blade 1, 3 Blade 2, another Twin² and
two 1U enclosures containing beo-11 and beo-12. The special top, left, right and bottom
(not visible) slots are empty. In future versions a network switch or power controller, that is
mounted at some special position of the rack, can be placed into these special slots.
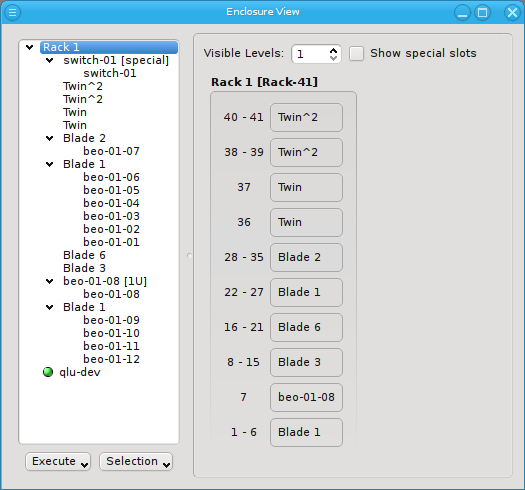
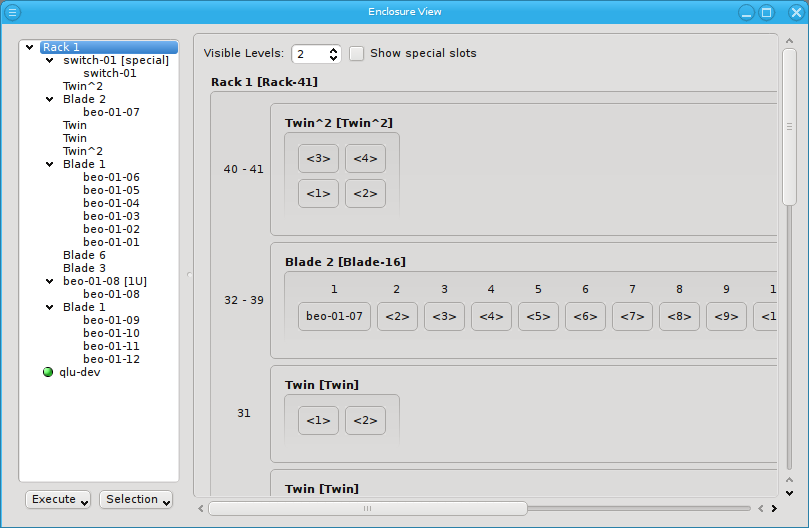
Now let’s explain the effect of the two controls at the top in more detail: The Show special slots check-box controls the visibility of the top, left, right and bottom special slots. Especially if these slots are empty, this will provide a more compact view of the interesting central slots. The other control, the visibility level, controls how many levels of the enclosure hierarchy are shown: Selecting a depth of 2 shows not only the selected rack with its slots but also the contents of the enclosures in each slot.
Since the current version of QluMan only supports host enclosures (Twin, Blade, …) and racks, a depth larger than 2 has no effect yet. In future versions, it will be possible to group racks into rows, rows into rooms, rooms into buildings and so on. This will allow you to reflect the physical layout of your cluster in as much detail, as you like.
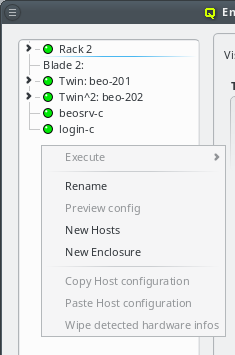
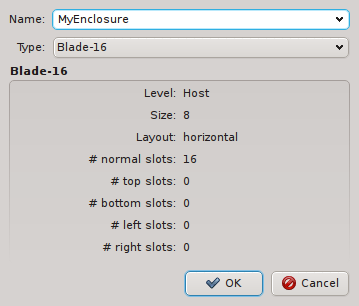
Populating Enclosures
New enclosures can be added through the context menu. The new enclosure must be given a name and its type can be selected. Currently, enclosure types cannot be manipulated yet. This will change in a future version.
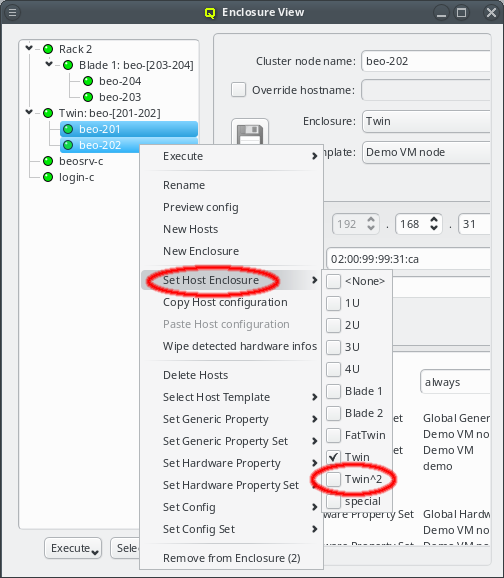
Suitable for ordinary servers, a host being selected in the enclosure view can be placed into a single slot host enclosure directly by selecting the correct type in the host info part of the window (see Enclosure View). For host enclosures that can hold more than one server/node (twin servers, blades etc.), drag&drop may be used to move hosts into them. Moreover, it’s also possible to create larger (non-host) enclosures (like racks) and move host enclosures into them also by using using drag&drop. Note, that a bare host cannot be placed directly into a non-host enclosure, only if it is already inside a host enclosure.
Another option to place hosts into enclosures is by selecting a number of them and then choosing a host enclosure from the context menu. This way, a new enclosure of the selected type is automatically created and all selected hosts are moved into it. If more hosts than can fit into a single enclosure of the chosen type are selected, additional enclosures of the same type will be created such that all hosts can be placed into one of them. This makes it easy to position large numbers of identical hosts into their enclosures. If the selected hosts were in an enclosure before and that enclosure becomes empty and is not itself part of a larger enclosure then the empty enclosure is automatically removed.
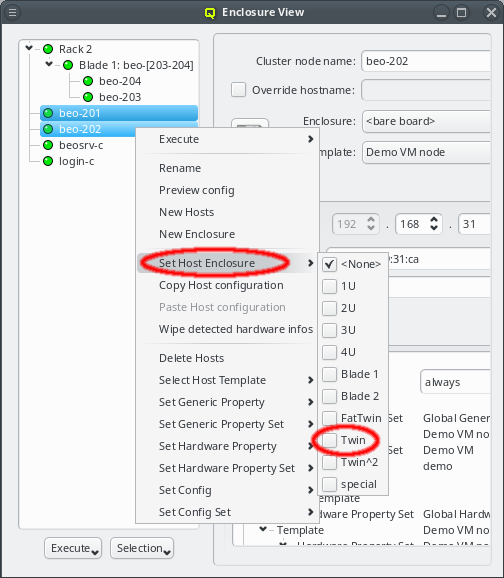
Relocating hosts by selecting a different host enclosure is supported not only on directly selected hosts but also on hosts inside selected enclosures. This allows changing the type of enclosure a group of hosts is in by selecting the old enclosure(s) and choosing a new one from the context menu. Note that this procedure does not change the type of the old enclosure but rather creates a new one, moves all the hosts to it and then deletes the now empty old enclosure(s).
Try it out: Place a number of hosts into a large enclosure (like a blade), then select the enclosure and choose a small enclosure (like 1U) to relocate them. In general, such an operation will create one enclosure of the new type and fill all its slots before creating a second one. Hosts having been in different enclosures before, can end up in the same enclosure and hosts that were in the same enclosure before can end up in different enclosures after this operation.
When using drag&drop for the relocation, the host or enclosure is always placed into the lowest suitable slot of the target enclosure. This reflects our experience, that usually enclosures are simply filled from left to right and bottom to top.
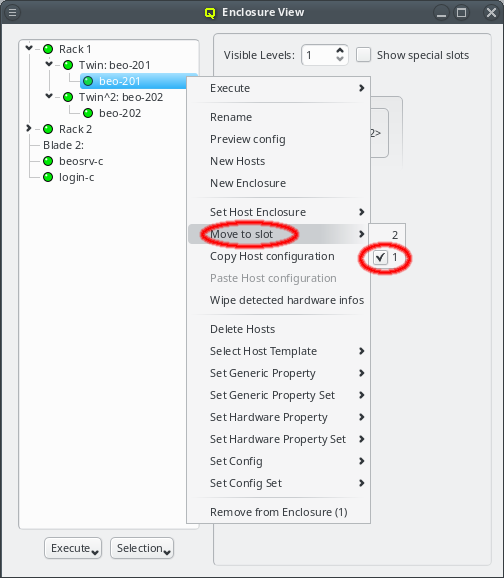
But sometimes this is not the case and a host or enclosure should be in a different slot as compared to the automatic placement. In this case, the host or enclosure can be moved through the context menu. The latter shows all the free slots the host or enclosure can be relocated to and a checked mark indicates the current location. Of course the relocation is only allowed into free slots. Hence, it may require removing (drag&drop out of the enclosure) a host or enclosure temporarily to free space for moving things around.
Host Selections
There are situations, where one wants to change a property or config of a whole set of hosts. For example, you may want to change all nodes located in a particular blade to no longer format their disk on boot. This can be achieved by selecting a set of hosts in the enclosure view with the mouse. A range of hosts can be selected by clicking on the first host and then clicking on the last host, while pressing the Shift key. Hosts can also be added or removed from the selection by clicking on a host while pressing the Ctrl key. Once a set of hosts is selected, changes can be made to all selected hosts through the context menu. For instance, this allows changing the Host Template or add/alter a generic property of a set of hosts.
|
When a host is part of an enclosure, selecting the enclosure will also select the host(s) inside of the enclosure, provided it is collapsed. However, hosts inside of expanded enclosures must be selected individually. |
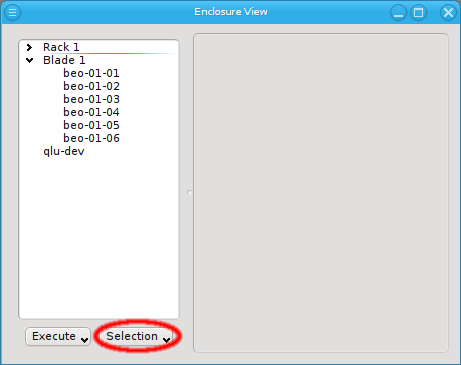
An alternative and more powerful way to select a set of hosts is available via the
Selection button at the bottom of the Enclosure View. When pressed, at the top
of the appearing selection menu you’ll find 3 items: To select all hosts, clear the selection
or to invert the selection.
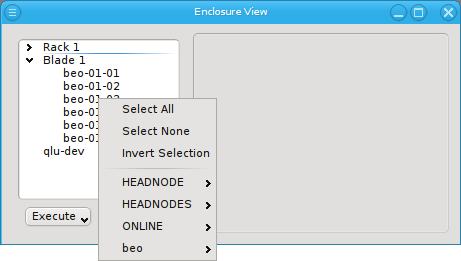
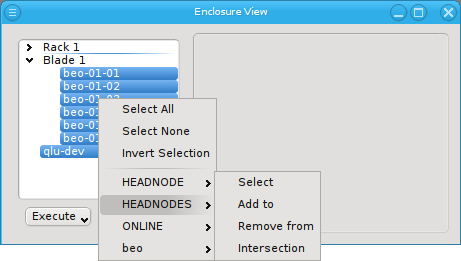
Below these items is a list of filters by which subsets of hosts were defined according to specific criteria. For more details on how to construct such Host Filters see Host Filters. When pressing Select, the selection is set to the hosts defined by the corresponding filter, dropping any previously selected hosts. Add to adds, while Remove from removes the hosts defined by the filter from the current selection. Intersection sets the selection to only those hosts in the current selection, that are also part of the set defined by the filter.